Openstack is a free and open-source private cloud software through which we can manage compute, network and storage resources of our data center with an ease using a single dashboard and via openstack cli commands. In this article we will demonstrate on how to install Openstack on a CentOS 8 system with packstack. Packstack is a command line utility which deploy different components of openstack using puppet modules.
Openstack deployment with packstack is generally used for POC (proof of concept) purpose, so it is not recommended to use packstack for production deployment. Use TripleO method to deploy openstack in production environment.
Minimum System requirements for OpenStack
- Minimal CentOS 8
- Dual core Processor
- 8 GB RAM
- 40 GB free disk space
- Stable Internet Connection
- At least one nic card
My Lab setup details:
- Hostname – openstack.example.com
- IP – 192.168.1.8
- Flat Network – 192.168.1.0/24
Let’s deep dive into the openstack installation steps,
Step 1) Set the hostname and update /etc/hosts file
Open the terminal and set the hostname using the following hostnamectl command,
[root@localhost ~]# hostnamectl set-hostname "openstack.example.com"
[root@localhost ~]# exec bash
Run below echo command to append hostname entry in /etc/hosts file.
[root@openstack ~]# echo -e "192.168.1.8\topenstack.example.com" >> /etc/hosts
Step 2) Disable Network Manager and Configure Network using network-scripts
Network-Manager is the default tool in CentOS 8 to manager networks but for Openstack we must disable it because openstack networking will not work properly with network-manager. In place of network manager, we must install native network-scripts.
To disable network-manager run the following commands,
[root@openstack ~]# systemctl disable NetworkManager
[root@openstack ~]# systemctl stop NetworkManager
Run following dnf command to install native network-scripts
[root@openstack ~]# dnf install network-scripts -y
Once the network-scripts package is installed then we can manage networking (ifcfg-* files) using native network.service
Now let’s configure IP address in ifcfg-enp0s3 file and start network service
root@openstack ~]# vi /etc/sysconfig/network-scripts/ifcfg-enp0s3
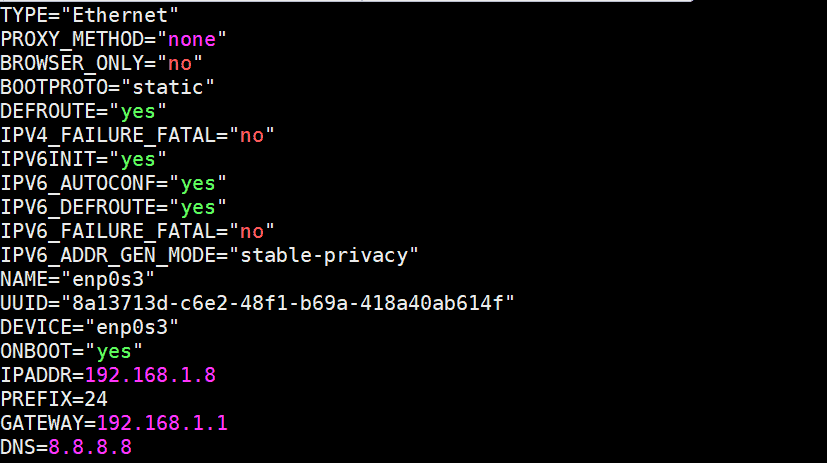
Save and exit the file and then start network service using following command,
[root@openstack ~]# systemctl start network
[root@openstack ~]# systemctl enable network
Now verify whether IP is assigned to NIC (enp0s3) using ip command,
[root@openstack ~]# ip a s enp0s3

Step 3) Enable OpenStack repositories and install packstack utility
At time of writing this article, ussuri openstack was available, so run the following command to configure its repositories
[root@openstack ~]# dnf config-manager --set-enabled powertools
or
[root@openstack ~]# dnf config-manager --enable PowerTools
[root@openstack ~]# dnf install -y centos-release-openstack-ussuri
Now installed all the available updates and reboot your system,
[root@openstack ~]# dnf update -y
[root@openstack ~]# reboot
Once the system is available after the reboot, execute following dnf command to install packstack utility
[root@openstack ~]# dnf install -y openstack-packstack
Step 4) Generate answer file and install openstack using packstack
Use packstack command to generate the answer file,
[root@openstack ~]# packstack --gen-answer-file /root/openstack-answer.txt
Once the answer file is generated, edit the following parameters using vi editor,
[root@openstack ~]# vi /root/openstack-answer.txt
..............
CONFIG_HEAT_INSTALL=y
CONFIG_PROVISION_DEMO=n
CONFIG_KEYSTONE_ADMIN_PW=P@ssw0rd
CONFIG_NEUTRON_OVN_BRIDGE_IFACES=br-ex:enp0s3
..............
Save and exit the file.
Replace the interface name (enp0s3) as per your setup.
Note: Default Tenant network type drive is set as “geneve” and default neutron type driver is set as “geneve and flat”. If wish to change these default parameters, then update following lines in answer file. In this demonstration i am not going to update these parameters.
CONFIG_NEUTRON_ML2_TYPE_DRIVERS=geneve,flat
CONFIG_NEUTRON_ML2_TENANT_NETWORK_TYPES=geneve
Run the following command to initiate the openstack deployment using answer file.
[root@openstack ~]# packstack --answer-file /root/openstack-answer.txt
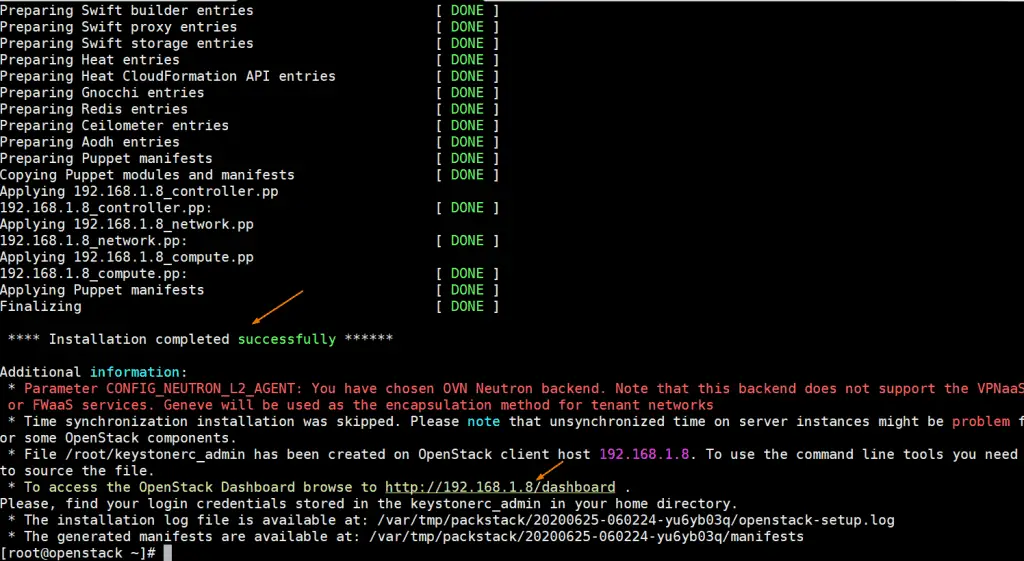
Deployment will take around 20 to 30 minutes depending on your system’s hardware and internet speed. Once it is installed successfully, we will get the following:
Now verify whether IP from enp03 interface is assigned to bridge br-ex and also confirm whether interface enp0s3 is added as a port in ovs-bridge.
Run the following commands:
[root@openstack ~]# ip a s enp0s3
[root@openstack ~]# ip a s br-ex
[root@openstack ~]# ovs-vsctl show
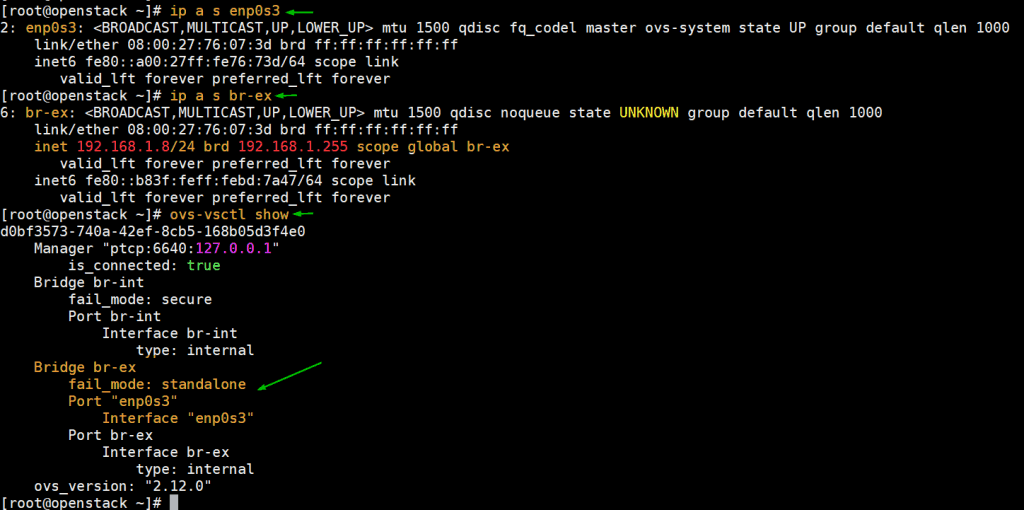
Perfect, above output confirms that installation was successful, and networking is also configured as per the answer file.
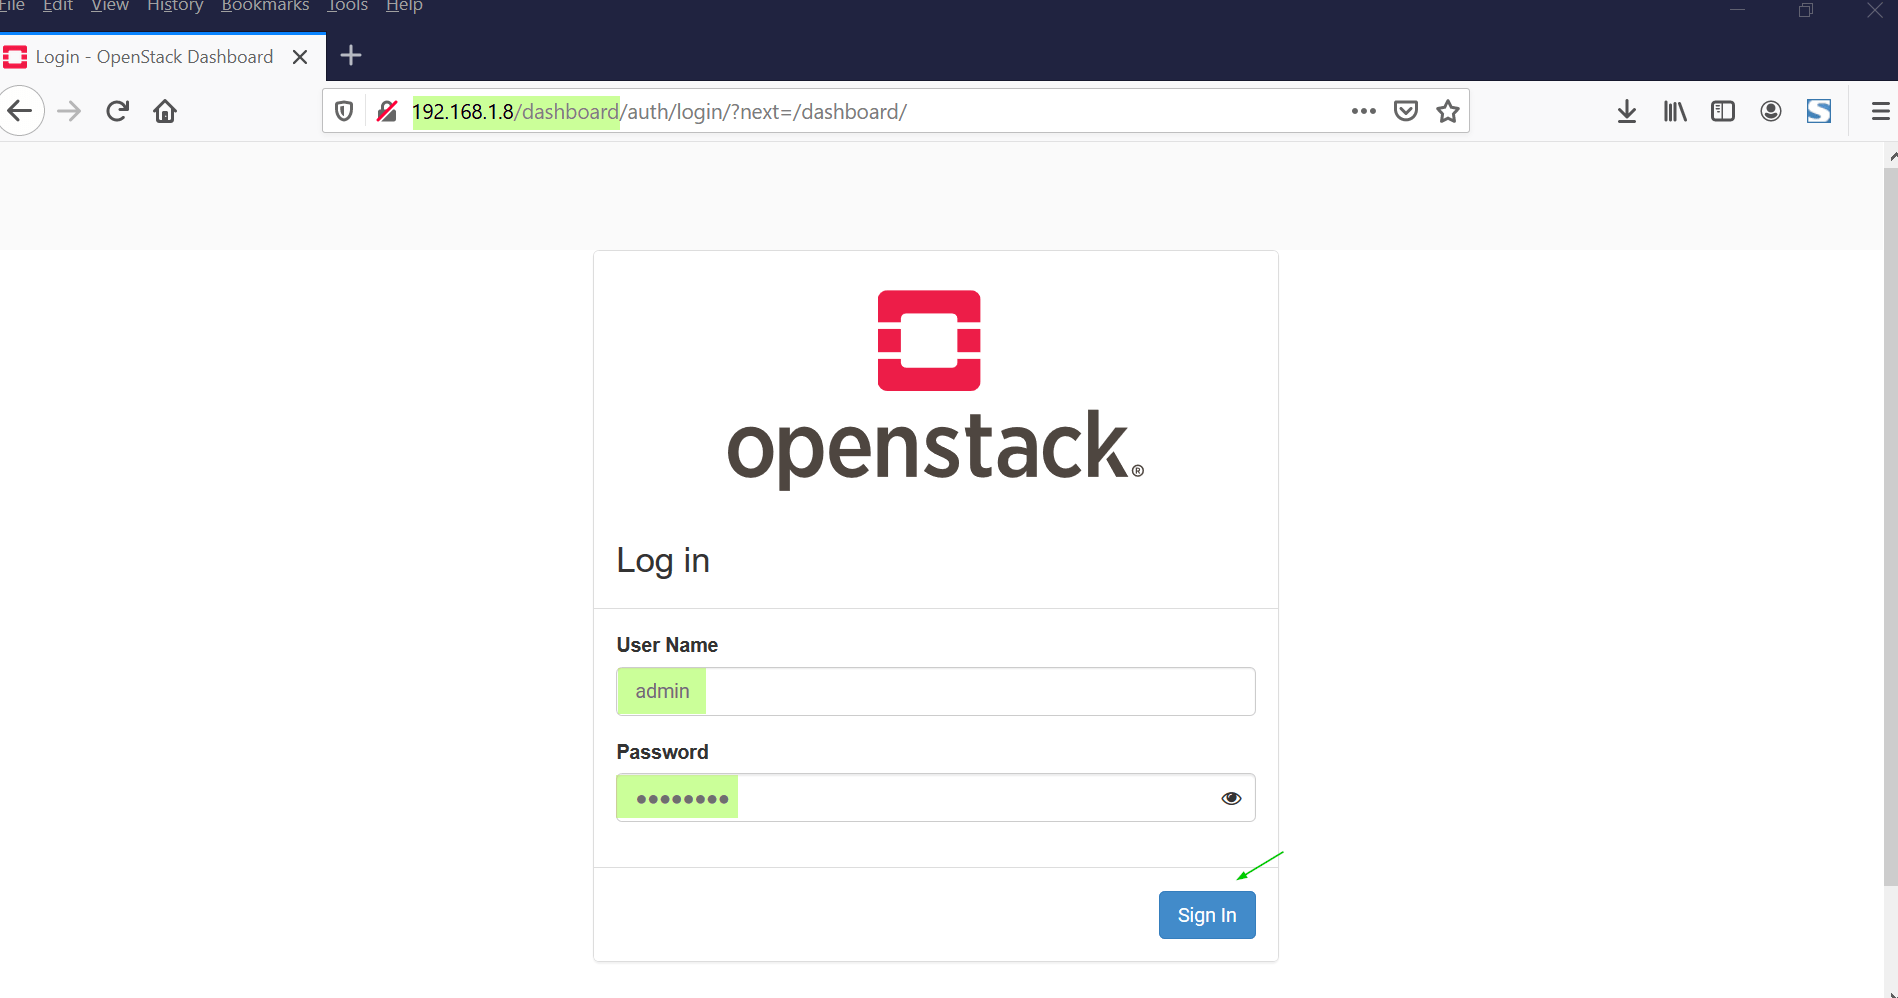
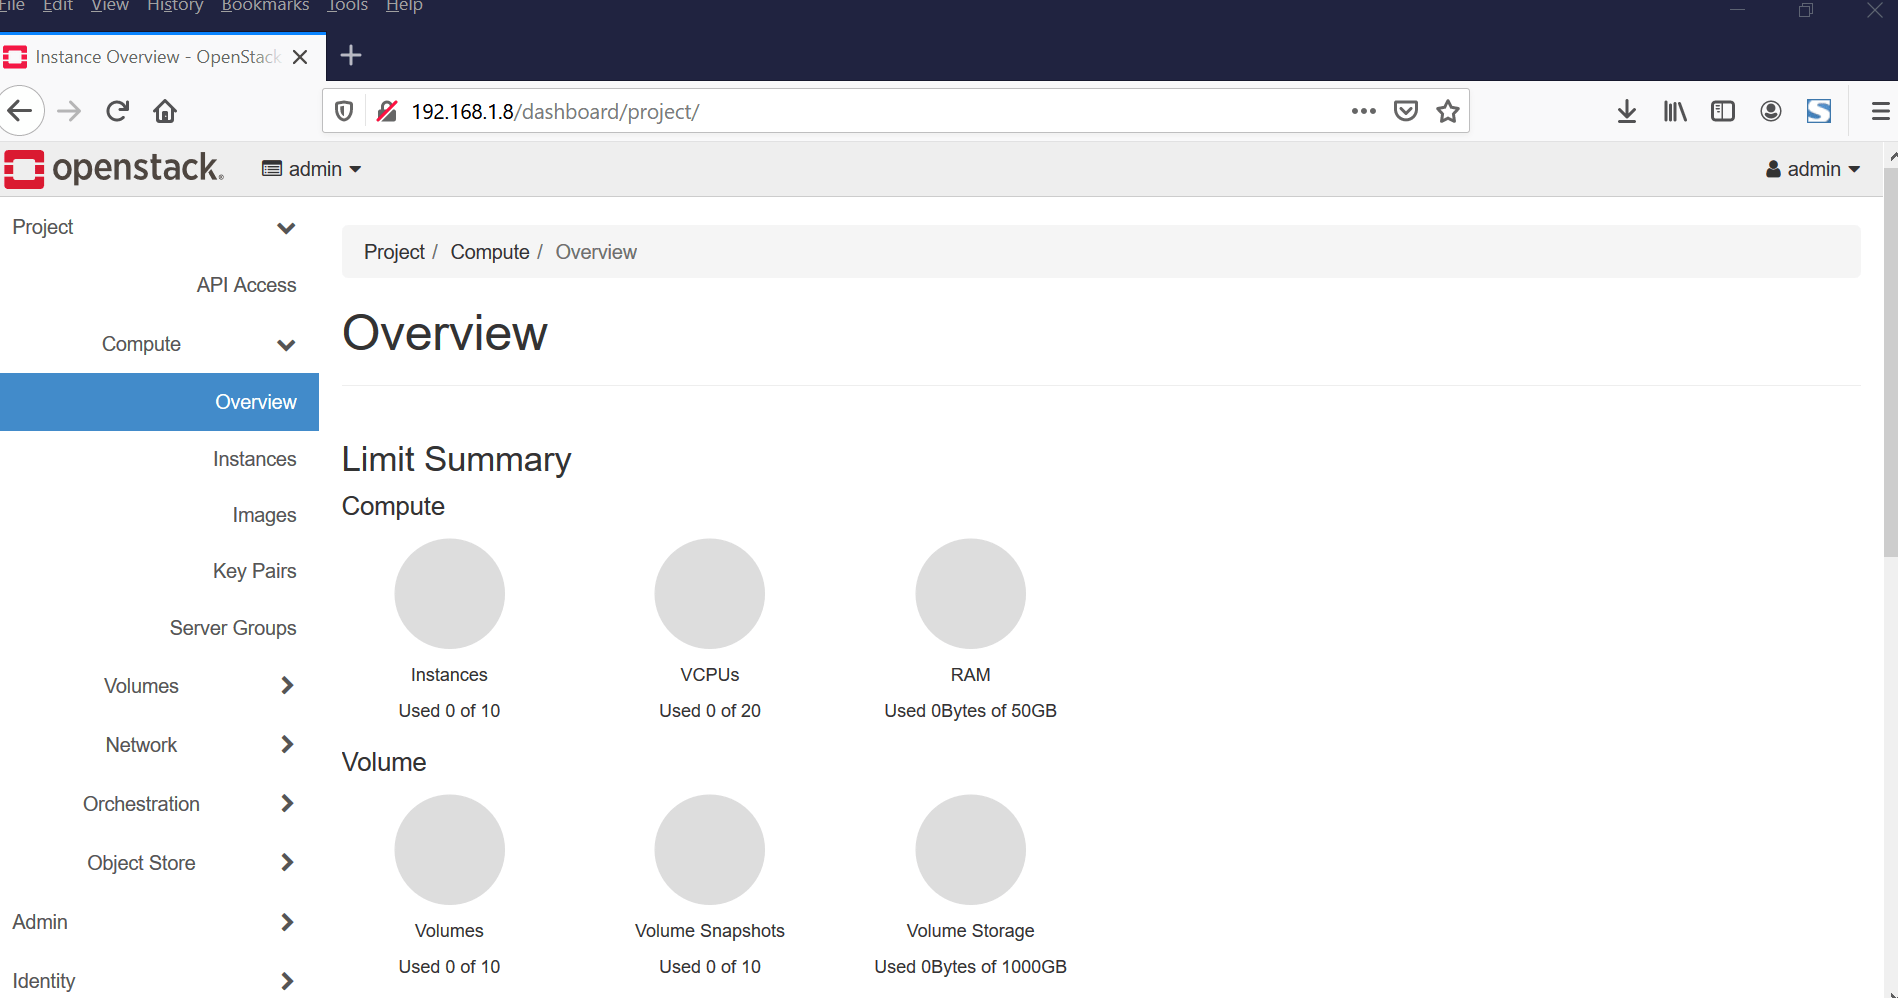
Step 5) Access Horizon Dashboard
Now try to login to Horizon dashboard. URL is already specified in the above output, in my case url is http://192.168.1.8/dashboard , Use the user name as admin and password that we specify in answer file.
We also refer the file “keystonerc_admin” for credentials
Now, let’s test this openstack deployment by launching an instance.
Step 6) Test and verify OpenStack installation by launching an instance
Before launching an instance in openstack, first we must create networks and router and glance image. So, let’s first create external network in admin tenant using following neutron commands,
[root@openstack ~]# source keystonerc_admin
[root@openstack ~(keystone_admin)]# neutron net-create external_network --provider:network_type flat --provider:physical_network extnet --router:external
Now add a subnet of your flat network to external network by running following neutron command.
[root@openstack ~(keystone_admin)]# neutron subnet-create --name public_subnet --enable_dhcp=True --allocation-pool=start=192.168.1.210,end=192.168.1.230 --gateway=192.168.1.1 external_network 192.168.1.0/24
Create a router by executing the following neutron command and set its gateway using external network
[root@openstack ~(keystone_admin)]# neutron router-create dev-router
[root@openstack ~(keystone_admin)]# neutron router-gateway-set dev-router external_network
Create private network and attach a subnet to it. Run the following neutron command,
[root@openstack ~(keystone_admin)]# neutron net-create pvt_net
[root@openstack ~(keystone_admin)]# neutron subnet-create --name pvt_subnet pvt_net 10.20.1.0/24
Add pvt_net interface to router “dev_router” using beneath neutron command,
[root@openstack ~(keystone_admin)]# neutron router-interface-add dev-router pvt_subnet
Now Download Cirros image and then upload it to glance
[root@openstack ~(keystone_admin)]# wget http://download.cirros-cloud.net/0.5.1/cirros-0.5.1-x86_64-disk.img
[root@openstack ~(keystone_admin)]# openstack image create --disk-format qcow2 --container-format bare --public --file cirros-0.5.1-x86_64-disk.img  cirros
Now head back to horizon dashboard and verify the network topology
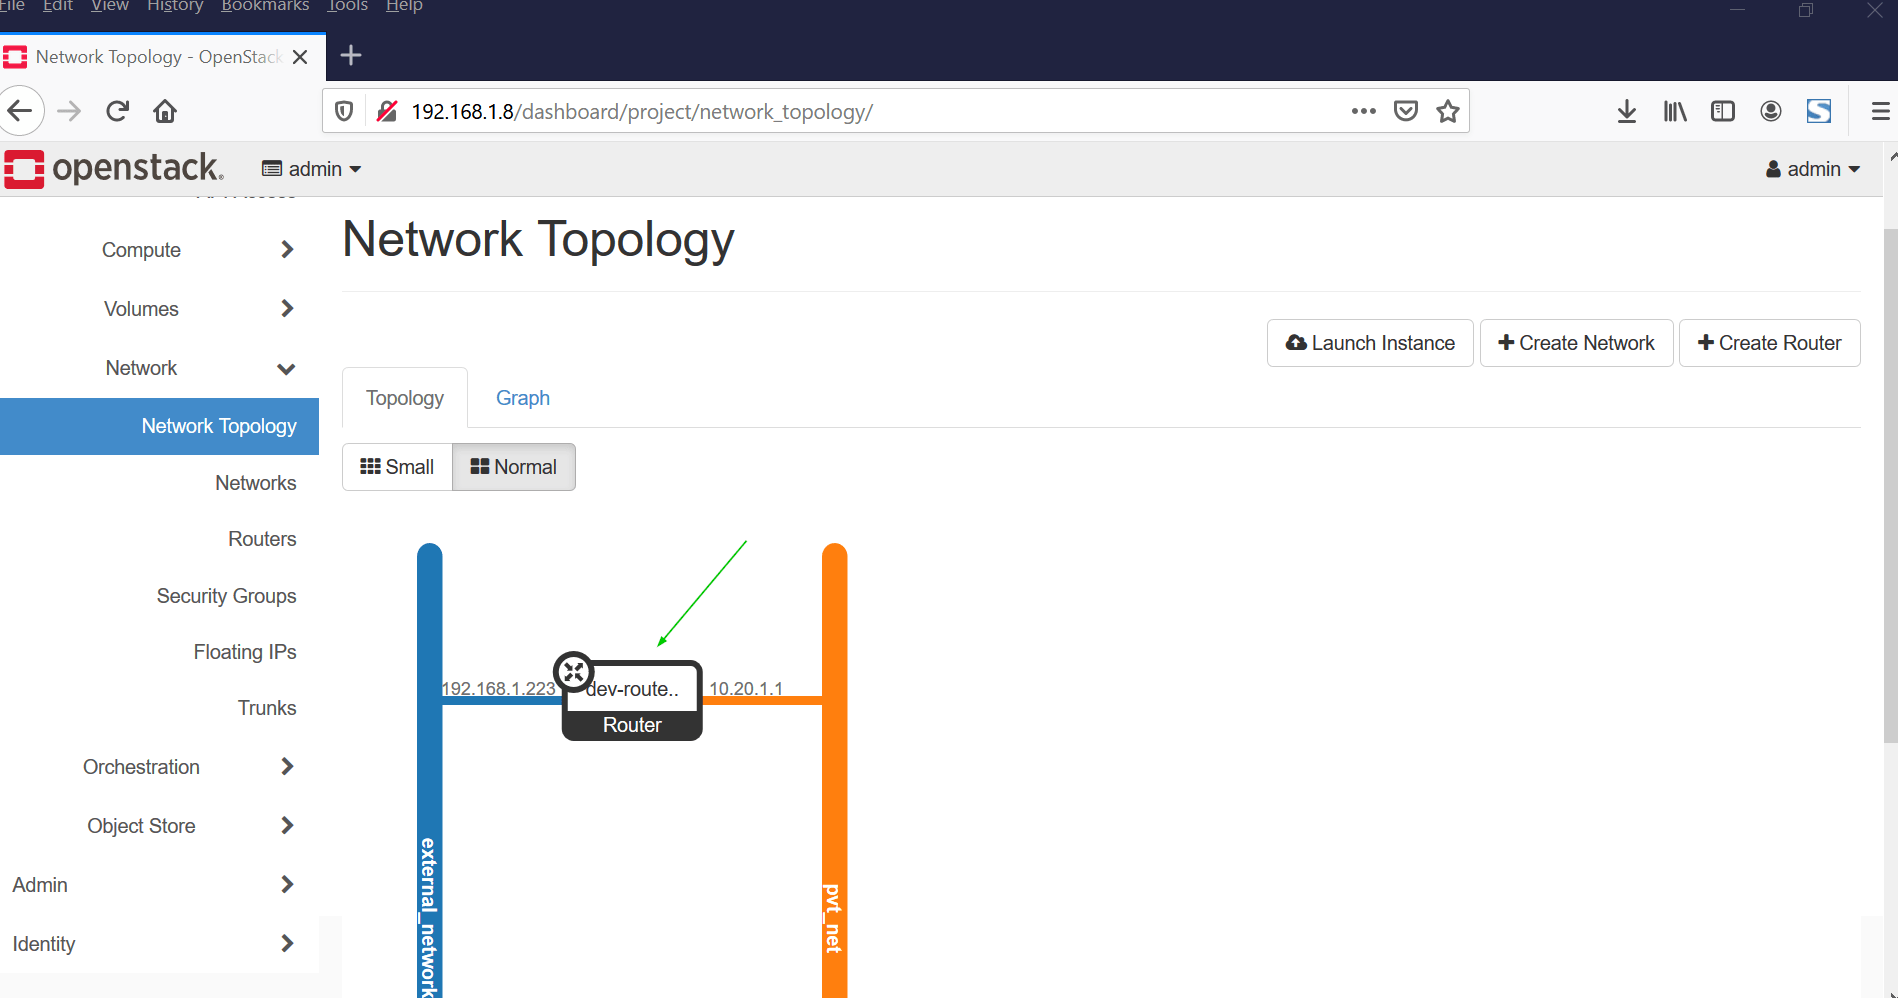
Perfect, above confirms that private and external network have been setup correctly along with the router.
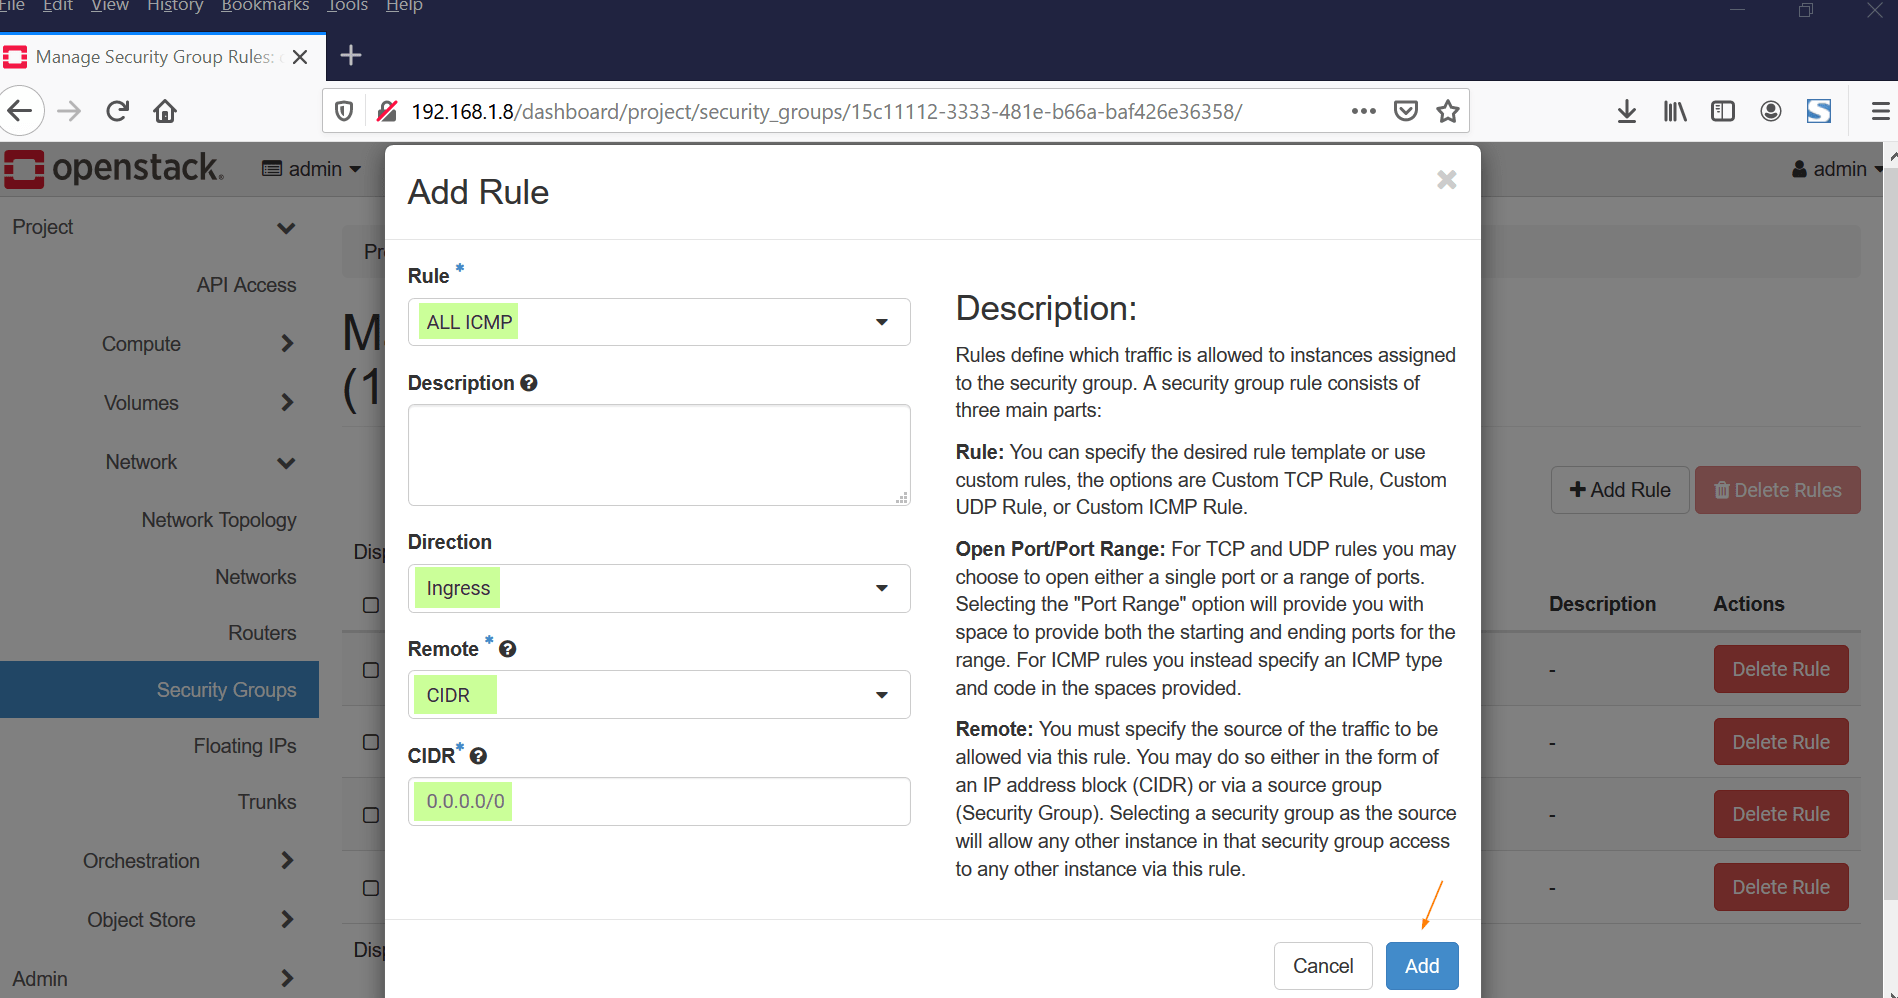
One final step before creating a vm, update the default security group, add icmp and ssh ingress rules, click on “Security Groups” under the network Tab, Click on Manage Rules and then click on “Add rule”
Similarly add rule for ssh
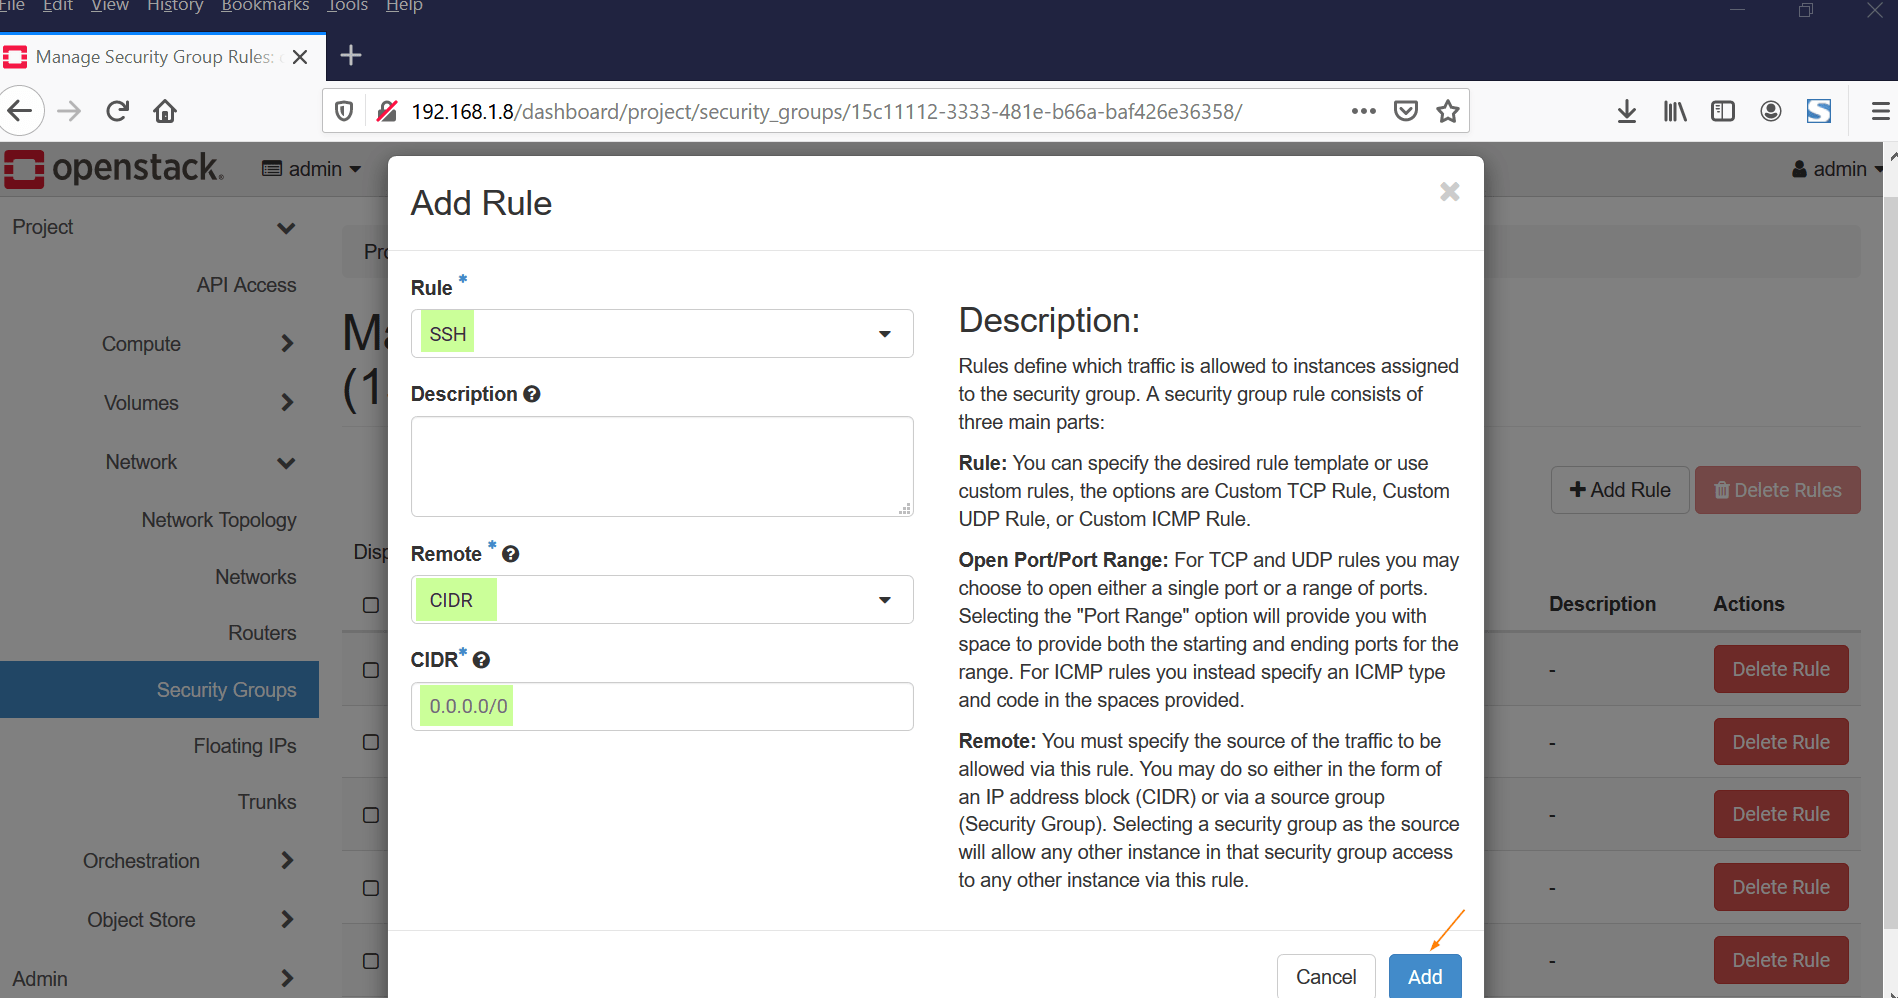
Click on Add
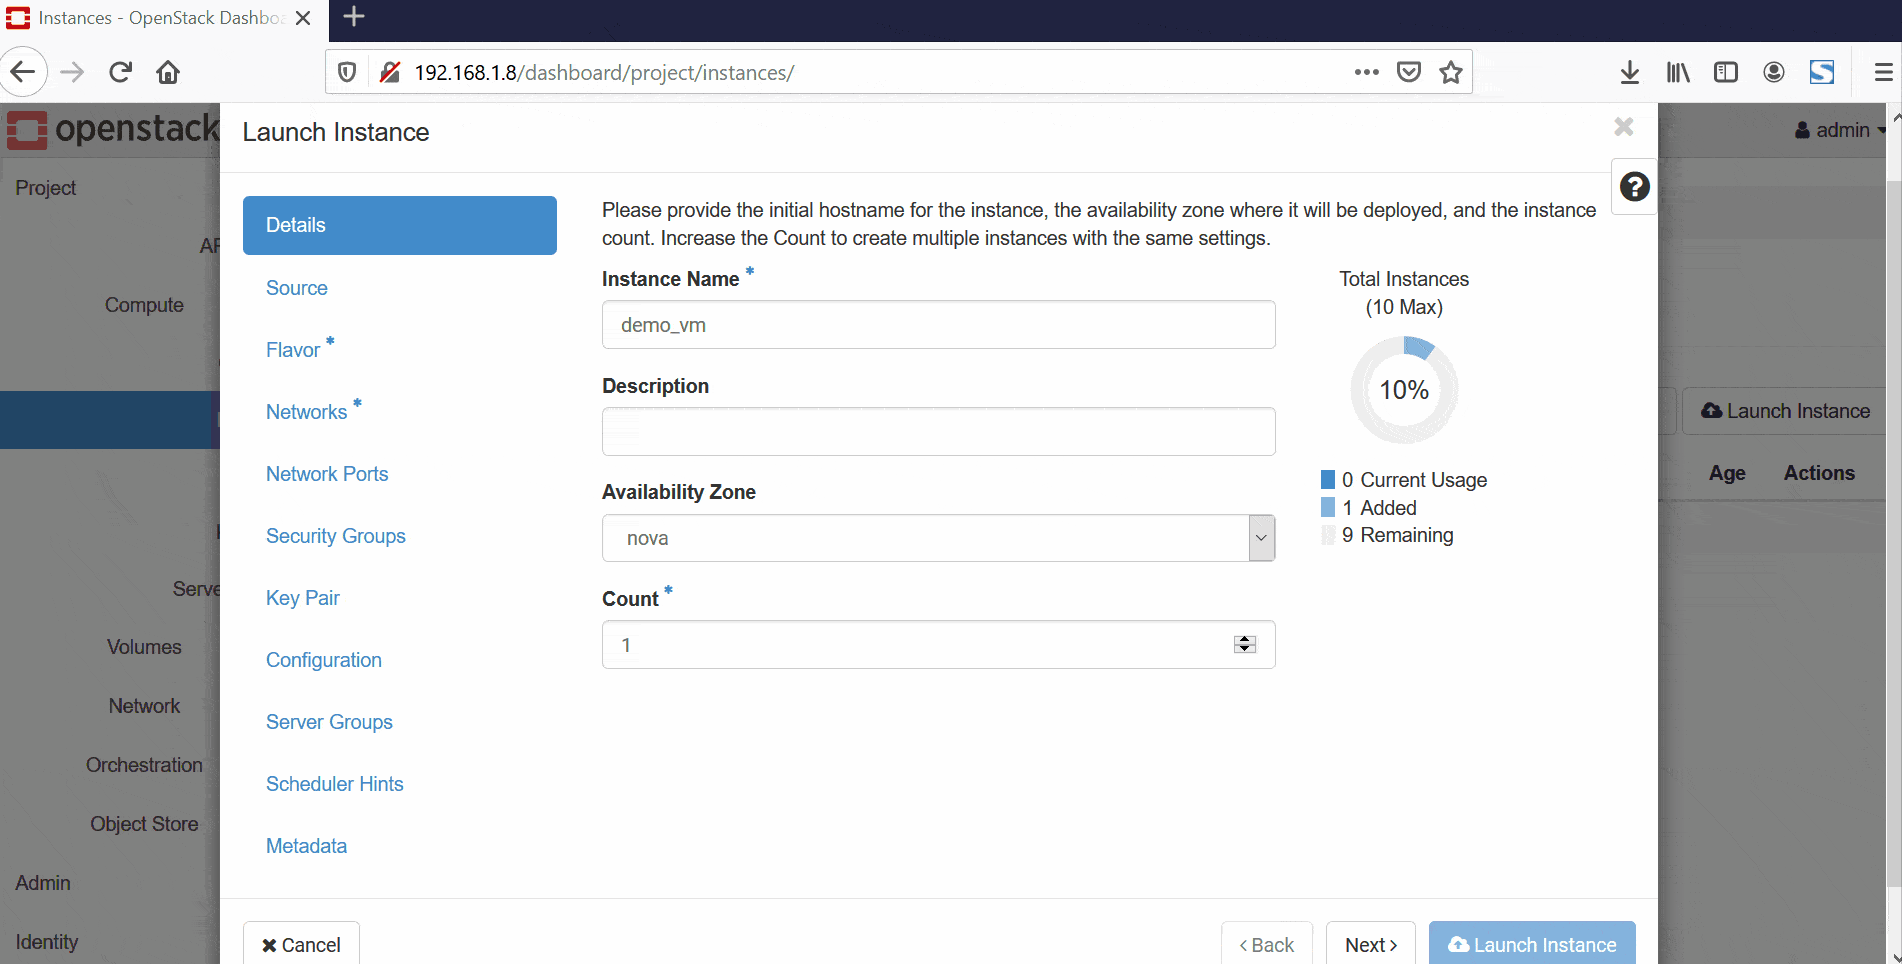
Now all the requirements for launching an openstack instance are fullfilled. Click on Compute Tab and then Choose Instances option and click on “Launch Instance”
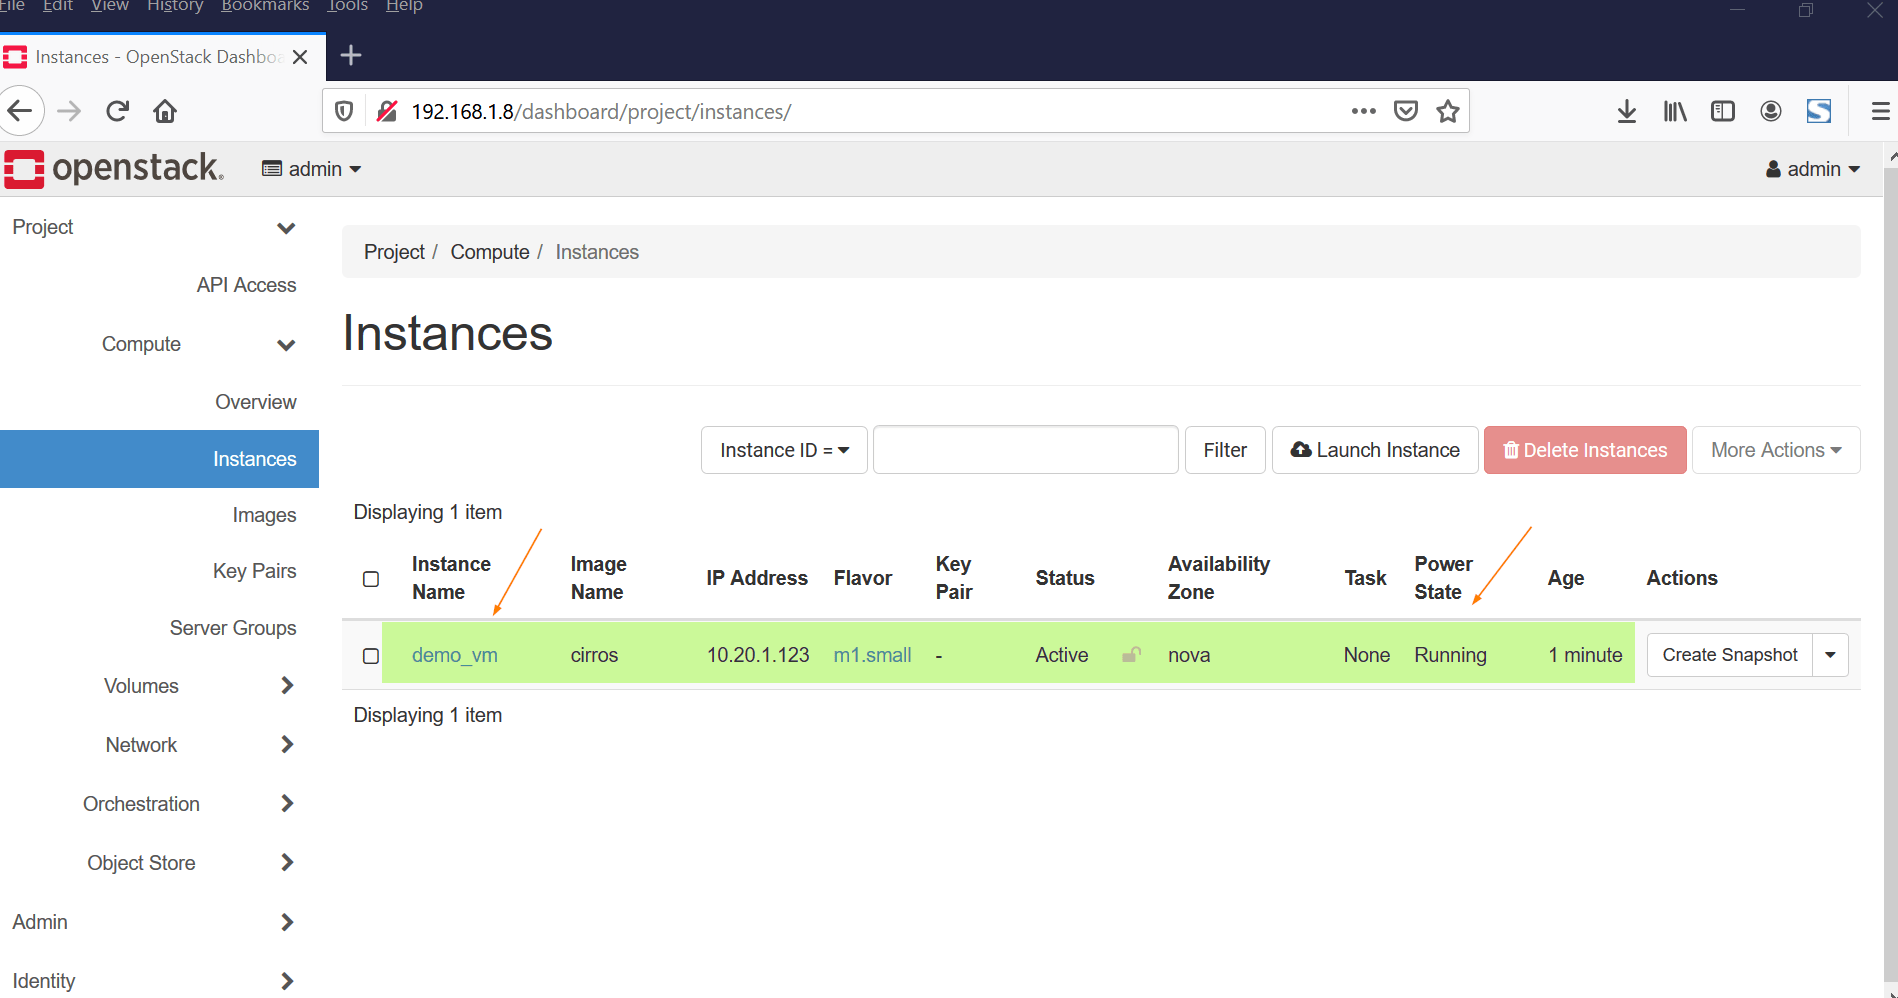
Once VM is launched successfully then we will get something like below,
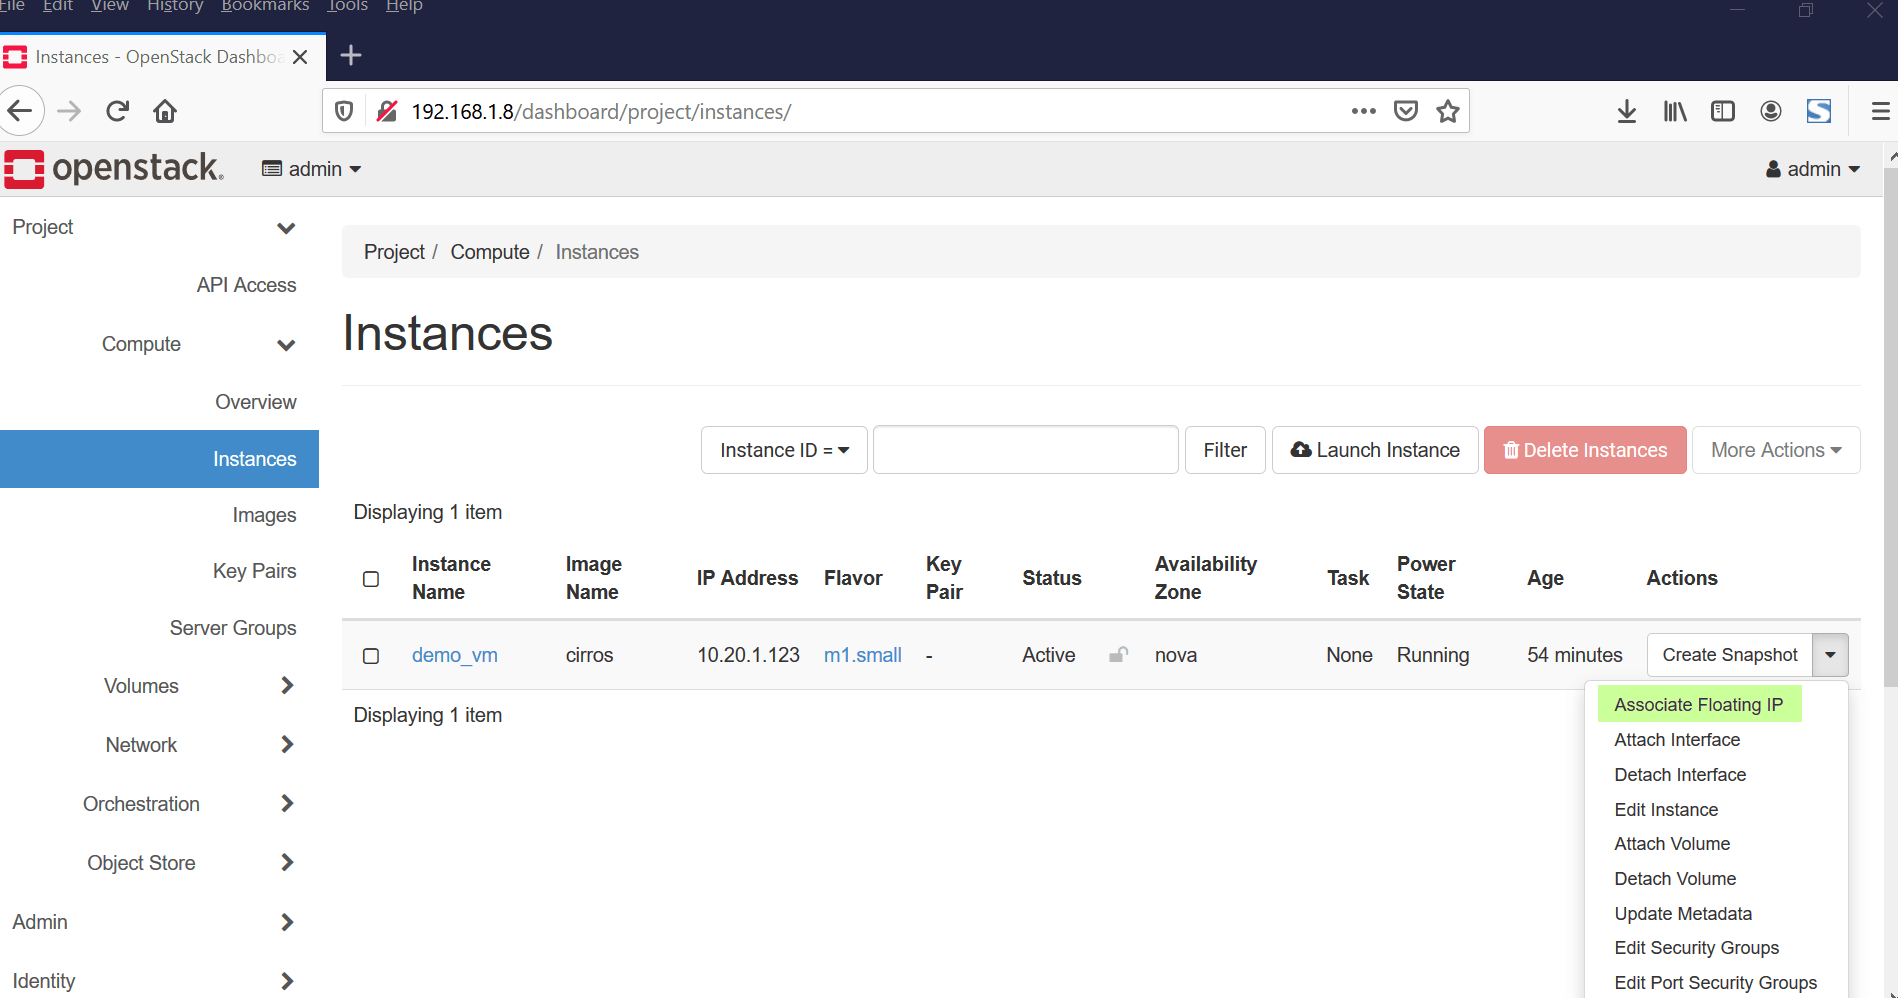
Now Associate floating IP to instance (demo_vm), Under the “Actions” Tab, Choose “Associate Floating IP”
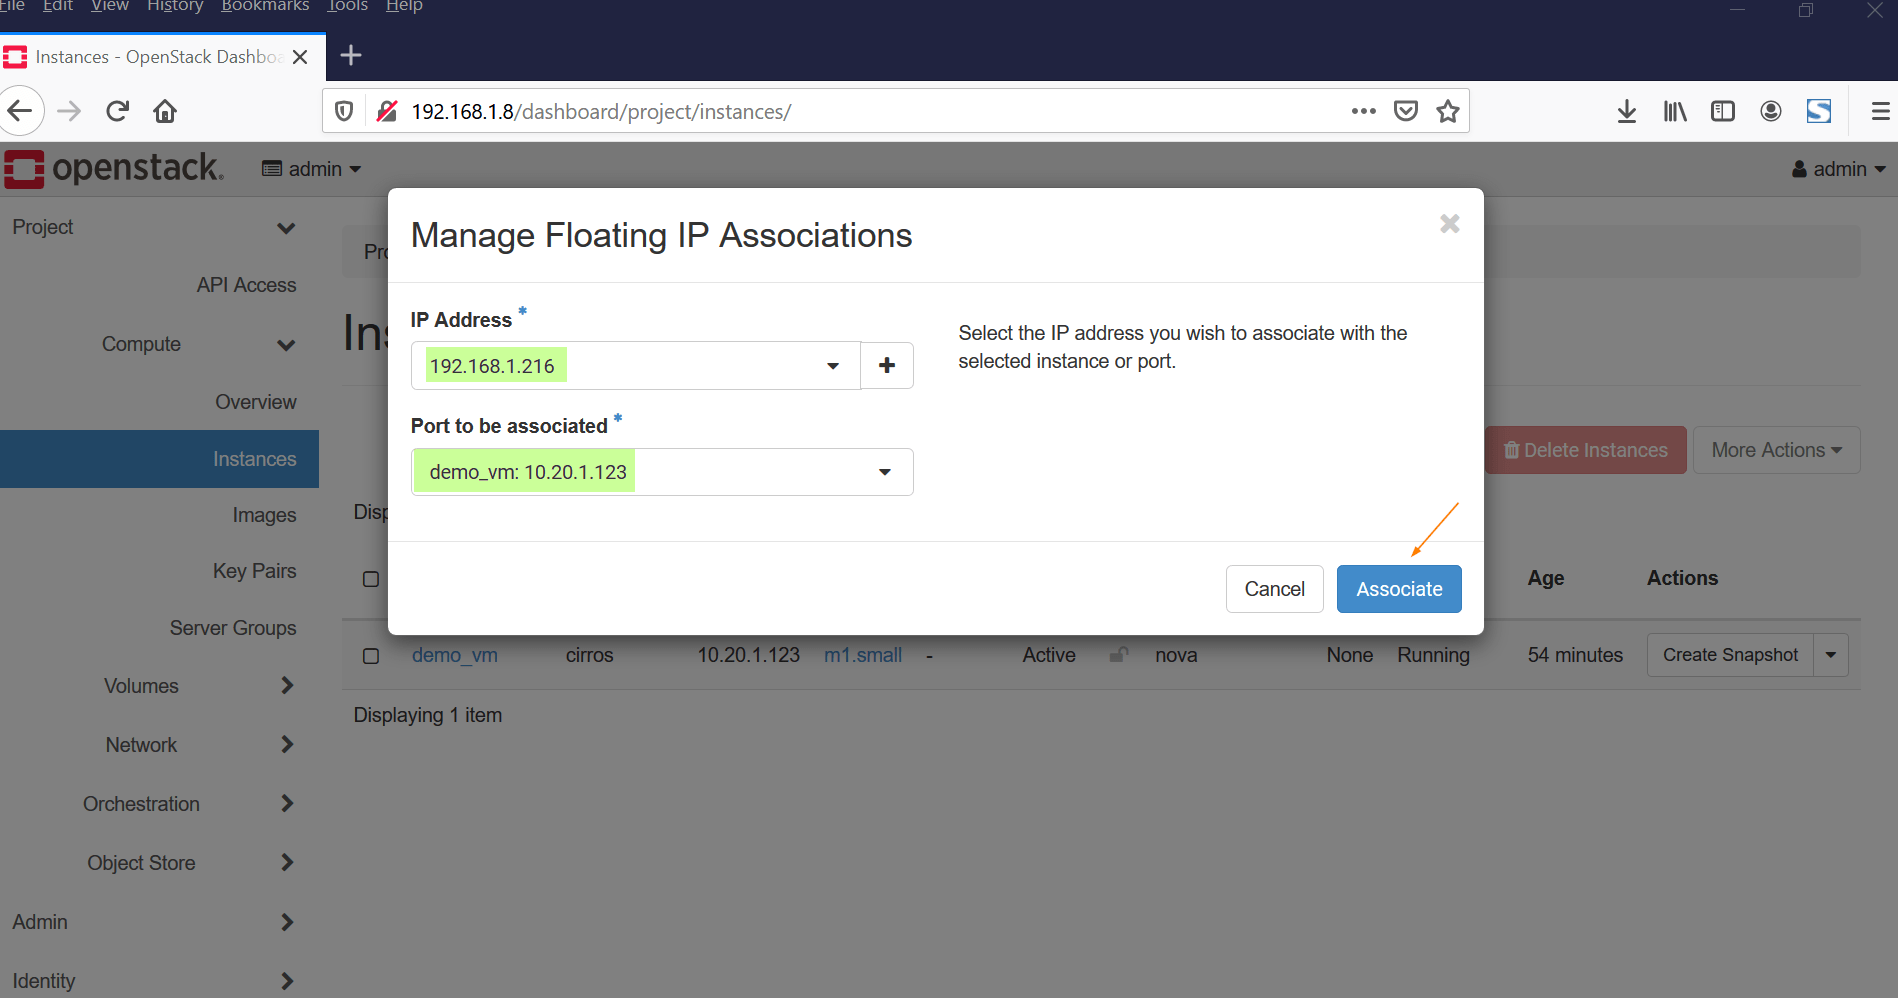
Now Choose IP or Click on + sign to get floating IP from external network and then associate it
Once IP is associated to the VM then floating IP will be displayed for under ‘IP Address‘ option, example is shown below
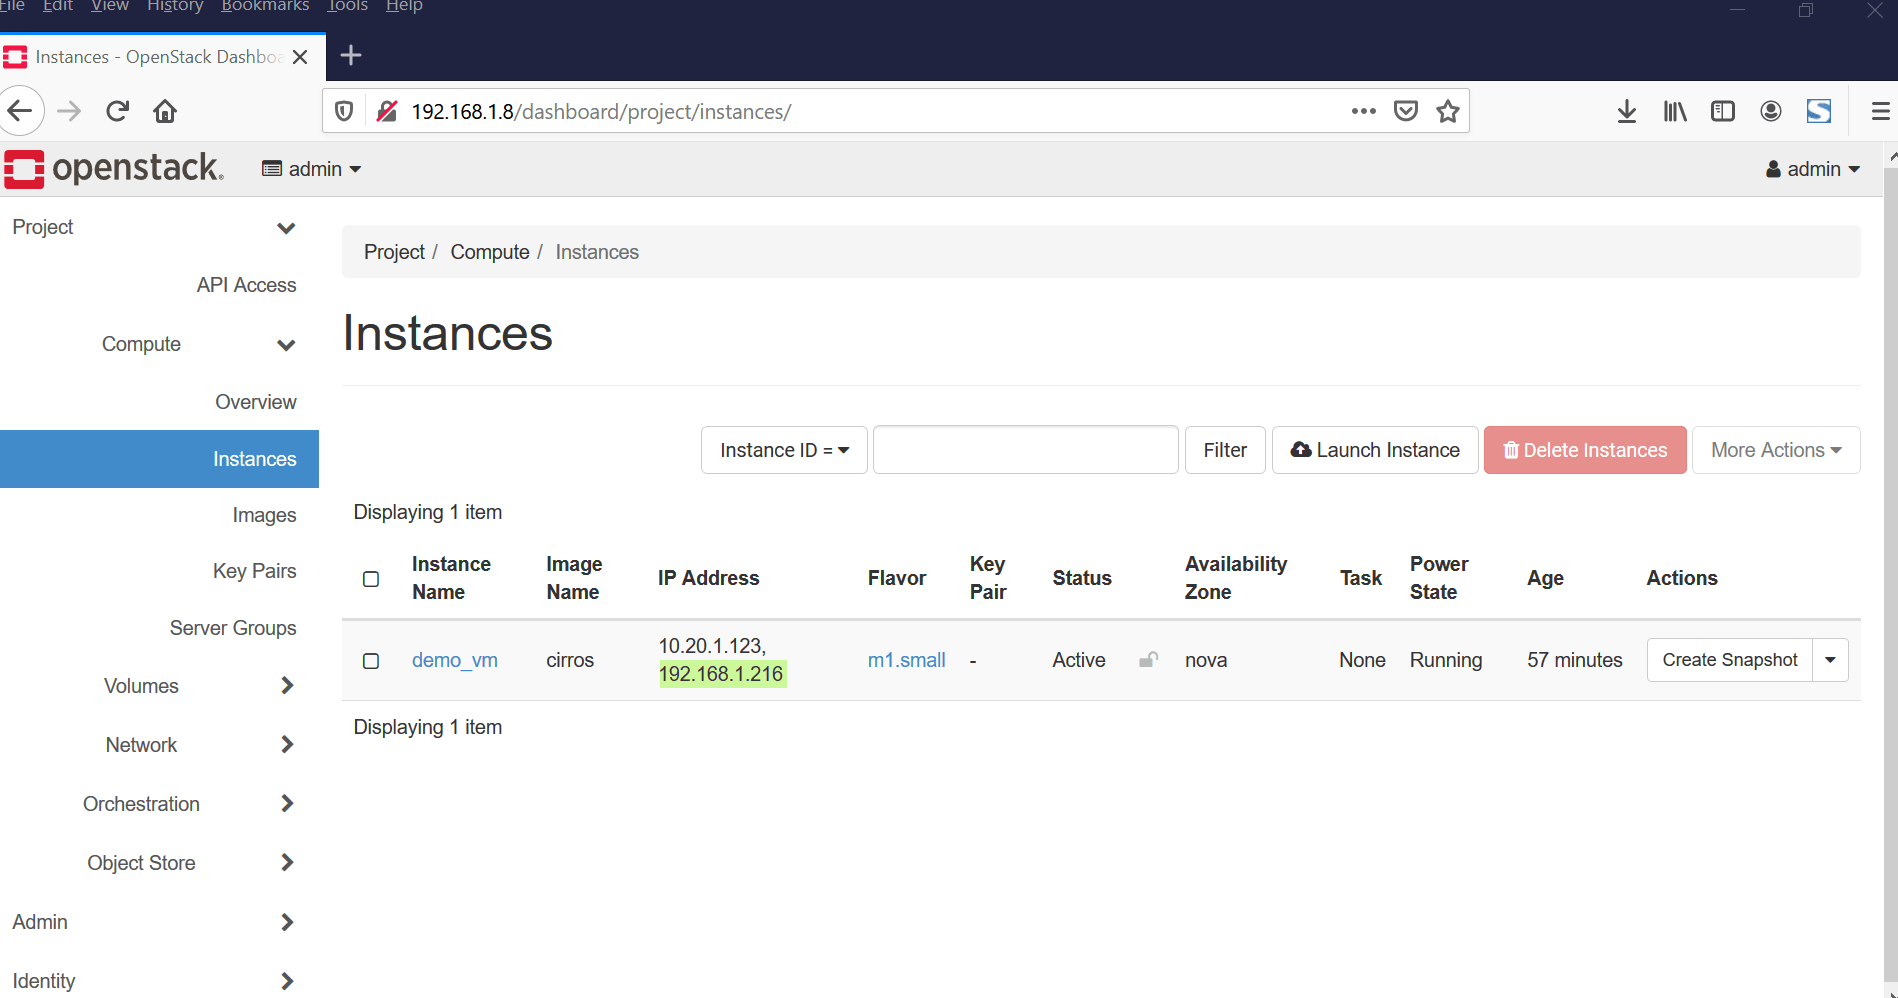
Now try to access this demo_vm using the floating ip, use cirros as a user and ‘gocubsgo’ as password
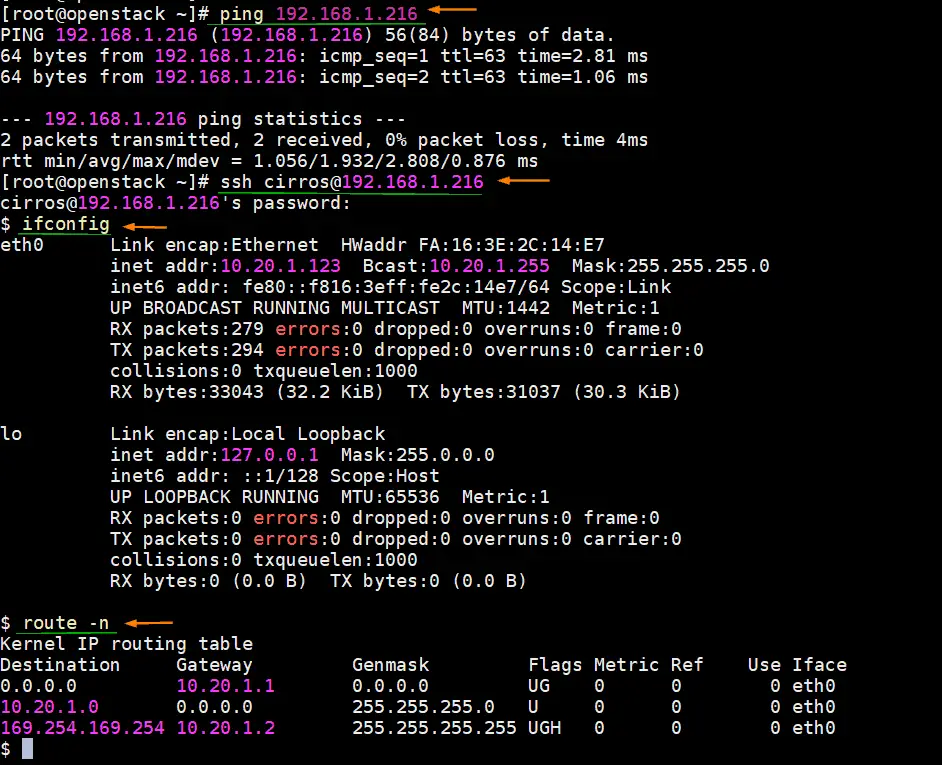
Great, above output confirms that we can access our instance via floating ip. This concludes the article; I hope this tutorial helps to deploy openstack on CentOS 8 system. Please don’t hesitate to share your feedback and comments.
Also Read: How to Create an Instance in OpenStack via Command Line
neutron net-create external_network –provider:network_type flat –provider:physical_network extnet –router:external
neutron CLI is deprecated and will be removed in the future. Use openstack CLI instead.
Am getting timedout error. Anyway to fix this common issue on my set up.
VNClientQosExtension
2020-08-19 01:05:13.332 52079 INFO neutron.db.ovn_revision_numbers_db [req-b54badc4-d7a9-4bb8-9c2a-b6ac2bc1228b – – – – -] Successfully bumped revision number for resource ce1326ba-a831-4111-866b-0f10c7e20063 (type: security_groups) to 1
2020-08-19 01:05:13.333 52079 INFO neutron.plugins.ml2.drivers.ovn.mech_driver.ovsdb.maintenance [req-b54badc4-d7a9-4bb8-9c2a-b6ac2bc1228b – – – – -] Maintenance task: Synchronization finished (took 0.06 seconds)
2020-08-19 01:06:31.225 51836 ERROR neutron_lib.callbacks.manager [req-856ded2d-08ee-420b-9bef-5b42d6688fbf 953d2f61e4ae485190d3ded583c92b41 246c8ce7566d42918867484d84604013 – default default] Error during notification for neutron.plugins.ml2.drivers.ovn.mech_driver.mech_driver.OVNMechanismDriver._create_security_group-4177769 security_group, after_create: ovsdbapp.exceptions.TimeoutException: Commands [, , , , ] exceeded timeout 180 seconds
Hi All,
I am looking for some suggestion on how to solve an “ERROR: Failed handling answer file: Given host does not listen on port 22: fe80::190a:4da5:6e3d:fd1a.” This error popped out right after the command “packstack –gen-answer-file=/root/answers.txt.” I tried the following commands to add port 22 but did not resolve the issue.
firewall -cmd –add-port=22/tcp
firewall -cmd –add-port=22/tcp –permenant
systemctl start ssh
systemctl enable sshd
[root@LinuxCentOS8 ~]# route -n
Kernel IP routing table
Destination Gateway Genmask Flags Metric Ref Use Iface
192.168.1.0 0.0.0.0 255.255.255.0 U 100 0 0 enp0s3
192.168.122.0 0.0.0.0 255.255.255.0 U 0 0 0 virbr0
[root@LinuxCentOS8 ~]# ifconfig
enp0s3: flags=4163 mtu 1500
inet 192.168.1.0 netmask 255.255.255.0 broadcast 192.168.1.255
inet6 2600:1700:3d00:7940:8f42:999a:4299:f5c2 prefixlen 64 scopeid 0x0
inet6 2600:1700:3d00:7940::48 prefixlen 128 scopeid 0x0
inet6 fe80::190a:4da5:6e3d:fd1a prefixlen 64 scopeid 0x20
ether 08:00:27:ff:ae:9b txqueuelen 1000 (Ethernet)
RX packets 27422 bytes 2490306 (2.3 MiB)
RX errors 0 dropped 4647 overruns 0 frame 0
TX packets 207 bytes 31619 (30.8 KiB)
TX errors 0 dropped 0 overruns 0 carrier 0 collisions 0
lo: flags=73 mtu 65536
inet 127.0.0.1 netmask 255.0.0.0
inet6 ::1 prefixlen 128 scopeid 0x10
loop txqueuelen 1000 (Local Loopback)
RX packets 58 bytes 4734 (4.6 KiB)
RX errors 0 dropped 0 overruns 0 frame 0
TX packets 58 bytes 4734 (4.6 KiB)
TX errors 0 dropped 0 overruns 0 carrier 0 collisions 0
virbr0: flags=4099 mtu 1500
inet 192.168.122.1 netmask 255.255.255.0 broadcast 192.168.122.255
ether 52:54:00:c0:d3:75 txqueuelen 1000 (Ethernet)
RX packets 0 bytes 0 (0.0 B)
RX errors 0 dropped 0 overruns 0 frame 0
TX packets 0 bytes 0 (0.0 B)
TX errors 0 dropped 0 overruns 0 carrier 0 collisions 0
I would really appreciate if someone can assist. I am not so savvy in Linux so still in learning phase.
Thanks for posting this article it provided me with ideas.
I have created automation to set up OpenStack (Packstack) on free VMware ESXi using Terraform and Ansible.
‘https://github.com/TribalNightOwl/openstack-packstack-esxi’
Hi….Im not able to ping from VM instance to external network (lan/home routergw//internet)…vm can only ping up to openstack router GW.
From external network I can ping those VM. Running openstack over virtualbox. I have gone through so many solution and yet none resolve the issue. Appreciate if someone that face the same problem and have found the solution to share with me….have tried for more than 2 weeks without luck….thank you
Hi Pradeep Kumar,
it very helpful to us.
everything is working fine but sometimes we got as below mentioned error in the dashboard.
Error: Unable to retrieve usage information.
can you please suggest could be the issue and please explain Network part deeply.
Hi Pradeep Kumar,
I have install openstack successfully but while launching instance i am getting error
————
Message
No valid host was found.
Code
500
Details
Traceback (most recent call last): File “/usr/lib/python3.6/site-packages/nova/conductor/manager.py”, line 1463, in schedule_and_build_instances instance_uuids, return_alternates=True) File “/usr/lib/python3.6/site-packages/nova/conductor/manager.py”, line 870, in _schedule_instances return_alternates=return_alternates) File “/usr/lib/python3.6/site-packages/nova/scheduler/client/query.py”, line 42, in select_destinations instance_uuids, return_objects, return_alternates) File “/usr/lib/python3.6/site-packages/nova/scheduler/rpcapi.py”, line 160, in select_destinations return cctxt.call(ctxt, ‘select_destinations’, **msg_args) File “/usr/lib/python3.6/site-packages/oslo_messaging/rpc/client.py”, line 181, in call transport_options=self.transport_options) File “/usr/lib/python3.6/site-packages/oslo_messaging/transport.py”, line 129, in _send transport_options=transport_options) File “/usr/lib/python3.6/site-packages/oslo_messaging/_drivers/amqpdriver.py”, line 654, in send transport_options=transport_options) File “/usr/lib/python3.6/site-packages/oslo_messaging/_drivers/amqpdriver.py”, line 644, in _send raise result nova.exception_Remote.NoValidHost_Remote: No valid host was found. Traceback (most recent call last): File “/usr/lib/python3.6/site-packages/oslo_messaging/rpc/server.py”, line 241, in inner return func(*args, **kwargs) File “/usr/lib/python3.6/site-packages/nova/scheduler/manager.py”, line 200, in select_destinations raise exception.NoValidHost(reason=””) nova.exception.NoValidHost: No valid host was found.
Created
Sept. 14, 2020, 10:35 p.m.
—-
Please help to resolve the same
Thanks,
Balkrishna
Hi Balkrishna Savalia,
In your case httpd service was not working.
can you please share your Network setting configuration?
‘[email protected]’ — please send an update here
Hello, I have the same probleme, my was installation was done, but I launch instances I get this error.
504 Gateway Timeout Gateway Timeout The gateway did not receive a timely response from the upstream server or application.
i have this problem
[root@openstack ~(keystone_admin)]# nova list
ERROR (ClientException): Unknown Error (HTTP 500)
[root@openstack ~(keystone_admin)]# nova list
+————————————–+———–+——–+————+————-+————————————-+
| ID | Name | Status | Task State | Power State | Networks |
+————————————–+———–+——–+————+————-+————————————-+
| ddeb8bbd-52d3-4e01-bb03-07f667f99d67 | Ubuntu 20 | ACTIVE | – | Running | RED1=10.9.9.13; private=10.1.1.163 |
+————————————–+———–+——–+————+————-+————————————-+
[root@openstack ~(keystone_admin)]# nova list
ERROR (ClientException): Unknown Error (HTTP 500)
[root@openstack ~(keystone_admin)]# nova list
ERROR (ClientException): Unknown Error (HTTP 500)
[root@openstack ~(keystone_admin)]# nova list
+————————————–+———–+——–+————+————-+————————————-+
| ID | Name | Status | Task State | Power State | Networks |
+————————————–+———–+——–+————+————-+————————————-+
| ddeb8bbd-52d3-4e01-bb03-07f667f99d67 | Ubuntu 20 | ACTIVE | – | Running | RED1=10.9.9.13; private=10.1.1.163 |
+————————————–+———–+——–+————+————-+————————————-+
[root@openstack ~(keystone_admin)]#
Hi sir…I would like to know is it possible to change IP address of Openstack packstack deployed?, I would like to avoid from deployed it again based on new IP address. If it can be done, please advise which part should I change. My server port1 is connected to network 192.168.0.10/24. Deployment of Openstack is using 192.168.0.10 as the IP address, my horizon browser access also is via 192.168.0.10.
Now I want to connect the server port1 to network 172.16.100.90/24. I know that horizon IP should be change to 172.16.100.90 and for sure that’s not the only component that I need to change. Thus, what other component that I should change/update with the new IP and how it can be done.
ERROR : Error appeared during Puppet run: 172.16.22.136_controller.pp
Error: Execution of ‘/usr/bin/mysql –host=172.16.22.136 –user=root –password=df68d07429734c50 -NBe create database `keystone` character set utf8 collate utf8_general_ci’ returned 1: ERROR 2002 (HY000): Can’t connect to MySQL server on ‘172.16.22.136’ (115)
I am getting this error