In this blog post, we will show you how to install GitLab on Ubuntu 24.04 system step-by-step. Additionally, we will cover how to secure GitLab with SSL certificates using Let’s Encrypt.
GitLab is an open-source, feature-rich DevOps platform designed for managing repositories, issues, CI/CD pipelines, and more. It allows teams to collaborate effectively and manage code repositories with ease.
Gitlab comes with Enterprise edition (Gitlab EE) and Community edition (Gitlab CE). In this post, we will cover the community edition installation.
Prerequisites
- A virtual or dedicated Ubuntu 24.04 instance with SSH access.
- Static Hostname and IP address
- Domain (linuxtechi.org)
- Sudo User with admin rights
- 2 GB RAM or more
- 2 vCPUs or more
- Internet Connectivity
Without any further delay, let’s deep dive into GitLab installation steps on Ubuntu 24.04
1) Install Updates
Let’s begin by updating the package lists and upgrading any existing packages to their latest versions.
$ sudo apt update
$ sudo apt upgrade -y
Reboot the system after applying updates,
$ sudo reboot
2) Install Required Dependencies
GitLab requires some dependencies to function correctly. Install them using the following apt command
$ sudo apt install -y curl openssh-server ca-certificates postfix
During the postfix installation, a configuration window will appear. Choose “Internet Site” and enter your server’s hostname as the mail server name. This will allow GitLab to send email notifications.
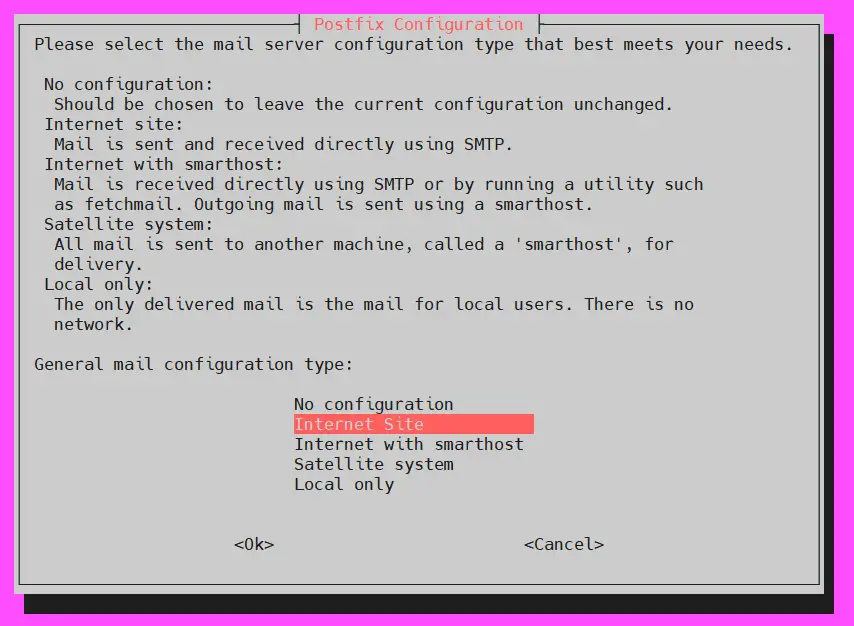
Choose “Internet Site” and then select OK.
Set the system mail name as system’s hostname and choose OK.
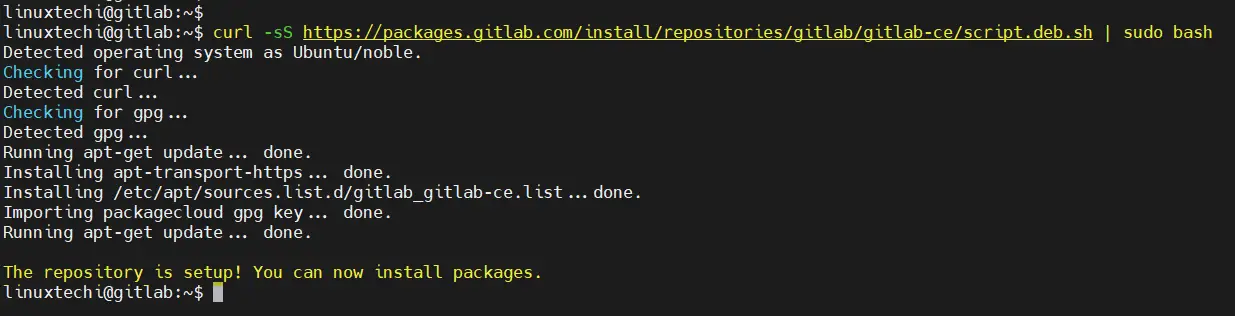
3) Add GitLab Apt Repository
Now, let’s add the GitLab repository. Run the following curl command, which will automatically detect your Ubuntu version and configure the repository accordingly.
$ curl -sS https://packages.gitlab.com/install/repositories/gitlab/gitlab-ce/script.deb.sh | sudo bash
4) Install Gitlab on Ubuntu 24.04
Run the following command to automatically install and configure gitlab-ce on your Ubuntu system. Make sure to replace the server’s hostname with your specific setup.
$ sudo EXTERNAL_URL="http://gitlab.linuxtechi.org" apt install gitlab-ce
Once the above the command is executed successfully, we will get output something like below,

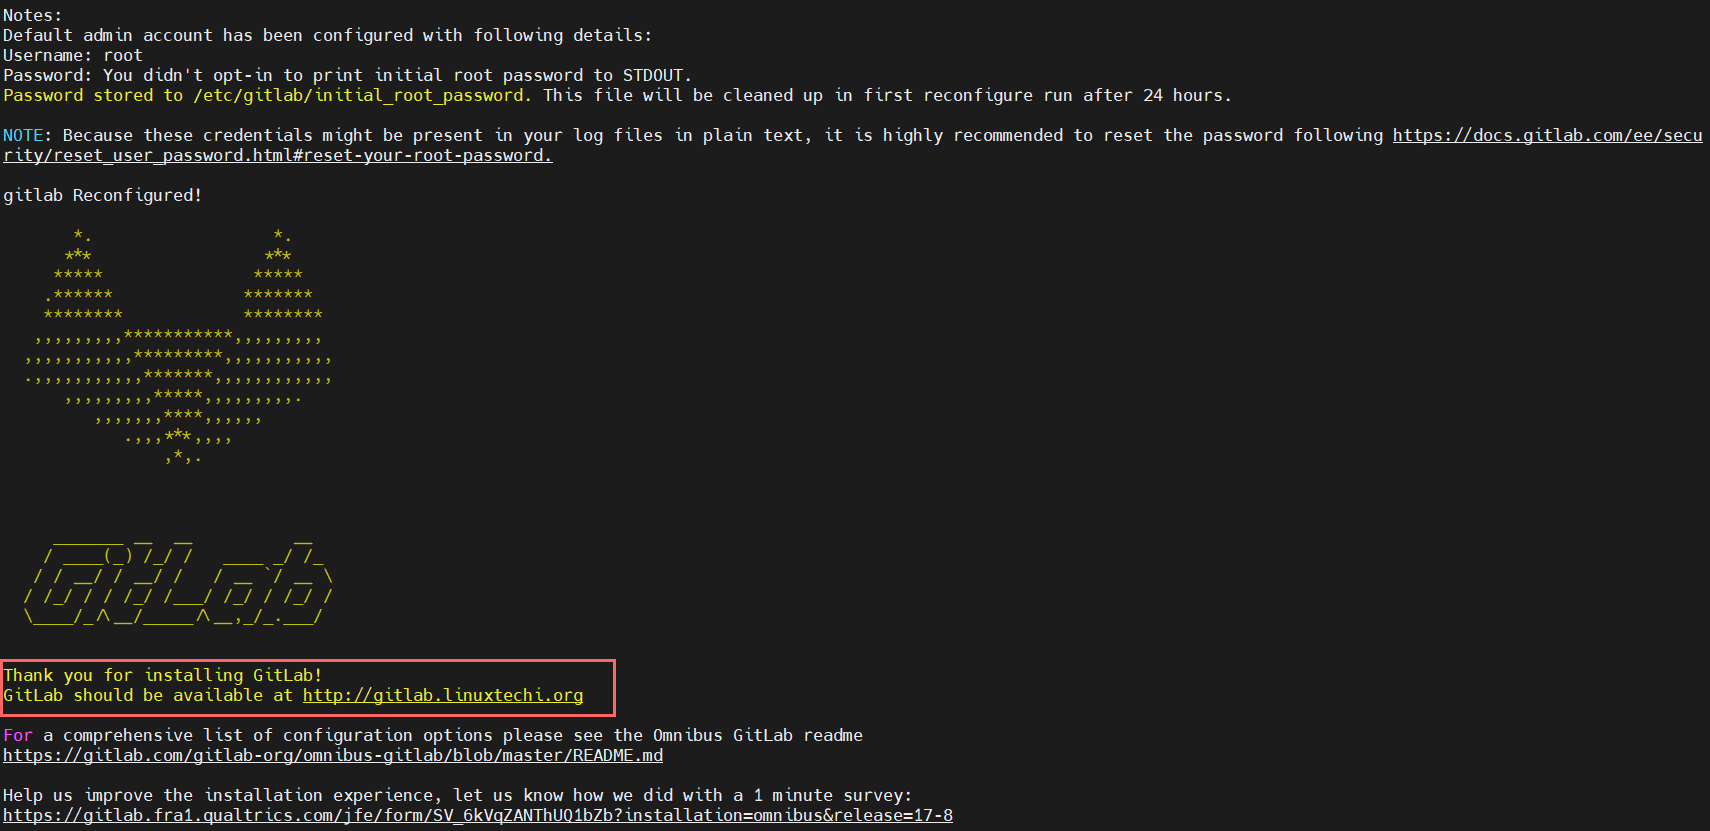
Output above confirms that GitLab has been installed successfully. User name for gitlab web interface is root and password is stored at “/etc/gitlab/initial_root_password”
Note : If OS firewall is enabled on your Ubuntu system, then allow 80 and 443 ports.
$ sudo ufw allow http
$ sudo ufw allow https
5) Access GitLab Web Interface
With GitLab installed and configured, open your web browser, and enter your server’s IP address or FQDN.
http://<Server-IP-Address-or-FQDN>
- User Name: root
- Password : <<Get Password from /etc/gitlab/initial_root_password>>
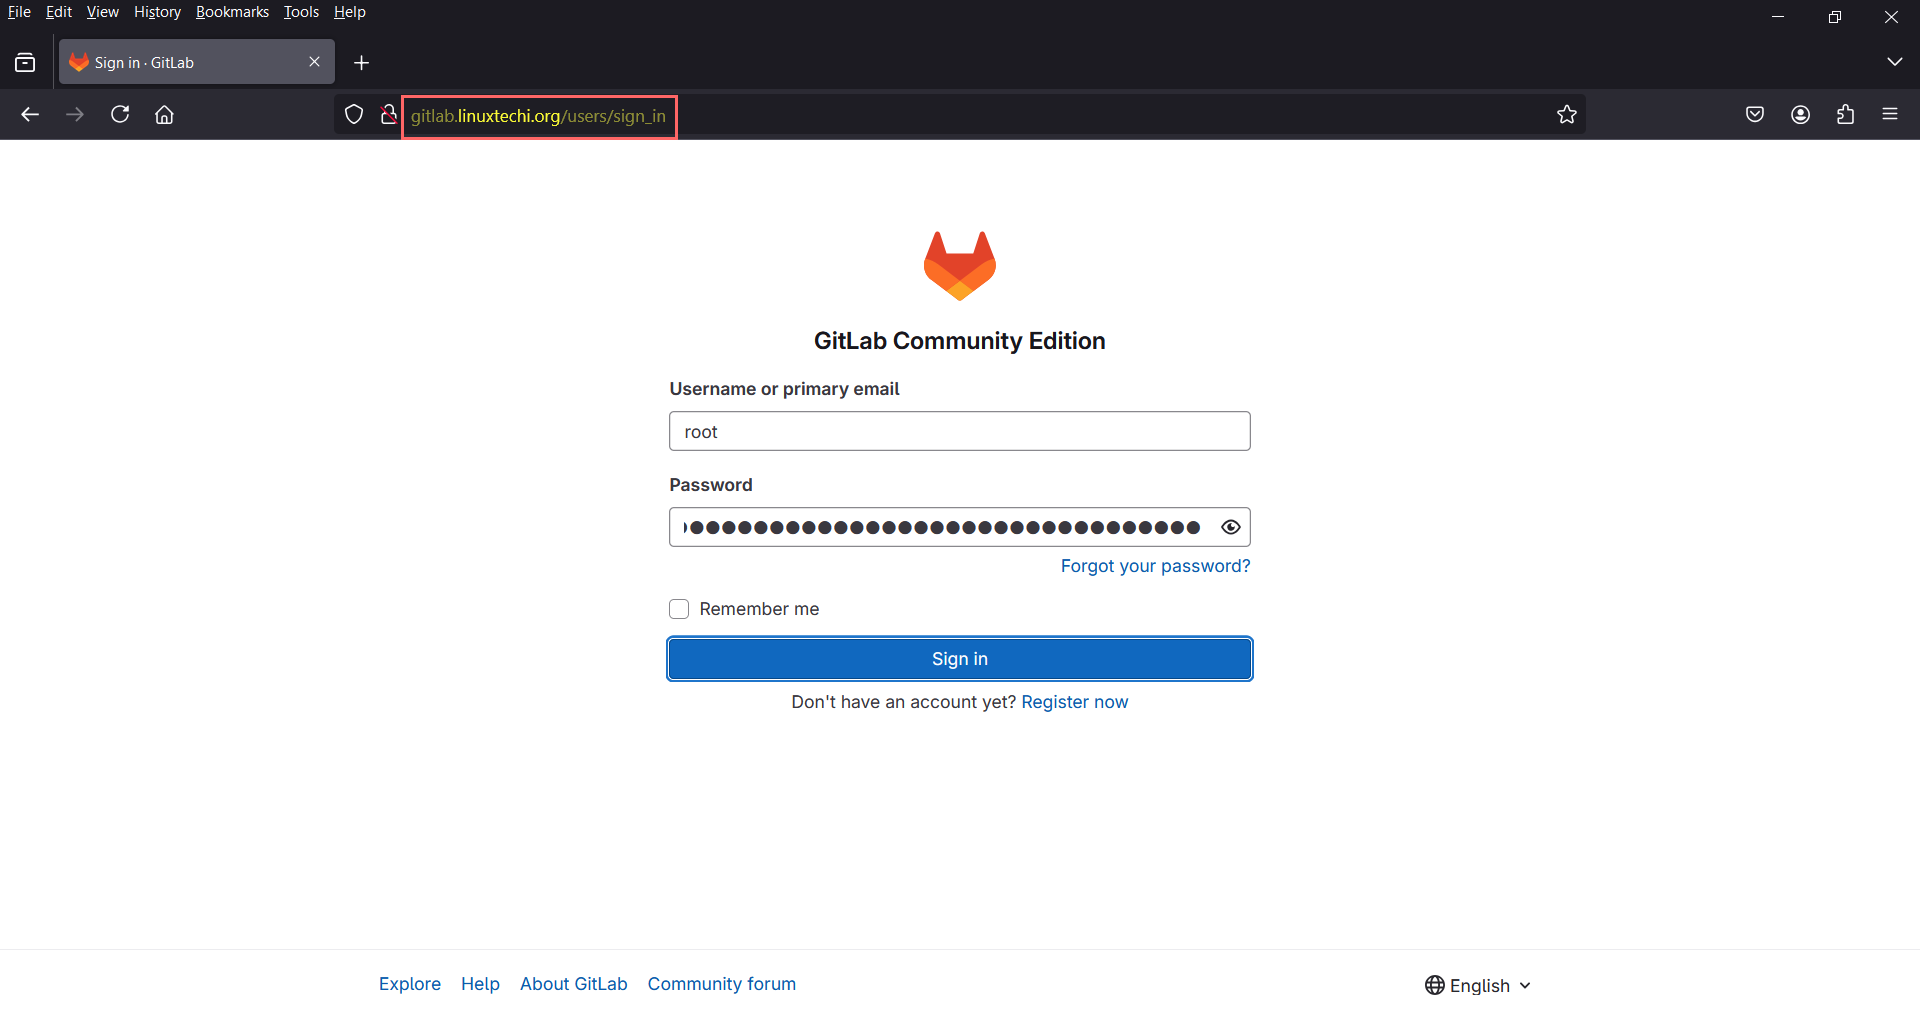
click on “Sign in“, it will take us the following dashboard.
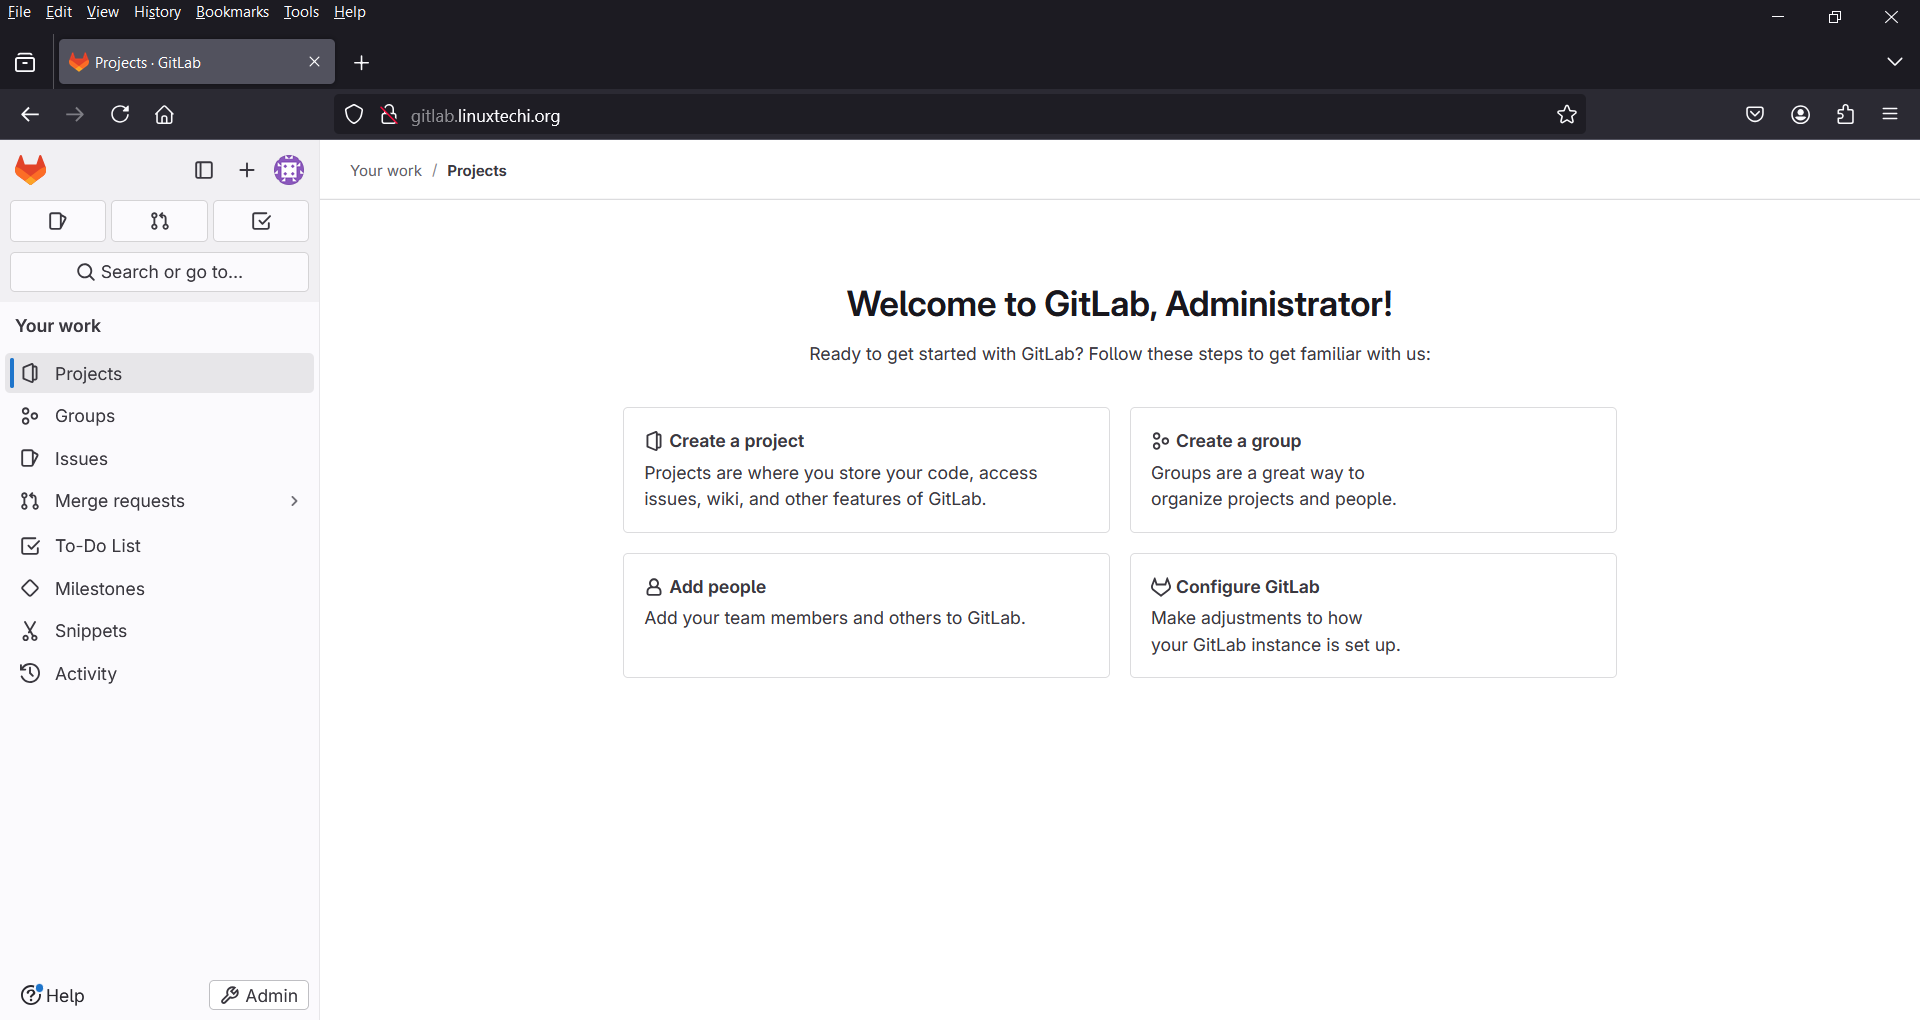
Great! The above confirmation shows that we have successfully logged into the GitLab web interface.
Currently, our GitLab server is running on the HTTP (port 80) protocol. If you would like to enable HTTPS for your GitLab instance, follow the steps below.
6) Secure GitLab with Let’s Encrypt SSL
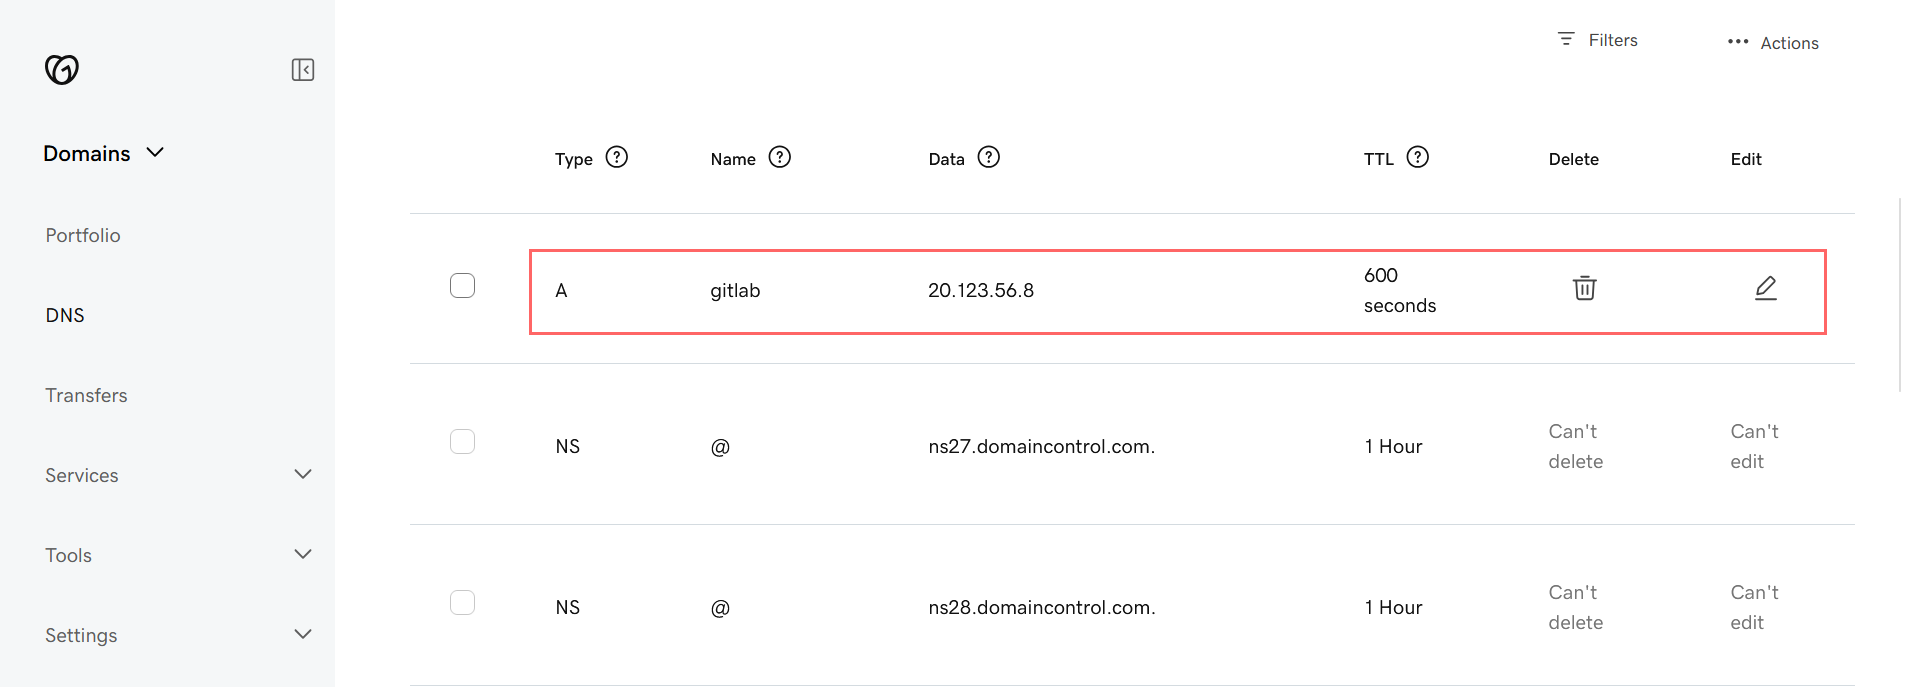
For enhanced security, you can configure HTTPS for your GitLab instance using either a self-signed certificate or a Let’s Encrypt certificate. Let’s Encrypt is suitable only for public domains with an A record accessible on the internet.
In our case, we are using the public domain “linuxtechi.org“, so we will secure GitLab with a Let’s Encrypt certificate. We have already configured the A record for our GitLab FQDN in the DNS of linuxtechi.org.
To configure HTTPS with Let’s Encrypt in GitLab, refer the following steps.
Edit the `gitlab.rb` file and add the following parameters.
$ sudo vi /etc/gitlab/gitlab.rb
letsencrypt['enable'] = true
letsencrypt['auto_renew'] = true
- The first line enables Let’s Encrypt configuration.
- The second line ensures the certificate is automatically renewed.
Next, customize auto-renewal schedule. Define the hour and day of the month for automatic renewal:
letsencrypt['auto_renew_hour'] = 5
letsencrypt['auto_renew_day_of_month'] = "*/6"
Next, set the external URL to use HTTPS, replace ` linuxtechi.org` with your domain name:
external_url 'https://gitlab.linuxtechi.org'
Save and close the file.
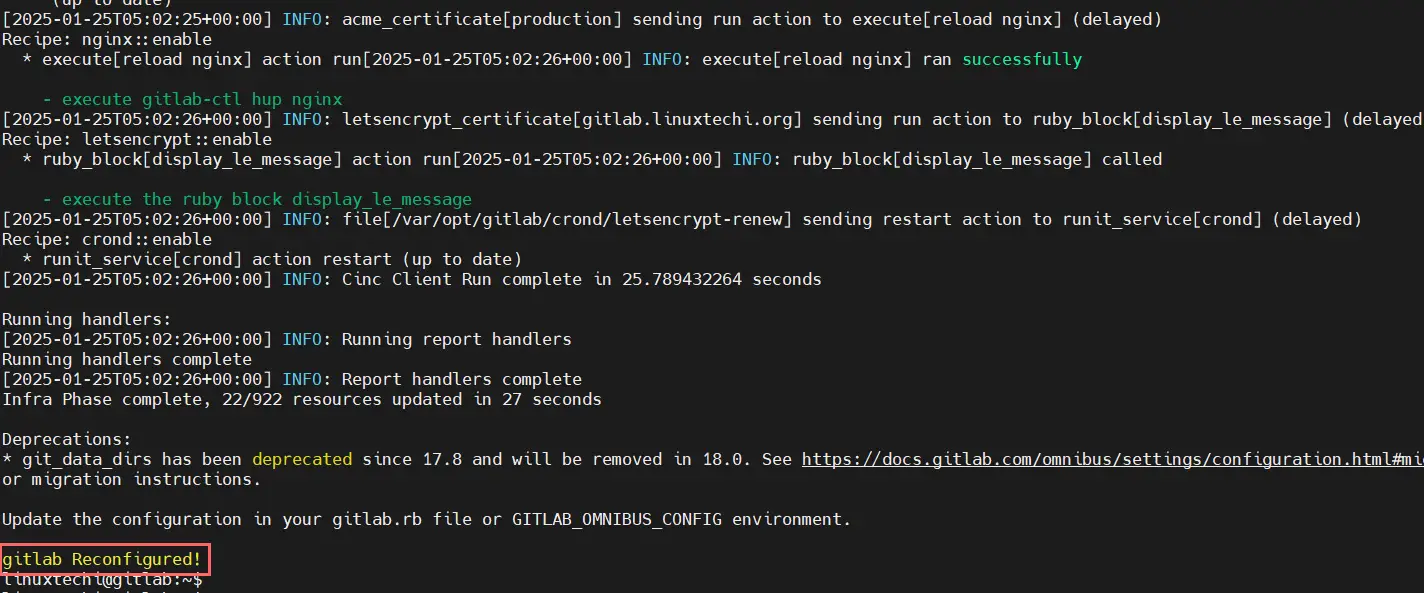
To make above changes into the effect, run the following command to reconfigure GitLab:
$ sudo gitlab-ctl reconfigure
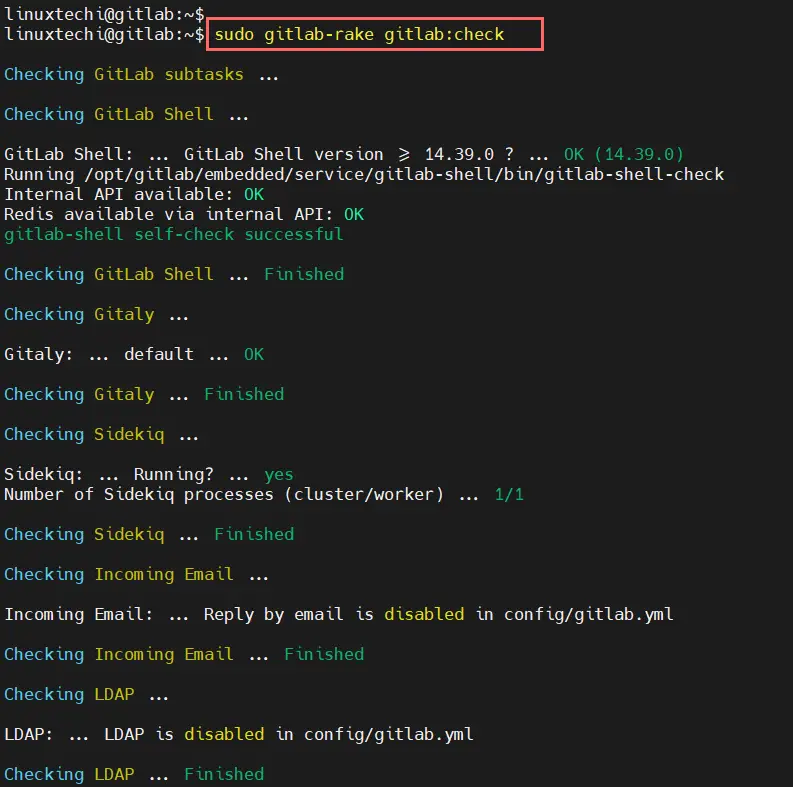
Confirm everything is configured correctly, run
$ sudo gitlab-rake gitlab:check
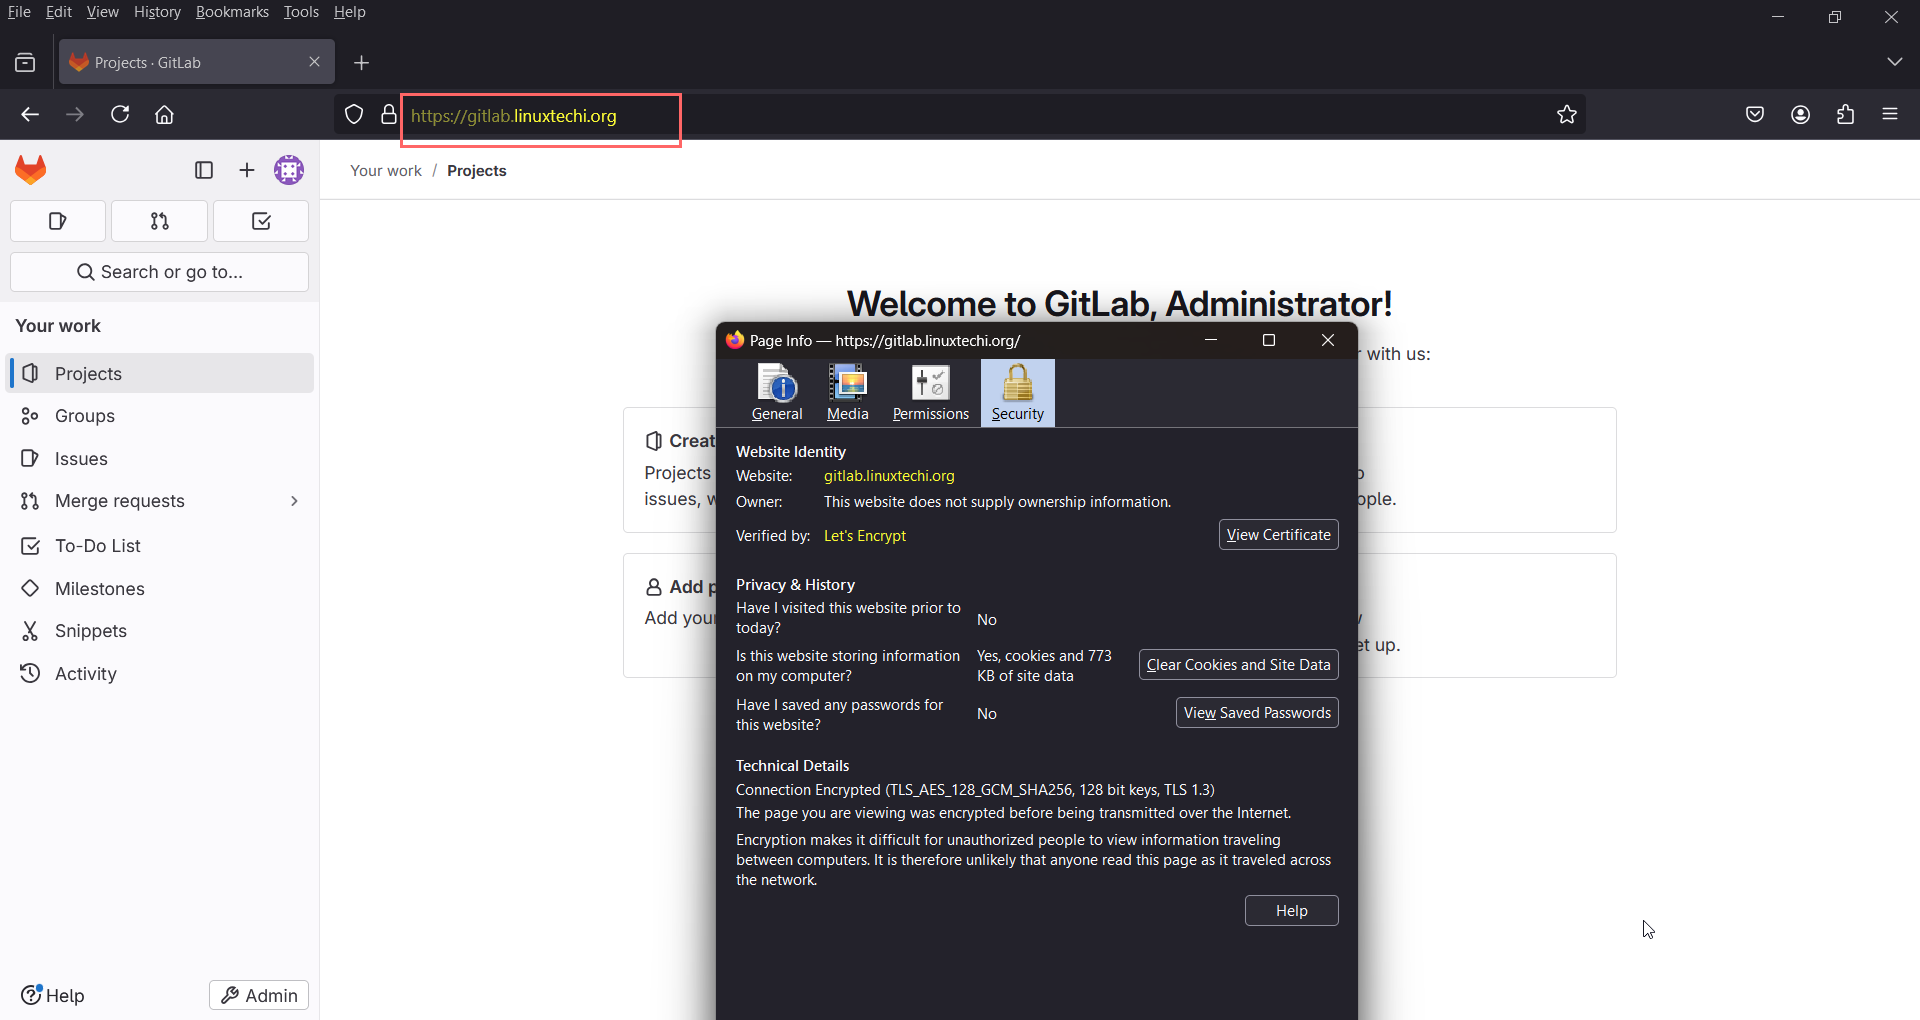
Now, reload the browser. You should notice that the URL of your gitlab instance is now secured with Let’s Encrypt SSL certificates.
Conclusion
Congratulations! You’ve successfully installed GitLab on your Ubuntu 24.04 system. With GitLab now up and running, you can create repositories, collaborate with your team, and optimize your development workflow using GitLab’s robust features. From version control to continuous integration, GitLab empowers you to streamline your DevOps processes.
For enhanced security, don’t forget to secure your GitLab instance with Let’s Encrypt SSL certificates, ensuring your data is protected with HTTPS encryption.
Feel free to share your queries and feedback in the comments section below!


After running steps 1 & 2 above then running step 3 I get the following error
sudo apt install gitlab-ce returns Unable to locate package gitlab-ce
Hi Gerald,
It seems like gitlab ce repository is not configured properly on your system that’s why you are getting the error.
To Fix this issue, please try to enable the repo using the step2 and then run “apt-get update” and after that try to install gitlab-ce packages.