Are you looking for an easy guide on how to install Kubernetes cluster on Ubuntu 22.04?
The step-by-step guide on this page will explain you how to install Kubernetes cluster on Ubuntu 22.04 using Kubeadm command step by step.
Kubernetes, often abbreviated as K8s, is an open-source container orchestration platform, designed to automate the deployment, scaling, and management of containerized applications. With Kubernetes, you can easily deploy, update, and scale applications without worrying about the underlying infrastructure.
A Kubernetes cluster consists of master node (control plane) and worker nodes. We generally run application workload on worker nodes and master nodes are used as control plane, as it manages the worker nodes and pods in the cluster.
Prerequisites
In this guide, we are using one master node and two worker nodes. Following are system requirements on each node,
- Minimal install Ubuntu 22.04
- Minimum 2GB RAM or more
- Minimum 2 CPU cores / or 2 vCPU
- 20 GB free disk space on /var or more
- Sudo user with admin rights
- Internet connectivity on each node
Lab Setup
- Master Node: 192.168.1.173 – k8smaster.example.net
- First Worker Node: 192.168.1.174 – k8sworker1.example.net
- Second Worker Node: 192.168.1.175 – k8sworker2.example.net
Without any delay, let’s jump into the installation steps of Kubernetes cluster
1) Set hostname on Each Node
Login to to master node and set hostname via hostnamectl command,
$ sudo hostnamectl set-hostname "k8smaster.example.net"
$ exec bash
On the worker nodes, run
$ sudo hostnamectl set-hostname "k8sworker1.example.net"   // 1st worker node
$ sudo hostnamectl set-hostname "k8sworker2.example.net"   // 2nd worker node
$ exec bash
Add the following lines in /etc/hosts file on each node
192.168.1.173   k8smaster.example.net k8smaster
192.168.1.174   k8sworker1.example.net k8sworker1
192.168.1.175   k8sworker2.example.net k8sworker2
2) Disable Swap & Add kernel Parameters
Execute beneath swapoff and sed command to disable swap. Make sure to run the following commands on all the nodes.
$ sudo swapoff -a
$ sudo sed -i '/ swap / s/^\(.*\)$/#\1/g' /etc/fstab
Load the following kernel modules on all the nodes,
$ sudo tee /etc/modules-load.d/containerd.conf <<EOF
overlay
br_netfilter
EOF
$ sudo modprobe overlay
$ sudo modprobe br_netfilter
Set the following Kernel parameters for Kubernetes, run beneath tee command
$ sudo tee /etc/sysctl.d/kubernetes.conf <<EOT
net.bridge.bridge-nf-call-ip6tables = 1
net.bridge.bridge-nf-call-iptables = 1
net.ipv4.ip_forward = 1
EOT
Reload the above changes, run
$ sudo sysctl --system
3) Install Containerd Runtime
In this guide, we are using containerd runtime for our Kubernetes cluster. So, to install containerd, first install its dependencies.
$ sudo apt install -y curl gnupg2 software-properties-common apt-transport-https ca-certificates
Enable docker repository
$ sudo curl -fsSL https://download.docker.com/linux/ubuntu/gpg | sudo gpg --dearmour -o /etc/apt/trusted.gpg.d/docker.gpg
$ sudo add-apt-repository "deb [arch=amd64] https://download.docker.com/linux/ubuntu $(lsb_release -cs) stable"
Now, run following apt command to install containerd
$ sudo apt update
$ sudo apt install -y containerd.io
Configure containerd so that it starts using systemd as cgroup.
$ containerd config default | sudo tee /etc/containerd/config.toml >/dev/null 2>&1
$ sudo sed -i 's/SystemdCgroup \= false/SystemdCgroup \= true/g' /etc/containerd/config.toml
Restart and enable containerd service
$ sudo systemctl restart containerd
$ sudo systemctl enable containerd
4) Add Apt Repository for Kubernetes
Kubernetes package is not available in the default Ubuntu 22.04 package repositories. So we need to add Kubernetes repository. run following command to download public signing key,
$ curl -fsSL https://pkgs.k8s.io/core:/stable:/v1.28/deb/Release.key | sudo gpg --dearmor -o /etc/apt/keyrings/kubernetes-apt-keyring.gpg
Next, run following echo command to add Kubernetes apt repository.
$ echo 'deb [signed-by=/etc/apt/keyrings/kubernetes-apt-keyring.gpg] https://pkgs.k8s.io/core:/stable:/v1.28/deb/ /' | sudo tee /etc/apt/sources.list.d/kubernetes.list
Note: At the time of writing this guide, Kubernetes v1.28 was available, replace this version with new higher version if available.
5) Install Kubectl, Kubeadm and Kubelet
Post adding the repositories, install Kubernetes components like kubectl, kubelet and Kubeadm utility on all the nodes. Execute following set of commands,
$ sudo apt update
$ sudo apt install -y kubelet kubeadm kubectl
$ sudo apt-mark hold kubelet kubeadm kubectl
6) Install Kubernetes Cluster on Ubuntu 22.04
Now, we are all set to initialize Kubernetes cluster. Run the following Kubeadm command on the master node only.
$ sudo kubeadm init --control-plane-endpoint=k8smaster.example.net
Output of above command,
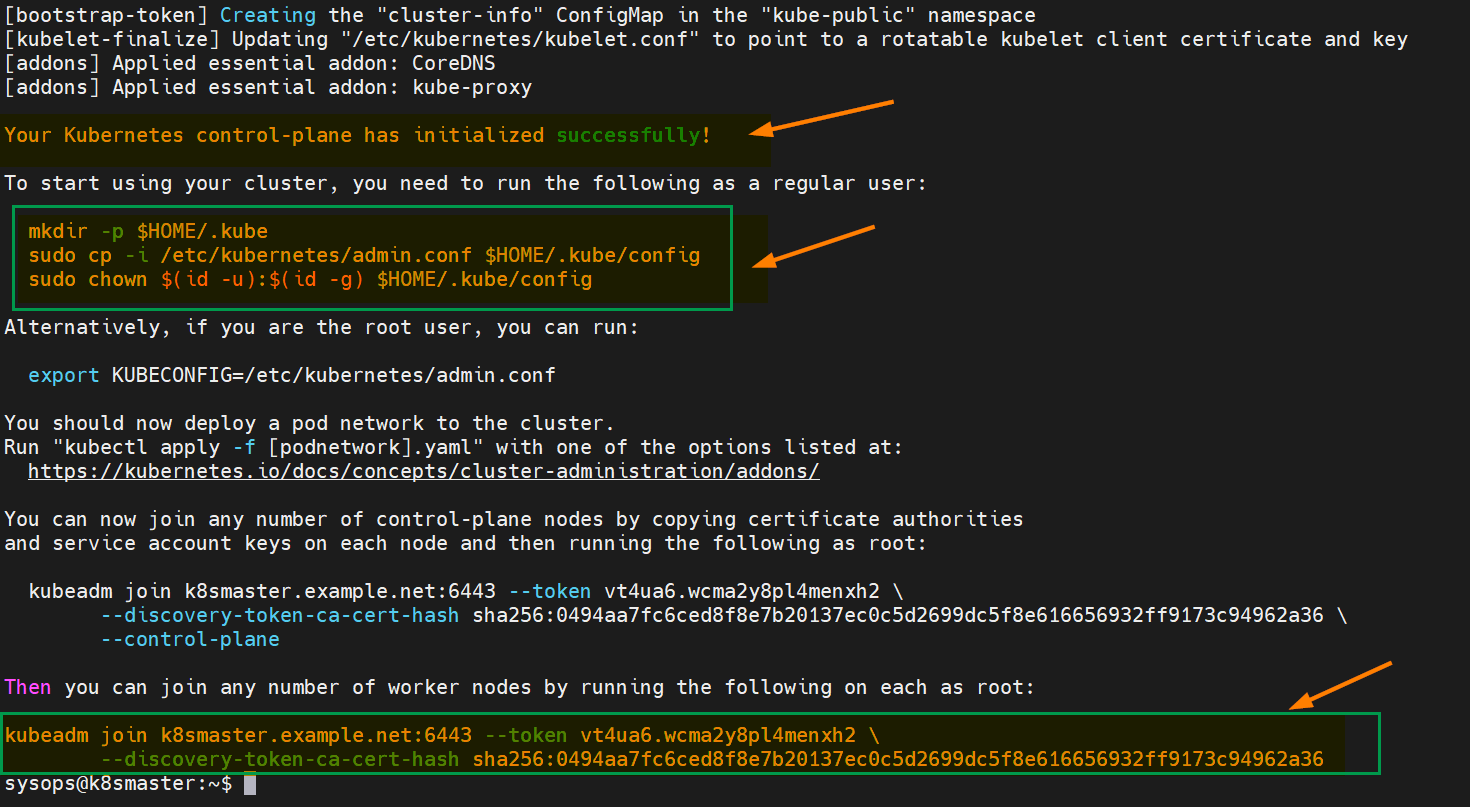
After the initialization is complete, you will see a message with instructions on how to join worker nodes to the cluster. Make a note of the kubeadm join command for future reference.
So, to start interacting with cluster, run following commands on the master node,
$ mkdir -p $HOME/.kube
$ sudo cp -i /etc/kubernetes/admin.conf $HOME/.kube/config
$ sudo chown $(id -u):$(id -g) $HOME/.kube/config
next, try to run following kubectl commands to view cluster and node status
$ kubectl cluster-info
$ kubectl get nodes
Output,

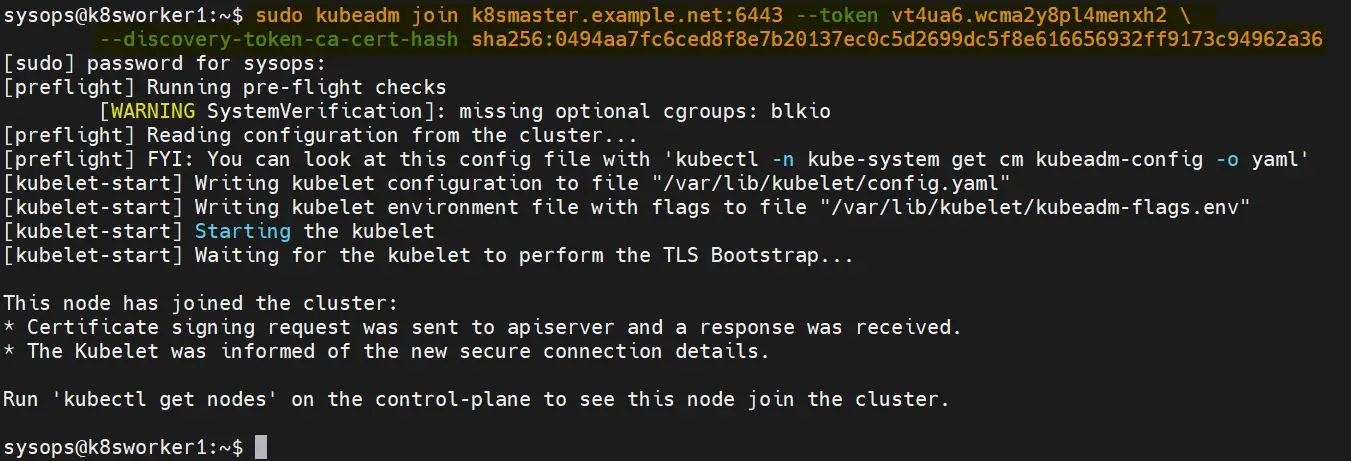
7) Join Worker Nodes to the Cluster
On each worker node, use the kubeadm join command you noted down earlier after initializing the master node on step 6. It should look something like this:
$ sudo kubeadm join k8smaster.example.net:6443 --token vt4ua6.wcma2y8pl4menxh2 \
   --discovery-token-ca-cert-hash sha256:0494aa7fc6ced8f8e7b20137ec0c5d2699dc5f8e616656932ff9173c94962a36
Output from both the worker nodes,
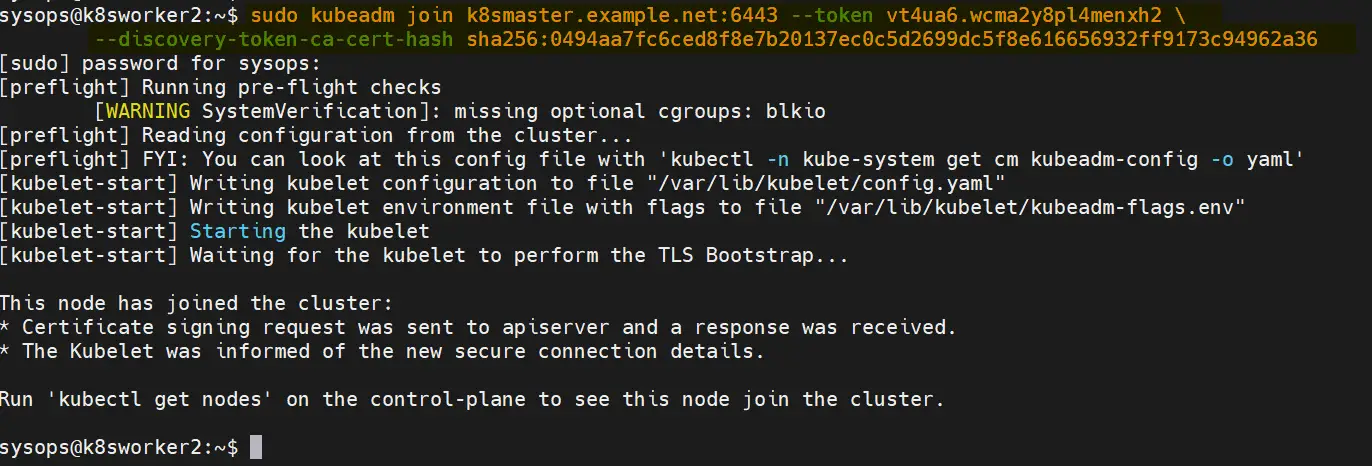
Above output from worker nodes confirms that both the nodes have joined the cluster.Check the nodes status from master node using kubectl command,
$ kubectl get nodes
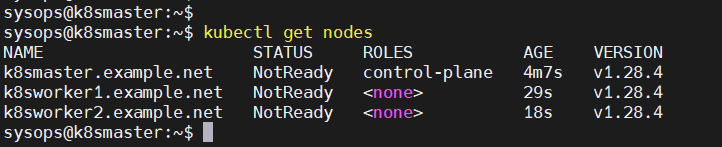
As we can see nodes status is ‘NotReady’, so to make it active. We must install CNI (Container Network Interface) or network add-on plugins like Calico, Flannel and Weave-net.
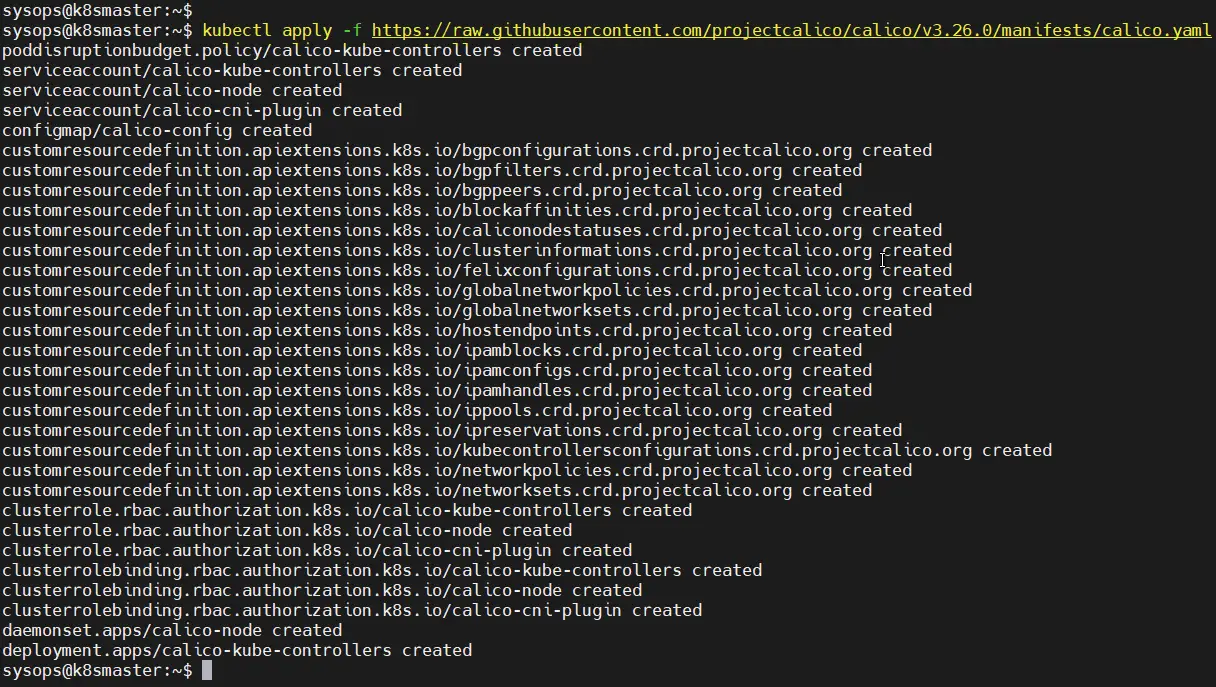
8) Install Calico Network Plugin
A network plugin is required to enable communication between pods in the cluster. Run following kubectl command to install Calico network plugin from the master node,
$ kubectl apply -f https://raw.githubusercontent.com/projectcalico/calico/v3.26.0/manifests/calico.yaml
Output of above commands would look like below,
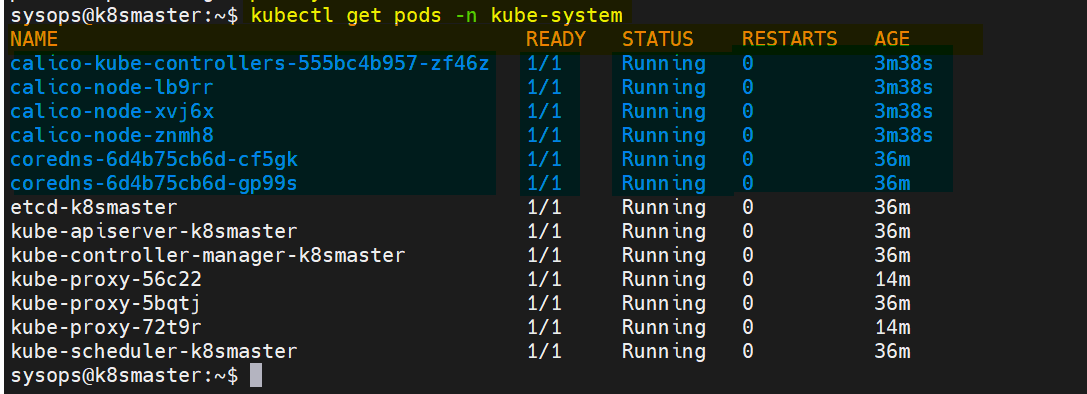
Verify the status of pods in kube-system namespace,
$ kubectl get pods -n kube-system
Output,
Perfect, check the nodes status as well.
$ kubectl get nodes
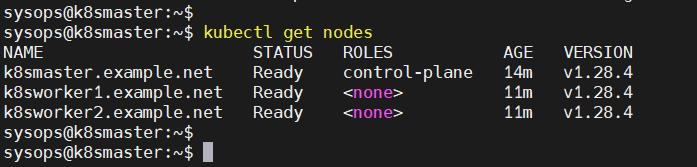
Great, above confirms that nodes are active node. Now, we can say that our Kubernetes cluster is functional.
9) Test Your Kubernetes Cluster Installation
To test Kubernetes installation, let’s try to deploy nginx based application and try to access it.
$ kubectl create deployment nginx-app --image=nginx --replicas=2
Check the status of nginx-app deployment
$ kubectl get deployment nginx-app
NAME        READY   UP-TO-DATE   AVAILABLE   AGE
nginx-app   2/2     2            2           68s
$
Expose the deployment as NodePort,
$ kubectl expose deployment nginx-app --type=NodePort --port=80
service/nginx-app exposed
$
Run following commands to view service status
$ kubectl get svc nginx-app
$ kubectl describe svc nginx-app
Output of above commands,

Use following curl command to access nginx based application,
$ curl http://<woker-node-ip-addres>:31246
$ curl http://192.168.1.174:31246
Output,
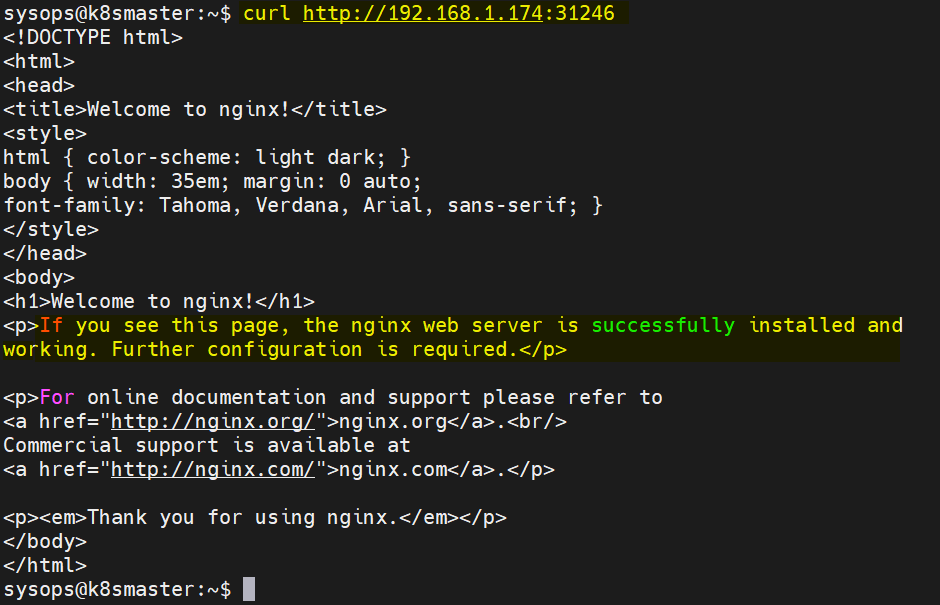
Great, above output confirms that nginx based application is accessible.
That’s all from this guide, I hope you have found it useful and informative. Feel free to post your queries and feedback in below comments section.
Also Read: How to Install Kubernetes Dashboard (Simple Guide)
Also Read: How to Install Kubernetes (K8s) Metrics Server Step by Step
Great tutorial…I was trying to do it from 10 days and now got it done in 2 hours…
Thank you so much
The doc which is really helpful and working
Kudos
sudo apt-mark hold kubelet kubeadm kubectl
kubelet set on hold.
kubeadm set on hold.
kubectl set on hold.
Any pointer.
$ sudo tee /etc/sysctl.d/kubernetes.conf <<EOF
net.bridge.bridge-nf-call-ip6tables = 1
net.bridge.bridge-nf-call-iptables = 1
net.ipv4.ip_forward = 1
EOF
change to
sudo tee -a /etc/sysctl.d/kubernetes.conf <<EOF
net.bridge.bridge-nf-call-ip6tables = 1
net.bridge.bridge-nf-call-iptables = 1
net.ipv4.ip_forward = 1
EOF
This is a great article and it brought me a lot closer to being able to install.
There’s few edit’s I might suggestץ
When installing on a VM with multiple NICs there might be all sort of problems.
So what eventually I had to do is:
1. Adding the additional params in the kubeadm init like so:
sudo kubeadm init –control-plane-endpoint=k8s-master –apiserver-advertise-
address= –cri-socket=/var/run/containerd/containerd.sock –pod-network-
cidr=192.168.0.0/16
2. Adding the following in the calico yaml:
“ipam”: {
“type”: “calico-ipam”,
“assign_ipv4”: “true”,
“assign_ipv6”: “false”,
“iface”: “”
}
Without these two edits the commands would be confused regarding the ip and interface to use.
Hello.
have followed the guide until sudo apt install -y containerd.io.
When I run this command, I get the following error message:
E: Unable to locate package containerd.io
E: Couldn’t find any package by glob ‘containerd.io’
What am I doing wrong?
Great write up — thanks for updating.
Wow, Wow, This guide is best of the best. Thank you Thank you.. i wana learn more