Postfix is a free and opensource MTA (Mail Transfer Agent) used for routing or delivering emails on a Linux system. In this guide, you will learn how to install and configure Postfix on CentOS 8.
Lab set up:
- OS : CentOS 8 server
- IP Address : 192.168.1.13
- Hostname: server1.crazytechgeek.info (Ensure the domain name is pointed to the server’s IP)
Step 1) Update the system
The first step is to ensure that the system packages are up to date. To do so, update the system as follows:
# dnf update
Before proceeding further, also ensure that no other MTAs such as Sendmail are existing as this will cause conflict with Postfix configuration. To remove Sendmail, for example, run the command:
# dnf remove sendmail
Step 2) Set Hostname and update /etc/hosts file
Use below hostnamectl command to set the hostname on your system,
# hostnamectl set-hostname server1.crazytechgeek.info
# exec bash
Additionally, you need to add the system’s hostname and IP entries in the /etc/hosts file
# vim /etc/hosts
192.168.1.13   server1.crazytechgeek.info
Save and exit the file.
Read Also : How to Setup DNS Server (Bind) on CentOS 8 / RHEL8
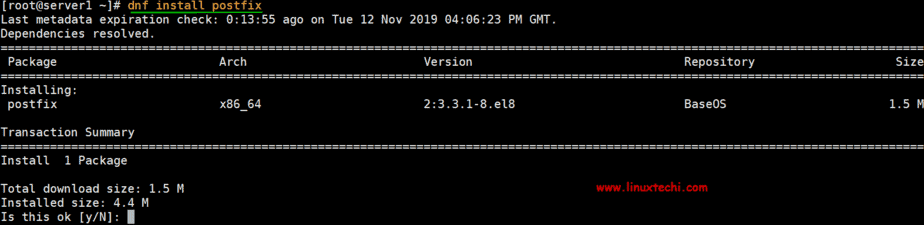
Step 3) Install Postfix Mail Server
After verifying that no other MTA is running on the system install Postfix by executing the command:
# dnf install postfix
Step 4) Start and enable Postfix Service
Upon successful installation of Postfix, start and enable Postfix service by running:
# systemctl start postfix
# systemctl enable postfix
To check Postfix status, run the following systemctl command
# systemctl status postfix
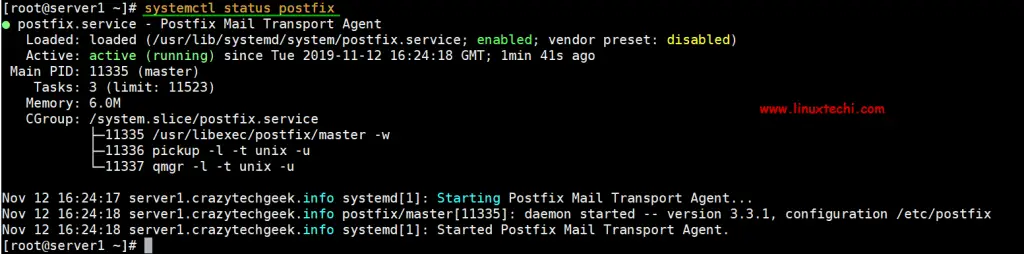
Great, we have verified that Postfix is up and running. Next, we are going to configure Postfix to send emails locally to our server.
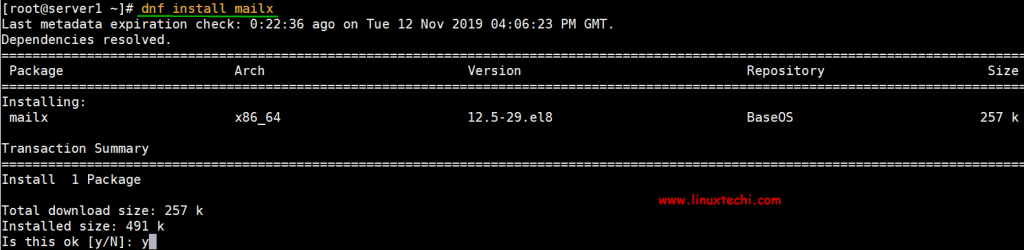
Step 5) Install mailx email client
Before configuring the Postfix server, we need to install mailx feature, To install mailx, run the command:
# dnf install mailx
Step 6) Configure Postfix Mail Server
Postfix’s configuration file is located in /etc/postfix/main.cf. We need to make a few changes in the configuration file, so open it using your favorite text editor.
# vi /etc/postfix/main.cf
Make changes to the following lines:
myhostname = server1.crazytechgeek.info
mydomain = crazytechgeek.info
myorigin = $mydomain
## Uncomment and Set inet_interfaces to all ##
inet_interfaces = all
## Change to all ##
inet_protocols = all
## Comment ##
#mydestination = $myhostname, localhost.$mydomain, localhost
##- Uncomment ##
mydestination = $myhostname, localhost.$mydomain, localhost, $mydomain
## Uncomment and add IP range ##
mynetworks = 192.168.1.0/24, 127.0.0.0/8
## Uncomment ##
home_mailbox = Maildir/
Once done, save and exit the configuration file. Restart postfix service for the changes to take effect
# systemctl restart postfix
Step 7) Testing Postfix Mail Server
Test whether our configuration is working, first, create a test user
# useradd postfixuser
# passwd postfixuser
Next, run the command below to send email from pkumar local user to another user ‘postfixuser‘
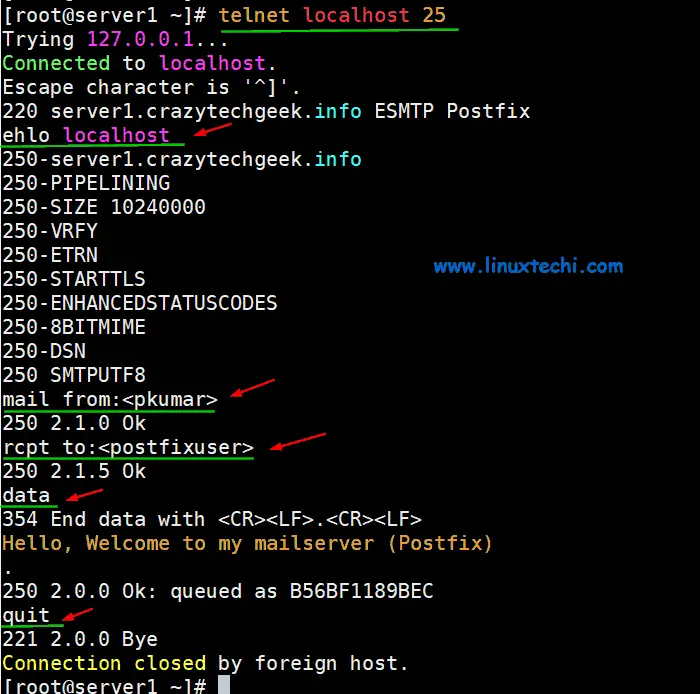
# telnet localhost smtp
or
# telnet localhost 25
If telnet service is not installed, you can install it using the command:
# dnf install telnet -y
When you run the command as earlier indicated, you should get the output as shown
[root@server1 ~]# telnet localhost 25
Trying 127.0.0.1...
Connected to localhost.
Escape character is '^]'.
220 server1.crazytechgeek.info ESMTP Postfix
Above confirm that connectivity to postfix mail server is working fine. Next, type the command:
# ehlo localhost
Output will be something like this
250-server1.crazytechgeek.info
250-PIPELINING
250-SIZE 10240000
250-VRFY
250-ETRN
250-STARTTLS
250-ENHANCEDSTATUSCODES
250-8BITMIME
250-DSN
250 SMTPUTF8
Next, run the commands highlighted in orange, like “mail from”, “rcpt to”, data and then finally type quit,
mail from:<pkumar>
250 2.1.0 Ok
rcpt to:<postfixuser>
250 2.1.5 Ok
data
354 End data with <CR><LF>.<CR><LF>
Hello, Welcome to my mailserver (Postfix)
.
250 2.0.0 Ok: queued as B56BF1189BEC
quit
221 2.0.0 Bye
Connection closed by foreign host
Complete telnet command to send email from local user “pkumar” to another local user “postfixuser” would be something like below
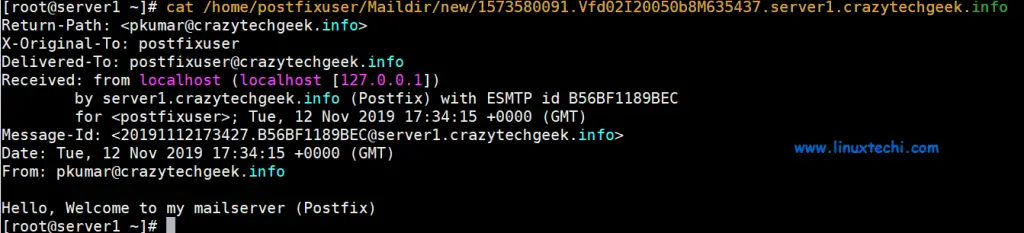
If everything went according to plan, you should be able to view the email sent at the new user’s home directory.
# ls /home/postfixuser/Maildir/new
1573580091.Vfd02I20050b8M635437.server1.crazytechgeek.info
#
To read the email, simply use the cat command as follows:
# cat /home/postfixuser/Maildir/new/1573580091.Vfd02I20050b8M635437.server1.crazytechgeek.info
Postfix mail server logs
Postfix mail server mail logs are stored in the file “/var/log/maillog“, use below command to view the live logs,
# tail -f /var/log/maillog

Securing Postfix Mail Server
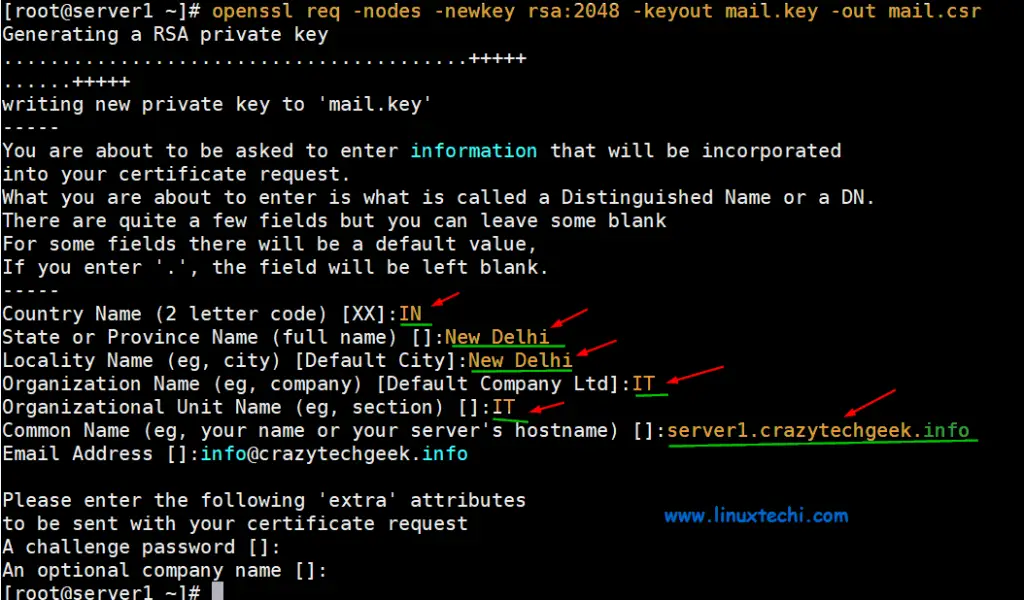
It is always recommended secure the communication of between clients and postfix server, this can be achieved using SSL certificates, these certificates can be either from trusted authority or Self Signed Certificates. In this tutorial we will generate Self Signed certificated for postfix using openssl command,
I am assuming openssl is already installed on your system, in case it is not installed then use following dnf command,
# dnf install openssl -y
Generate Private key and CSR (Certificate Signing Request) using beneath openssl command,
# openssl req -nodes -newkey rsa:2048 -keyout mail.key -out mail.csr
Now Generate Self signed certificate using following openssl command,
# openssl x509 -req -days 365 -in mail.csr -signkey mail.key -out mail.crt
Signature ok
subject=C = IN, ST = New Delhi, L = New Delhi, O = IT, OU = IT, CN = server1.crazytechgeek.info, emailAddress = [email protected]
Getting Private key
#
Now copy private key and certificate file to /etc/postfix directory
# cp mail.key mail.crt /etc/postfix
Update Private key and Certificate file’s path in postfix configuration file,
# vi /etc/postfix/main.cf
………
smtpd_use_tls = yes
smtpd_tls_cert_file = /etc/postfix/mail.crt
smtpd_tls_key_file = /etc/postfix/mail.key
smtpd_tls_security_level = may
………
Restart postfix service to make above changes into the effect.
# systemctl restart postfix
Let’s try to send email to internal local domain and external domain using mailx client.
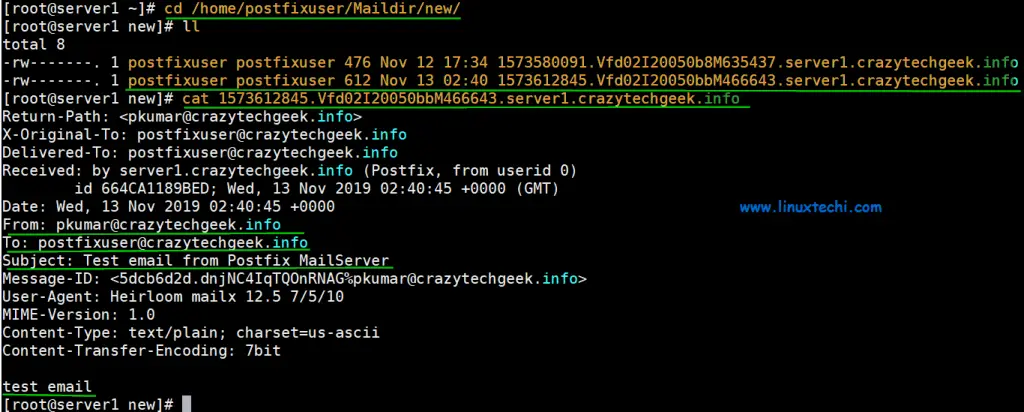
Sending local internal email from pkumar user to postfixuser
# echo "test email" | mailx -s "Test email from Postfix MailServer" -r [email protected] [email protected]
Check and read the email using the following,
# cd /home/postfixuser/Maildir/new/
# ll
total 8
-rw-------. 1 postfixuser postfixuser 476 Nov 12 17:34 1573580091.Vfd02I20050b8M635437.server1.crazytechgeek.info
-rw-------. 1 postfixuser postfixuser 612 Nov 13 02:40 1573612845.Vfd02I20050bbM466643.server1.crazytechgeek.info
# cat 1573612845.Vfd02I20050bbM466643.server1.crazytechgeek.info
Sending email from postfixuser to external domain ( [email protected])
# echo "External Test email" | mailx -s "Postfix MailServer" -r [email protected] [email protected]
Note: If Your IP is not blacklisted anywhere then your email to external domain will be delivered otherwise it will be bounced saying that IP is blacklisted in so and so spamhaus database.
Check Postfix mail queue
Use mailq command to list mails which are in queue.
# mailq
Mail queue is empty
#
And that’s it! Our Postfix configuration is working! That’s all for now. We hope you found this tutorial insightful and that you can comfortably set up your local Postfix server.
Read Also: How to Install and Configure Samba on CentOS 8
Read Also : How to Install Zimbra Mail Server on CentOS 8 / RHEL 8
Hello, the local mail sending/receiving works all right for me, but when I try to send a message to my gmail account it bounces back, without saying much (like it would in the case you pointed out of blocked IPs).
If could please check out the log file and maybe point out what could be wrong from it I would greatly appreciate it!
Here is the log output:
‘https://pastebin.com/kshmHbVc’
Note: I’ve changed some usernames/domain names for privacy reasons
By looking at the logs, it seems like issue with hostname of your mailserver. Did u update the hostname in /etc/hosts file and /etc/postfix/main.cf.
Thanks for your instruction.
I have received email in my Gmail, however, when I tried to reply, nothing came to my inbox. Can you give me some advice?
You need to add MX record for your domain in DNS server to start receiving the emails from outside like Gmail, Yahoo etc
Could we connect to mail server with outlook after adding MX record?
Anything we need to do in server?
Yes, You can configure your email id in outlook after adding MX record. MX record will route the emails from outside world to your mail server (postfix). For Sending emails locally & to outside world doesn’t need MX record.
Hi,
Thank you for this tutorial.
I am able to send email to my own domain’s email addresses but unable to send email to any other domain.
Can you please help me on this?
Thanks,
Anindya
By default, Postfix uses port 25 for SMTP. For the sake of avoiding abuse for bad mail, most VPS service providers block this port. You can try the
command telnet gmail-smtp-in.l.google.com 25, if you get a response likeTrying 74.125.68.26...
Connected to gmail-smtp-in.l.google.com.
Escape character is '^]'.
220 mx.google.com ESMTP m6si752389plx.46 - gsmtp
then you can use port 25 to send mail to external servers. Otherwise, you need to contact your service provider to ask them to open port 25. or configure Postfix to use a different port.