This guide walks you through the process of setting up a DNS bind server on RHEL 9 or 8. RHEL stands for Red Hat Enterprise Linux.
BIND (Berkeley Internet Name Domain), developed in the 1980s by students at Berkeley University, is an open-source DNS server widely used on Linux systems. DNS servers are essential for resolving fully qualified domain names (FQDNs) into IP addresses and vice versa.
This name resolution is crucial because it converts user-friendly domain names into numerical IP addresses that computers use to locate services. Without DNS, remembering each IP address for different domains would be challenging, making DNS a vital component of internet communication.
Lab setup:
- Server : RHEL 9 or 8 (minimal server)
- IP address : 192.168.43.35
- Hots Name : dns-primary.linuxtechi.local
- Domain : linuxtechi.local
Let’s now hit the ground running with the configuration of the DNS bind server.
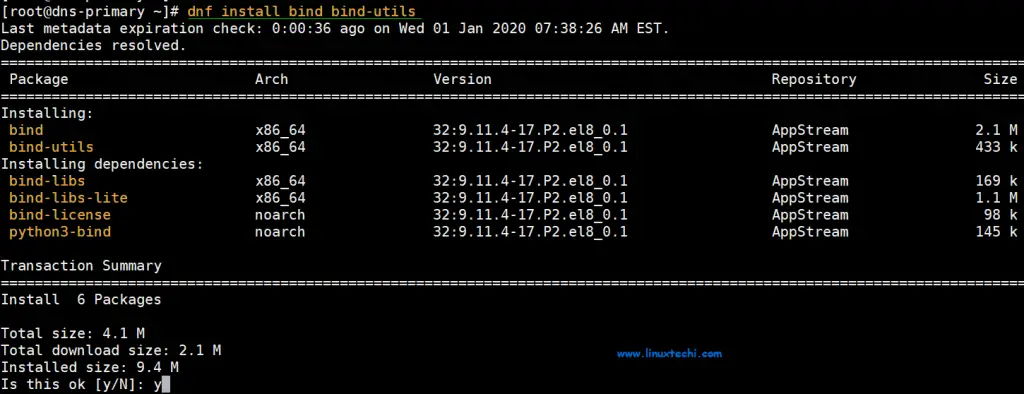
1) Install bind DNS on RHE 9 or 8
We begin with the installation of the bind and bind-utils package. These packages constitutes dns server and its utilities responsible for querying name servers or DNS servers.
Execute the command:
# dnf install bind bind-utils
Once successfully installed, start the DNS server using the command below:
# systemctl start named
Next, enable it so that it can kick in even after a reboot
# systemctl enable named
Just to be sure that the service is running as expected, check its status
# systemctl status named
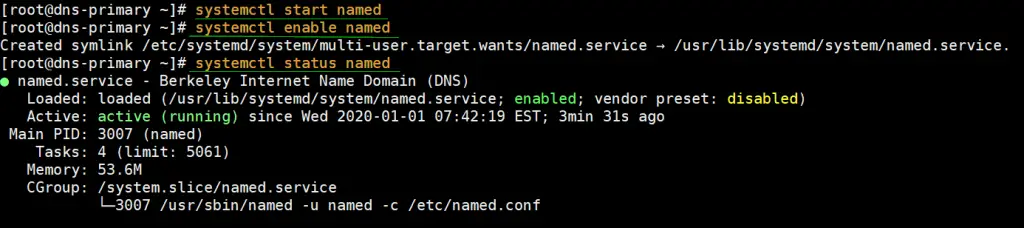
Great, the DNS server is running just perfectly. Now let’s jump into configuring the Bind DNS server
2) Configure bind DNS server
Usually, best practice recommends making a backup of a configuration file before making any changes. This is so that should anything go wrong, we can always revert to the original unedited file. And it’s no different here.
Let’s take a backup of the config file /etc/named.conf
# cp /etc/named.conf /etc/named.bak
Now go ahead and open the file using your preferred text editor. In this case, we’re using vim editor.
# vim /etc/named.conf
Under the ‘Options’ section, ensure you comment out the lines indicated below to enable the Bind DNS server to listen to all IPs.
// listen-on port 53 { 127.0.0.1; };
// listen-on-v6 port 53 { ::1; };
Additionally, locate the allow-query parameter and adjust it according to your network subnet.
allow-query { localhost; 192.168.43.0/24; };
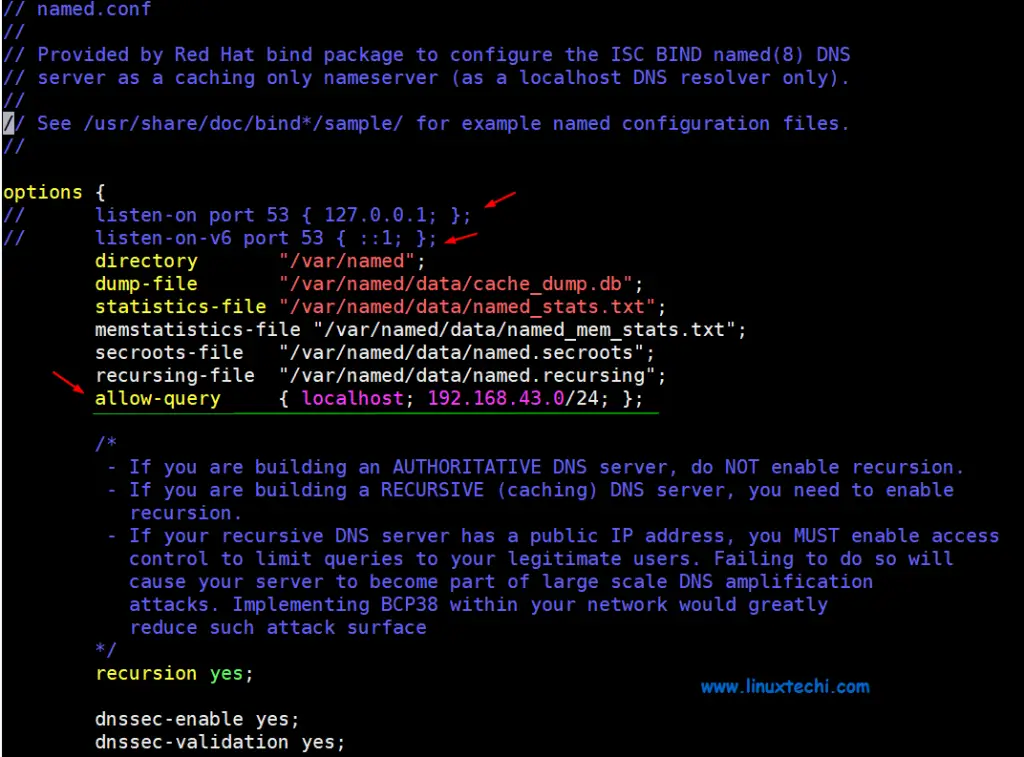
This setting allows only the hosts in the defined network to access the DNS server and not just any other host.
A forward lookup DNS zone is one that stores the host name ip address relationship. When queried, it gives the IP address of the host system using the host name. In contrast, the reverse DNS zone returns the Fully Qualified Domain Name (FQDN) of the server in relation to it’s IP address.
To define the reverse and forward lookup zones, copy and paste the following configuration at the end of /etc/named.conf
//forward zone
zone "linuxtechi.local" IN {
     type master;
     file "linuxtechi.local.db";
     allow-update { none; };
     allow-query { any; };
};

//backward zone
zone "43.168.192.in-addr.arpa" IN {
     type master;
     file "linuxtechi.local.rev";
     allow-update { none; };
     allow-query { any; };
};
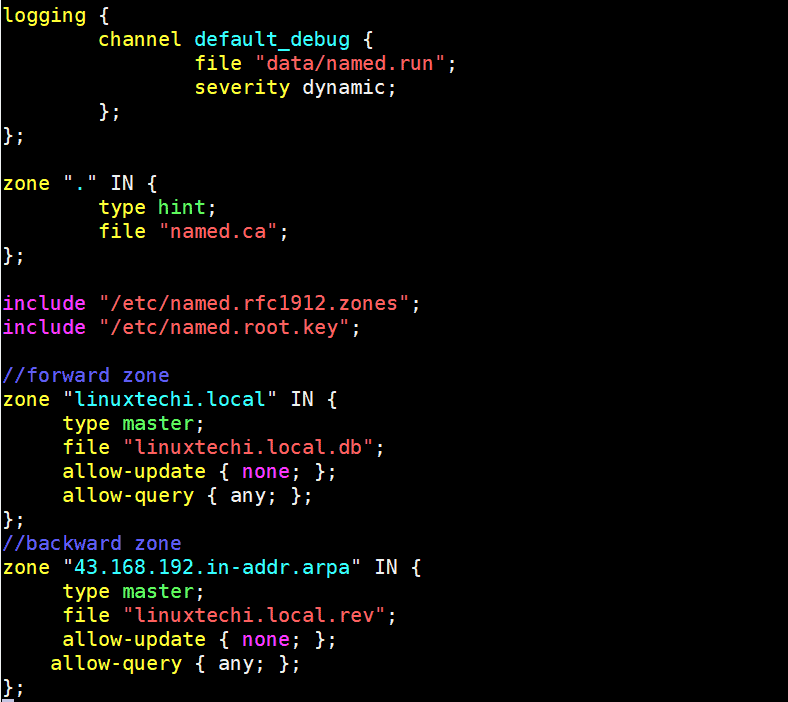
- type: Stipulates the role of the server for a particular zone. the attribute ‘master’ implies that this is an authoritative server.
- file: Points to the forward / reverse zone file of the domain.
- allow-update: This attribute defined the host systems which are permitted to forward Dynamic DNS updates. In this case, we don’t have any.
After saving, exit the /etc/named.conf configuration file.
3) Create a forward DNS zone file for the domain
Create a forward DNS zone file for domain linuxtechi.local as shown below and add the following content
[root@dns-primary ~]# vim /var/named/linuxtechi.local.db
$TTL 86400
@ IN SOA dns-primary.linuxtechi.local. admin.linuxtechi.local. (
                                                2020011800 ;Serial
                                                3600 ;Refresh
                                                1800 ;Retry
                                                604800 ;Expire
                                                86400 ;Minimum TTL
)

;Name Server Information
@ IN NS dns-primary.linuxtechi.local.

;IP Address for Name Server
dns-primary IN A 192.168.43.35

;Mail Server MX (Mail exchanger) Record
linuxtechi.local. IN MX 10 mail.linuxtechi.local.

;A Record for the following Host name
www  IN   A   192.168.43.50
mail IN   A   192.168.43.60

;CNAME Record
ftp  IN   CNAME www.linuxtechi.local.
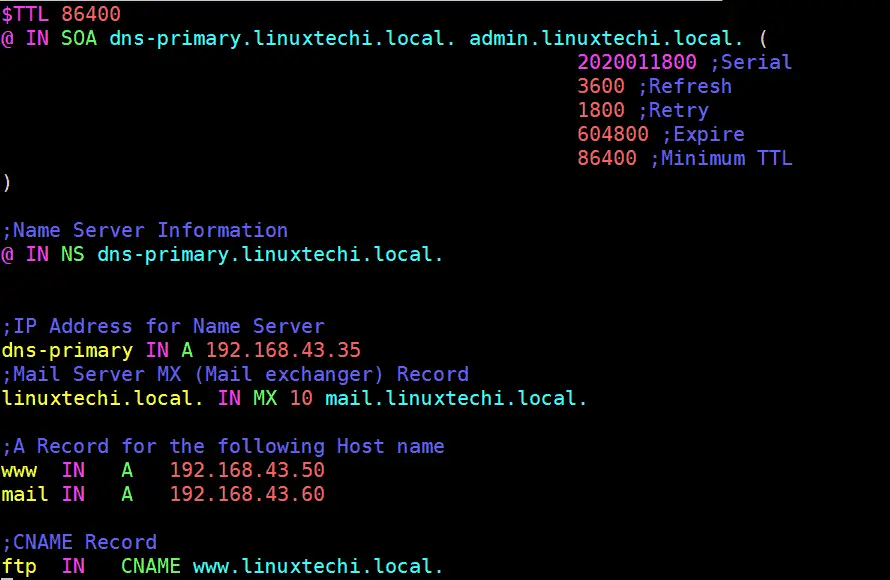
Let’s define some of the parameters indicated in the configuration file:
- TTL: This is short for Time-To-Live. TTL is the duration of time (or hops) that a packet exists in a network before finally being discarded by the router.
- IN: This implies the Internet.
- SOA: This is short for the Start of Authority. Basically, it defines the authoritative name server, in this case, dns-primary.linuxtechi.local and contact information – admin.linuxtechi.local
- NS: This is short for Name Server.
- A: This is an A record. It points to a domain/subdomain name to the IP Address
- Serial: This is the attribute used by the DNS server to ensure that contents of a specific zone file are updated.
- Refresh: Defines the number of times that a slave DNS server should transfer a zone from the master.
- Retry: Defines the number of times that a slave should retry a non-responsive zone transfer.
- Expire: Specifies the duration a slave server should wait before responding to a client query when the Master is unavailable.
- Minimum: This is responsible for setting the minimum TTL for a zone.
- MX: This is the Mail exchanger record. It specifies the mail server receiving and sending emails
- CNAME: This is the Canonical Name. It maps an alias domain name to another domain name.
- PTR: Short for Pointer, this attributes resolves an IP address to a domain name, opposite to a domain name.
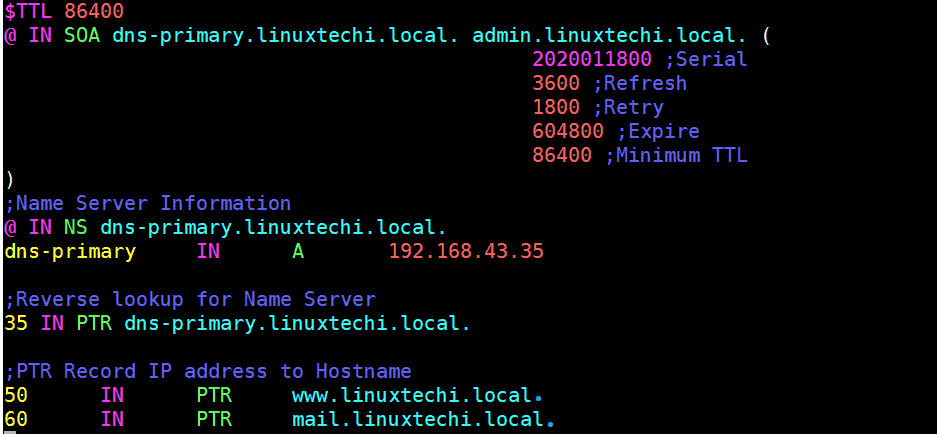
4) Create a reverse DNS zone file for the domain
Similarly, we need to create a file for reverse DNS lookups. Paste the following content in the file:
[root@dns-primary ~]# vim /var/named/linuxtechi.local.rev
$TTL 86400
@ IN SOA dns-primary.linuxtechi.local. admin.linuxtechi.local. (
                                            2020011800 ;Serial
                                            3600 ;Refresh
                                            1800 ;Retry
                                            604800 ;Expire
                                            86400 ;Minimum TTL
)
;Name Server Information
@ IN NS dns-primary.linuxtechi.local.
dns-primary     IN      A       192.168.43.35

;Reverse lookup for Name Server
35 IN PTR dns-primary.linuxtechi.local.

;PTR Record IP address to Hostname
50      IN      PTR     www.linuxtechi.local.
60      IN      PTR     mail.linuxtechi.local.
Next, assign the necessary file permissions to the two configuration files.
# chown named:named /var/named/linuxtechi.local.db
# chown named:named /var/named/linuxtechi.local.rev
To confirm that the DNS zone lookup files are free from any syntactical errors, run the commands shown:
# named-checkconf
# named-checkzone linuxtechi.local /var/named/linuxtechi.local.db
# named-checkzone 192.168.43.35 /var/named/linuxtechi.local.rev
If there are no errors, you should get the output shown:

For the changes to be reflected in the system, restart the Bind DNS server
# systemctl restart named
For client systems to access the system we need to add the DNS service on the firewall and thereafter reload the firewall.
# firewall-cmd  --add-service=dns --zone=public  --permanent
# firewall-cmd --reload

5) Test the Bind DNS server from a client system
Having finalized the configuration on the DNS server, let’s head out to a client machine and perform a few tests.
On a client machine ( CentOS 8 / RHEL 8), open the /etc/resolv.conf file and edit the following parameter:
nameserver 192.168.43.35
As always, save & close the configuration file.
Lastly, you need to append the Bind DNS server’s IP address to the /etc/sysconfig/network-scripts/ifcfg-enp0s3 file as shown.
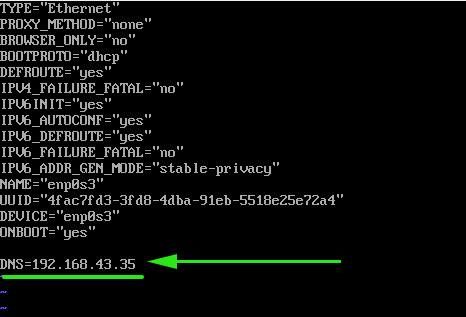
Save and close the config file and then restart the network manager service to make above change into the effect,
# systemctl restart NetworkManager
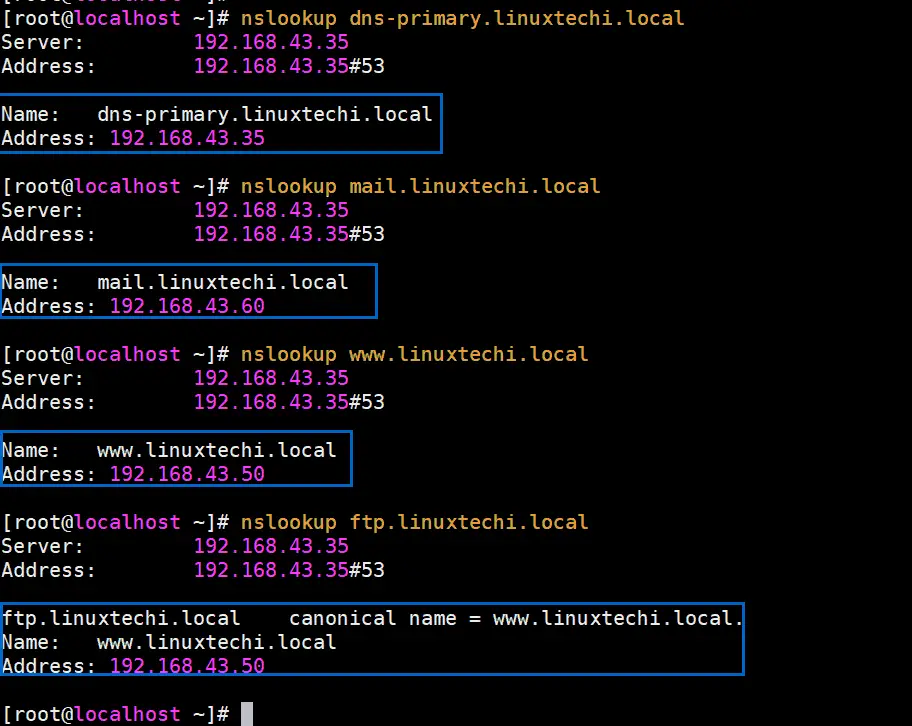
Using the nslookup command test the Bind DNS server as shown:
# nslookup dns-primary.linuxtechi.local
# nslookup mail.linuxtechi.local
# nslookup www.linuxtechi.local
# nslookup ftp.linuxtechi.local
# nslookup 192.168.43.35

The output from the nslookup command confirms that the forward DNS lookup is working as expected.
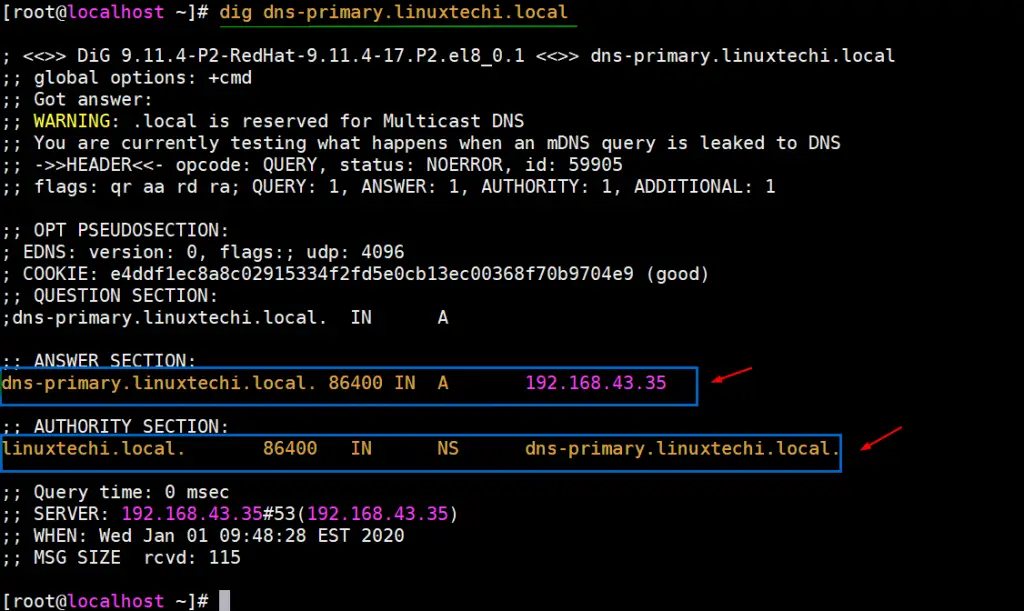
Moreover, you can also use the dig command as shown
# dig dns-primary.linuxtechi.local
To perform a reverse DNS lookup, use the dig command as shown:
# dig -x 192.168.43.35

Perfect! The reverse DNS lookup is also working as we would expect.
And that wraps up this tutorial. In this guide, we walked you through the installation of a DNS server using Bind on RHEL 9 or 8. Give it a try and do not hesitate to send your feedback.
Also Read : How to Setup NFS Server on CentOS 8 / RHEL 8
good tutorial. worked for me