Chmod command in Linux is used to change or assign permissions on files and directories. In Linux / Unix systems, accessibility to files and directories is determined by file ownership and permissions. In a previous article, we looked at how to manage file & directory ownership using the chown command. In this tutorial, we look at the chmod command.
The chmod command, short for change mode is used to manage file and directory permissions and determines who can access them. Let’s now dive in and explore the nature of file & directory permissions and how they can be modified.
Linux permissions
To better understand how the chmod command works, it’s prudent that we study the Linux file permissions model.
In Linux, we have 3 types of file permissions: read (r), write (w) and execute (x) permissions. These permissions determine which users can read, write or execute the files. You can assign these permissions using the text or octal (numeric) notation as we shall later discuss in this tutorial.
Files and directories can belong to either the owner of the file (u), group (g) or others (o)
- u – Owner of the file
- g – Group
- o – Others
File permissions are listed using the ls -l command. The -l flag lists the file permissions. The permissions are arranged in three sets: the user, group and others respectively
To get a better understanding of file permissions, we are going to list the contents of our directory as shown:
$ ls -l

Starting from the extreme left, the first character/symbol indicates the file type. A hyphen (-) indicates that the file is a regular file. The symbol d indicates that it is a directory. Symbol l indicates that it’s a symbolic link.
The remaining nine characters are segmented into 3 triplets each bearing three symbols r(read), w(write) and x(execute). As pointed out earlier, the first segment points to the owner permissions, the second indicates the group permissions and the last portion specifies the permissions that other users have on the file or directory.
From the output, we can see that we have 2 files (hello.txt & reports.zip) and a single directory.
Let’s examine the first file
-rw-rw-r-- 1 linuxtechi linuxtechi 35 Aug 17 15:42 hello.txt
For the first file, the -rw-rw-r– permissions imply that the owner of the file has read and write permissions, the group also bears read & write permissions, while other users only have read permissions. The same permissions also apply for the reports.zip compressed file.
Let’s look at the directory’s permissions:
drwxrwxr-x 2 linuxtechi linuxtechi 4096 Aug 17 15:43 sales
We can see that the owner of the directory and group has all the permissions (read, write and execute) while other users have read and execute permissions only.
The triple hyphen symbols — indicate no permissions have been granted for either the owner of the file, group or other users.
Using chmod command to set file & directory permissions
Having looked at the file permissions and how to view them, let’s no focus on how to modify these permissions.
The chmod command in Linux is used to change file and directory permissions using either text (symbolic) or numeric (octal) notation. It takes the following syntax:
$ chmod [OPTIONS] MODE filename
Only the root user or a regular user with sudo privileges can change file or directory permissions. You can pass more than one file or directory separated by spaces in the command syntax.
Let’s now delve and see different examples of chmod command.
Example 1) Assign permissions using numeric notation
When setting permissions using the numeric style/notation, use the syntax shown below:
$ sudo chmod [OPTIONS] numeric_value filename
The numeric value can take 3 or 4 numbers. However, in most cases, 3 numbers are used. The read, write and execute permissions take the following values:
- read permission => 4
- write permission => 2
- execute permission => 1
The total sum of the values of the permissions i.e. read, write and execute in each of the three segments account for the complete permissions of a given file or directory.
What do we mean by this ?
Let’s assume the owner has read, write and execute permissions, the group has read and execute permissions and other users have read permissions only, this can be broken down as follows:
- u : rwx = 7
- g : r-x = 5
- o : r– = 4
Therefore, we arrive at the value of 754 as the numeric value for the file permissions of the given file.
To assign read, write and execute permissions to the owner, and read permissions only to the group and other users, run the command:
$ chmod 744 devops.txt
To assign all permissions to the owner of the file, read and execute permissions to the group and no permissions at all to other users, execute:
$ chmod 750 coders.txt
To assign all permissions to the owner of the file, read and write permissions to the group and other users run the command:
$ chmod 755 sysadmin.txt
Example 2) Recursively assigning permissions to directories
When assigning permissions to directories, use the -R flag to recursively assign permissions to its files and subfolders. For example:
$ chmod 755 -R directory_name
$ chmod 755 -R /home/linuxtechi/data
Example 3) Assign permissions using text notation
Another way of assigning permissions is by using the text notation. In this method, the chmod command takes flags or symbols which represent the owner, group, others or all users ( u, g , and o) in the syntax.
The method is not as straightforward as the previous method and caution should be taken to avoid assigned the wrong permissions.
Here’s what the syntax looks like
$ chmod [OPTIONS] [ u g o a ] [ – + = ] [ r, w, x ] file
Let’s break this down.
The first group of parameters [ u g o a] specify the category of users whose permissions will changes
- u : user
- g : group
- o : other
- a : all ( This includes all the above )
If this set is omitted, then the default option is the a option.
The second set of options – operator options [ – + = ] – determines whether permissions are going to be added or removed from the category of users. The option remove
- – : The flag removes the file permissions from a specified user.
- + : This adds/appends permissions to a specified user.
- = : This assigns specified users distinct permissions and removes the previous permissions of the user segment.
Let’s have a look at a few examples:
Example 4) Assign read permissions to a file
$ chmod o=r filename
The above command assigns other users denoted by the symbol ‘o’ read permissions only to the file and removes earlier permissions assigned to the ‘others’ segment. Take a file1.txt which has the following permissions

To assign ‘others ( o )’ segment read permissions only run
$ sudo chmod o=r file1.txt
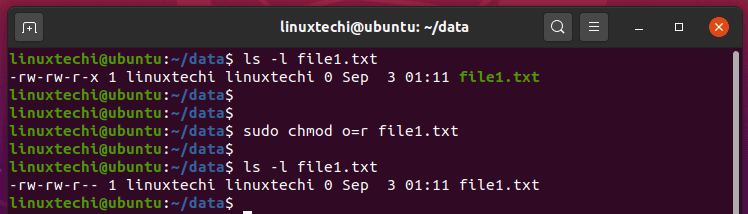
From the output, we can see that the ‘others’ segment has been assigned read permissions while at the same time has lost the execute permissions. This implies that the = operator assigns new permissions while at the same time erases the previous permissions.
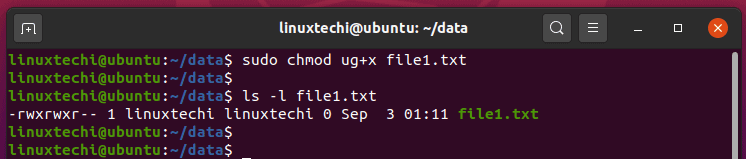
Example 5) Assign Execute Permissions to File and Group Owner
$ sudo chmod ug+x filename
The above command adds execute permissions to the owner and the group of the file. Using our file, this becomes:
$ sudo chmod ug+x file1.txt
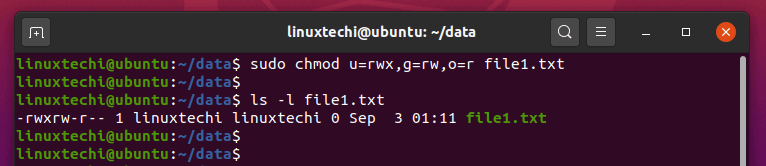
Example 6) Assign different permissions to file, group and others
$ sudo chmod u=rwx,g=rw,o=r filename
The above command assigns all the permissions to the owner of the file, read and write permissions to the group and only read permissions to other users.
NOTE: If there are no permissions specified after the = operator, then all permissions from the user segment are removed.
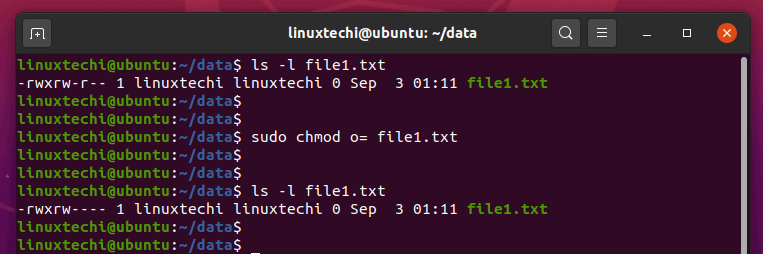
Example 7) Remove all permissions for other users
$ sudo chmod o= filename
The command above removes all the permissions from the ‘others’ user segment for the specified file.
The command has the same effect as the command below:
$ sudo chmod o-rwx filename
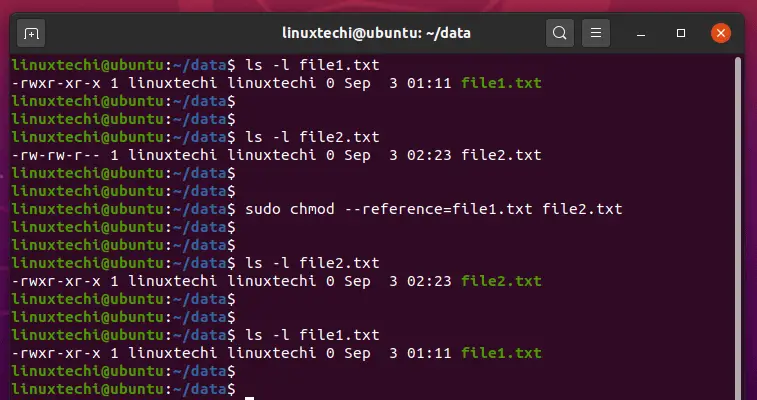
Example 8) Assign permissions using a reference file
Another handy and convenient way of assigning file permissions is using a reference file. In this method, you make use of the –reference=ref_file option to set the permissions of a file to be the same as those of another reference file. Use the syntax below
$ sudo chmod –reference=ref_file filename
For example, to set file permissions of file2.txt to be the same as those of file1.txt run the command:
$ sudo chmod --reference=file1.txt file2.txt
The reference file is file1.txt while file2.txt is the file that will take up the file permissions for the reference file.
Example 9) Assign execute permission to directories only
Let’s assume we have a directory which has files and sub-directories and we wish to assign execute permission only on directories without touching files. So, this can be achieved by using following chmod command,
$ chmod a+X *
If you have noticed carefully, we have used capital X for execute permission, above command will set execute permission on all directories of our current working directory.
Conclusion
This draws the curtain on our topic. We looked at chmod command and saw various examples in which the command can be used to change file permissions.


Hi,
Small error example 8:
sudo –reference=ref_file filename
and
sudo –reference=file1.txt file2.txt
should be
sudo chmod –reference=ref_file filename
and
sudo chmod –reference=file1.txt file2.txt
Thank you anyway for this nice article!
Hi Pierre,
Thanks for notifying the typo, i have corrected it now.
Nice Article.