Nmap stands for Network Mapper, it is a free and open-source network discovery and reconnaissance tool used for host discovery and collecting detailed information about a host. Written in C, C++ and Python and Initially released in September 1997, nmap has become an integral tool for cybersecurity and digital forensic professionals who rely on it to reveal detailed information about target hosts and unearth potential vulnerabilities. Nmap reveals information such as Active hosts on a network, open ports, OS and service detection, and performing stealth scans to mention just a few.
In this guide, we highlight some of the handy Nmap commands that you can use to retrieve as much information as you can from host systems.
How to install nmap
Before we look at various ways in which the nmap command can be used, let’s check out how you can install this useful command-line tool. The universal and easiest way to install nmap is using snap packages. Snaps are prebuilt software packages that ship with libraries and dependencies. They are readily available in all major Linux distros. You can find tons of snaps in snapstore. However, before installing Nmap from snap packages, you need to first enable the snapd daemon. This will enable you to download and install snap packages.
To install Nmap using snaps, run the command below.
$ sudo snap install nmap
Alternatively, you can choose to go with installing Nmap using package managers unique to each family of Linux distribution.
For Ubuntu & Debian
For Ubuntu/Debian/Mint based distributions use the APT package manager as shown.
$ sudo apt -y install nmap
For CentOS 8 / RHEL 8 / Fedora 22 and later version
For CentOS 8 / RHEL 8 and Fedora 22 and later use the dnf package manager.
$ sudo dnf -y install nmap
For CentOS 7 & RHEL 7
For CentOS 7 / RHEL 7 and earlier versions use the yum package manager.
$ sudo yum -y install nmap
For Arch Linux / Manjaro
For Arch-based systems, use the pacman package manager as shown.
$ sudo pacman -S nmap
Having looked at the installation of nmap, let’s now proceed and see 20 awesome nmap command examples in Linux
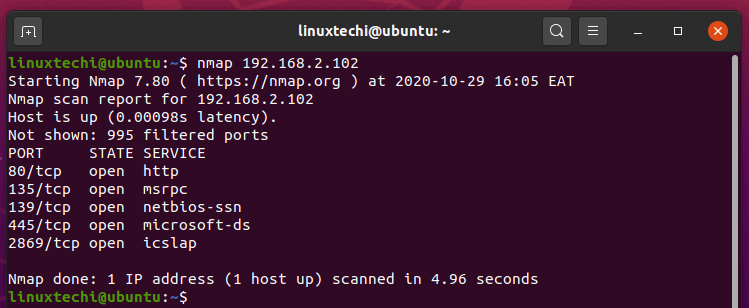
1) Nmap command for scanning a single host
In its basic form, the nmap command can be used to scan a single host without passing any arguments. The syntax is as shown:
$ nmap target-ip
For example;
$ nmap 192.168.2.102
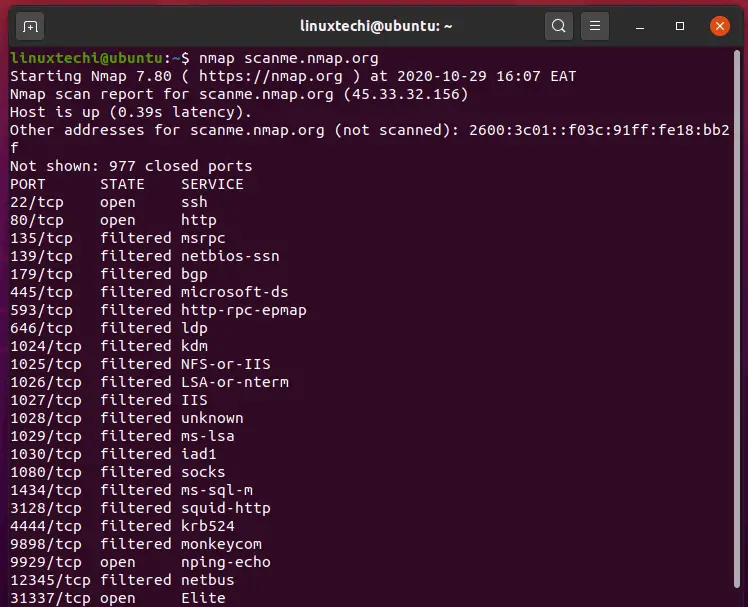
Alternatively, instead of specifying the IP address, you can specify the domain name as shown:
$ nmap scanme.nmap.org
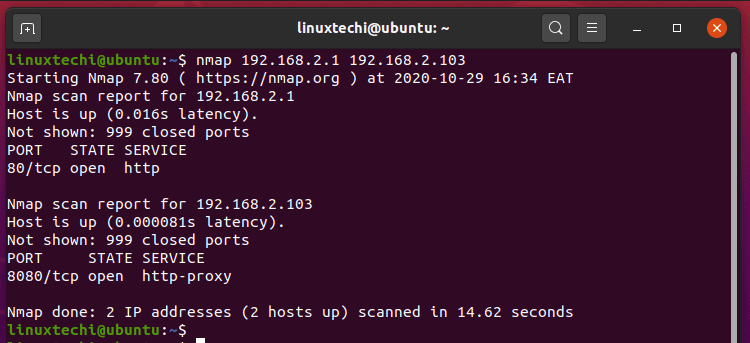
2) Scan multiple hosts
Scanning multiple hosts at a go comes particularly in handy for extensive networks where you want to scan several hosts at once. It’s a convenient way of scanning hosts in a single command instead of scanning each host separately. For instance, you can scan 10 or more hosts or an entire subnet as you work on something else. There are different ways of going about this.
Firstly, you can specify multiple IP address or domains in a row separated by a space as shown;
$ nmap 192.168.2.1 192.168.2.103
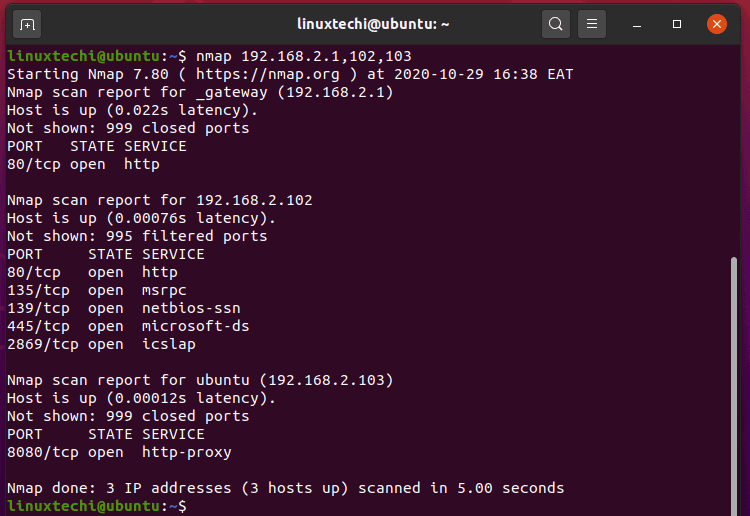
Rather than typing the IP addresses in full, you can separate the endings with a comma as shown.
$ nmap 192.168.2.1,102,103
Also, you can specify a range of IP addresses using a hyphen. For example, the command below scans hosts from 192.168.2.1 to 192.168.2.100
$ nmap 192.168.2.1-100
3) Scan a subnet with nmap
Additionally, you can use a wildcard to scan an entire subnet as shown:
$ nmap 192.168.2.*
OR
$ nmap 192.168.2.0/24
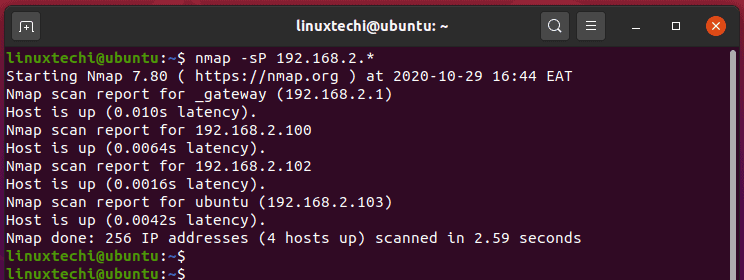
To refine the scan and only discover live hosts in a subnet, use the -sP option as shown.
$ nmap -sP 192.168.2.*
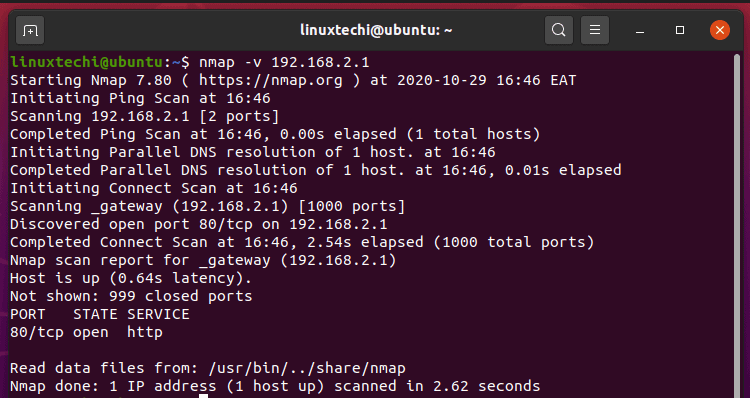
4) Get more information with verbose option
To get more robust output during the nmap scan, use the -v option. This option prints out the details of the scan such as the nature of the scan and open ports that are discovered.
$ nmap -v 192.168.2.1
5) Exclude hosts from a Nmap scan
When scanning a range of hosts, you may decide to exclude a single host from the scan. To achieve this, use the –exclude option. In the example below, we have excluded the host 192.168.2.20 from being scanned.
$ nmap 192.168.2.0/24 --exclude 192.168.2.20
To exclude multiple hosts from the Nmap scan , specify the hosts to be excluded in a file and link the command to the file as shown:
$ nmap 192.168.2.* --excludefile exclude.txt
The above command excludes all the hosts contained in the exclude.txt file.
6) Perform a fast scan
As the name suggests, you can perform a much faster scan using nmap by passing the -F flag as shown:
$ nmap -F 173.82.202.201
A disclaimer though – This scan yields fewer ports than the ordinary scan.
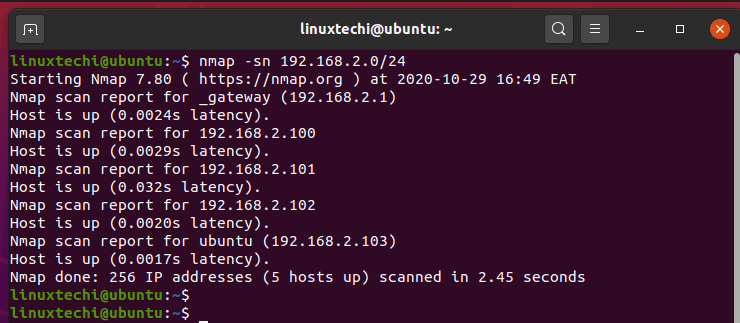
7) Scan Active hosts in a network
This is more like a ping scan. It detects active hosts in a subnet. To scan for active hosts, pass the -sn option followed by the IP address and the subnet. For example:
$ nmap -sn 192.168.2.0/24
8) Scan hosts contained in a file
If you have a segmented network, especially one with VLANs, chances are that you have hosts in different subnets. An easy way of scanning them is by defining their IP addresses in a text file and passing the file as an argument using the -iL option.
$ nmap iL hosts.txt
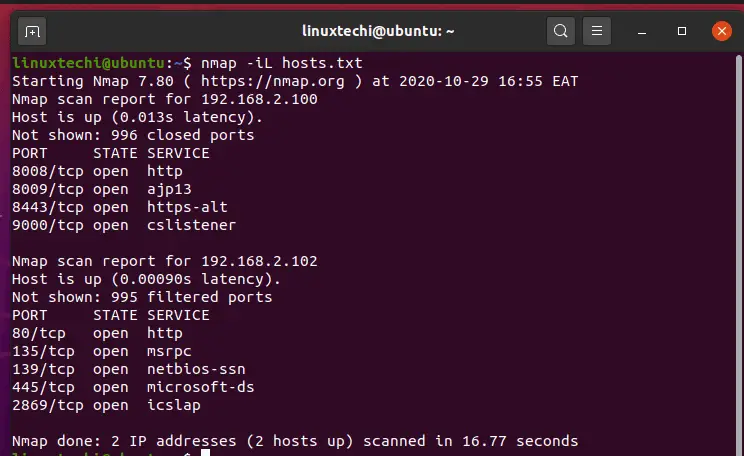
Here’s a sample of the host file
$ cat hosts.txt
192.168.2.100
192.168.2.102
192.168.20.5-50
9) Perform a scan to detect Firewall
Firewall detection is especially useful when performing vulnerability tests or ethical hacking. It allows the sysadmin to know if the firewall of the target host is enabled or not. To know the status of a firewall, use the -sA flag as shown.
$ nmap -sA 192.168.2.1
This initiates an ACK scan which examines whether packets can pass through unfiltered. Use the -n flag to prevent reverse DNS resolution on the target host.
10) Perform OS detection with nmap
Nmap can also provide insights on the OS or operating system of the target system and also version detection. For OS detection pass the -O option as shown. We’re going to scan a cloud VPS hosted on a Linux system and see what nmap gives us.
NOTE: If you are a regular user, you need to invoke the sudo command as OS detection requires sudo privileges.
$ sudo nmap -O 173.82.202.201
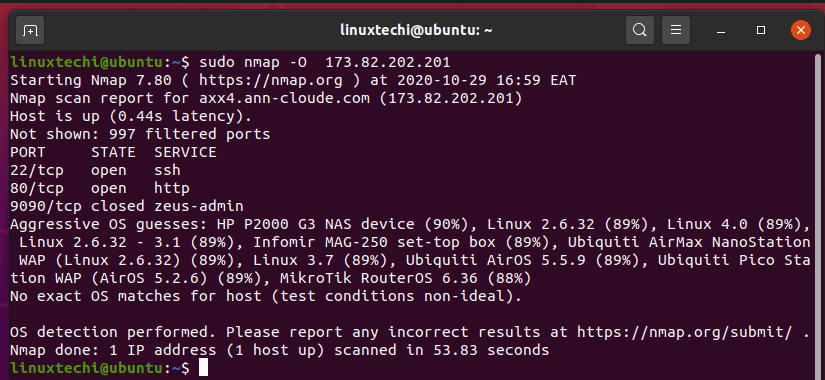
Nmap does its very best to identify the OS and it’s version however, the results may not always represent an accurate result.
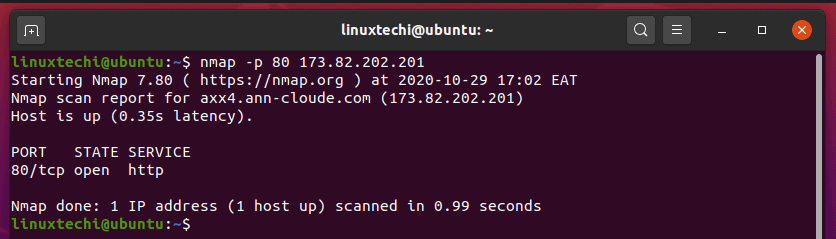
11) Perform port scanning
One of the essential tasks on the nmap tool is scanning ports on a host system. You can cut to the chase and specify a port to be scanned using the -p flag followed by the port number as shown:
$ nmap -p 80 173.82.202.201
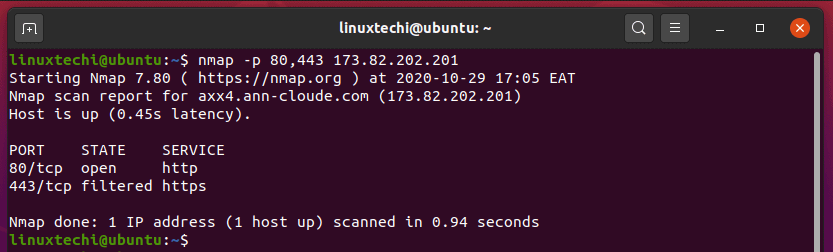
Additionally, you can scan for multiple ports by separating them using a comma as shown:
$ nmap -p 80,443 192.168.2.1
You can also define a range of ports to be scanned by separating them with a hyphen.
$ nmap -p 80-443 192.168.2.1
12) Scan for TCP/UDP ports
You can narrow down to scanning ports which are either TCP or UDP. To scan TCP ports, use the -sT option as shown.
$ nmap -sT 173.82.202.201
For a particular TCP port, such as port 80,run:
$ nmap -p T:80 173.82.202.201
For UDP ports, use the -sU option.
$ nmap -sU 173.82.202.201
For a particular UDP port, such as port 69 execute:
$ nmap -p U:69 173.82.202.201
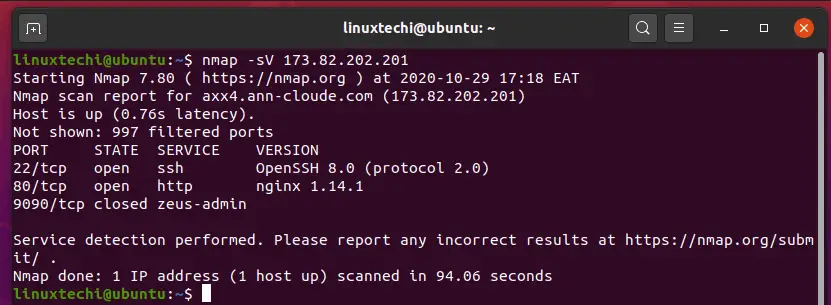
13) Discover service version
When scanning for possible vulnerabilities, detecting running services and their versions as well as the ports they are listening on is crucial. This allows you to know which services can be leveraged by an attacker to compromise your system. Knowledge about service & port versions enables you to make a decision on whether to update the services to their latest versions or uninstall them altogether.
To gather services and port information use the -sV flag.
$ nmap -sV 173.82.202.201
14) Perform a stealth scan
A nmap scan is usually ‘noisy’ and leave footprints which can be flagged by a robust IDS ( intrusion detection system ) and eventually be traced back to you. To stay anonymous , you can perform a stealth scan using the -sS option.
$ nmap -sS 173.82.202.201
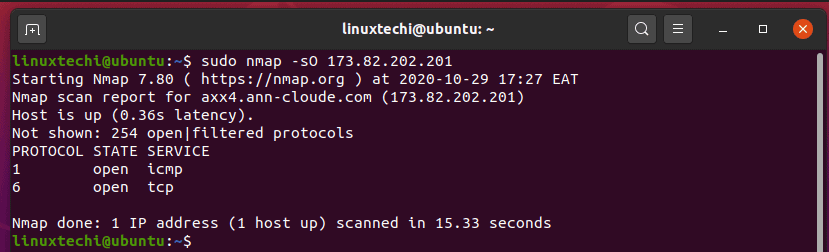
15) Determine supported IP protocols
You can retrieve information about the protocols supported by a target system (ICMP,TCP, UDP etc) using the -sO flag.
$ sudo nmap -sO 173.82.202.201
16) Perform an aggressive scan
When the -A option is used, nmap gives very detailed scan results including open ports and versions of running services, OS detection and even performs a traceroute of the target host(s).
$ nmap -A 173.82.202.201
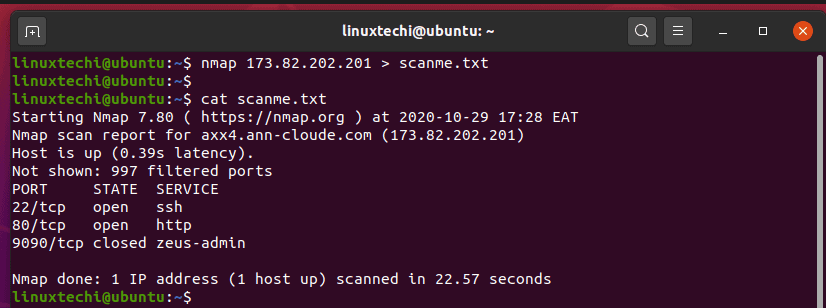
17) Save nmap output to a file
By default, nmap prints out scan results on the terminal. But if you need to save the results on a text file for more analysis at your convenience, you can use the redirection operator as shown.
$ nmap 173.82.202.201 > scanme.txt
To verify that the scan results have been saved, use the cat command as shown.
$ cat scanme.txt
Additionally, you can pass the -oN option followed by the output file and the host.
$ nmap -oN scanme.txt scanme.nmap.org
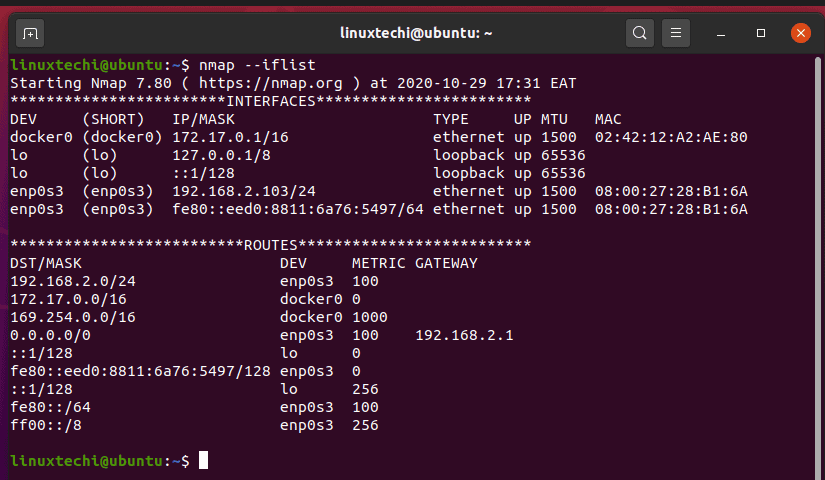
18) Print out the host interfaces and routes
Sometimes, you might find the need to find the host system’s interfaces and routes for debugging purposes. This can be easily achieved by passing the –iflist option.
$ nmap --iflist
19) Get help with nmap
To satiate your curiosity on additional nmap options, use the -h flag. This is synonymous with getting help with nmap commands.
$ nmap -h
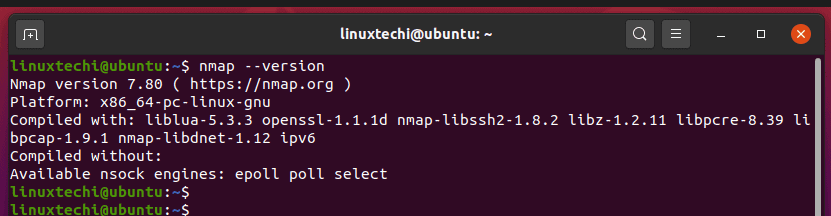
20) Check nmap version
To check the version of nmap you are using run the command:
$ nmap -v
Those are just 20 of the basic Nmap commands that you can use to enumerate various host systems. There are still plenty of nmap options that you can use to get refined details about the target system, but the examples we have listed are a good place to start from. We hope that this guide has been helpful in acquainting you with the nmap tool and various command examples.
Also Read : 9 tee Command Examples in Linux