In the previous article, we have covered how to Install Zabbix Server on CentOS 8. In this guide, we go a step further and show you how you can add a Linux host to the Zabbix Server so that we can monitor various metrics such as CPU load, memory utilization, swap usage, and disk utilization to mention a few.
But first, we need to install the Zabbix Agent on the remote host which is going to ship the metrics of the remote system to the Zabbix server for monitoring. In this guide, we will install the Zabbix agent on Ubuntu 20.04 LTS and CentOS 8.
How to Install Zabbix agent on Ubuntu Linux?
To get started with the installation of Zabbix agent, follow the steps below:
Step 1) Adding the Zabbix repository and Installing Zabbix agent
By default, the Zabbix repository is not included in the Ubuntu repository. We, therefore, need to manually add it before installing the Zabbix agent. At the time of penning down this guide, the latest version of Zabbix is Zabbix 5.0. Therefore, we are going to add the Zabbix agent that corresponds to that version.
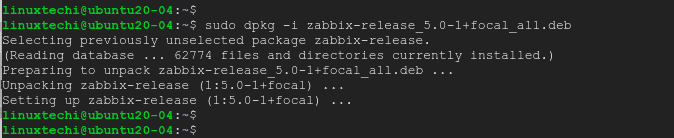
To so do, first download the repository’s Debian package:
For Ubuntu 20.04 (Focal Fossa)
$ wget https://repo.zabbix.com/zabbix/5.0/ubuntu/pool/main/z/zabbix-release/zabbix-release_5.0-1%2Bfocal_all.deb
After the package is downloaded, update the package list and install the zabbix-agent using the dpkg package manager as shown:
$ sudo apt update
$ sudo dpkg -i zabbix-release_5.0-1+focal_all.deb
or
$ sudo apt install -y zabbix-agent
For Ubuntu 18.04 (Bionic Beaver)
For Ubuntu 18.04, execute the commands below to add the repository
$ wget https://repo.zabbix.com/zabbix/5.0/ubuntu/pool/main/z/zabbix-release/zabbix-release_5.0-1%2Bbionic_all.deb
$ sudo apt update
$ sudo dpkg -i zabbix-release_5.0-1+bionic_all.deb
or
$ sudo apt install -y zabbix-agent
For Ubuntu 16.04 (Xenial Xerus)
$ wget https://repo.zabbix.com/zabbix/5.0/ubuntu/pool/main/z/zabbix-release/zabbix-release_5.0-1%2Bxenial_all.deb
$ sudo apt update
$ sudo dpkg -i zabbix-release_5.0-1+xenial_all.deb
or
$ sudo apt-get install -y zabbix-agent
Step 2) Configure Zabbix agent
With the successful installation of the Zabbix agent, we need to make a couple of tweaks for the remote system to communicate with the Zabbix server. We are going to make a few adjustments in the configuration file which is /etc/zabbix/zabbix_agentd.conf
In the file locate the Server and hostname attributes and set them to correspond to the server’s parameters. In our case, we have:
Server=10.128.0.10
hostname=ubuntu20-04
Once done, save & exit the configuration file.
Also, ensure that you can reach the Zabbix server by pinging its IP address and hostname.
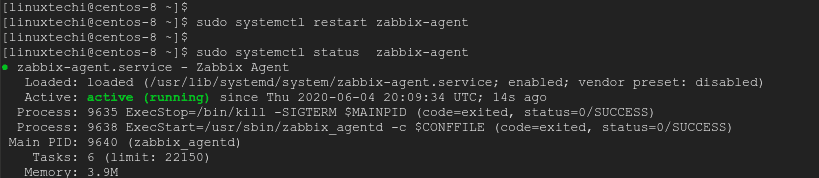
For the changes to come into effect, restart the Zabbix-agent as shown:
$ sudo systemctl restart zabbix-agent
To ensure it is running, check its status using the command:
$ sudo systemctl status zabbix-agent
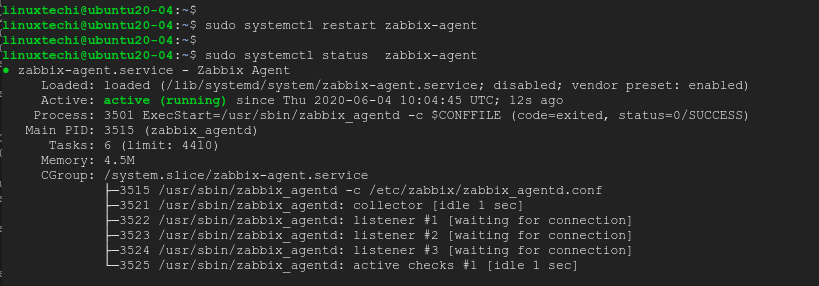
From the output, it’s clear that the Zabbix agent is up and running.
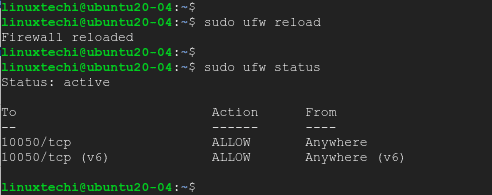
Step 3) Configure the firewall rules for zabbix-agent
Finally, we need to configure the firewall to open port 10050 which the zabbix-agent listens on. Therefore, run the commands below:
$ sudo ufw allow 10050/tcp
$ sudo ufw reload
To confirm that the port is open, run:
$ sudo ufw status
Up to this mark, you have successfully installed the Zabbix agent on Ubuntu and your system is ready to be added to the Zabbix server for monitoring.
How to install zabbix agent on CentOS 8 / RHEL 8?
For CentOS 8 / RHEL 8 systems, the steps for installing the Zabbix agent are pretty much similar.
Step 1) Adding the Zabbix repository
Begin by manually adding the repository since the Zabbix repository is not included by default on AppStream repo.
$ sudo dnf install https://repo.zabbix.com/zabbix/5.0/rhel/8/x86_64/zabbix-agent-5.0.0-1.el8.x86_64.rpm
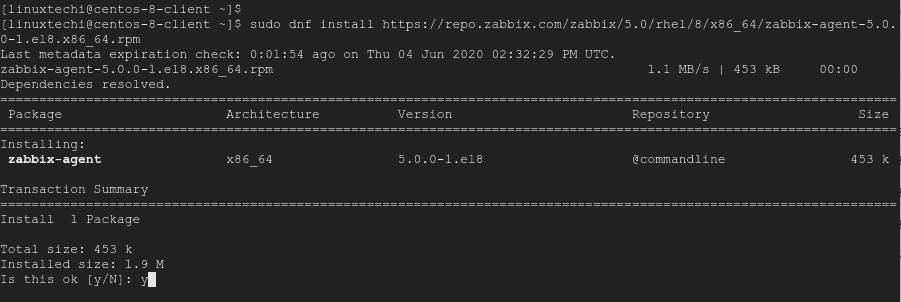
Press Y to finish the installation.
Run below command to install Zabbix Agent on CentOS 8 / RHEL 8
$ sudo dnf install -y zabbix-agent
Step 2) Configure zabbix agent
As demonstrated earlier, a few changes need to be made in the agent’s configuration which is /etc/zabbix/zabbix_agentd.conf
As before, set the Server and hostname directives to match the Zabbix server’s parameters as shown:
Server=10.128.0.10
hostname=centos-8
Once done, save & exit the configuration file. Next, restart the Zabbix-agent daemon and confirm whether it’s running:
$ sudo systemctl restart zabbix-agent
$ sudo systemctl status zabbix-agent
Step 3) Configure the firewall rule for zabbix-agent
Finally, to allow Zabbix-agent to establish communication with the Zabbix Server and vice versa , configure the firewall by running the commands as shown:
$ sudo firewalld --add-port=10050/tcp --permanent
$ sudo firewalld --reload
Adding or Registering Remote Linux Host in Zabbix Server
Login to your Zabbix Server portal using admin user’s credentials .To add a host on the Zabbix server, click on Configuration –> Hosts.
On the far top- right end, click on the ‘Create host’ button

On the page that appears, fill out the remote Linux’s details as listed:
- Hostname
- Visible name
- IP address
- Description
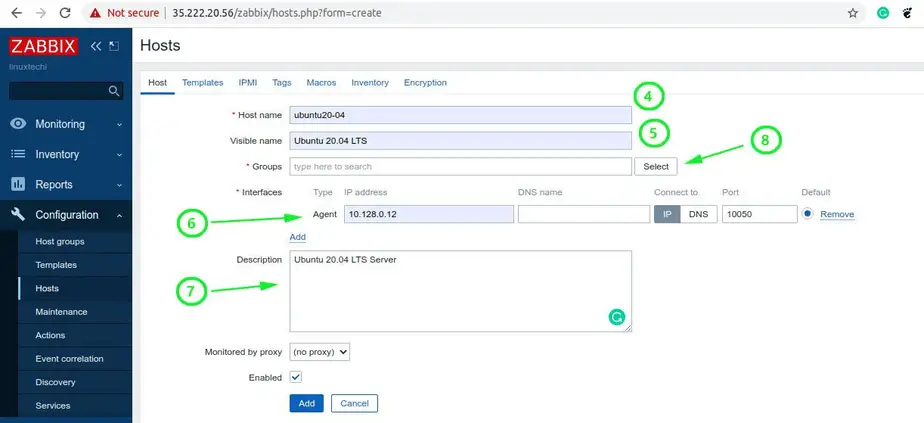
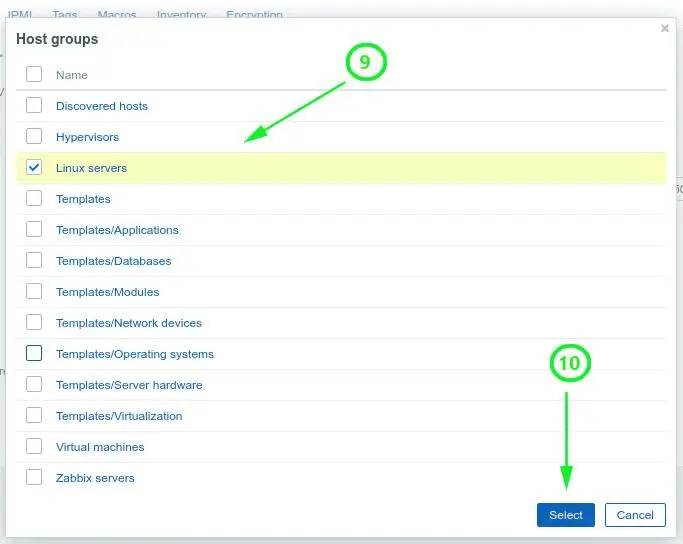
Next, click on the ‘select’ button next to the ‘Groups’ text field. On the ‘Host groups’ list, click on ‘Linux servers’ and then click ‘Select’.
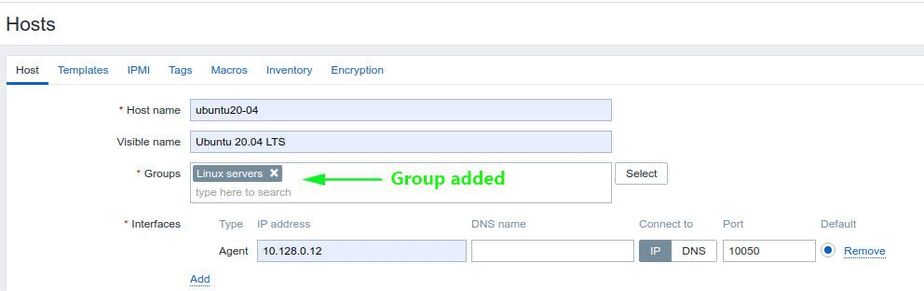
As you can see, the group has been added.
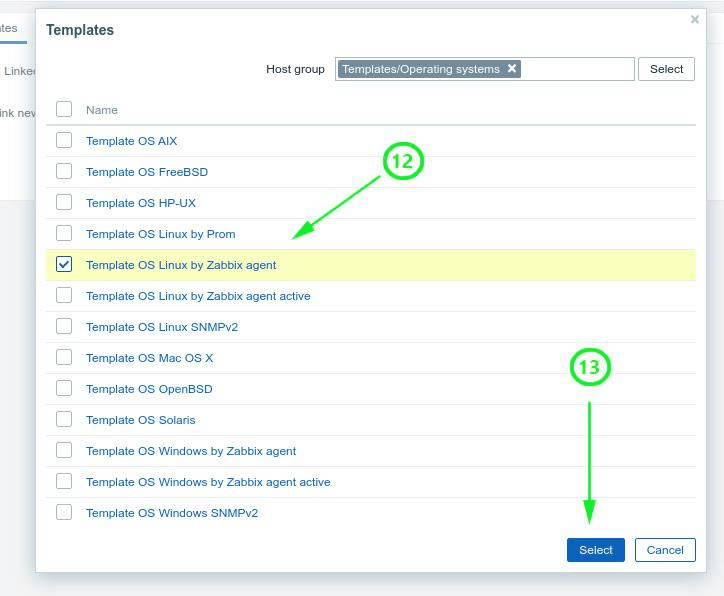
We also need to add a template for our server. So, click on the ‘Templates’ menu option.

On the ‘Templates’ list that appears, click on ‘Template OS Linux by Zabbix agent’ and hit the ‘Select’ button.
This takes you back to the home screen and there you can see that your new host system has been added.
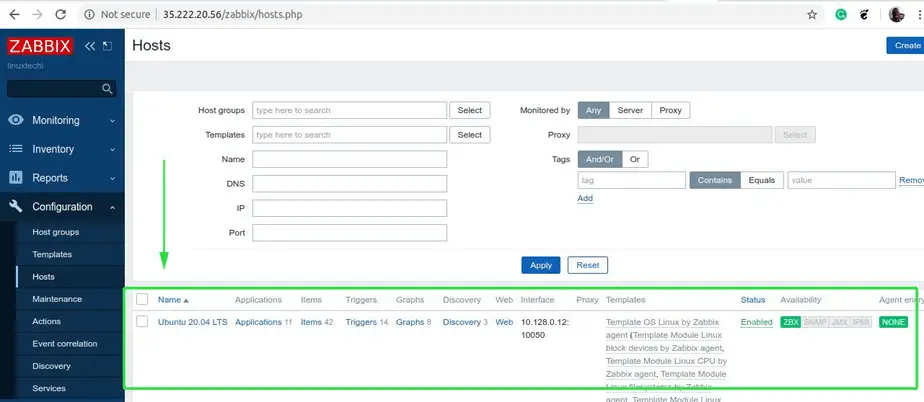
To add the CentOS-8 system, repeat the same steps described.
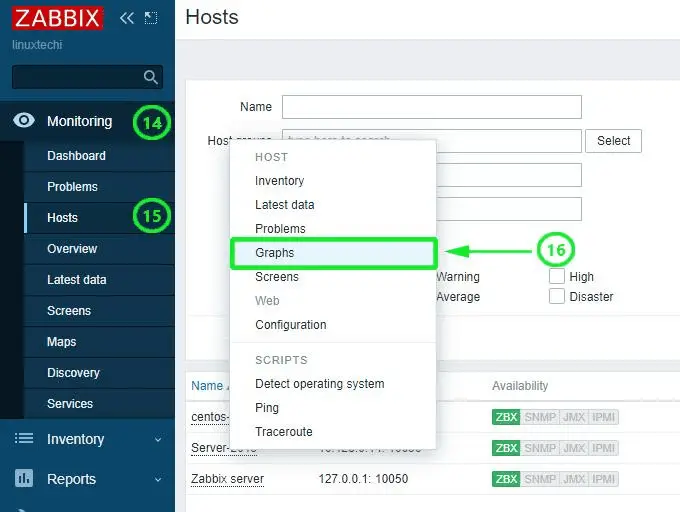
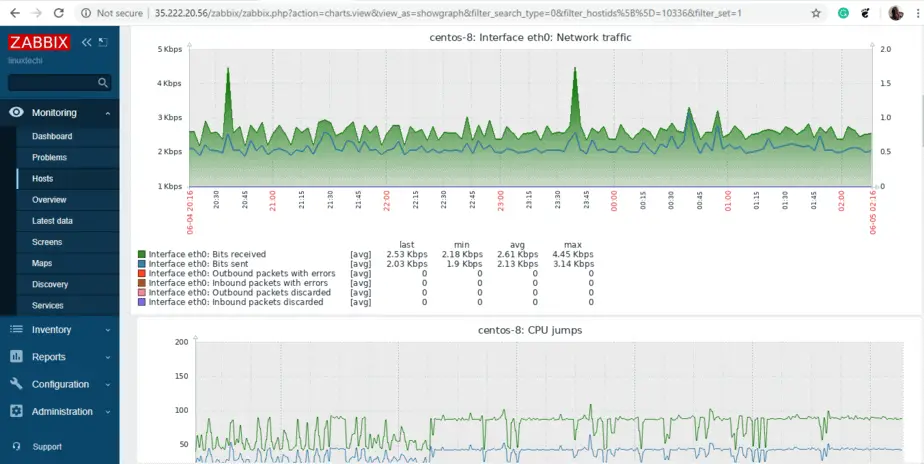
Graphing statistics of the remote hosts
To represent system metrics in a graphical form, click on ‘Monitoring’ –> ‘Hosts’
Next, click on the host you want to graph and select the ‘graph’ option from the pull-up menu.
Zabbix server will begin generating various graphs representing various system metrics such as Processes, CPU load, and network traffic statistics to mention a few.
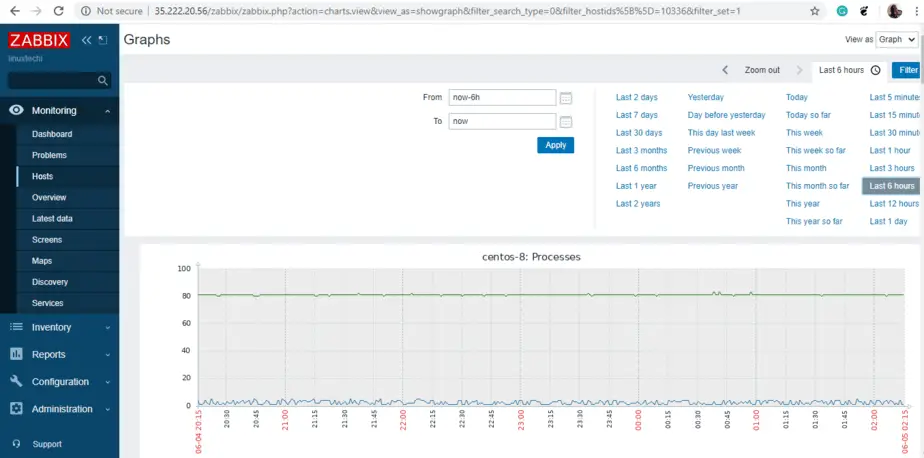
Scroll down to view other graphs displaying various metrics as shown below.
We have successfully added 2 Linux host systems to the Zabbix server and managed to graph various system metrics. We appreciate your feedback. Give it a try and let us know your experience.


Hello,
Thank you for this good explanantion, I have added hosts on Zabbix 6 however all Linux host are grayed out, inteface status is showing unknown. What can I do to make them available (green color?)
Hello Magwai. Kindly ensure that port 10050 has been opened on the firewall for all the nodes in your setup. Then restart the firewall for the changes to come into effect. Let me know how this goes.
Hello James Kiarie,
Thank you for your reply. Firewall is not running (disabled) for all nodes. SELinux is disabled.
Please find below Node01 settings if it can help
[root@node01 ~]# sestatus
SELinux status: disabled
[root@node01 ~]#
[root@node01 ~]#
[root@node01 ~]# firewall-cmd –list-ports
FirewallD is not running
[root@node01 ~]# systemctl status firewalld
● firewalld.service – firewalld – dynamic firewall daemon
Loaded: loaded (/usr/lib/systemd/system/firewalld.service; disabled; vendor preset: enabled)
Active: inactive (dead)
Docs: man:firewalld(1)
[root@node01 ~]#
[root@node01 ~]#
[root@node01 ~]#
[root@node01 ~]# grep -vE ‘#|^$’ /etc/zabbix/zabbix_agentd.conf
PidFile=/run/zabbix/zabbix_agentd.pid
LogFile=/var/log/zabbix/zabbix_agentd.log
LogFileSize=0
Server=192.168.1.20 #### Zabbix Server IP
ServerActive=192.168.1.20
Hostname=192.168.1.40 #### Node01 IP
Include=/etc/zabbix/zabbix_agentd.d/*.conf
[root@node01 ~]#
[root@node01 ~]#
[root@node01 ~]# systemctl status zabbix-agent
● zabbix-agent.service – Zabbix Agent
Loaded: loaded (/usr/lib/systemd/system/zabbix-agent.service; enabled; vendor preset: disabled)
Active: active (running) since Mon 2022-09-26 15:38:46 EAT; 3 days ago
Process: 11373 ExecStop=/bin/kill -SIGTERM $MAINPID (code=exited, status=0/SUCCESS)
Process: 11376 ExecStart=/usr/sbin/zabbix_agentd -c $CONFFILE (code=exited, status=0/SUCCESS)
Main PID: 11379 (zabbix_agentd)
Tasks: 6
CGroup: /system.slice/zabbix-agent.service
├─11379 /usr/sbin/zabbix_agentd -c /etc/zabbix/zabbix_agentd.conf
├─11380 /usr/sbin/zabbix_agentd: collector [idle 1 sec]
├─11381 /usr/sbin/zabbix_agentd: listener #1 [waiting for connection]
├─11382 /usr/sbin/zabbix_agentd: listener #2 [waiting for connection]
├─11383 /usr/sbin/zabbix_agentd: listener #3 [waiting for connection]
└─11384 /usr/sbin/zabbix_agentd: active checks #1 [idle 1 sec]
Sep 26 15:38:46 node01 systemd[1]: Stopped Zabbix Agent.
Sep 26 15:38:46 node01 systemd[1]: Starting Zabbix Agent…
Sep 26 15:38:46 node01 systemd[1]: Started Zabbix Agent.