Canonical has released its stable and latest LTS (Long Term Support) operating system i.e “Ubuntu 20.04” and Code name for Ubuntu 20.04 is “Focal Fossa“. As it is an LTS version so canonical will provide updates and support for next 5 years. In this post we will demonstrate the Installation steps of Ubuntu 20.04 LTS for Laptop or Desktop. Let’s first look into some of the new features that have included in this release.
New Features of Ubuntu 20.04 LTS Desktop:
- Ubuntu 20.04 LTS is released with latest and stable kernel version 5.4
- Package updates and support until 2025.
- It offers faster boot speed as compared with previous LTS release (18.04)
- Improved and updated GNOME 3.36 Desktop
- Improved ZFS file system install support
- Improved and updated Yaru theme
- Removed Amazon Web Launcher
- New Lock Screen
Minimum System Requirements for Ubuntu 20.04 LTS Desktop:
- 4 GB RAM
- Dual Core Processor (2 GHZ)
- 25 GB free disk space
- Installation bootable Media (USB / DVD)
- Stable Internet Connection (Optional)
Let’s Jump into Installation steps of Ubuntu 20.04 LTS Desktop, these steps are application for installing Ubuntu 20.04 LTS on your Laptop, Desktop or even inside a vm (virtual machine).
Step by Step Ubuntu 20.04 LTS Desktop Installation Guide
Step 1) Download Ubuntu 20.04 LTS Desktop ISO File
Download Ubuntu 20.04 LTS desktop iso file from its official web site,
https://ubuntu.com/download/desktop
Once the iso file is downloaded on your system, burn it either into flash drive or DVD and make it bootable.
Read Also : How to Create Bootable USB Disk / DVD on Ubuntu / Linux Mint
On Windows Operating system, we can use “Rufus” tool to create a bootable USB drive from the ISO file.
Step 2) Boot System using Bootable Media (USB / DVD / Flash Drive)
Now reboot the target system on which you are planning to install Ubuntu 20.04 LTS and go to its bios settings and change boot medium from disk to above created bootable media such USB or DVD or Flash drive.
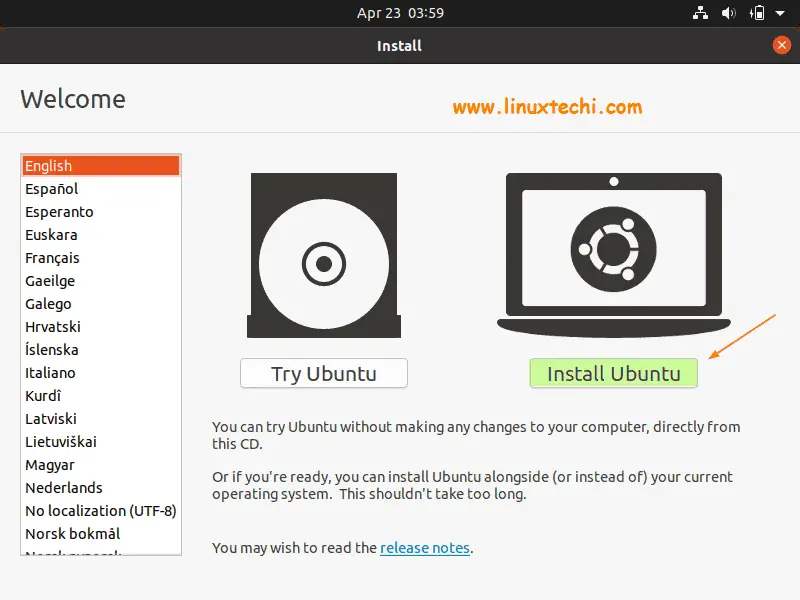
Once the system boots up with bootable media then we will get the following screen,
After Couple of second we will get below screen, click on “Install Ubuntu” option to start the installation process.
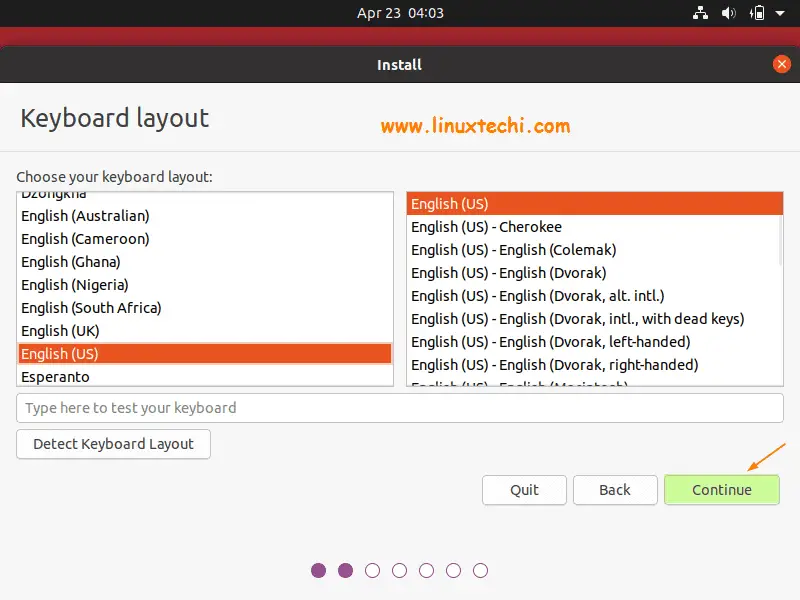
Step 3) Choose Your preferred Keyboard Layout
In this step, choose your preferred keyboard layout and then click on “Continue”
Step 4) Prepare Installation and Install updates & third-party software
In this step, we have to choose whether we want to go with Normal Installation or Minimal Installation. Difference between these installations is that in “Normal Installation” all the GUI related utilities will be installed during the installation whereas in “Minimal Installation” only basic GUI related utilities will be installed.
Apart from this we have a choice whether we want to install updates and third-part tools like graphics software and additional media formats during installation but choose these options only when you have stable internet connection else untick these options.
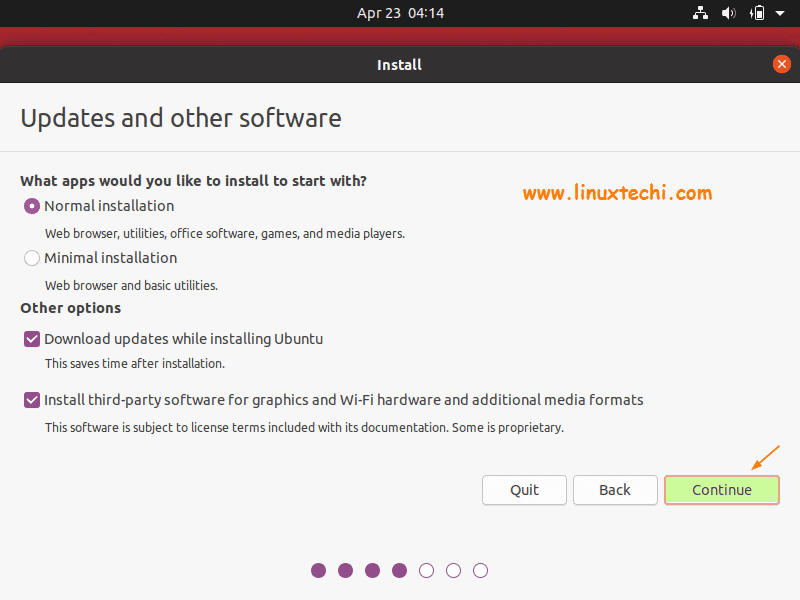
Click on Continue to proceed further
Step 5) Choose Ubuntu 20.04 LTS Installation type
In this step, Installer will give option to choose installation type,
- Erase Disk & Install Ubuntu: Choose this option if you are new to Ubuntu installation and want the installer to create partition automatically for you. In this option we have “Advanced feature” where we can choose to encrypt disk and use lvm partitions.
- Something else: If you want to have your own customized partition scheme then choose this option.
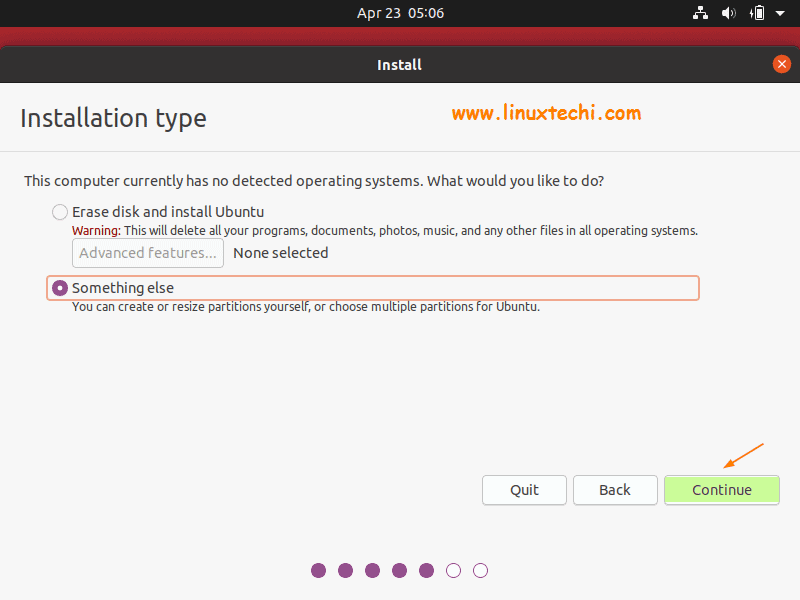
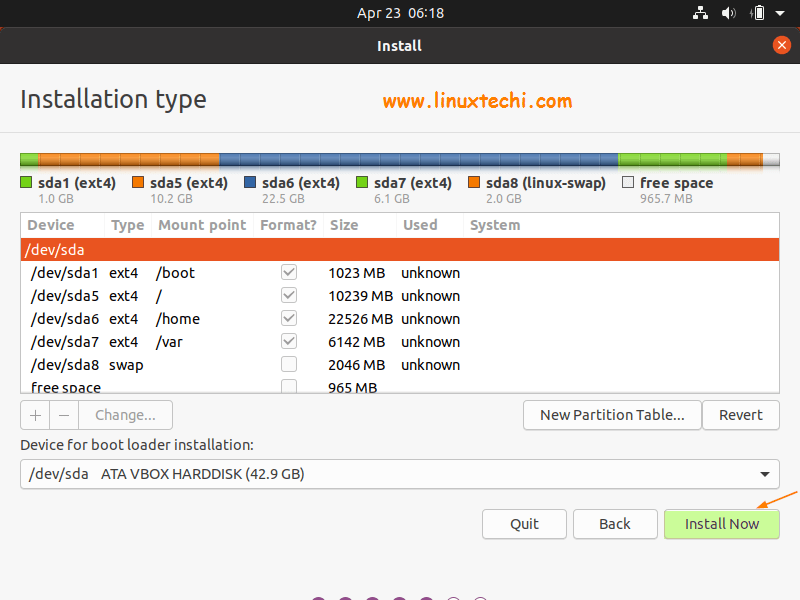
In this demonstration we will choose the second option “Something else” and will create following custom partitions on 40 GB disk,
- /boot = 1 GB (ext4 file system)
- / = 10 GB (ext4 file system)
- /home = 22 GB (ext4 file system)
- /var = 6 GB (ext4 file system)
- Swap = 2 GB (ext4 file system)
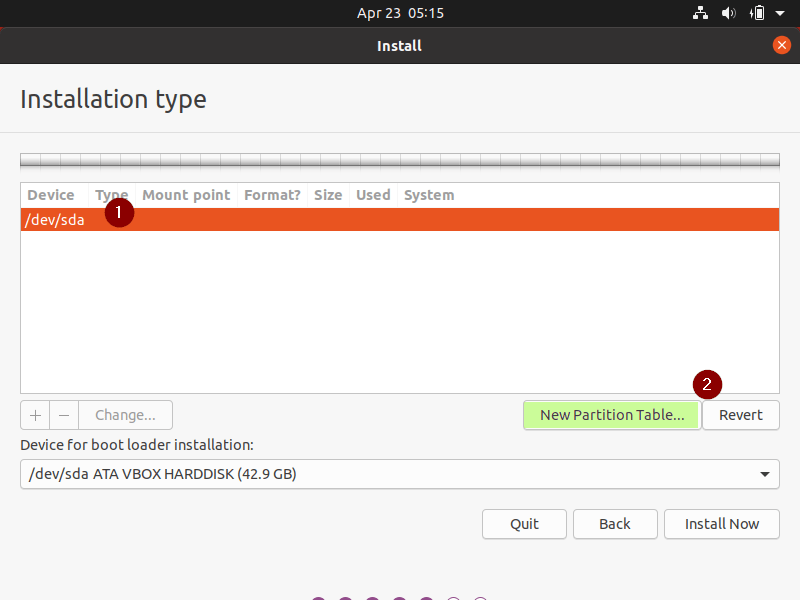
To start creating partitions, first we must create a partition table, so select the Device (or Disk) and then click on “New Partition Table”
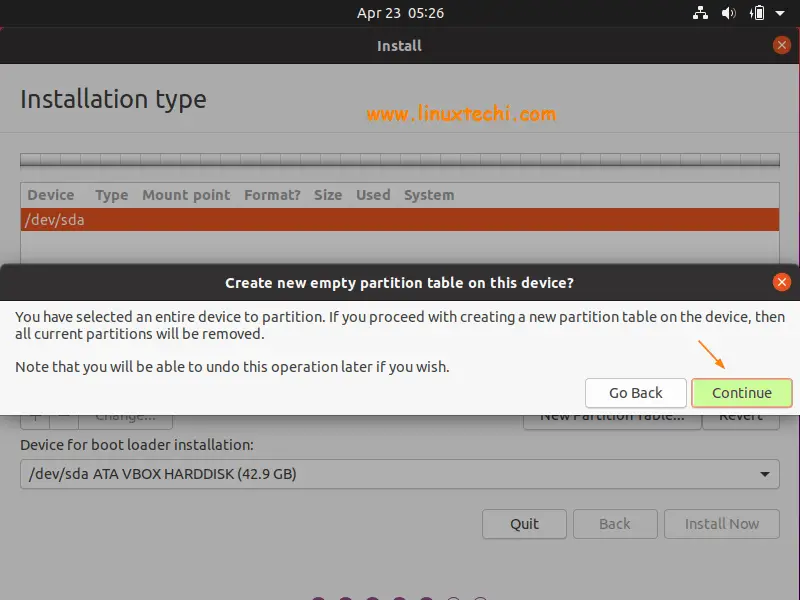
Click on Continue,
In the next window, choose disk and then click on + sign and then specify the partition mount point, file system type and its size,
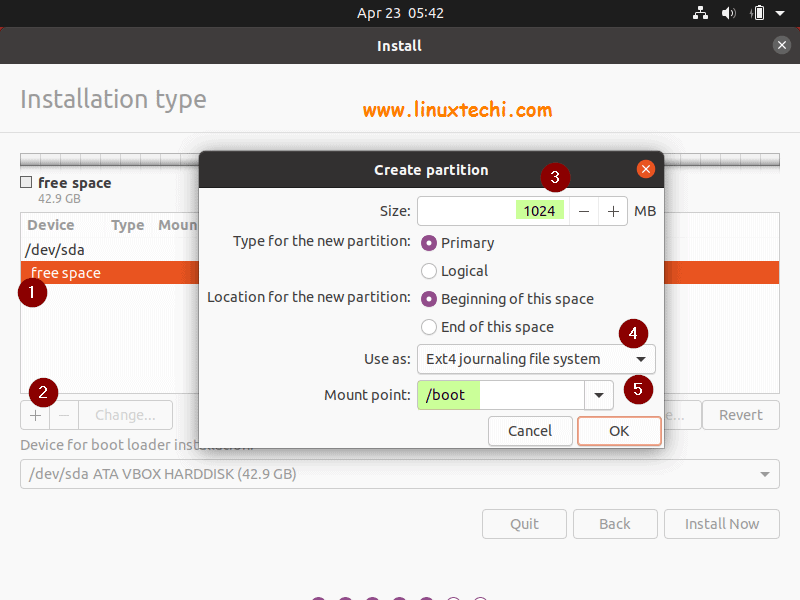
Click on OK,
Next Create slash (/) partition of Size 10 GB
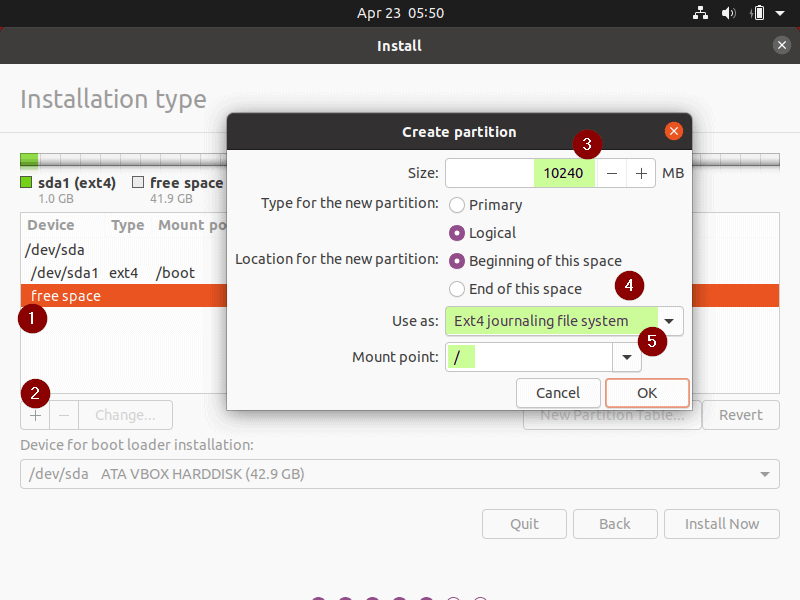
Click on OK
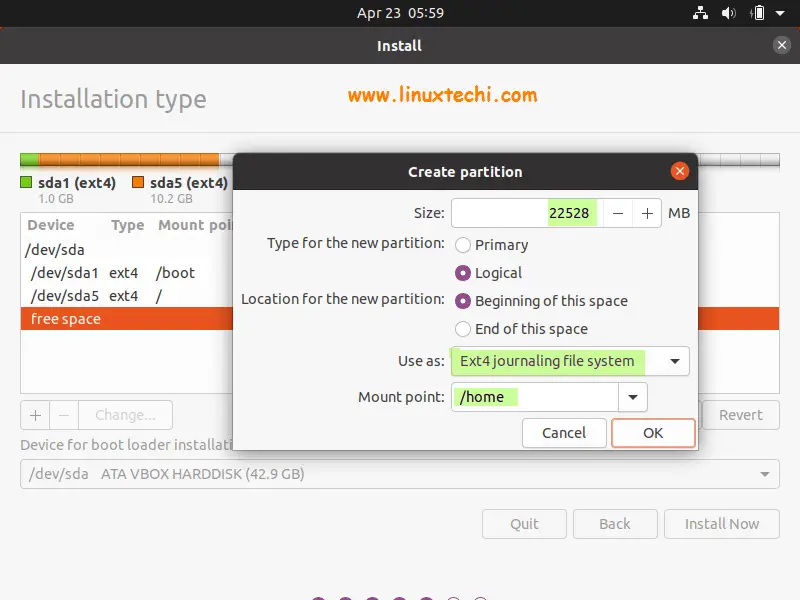
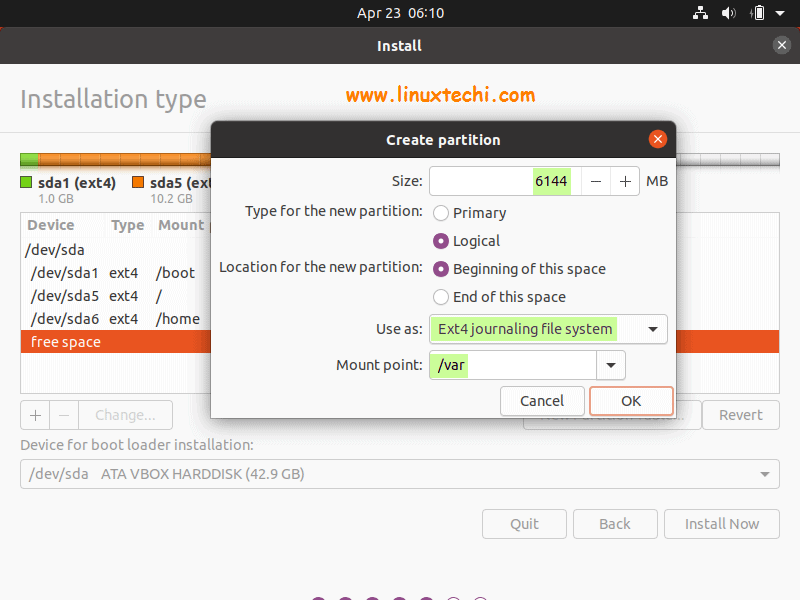
Similarly Create next two partitions /home and /var of size 22 GB and 6 GB respectively.
Now finally create our last partition as swap of size 2 GB.
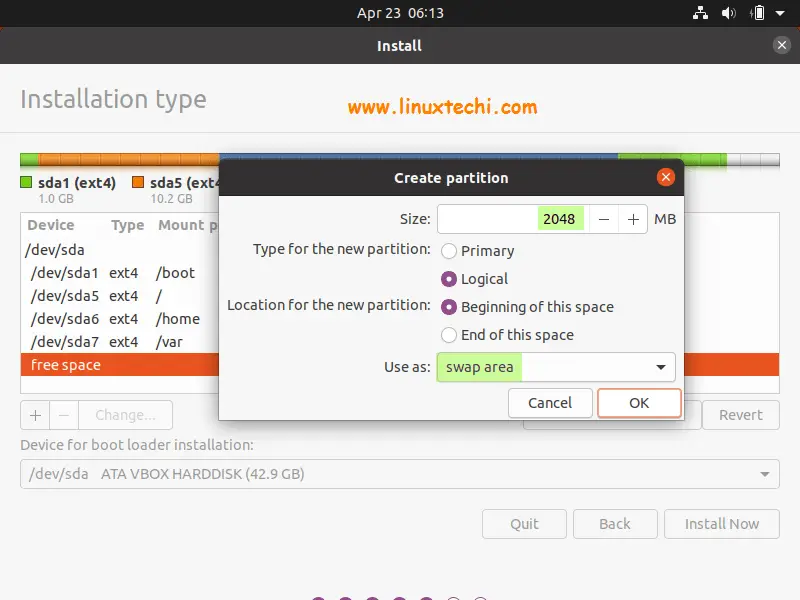
Click on Ok to proceed further and in the next window, click on “Install Now” option
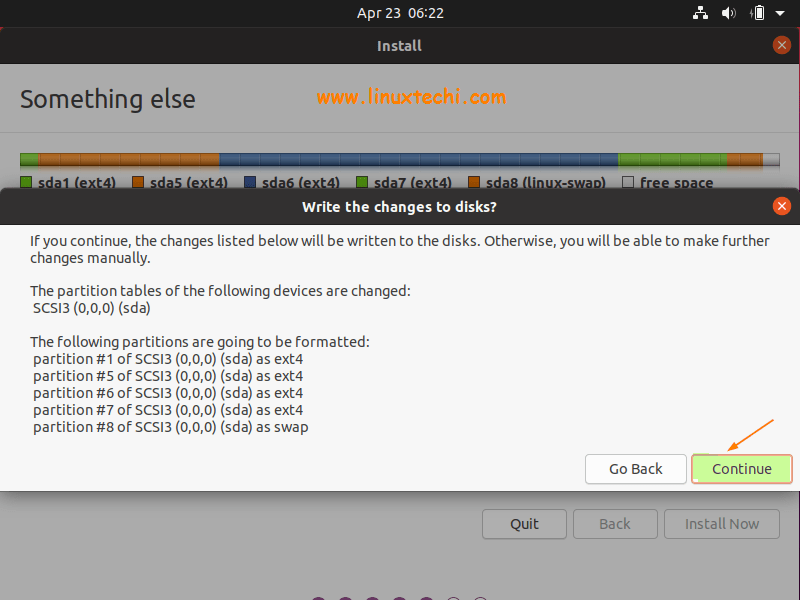
In the screen, choose “Continue” to write changes to the disk.
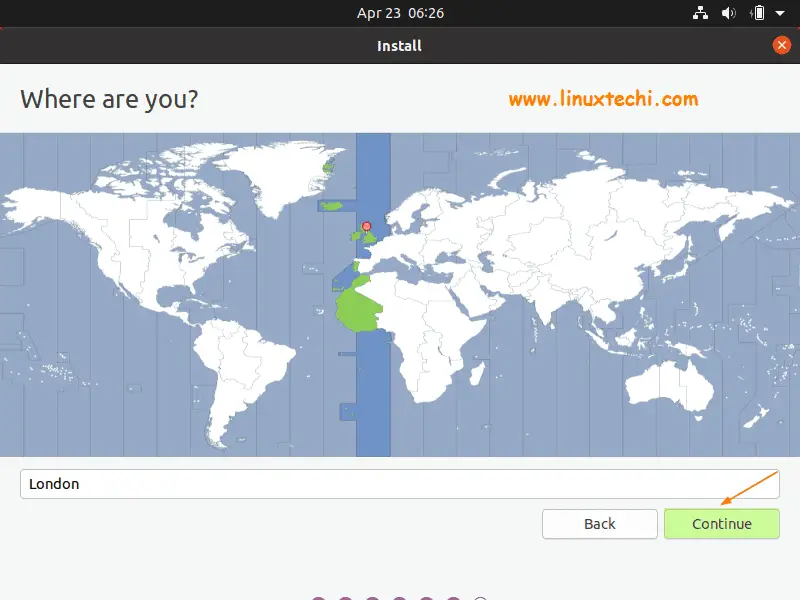
Step 6) Choose Preferred Time Zone for Your Ubuntu 20.04 LTS
Choose your preferred time zone which suits to your current location and the click on “Continue”
Step 7) Enter Host Name and Local User Credentials
As per your environment, enter the hostname and local user details and its credentials
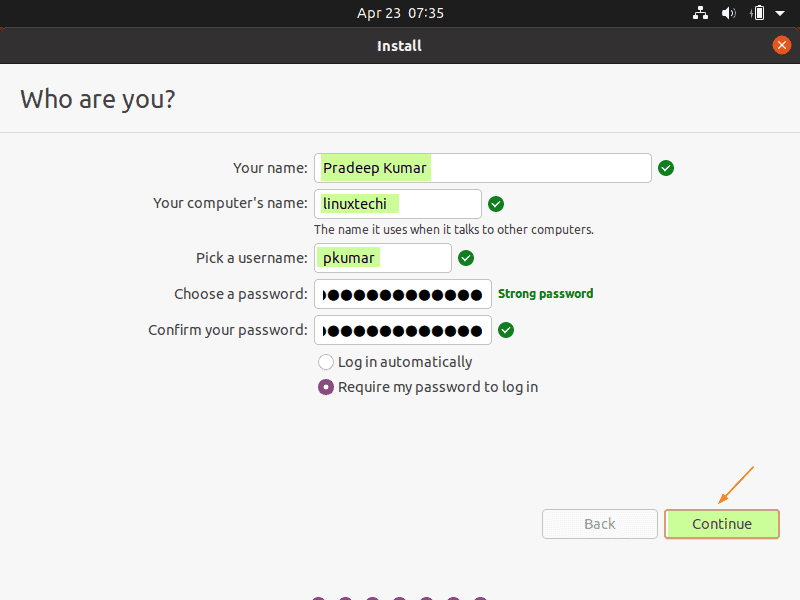
Click on Continue to proceed with the installation,
Step 8) Ubuntu 20.04 LTS Installation Started
As we can see in the below screen, installation has been started and it is in progress,

Once the installation is completed successfully, installer will prompt us to reboot the system.
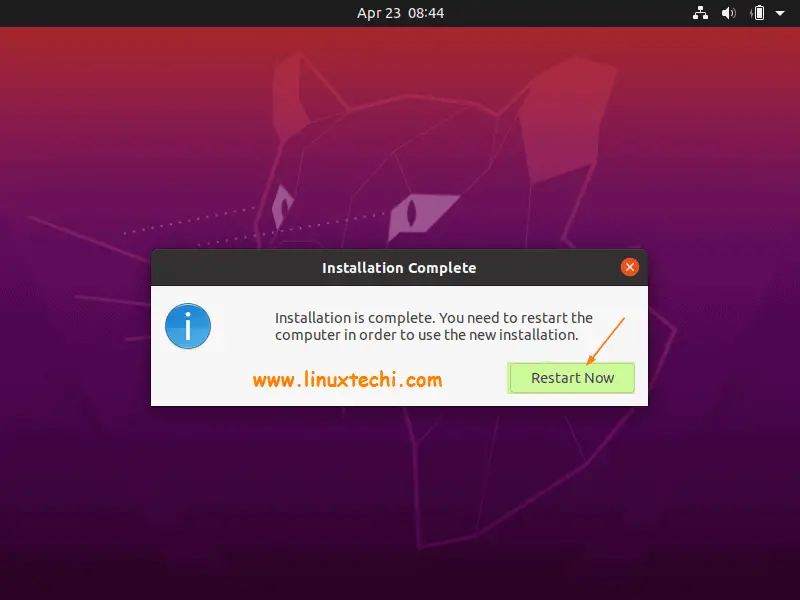
Click on “Restart Now” to reboot the system. Also don’t forget to change boot medium as disk from bios settings so that system boots up with disk on which we have installed ubuntu 20.04 LTS
Step 9) Login Screen after Ubuntu 20.04 LTS Installation
When we reboot the system after the successful installation, we will get below login screen, enter the credentials of the local user that we have created during the installation and then hit enter.

Following gnome desktop environment will appear after login,

Great, above screen confirms that we have successfully installed Ubuntu 20.04 LTS on our system. Explore this exciting operating system and share your feedback and comments.
Also Read : Top 14 Things to do After Installing Ubuntu 20.04 LTS
Also Read : How to Dual Boot Ubuntu 20.04 LTS Along with Windows 10

I’don istall ubuntu . Eror you need at least 8.6 GB disk space to install .this computer has only 0.0B
i already installed ubuntu gnome in my new ssd and as it is not LTS, i want to change to ubuntu 20.04 or 18 but while installing after copying some files, throwing an error “errno 5: installer crashed”
What error code you got?
Make sure your minimum hardware requirement are met.
AXJ is now running Ubuntu and cooperating actively with their Teams in the developments for real time news and information world wide.
worked great, don’t use whole disk,just follow these install instructions
THANK YOU