Our previous article we had already demonstrated the installation steps of Ansible AWX on CentOS 8 and RHEL 8. Ansible AWX is free and open source version Red Hat Ansible Tower. It provides a Graphical user interface, Rest API and Ansible task engine.
In this article we will through some lights on the basic usage of Ansible AWX GUI and how we can run and schedule Ansible Playbooks using this tool.
Lab Details for AWX GUI,
- 192.168.1.6 // Already Installed Ansible AWX system (CentOS 8)
- 192.168.1.9 // Ansible Client (CentOS 7)
- 192.168.1.10 // Ansible Client (Ubuntu 18.04)
- Time Synching of all the machines with NTP Servers
- sysadm user with sudo rights
Let’s jump into the steps of AWX basic Usage and running Ansible playbooks via AWX GUI,
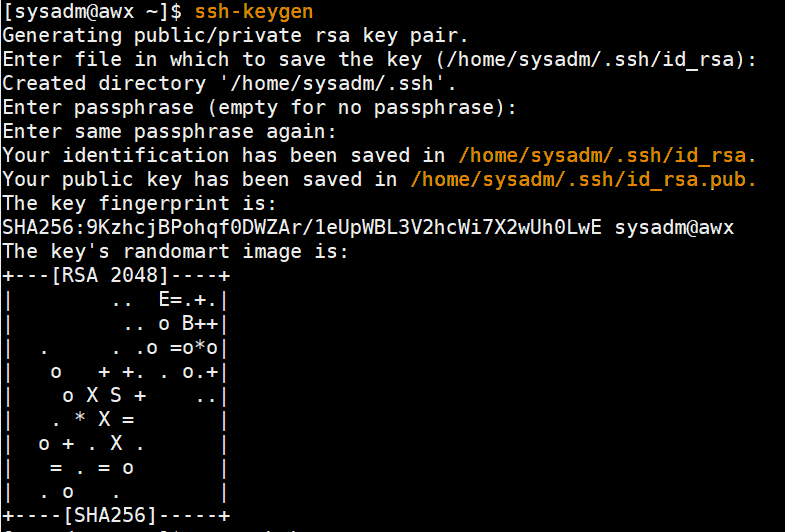
Step 1) Setup Keys based authentication among Ansible AWX Node and its clients
As we are using sysadm user, so we will be exchanging the ssh keys of this user from Ansbile AWX system to ansible clients.
I am assuming sysadm user is already created on these systems and have the sudo rights. Use below commands to generate SSH keys for sysadm user from AWX Node and share its public keys to ansible clients using ssh-copy-id command,
[sysadm@awx ~]$ ssh-keygen
Now copy the public key of sysadm user to clients
[sysadm@awx ~]$ ssh-copy-id [email protected]
[sysadm@awx ~]$ ssh-copy-id [email protected]
Verify Whether Keys based authentication has been setup properly or not, run the following commands,
[sysadm@awx ~]$ ssh  [email protected] "hostname;exit"
centos7
[sysadm@awx ~]$ ssh  [email protected] "hostname;exit"
Ubuntu-18-04
[sysadm@awx ~]$
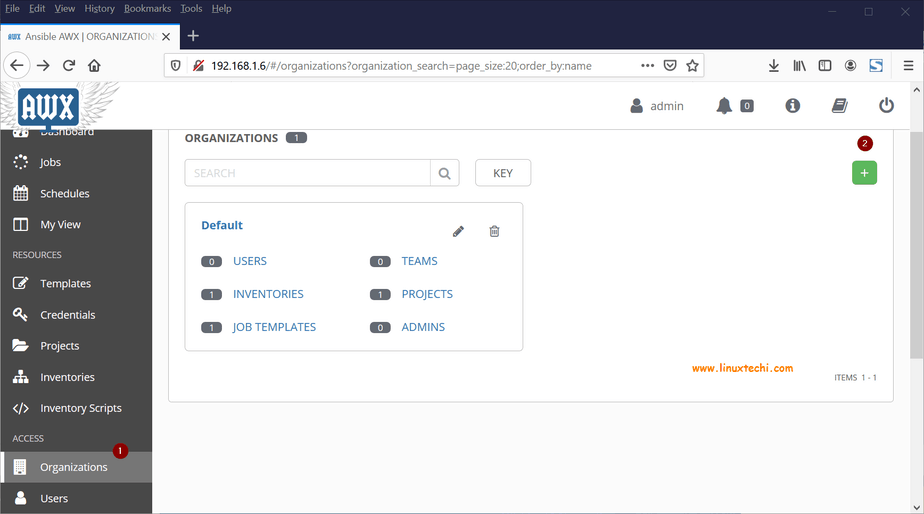
Step 2) Create an Organization in AWX GUI
Login to Ansible AWX GUI and go to Organization Tab and create an organization by clicking on “+” symbol,
Next we will be prompted to enter Organization Name,
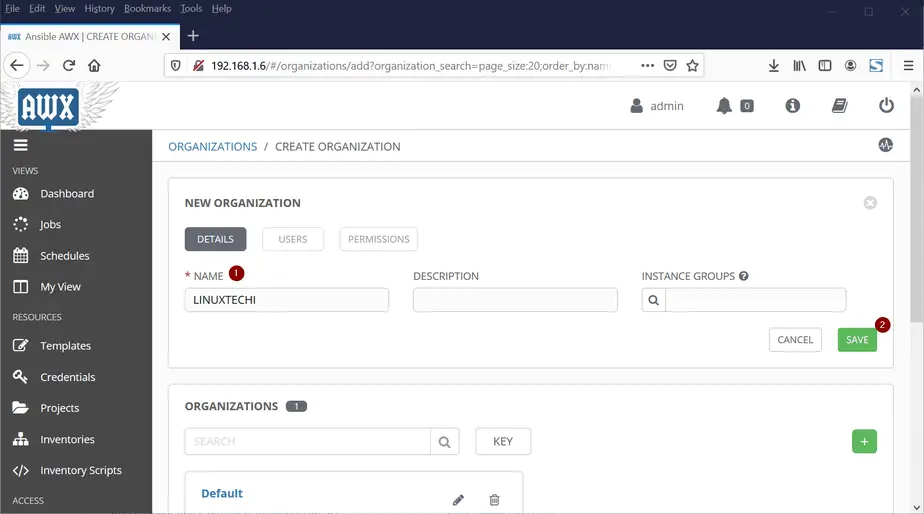
Click on Save
Step 3) Create a Project and Assign Organization to it
Before creating a project, let’s first create project’s directory where we will store all ansible playbooks, go to cli console of AWX node and run,
[sysadm@awx ~]$ sudo mkdir /var/lib/awx/projects/automation
Now Create a sample playbook to install bind-utils packages on CentOS and Ubuntu Systems,
[sysadm@awx ~]$ cd /var/lib/awx/projects/automation/
[sysadm@awx automation]$ sudo vi example.yaml
---
- hosts: all
  gather_facts: true
  become: true
  tasks:
    - yum:
        name: bind-utils
      when: ansible_os_family == "RedHat"
    - apt:
        name: dnsutils
      when: ansible_os_family == "Debian"
Save and exit the file,
Now Go to AWX GUI, Select Projects Tab and then click on + sign to create a new Project and specify the name of project that suits to your setup and specify other details like Organizations as “LINUXTECHI”, SCM Type as “Manual”, Project Base Path as “/var/lib/projects” and Playbook Directory as “automation”
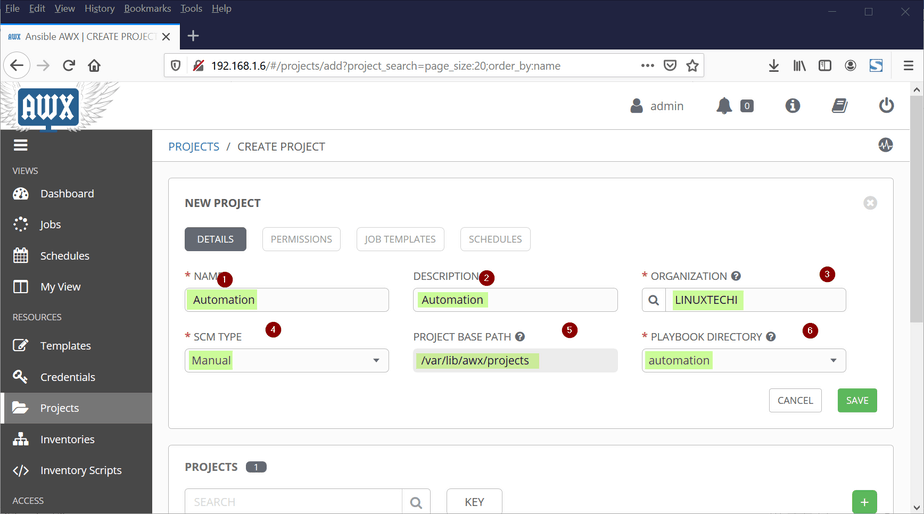
Click on Save
Step 4) Create Credentials and add private key and other details
These credentials will be used while executing the playbooks on target ansible clients. To get contents of SSH private key of sysadm user, run the following command:
[sysadm@awx ~]$ cat ~/.ssh/id_rsa
Now, Select Credentials Tab and Click on ‘+’ sign to create credentials and choose Credentials type as “Machine“, Choose Organization as “LINUXTECHI“, Username as “sysadm” and Paste Private Key of sysadm user in “SSH Private Key” Section, Choose ‘Privilege Escalation Method‘ as ‘sudo‘, ‘Privilege Escalation Username‘ as ‘sysadm‘ and ‘Privilege Escalation Password’ as {password-of-sysadm-user}
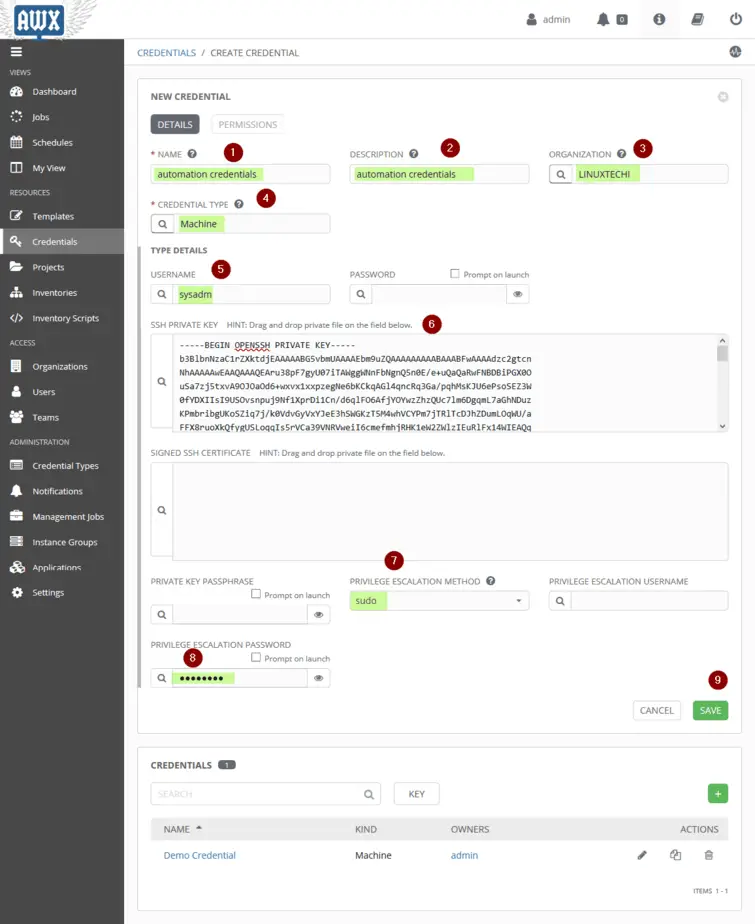
Click on SAVE,
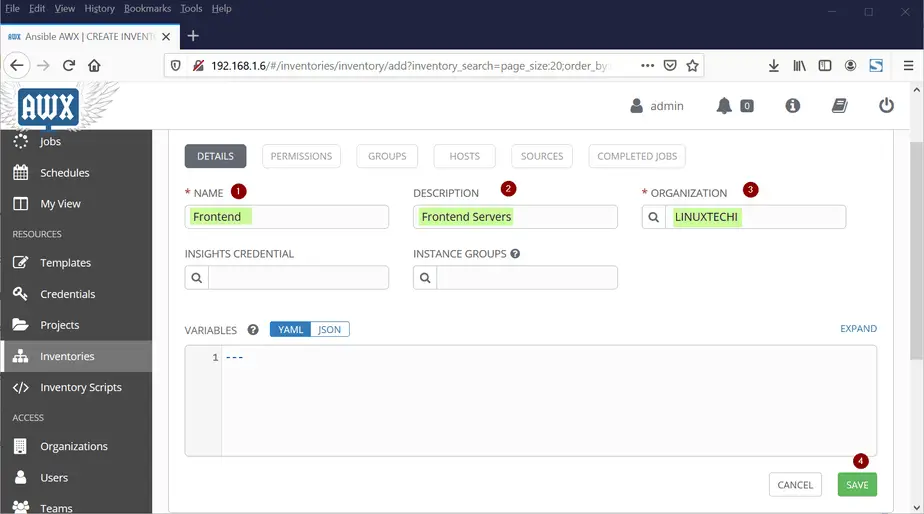
Step 5) Create an Inventory, add hosts to it and run ping module
To Create an inventory, Select the Inventory Tab and then click on + sign and specify the name of Inventory and choose organization as “LINUXTECHI“,
To Add hosts to Frontend Inventory, Choose SAVE option in above window then Click on HOSTS and the Click on ‘+’ symbol to start adding hosts, Specify the IP ADDRESS or Host name in the “HOST NAME” field and then click on save.
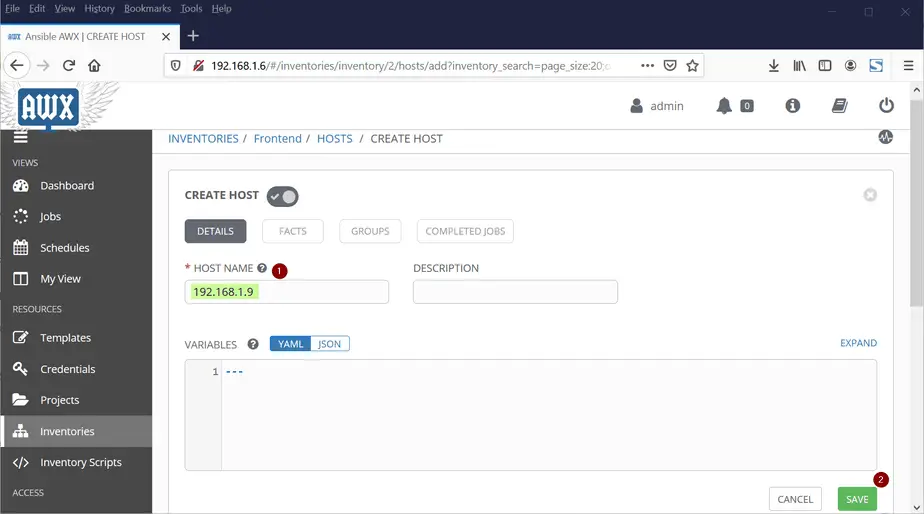
Similarly add another host “192.168.1.10”.
Let’s try to run ping module on one of the hosts to verify connectivity and credentials. Choose any of the host from inventory and the click on “RUN COMMANDS”
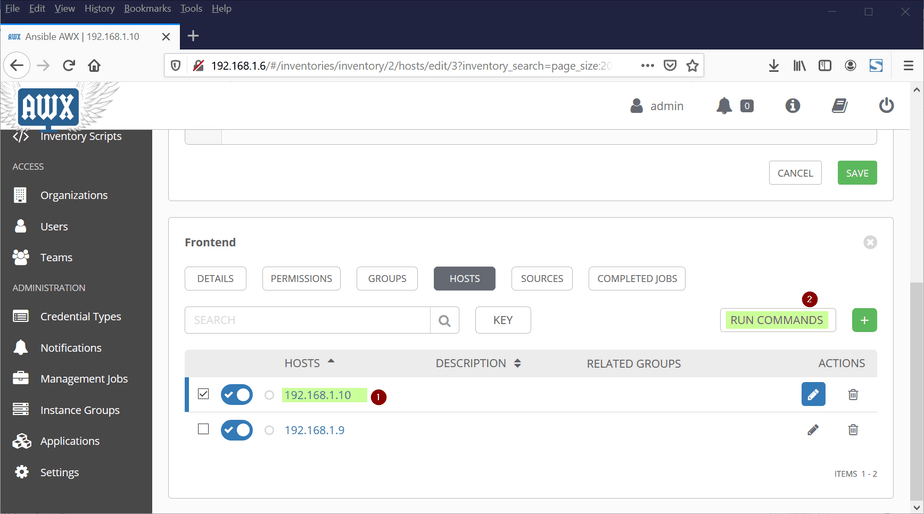
In the next window, choose ‘ping‘ from module section and Choose “automation credentials” from Machine Credentials,

Click on Launch and then we will get following screen,
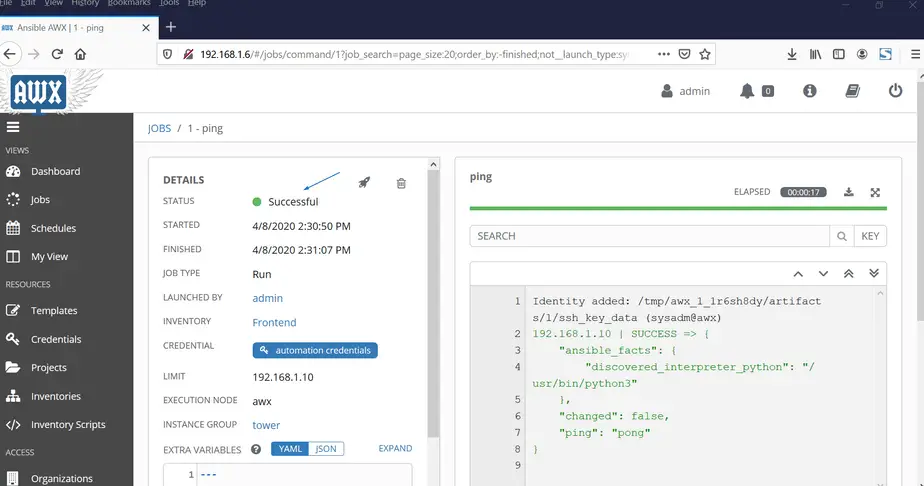
Perfect, above window confirms that Connectivity and credentials are working fine. Let’s move to the next step and create templates.
Step 5) Create and Run Job Template
To Create Job Template, choose “Template” Tab and the click on + sign and Choose “Job Template”
Specify the followings as:
- NAME : PKG Install
- Description : Install Bind Utils PKG
- JOB TYPE : Run
- INVENTORY : Frontend
- PROJECT : Automation
- PLAYBOOK : example.yaml
- CREDENTIALS : automation credentials
- Choose “ENABLE PRIVILEGE ESCALATION”
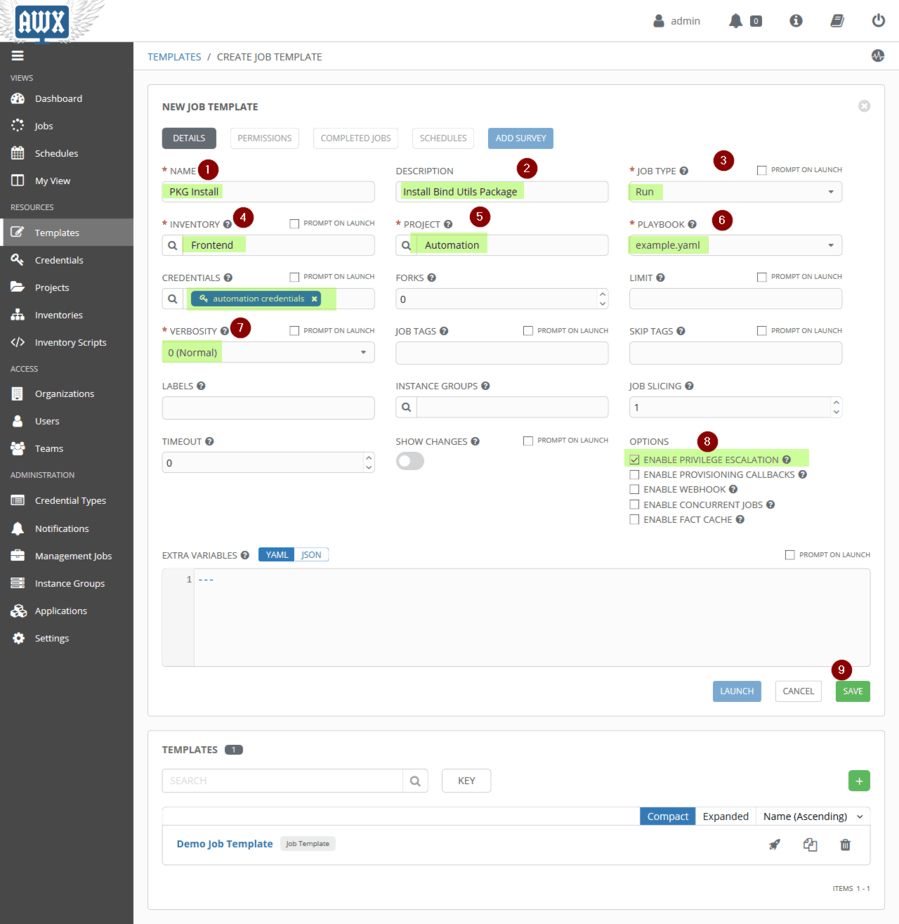
Click on SAVE
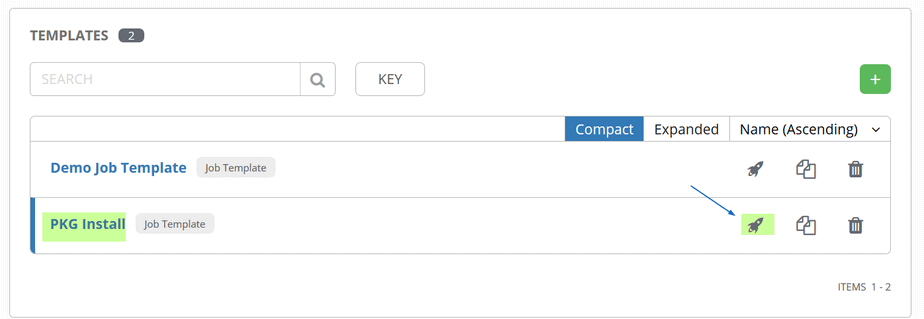
Now try to Run the Job and see whether Job is executed is successfully, here execution of Job is nothing but Ansible playbook execution on inventory using the credentials that we have created in above steps.
Select the Job as “PKG Install” and the click on Rocket Symbol to run the Job,
We will get the following screen, if Job or Ansible Playbook is executed successfully then we should get success message.
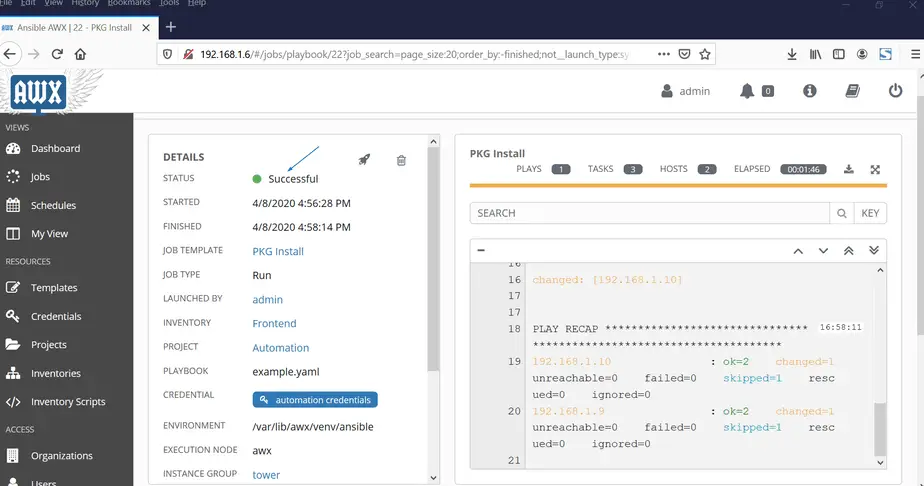
Great, Job was executed successfully, let schedule this job.
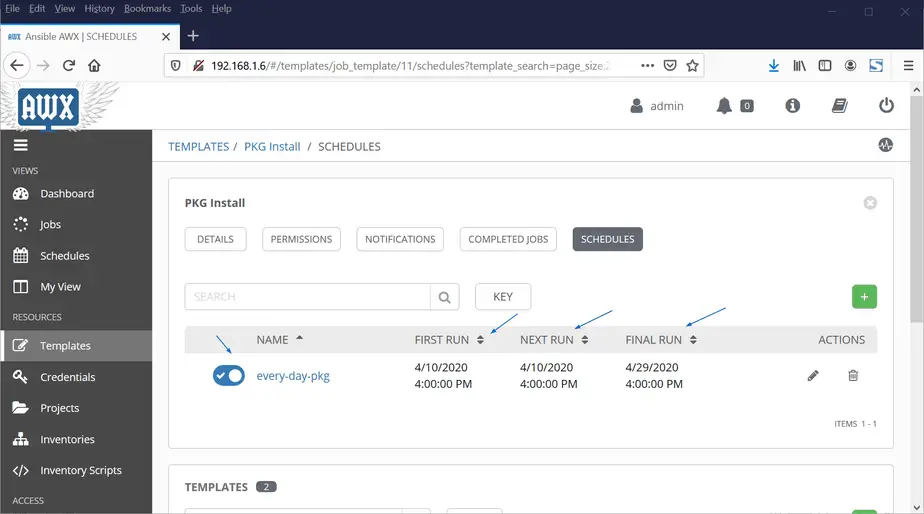
Step 6) Scheduling Job Template
Choose the Job Template which you want to schedule, in my case it would be “PKG Install” and the choose “SCHEDULES” option and the click on + sign to create a new schedule,
Let’s Assume we want to create a schedule in such a way that Job will be executed every day at 16:00 Hours till 30th April,
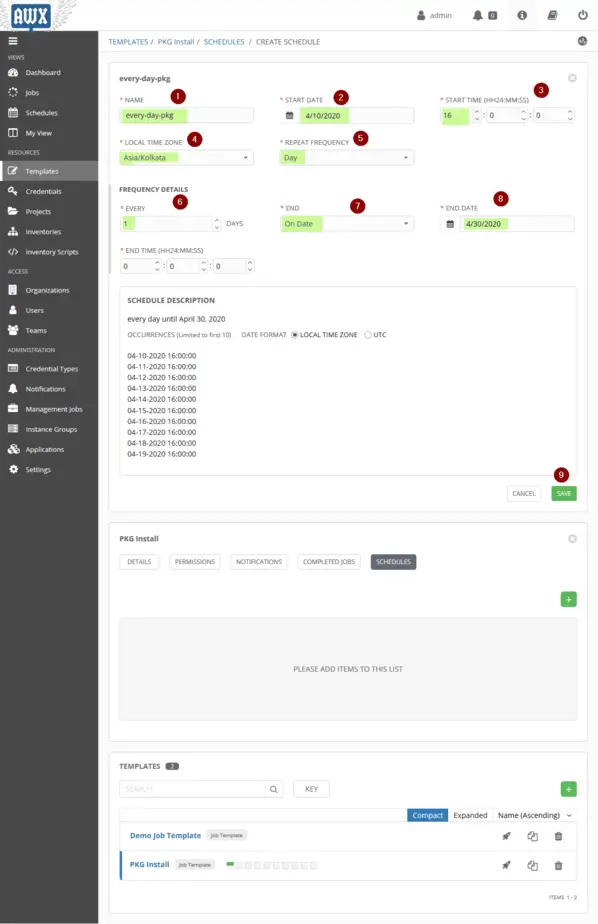
Click on Save to enable this schedule for Job Template “PKG Install“.
That’s all from this article, I hope these steps helps to understand the basic usage of Ansible AWX GUI and how Ansible Playbooks are executed via Job template. Please don’t hesitate to share your feedback and comments.
Excellent post,
can you please give me one example by running a play book to copy one file from /srcfile1 to target node to /targetfile1 by using copy module.
Here I dont know how the src: flag will work as my source awx server is in a container not exactly on a base