Are you looking for easy guide on how to install memcached?
The step-by-step guide on this page will show you how to install memcached on RHEL 8 / CentOS 8 stream.
Memcached is a high-performance, opensource in-memory key-value caching service that comes in handy in a variety of ways. First, it helps speed up the applications by caching session data, user authentication tokens, and API calls. Furthermore, it provides a mechanism that helps in sharing data across multiple application instances.
So, what are the benefits of using Memcached? We can summarize the advantages into two: improving application performance and reducing the cost of running your applications since it’s free.
What you need
As you get started out, ensure you that the following requirements are fulfilled:
- Minimal Installed RHEL 8 or CentOS 8 stream.
- A standard user with sudo or elevated privileges
Without much further ado, let’s roll up our sleeves and get busy.
Step 1) Install Memcached Caching Server
To install the Memcached caching server, first update the system package list using the command:
$ sudo dnf update -y
Since the Memcached package alongside its dependencies is present on the AppStream repositories, we will install Memcached using the default package manager as shown:
$ sudo dnf install -y memcached libmemcached
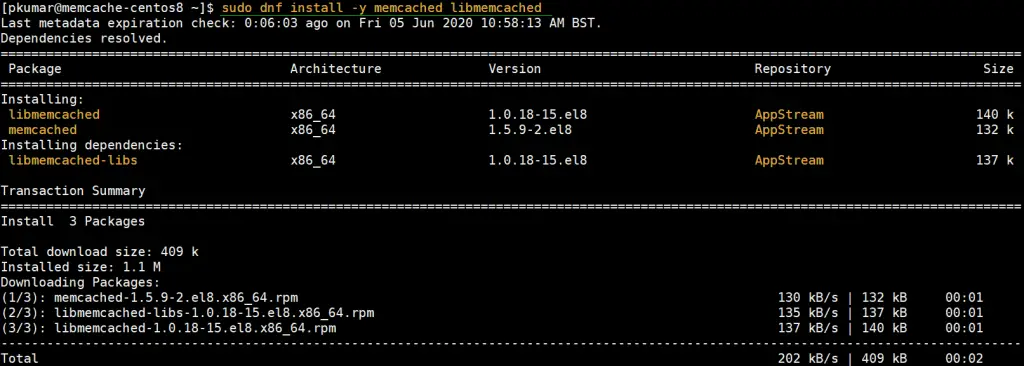
Finally, you will get the output below to indicate that the installation was successful.

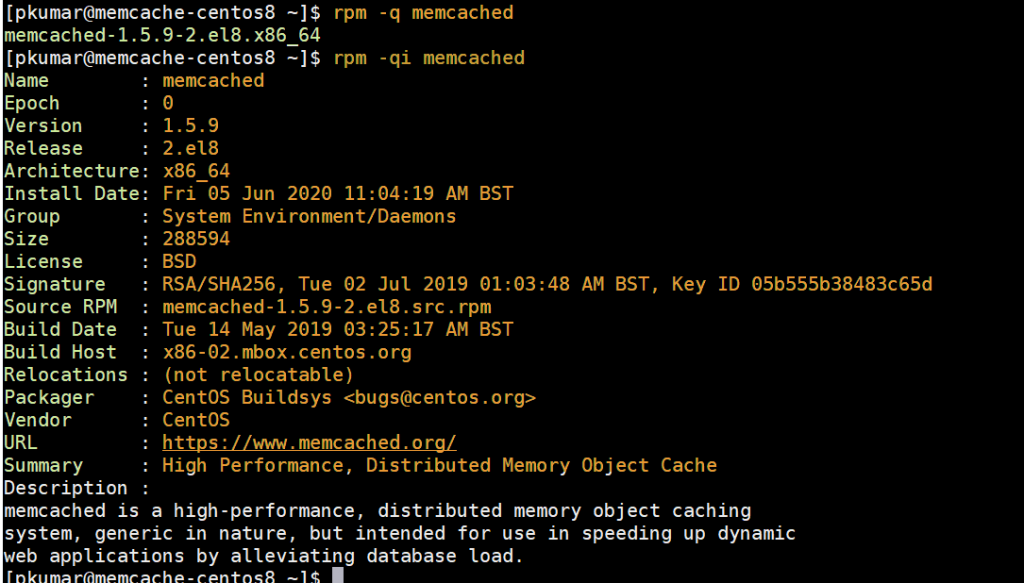
To be sure that Memcached is installed on RHEL 8 / CentOS 8, execute:
$ rpm -q memcached
memcached-1.5.9-2.el8.x86_64
$
For more detailed information about Memcached, use the -qi arguments as shown. This displays more in-depth information such as the Memcached version, Architecture, install date, build date and so much more.
$ rpm -qi memcached
Step 2) Configure Memcached
The Memcached default configuration file is /etc/sysconfig/memcached. By default, it listens on port 11211 and on the localhost, system denoted by 127.0.0.1 as observed on line 5.
$ cat -n /etc/sysconfig/memcached
     1  PORT="11211"
     2  USER="memcached"
     3  MAXCONN="1024"
     4  CACHESIZE="64"
     5  OPTIONS="-l 127.0.0.1,::1"
$
If the application you intend to connect to Memcached is located on the same server as Memcached, please leave the default configuration as it is.
If you have an application running on a remote system, on the same LAN and you’d want it to connect to the Memcached server, adjust line 5 by replacing the localhost address 127.0.0.1 with the IP address of the remote system.
For example, the remote system on which our application is hosted has an IP 192.168.2.100. Therefore, adjust the configuration file as shown.
$ sudo vi /etc/sysconfig/memcached
      1 PORT="11211"
      2 USER="memcached"
      3 MAXCONN="1024"
      4 CACHESIZE="64"
      5 OPTIONS="-l 192.168.2.100,::1"
Save and exit the configuration file.
Step 3) Configure Firewall Rules for Memcached
Additionally, we need to allow traffic to the Memcached server by opening the default port ( port 11211) on the firewall.
Therefore, run the commands below:
$ sudo firewall-cmd --add-port=11211/tcp --zone=public --permanent
$ sudo firewall-cmd --reload
Step 4) Start and Enable memcached service
With all the configurations done with, start, and enable Memcached as shown:
$ sudo systemctl start memcached
$ sudo systemctl enable memcached
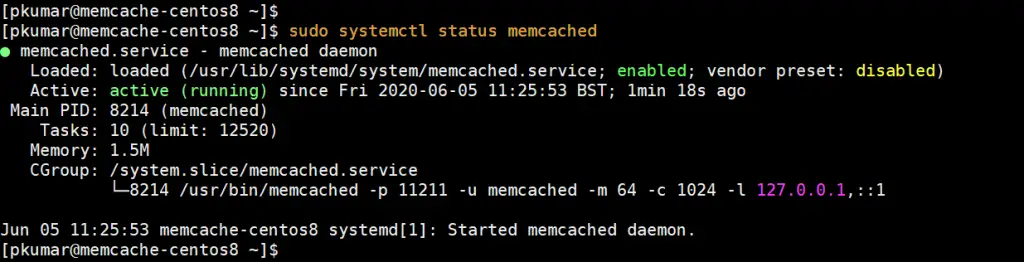
To confirm that Memcached is up and running, run the command:
$ sudo systemctl status memcached
Integrating Memcached with PHP
As we stated earlier, Memcached can be used in speeding up applications. For that to happen, you need to install a language-specific client on the server. For example, if you are running a PHP application such as WordPress, OwnCloud or Magento, install the php-pecl-memcache extension as shown.
Above said extension or package is not available in the default CentOS 8 repositories, so first we must enable epel and remi repositories, run the following commands one after the another,
$ sudo dnf install epel-release -y
$ sudo dnf install https://rpms.remirepo.net/enterprise/remi-release-8.rpm -y
$ sudo dnf module enable php:remi-7.4 -y
$ sudo dnf install -y php-pecl-memcache php-pecl-memcached
Read Also: How to Install PHP 7.4 on CentOS 8 / RHEL 8
Now to test it, let’s install a web server and other PHP dependencies
$ sudo dnf install -y nginx php php-cli
Now start web server’s service (nginx) and create a test PHP page to verify whether Memcached is enabled for PHP or Not
$ sudo systemctl enable nginx.service –now
$ sudo systemctl restart memcached.service
$ sudo vi /usr/share/nginx/html/info.php
Now paste the following content into the file and save the changes.
<?php
phpinfo();
?>
Thereafter, head out to your browser and browse the address below
http://server-ip/info.php
Scroll down and be on the lookout for the Memcached section that displays all the information about Memcached.
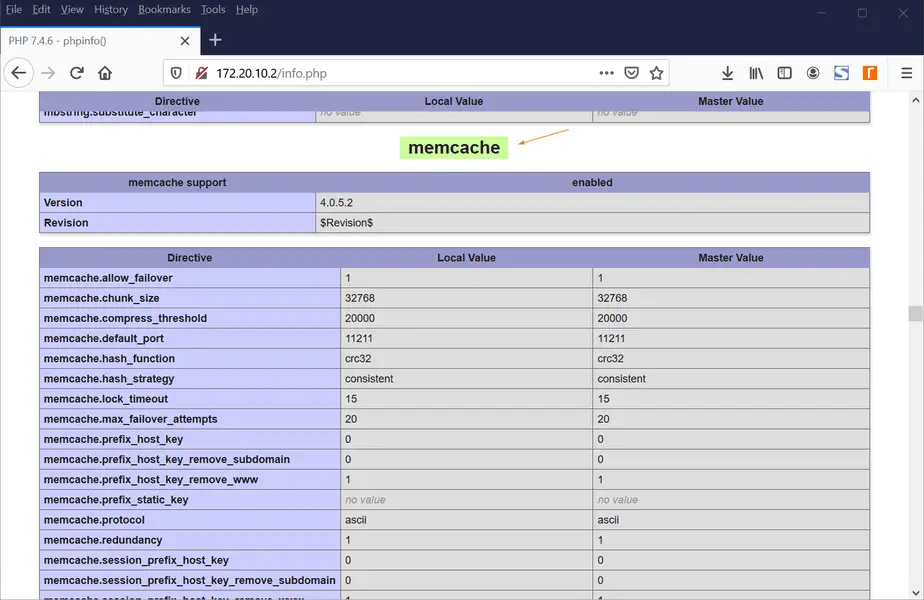

This is a confirmation that Memcached is installed and working well with PHP and your Nginx web server.
Integrate Memcached for Python-based applications
For Python applications, ensure that you install pymemcache and python-memcached libraries as shown using pip.
$ pip3 install pymemcache --user
$ pip3 install python-memcached --user
As we wrap up, Memcached is a simple and cost-effective way of speeding up your applications by caching frequently used content. It’s free and opensource and you can tweak it to your preferences. You can visit the Memcached Wiki for or more detailed information about Memcached.
Read Also: How to Install and Configure KVM on RHEL 8 / CentOS 8