In our previous guide, we demonstrated how to install and configure HAProxy as a load balancer on Ubuntu 22.04. This guide is a continuation of that guide and, we will go a step further and demonstrate how to setup HAProxy SSL termination on Ubuntu 22.04 step by step.
HA Proxy is a widely used and opensource HTTP load balancer and proxying solution for Linux, Solaris, and FreeBSD environments. It’s used to enhance the performance and reliability of web servers by distributing the workload across multiple servers. By so doing, it provides high availability of services and applications.
SSL Termination
The previous guide did not take into consideration the encryption of web traffic that goes through the HA Proxy load balancer. The incoming traffic that goes through the load balancer is in plain text and is, therefore, insecure and prone to eavesdropping by nefarious third parties.
HAProxy can be configured to encrypt the traffic it receives before distributing it across the multiple backend servers. This is a preferred approach as opposed to encrypting individual backend servers which can be a tedious process This is where SSL termination comes in.
The HAProxy encrypts the traffic between itself and the client and then relays the messages in clear text to the backend servers in your internal network. It then encrypts the response from the backend servers and relays them to the clients
The TLS/SSL certificates are stored only on the HAProxy load balancer rather than the multiple backend servers, thus reducing the workload on the servers.
To demonstrate SSL termination, we will secure and configure the HAProxy load balancer with the Let’s encrypt certificate.
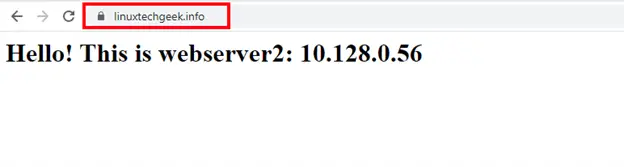
For this to work, you need a Fully Qualified Domain Name (FQDN) or simply a registered domain name pointed to your HAProxy’s public IP address. In this guide, we have a domain called linuxtechgeek.info pointed to our HAProxy’s public IP.
Step 1) Install Certbot
To obtain an SSL/TL certificate from Let’s Encrypt Authority, you first need to install certbot. Certbot is free and opensource software that is used for automating the deployment of Let’s Encrypt SSL certificates on websites.
To install certbot login into the HAProxy server and, first, update the local package index:
$ sudo apt update
Next, install certbot using the following command:
$ sudo apt install -y certbot python3-certbot-apache
The python3-certbot-apache package is a plugin that allows Cerbot to work with Apache. With certbot installed, we can now proceed to obtain the SSL certificate.
Step 2) Obtaining SSL Certificate
Let’s Encrypt provides a number of ways to obtain SSL Certificates using various plugins. Most of the plugins only assist in obtaining the certificate which requires manual configuration of the web server. These plugins are called ‘authenticators’ because they merely check whether the server should be issued a certificate.
In this guide, we will show you how to obtain the SSL certificate using the Standalone plugin. The plugin employs a seamless method of obtaining SSL certificates. It does so by temporarily spawning a small web server on port 80 to which Let’s Encrypt CA can connect and validate your server’s identity before issuing a certificate.
As such, you need to ensure that no service is listening on port 80. To check which services are listening on port 80, run the command.
$ netstat -na | grep ':80.*LISTEN'
If Apache is running on the HAProxy server, stop it as shown.
$ sudo systemctl stop apache2
Next, run certbot using the standalone plugin to obtain the certificate
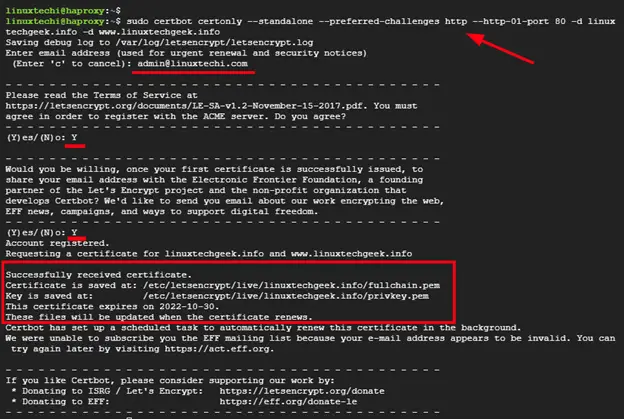
$ sudo certbot certonly --standalone --preferred-challenges http --http-01-port 80 -d linuxtechgeek.info -d www.linuxtechgeek.info
The plugin will walk you through a series of prompts. You will be prompted to provide your email address and later agree to the Let’s Encrypt Terms of Service. Also, you can decide to opt-in to receive EFF’s emails about news and campaigns surrounding digital freedom.
If all goes well, the SSL certificate and key will be successfully saved on the server. These files are themselves saved in the /etc/letsencrypt/archives directory, but certbot creates a symbolic link to the /etc/letsencrypt/live/your_domain_name path.
Once the certificate has been obtained, you will have the following files in the /etc/letsencrypt/live/your_domain_name directory.
- cert.pem – This is your domain’s certificate.
- chain.pem – This is Let’s Encrypt chain certificate.
- fullchain.pem – Contains a combination of cert.pem and chain.pem
- privkey.pem – The private key to your certificate.
Step 3) Configure HAProxy to use SSL Certificate
For HAProxy to carry out SSL Termination – so that it encrypts web traffic between itself and the clients or end users – you must combine the fullchain.pem and privkey.pem file into one file.
But before you do so, create a directory where all the files will be placed.
$ sudo mkdir -p /etc/haproxy/certs
Next, create the combined file using the cat command as follows.
$ DOMAIN='linuxtechgeek.info' sudo -E bash -c 'cat /etc/letsencrypt/live/$DOMAIN/fullchain.pem /etc/letsencrypt/live/$DOMAIN/privkey.pem > /etc/haproxy/certs/$DOMAIN.pem'

Next, secure the file by assign the following permissions to the directory using chomd command.
$ sudo chmod -R go-rwx /etc/haproxy/certs
Now access the HAProxy configuration file.
$ sudo vim /etc/haproxy/haproxy.cfg
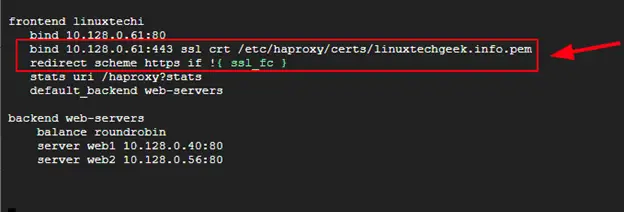
In the frontend section add an entry that binds your server’s IP to port 443 followed by the path to the combined key.
bind haproxy-ip:443 ssl crt /etc/haproxy/certs/domain.pem
To enforce redirection from HTTP to HTTPS, add the following entry.
redirect scheme https if !{ ssl_fc }
Save the changes and exit the configuration file. Be sure to confirm that the syntax for HAProxy is okay using the following syntax.
$ sudo haproxy -f /etc/haproxy/haproxy.cfg -c

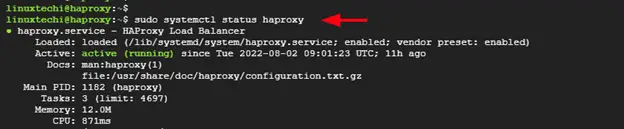
To apply the changes made, restart HAProxy
$ sudo systemctl restart haproxy
And ensure that it is running.
$ sudo systemctl status haproxy
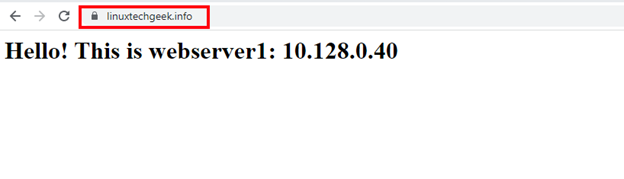
Step 4) Verifying SSL Termination
Finally, refresh your browser, and this time around, you will find that your load balancer is now secured with a TLS/SSL as evidenced by the padlock icon in the URL bar.
Conclusion
In this guide, we have demonstrated how to set up SSL termination with HAProxy on Ubuntu 22.04. Your feedback is welcome.