Welcome back LinuxTechi users, with the continuation of our openstack deployment with Tripleo approach. In this tutorial we will discuss the steps how we can deploy tripleo overcloud Servers (Controller and Compute) via undercloud on CentOS 7 VMs hosted in KVM hypervisor.
In our last article we have already discussed our lab setup details and installation of tripleo Undercloud on CentOS 7, for undercloud installation steps refer:
I am assuming undercloud is already installed and configured. Let’s start overcloud deployment steps.
Step:1 Download and Import Overcloud images
Login to the undercloud server as stack user and download the overcloud images from the below url, in my case I am using latest version of openstack( i.e pike), you can download the images that suits to your environment and openstack version,
https://images.rdoproject.org/pike/delorean/current-tripleo-rdo/
[stack@undercloud ~]$ sudo wget https://images.rdoproject.org/pike/delorean/current-tripleo-rdo/overcloud-full.tar --no-check-certificate
[stack@undercloud ~]$ sudo wget https://images.rdoproject.org/pike/delorean/current-tripleo-rdo/ironic-python-agent.tar --no-check-certificate
[stack@undercloud ~]$ mkdir ~/images
[stack@undercloud ~]$ tar -xpvf ironic-python-agent.tar -C ~/images/
[stack@undercloud ~]$ tar -xpvf overcloud-full.tar -C ~/images/
[stack@undercloud ~]$  source ~/stackrc
(undercloud) [stack@undercloud ~]$ openstack overcloud image upload --image-path ~/images/
Now view the uploaded images
(undercloud) [stack@undercloud ~]$ openstack image list

+--------------------------------------+------------------------+--------+
| ID                                   | Name                   | Status |
+--------------------------------------+------------------------+--------+
| 003300db-bbe1-4fc3-af39-bca9f56cc169 | bm-deploy-kernel       | active |
| 1a1d7ddf-9287-40fb-aea5-3aacf41e76a2 | bm-deploy-ramdisk      | active |
| be978ecb-2d33-4faf-80c0-8cb0625f1a45 | overcloud-full         | active |
| 0c0c74bc-0b0f-4324-81b4-e0abeed9455e | overcloud-full-initrd  | active |
| 0bf28731-d645-401f-9557-f24b3b8a6912 | overcloud-full-vmlinuz | active |
+--------------------------------------+------------------------+--------+
(undercloud) [stack@undercloud ~]$
Step:2 Add DNS Server in the undercloud network
Use below openstack command to view the subnet
(undercloud) [stack@undercloud ~]$ openstack subnet list
+--------------------------------------+-----------------+--------------------------------------+------------------+
| ID                                   | Name            | Network                              | Subnet           |
+--------------------------------------+-----------------+--------------------------------------+------------------+
| b3c8033d-ea58-44f3-8de1-5d5e29cad74b | ctlplane-subnet | fe1c940b-7f89-428a-86e1-2d134ce8d807 | 192.168.126.0/24 |
+--------------------------------------+-----------------+--------------------------------------+------------------+
(undercloud) [stack@undercloud ~]$ openstack subnet show  b3c8033d-ea58-44f3-8de1-5d5e29cad74b
Use below command to add dns server
(undercloud) [stack@undercloud ~]$ neutron subnet-update b3c8033d-ea58-44f3-8de1-5d5e29cad74b --dns-nameserver 192.168.122.1
Now verify whether DNS server has been added or not
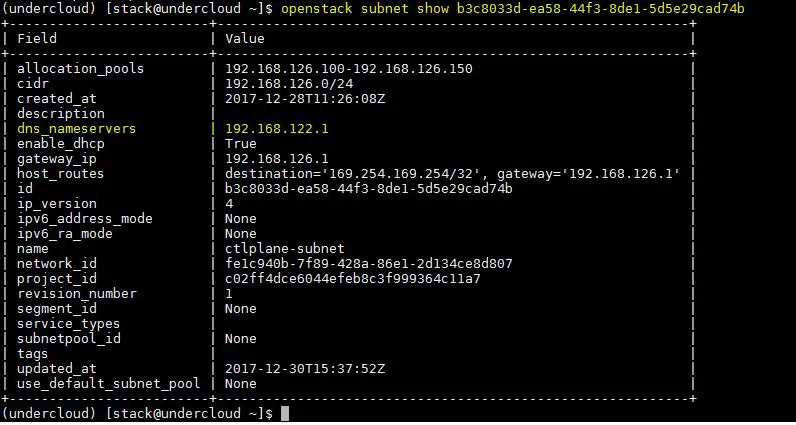
(undercloud) [stack@undercloud ~]$ openstack subnet show b3c8033d-ea58-44f3-8de1-5d5e29cad74b
Output would be something like below
Step:3 Create VMs for Overcloud’s Controller & Compute
Go to physical server or KVM hypervisor and define two VMs for compute and One for controller node.
Use below commands to create qcow2 image for controller and compute VMs.
[root@kvm-hypervisor ~]# cd /var/lib/libvirt/images/
[root@kvm-hypervisor images]# qemu-img create -f qcow2 -o preallocation=metadata overcloud-controller.qcow2 60G
[root@kvm-hypervisor images]# qemu-img create -f qcow2 -o preallocation=metadata overcloud-compute1.qcow2 60G
[root@kvm-hypervisor images]# qemu-img create -f qcow2 -o preallocation=metadata overcloud-compute2.qcow2 60G
[root@kvm-hypervisor images]# chown qemu:qemu overcloud-*
Use below Virt-install and virsh define command to create and define overcloud vms in KVM hypervisor,
Note: Change RAM, vcpu and CPU family that suits to your environment
[root@kvm-hypervisor ~]# virt-install --ram 8192 --vcpus 2 --os-variant rhel7 --disk path=/var/lib/libvirt/images/overcloud-controller.qcow2,device=disk,bus=virtio,format=qcow2 --noautoconsole --vnc --network network:provisioning --network network:external --name overcloud-controller --cpu Haswell,+vmx --dry-run --print-xml > /tmp/overcloud-controller.xml
[root@kvm-hypervisor ~]#
[root@kvm-hypervisor ~]# virt-install --ram 8192 --vcpus 2 --os-variant rhel7 --disk path=/var/lib/libvirt/images/overcloud-compute1.qcow2,device=disk,bus=virtio,format=qcow2 --noautoconsole --vnc --network network:provisioning --network network:external --name overcloud-compute1 --cpu Haswell,+vmx --dry-run --print-xml > /tmp/overcloud-compute1.xml
[root@kvm-hypervisor ~]#
[root@kvm-hypervisor ~]# virt-install --ram 8192 --vcpus 2 --os-variant rhel7 --disk path=/var/lib/libvirt/images/overcloud-compute2.qcow2,device=disk,bus=virtio,format=qcow2 --noautoconsole --vnc --network network:provisioning --network network:external --name overcloud-compute2 --cpu Haswell,+vmx --dry-run --print-xml > /tmp/overcloud-compute2.xml
[root@kvm-hypervisor ~]#
[root@kvm-hypervisor ~]# virsh define --file /tmp/overcloud-controller.xml
[root@kvm-hypervisor ~]# virsh define --file /tmp/overcloud-compute1.xml
[root@kvm-hypervisor ~]# virsh define --file /tmp/overcloud-compute2.xml
Verify the VMs status using virsh list command,
[root@kvm-hypervisor ~]# virsh list --all | grep overcloud*
 -     overcloud-compute1             shut off
 -     overcloud-compute2             shut off
 -     overcloud-controller           shut off
[root@kvm-hypervisor ~]#
Step:4 Install and Configure vbmc (Virtual BMC) on undercloud
Vbmc is power management tool for virtual machines, VMs can be managed via ipmitool.
Using vbmc we can power off, power on and also verify the power status of a VM. We require vbmc as undercloud will require to power on / off VMs during the deployment.
Note: vbmc is the replacement of pxe_ssh as pxe_ssh is depreciated now.
Run below yum install command to install virtualbmc,
[stack@undercloud ~]$ sudo yum install python-virtualbmc -y
Exchange the ssh keys from cloudcloud vm to physical server (KVM hypervisor)
[stack@undercloud ~]$ ssh-copy-id [email protected]
Add the VMs to vbmc using the following commands, In my case libvirt-uri is “qemu+ssh://[email protected]”
[stack@undercloud ~]$ vbmc add overcloud-compute1 --port 6001 --username admin --password password --libvirt-uri qemu+ssh://[email protected]/system
[stack@undercloud ~]$ vbmc start overcloud-compute1
[stack@undercloud ~]$ vbmc add overcloud-compute2 --port 6002 --username admin --password password --libvirt-uri qemu+ssh://[email protected]/system
[stack@undercloud ~]$ vbmc start overcloud-compute2
[stack@undercloud ~]$ vbmc add overcloud-controller --port 6003 --username admin --password password --libvirt-uri qemu+ssh://[email protected]/system
[stack@undercloud ~]$ vbmc start overcloud-controller
Verify the VMs status and its ports,
[stack@undercloud ~]$ vbmc list
+----------------------+---------+---------+------+
|     Domain name      |  Status | Address | Port |
+----------------------+---------+---------+------+
|  overcloud-compute1  | running |    ::   | 6001 |
|  overcloud-compute2  | running |    ::   | 6002 |
| overcloud-controller | running |    ::   | 6003 |
+----------------------+---------+---------+------+
[stack@undercloud ~]$
To view power status of VMs, use below command,
[stack@undercloud ~]$ ipmitool -I lanplus -U admin -P password -H 127.0.0.1 -p 6001 power status
Chassis Power is off
[stack@undercloud ~]$ ipmitool -I lanplus -U admin -P password -H 127.0.0.1 -p 6002 power status
Chassis Power is off
[stack@undercloud ~]$ ipmitool -I lanplus -U admin -P password -H 127.0.0.1 -p 6003 power status
Chassis Power is off
[stack@undercloud ~]$
Step:5 Create and Import overcloud nodes inventory via json file
Let’s create a inventory file(json), it will include the details of overcloud servers (Controllers and Compute).
First capture mac address of over cloud nodes, for this go the kvm hypervisor run the below commands
[root@kvm-hypervisor ~]# virsh domiflist overcloud-compute1 | grep provisioning
-          network    provisioning virtio      52:54:00:08:63:bd
[root@kvm-hypervisor ~]# virsh domiflist overcloud-compute2 | grep provisioning
-          network    provisioning virtio      52:54:00:72:1d:21
[root@kvm-hypervisor ~]# virsh domiflist overcloud-controller | grep provisioning
-          network    provisioning virtio      52:54:00:0a:dd:57
[root@kvm-hypervisor ~]#
Now create a json file with name “overcloud-stackenv.json”
[stack@undercloud ~]$ vi overcloud-stackenv.json
{
  "nodes": [
    {
      "arch": "x86_64",
      "disk": "60",
      "memory": "8192",
      "name": "overcloud-compute1",
      "pm_user": "admin",
      "pm_addr": "127.0.0.1",
      "pm_password": "password",
      "pm_port": "6001",
      "pm_type": "pxe_ipmitool",
      "mac": [
        "52:54:00:08:63:bd"
      ],
      "cpu": "2"
    },
    {
      "arch": "x86_64",
      "disk": "60",
      "memory": "8192",
      "name": "overcloud-compute2",
      "pm_user": "admin",
      "pm_addr": "127.0.0.1",
      "pm_password": "password",
      "pm_port": "6002",
      "pm_type": "pxe_ipmitool",
      "mac": [
        "52:54:00:72:1d:21"
      ],
      "cpu": "2"
    },
    {
      "arch": "x86_64",
      "disk": "60",
      "memory": "8192",
      "name": "overcloud-controller",
      "pm_user": "admin",
      "pm_addr": "127.0.0.1",
      "pm_password": "password",
      "pm_port": "6003",
      "pm_type": "pxe_ipmitool",
      "mac": [
        "52:54:00:0a:dd:57"
      ],
      "cpu": "2"
    }
  ]
}
Replace the mac address of the VMs that suits to your environment.
Import the Nodes and do the introspection using below command
[stack@undercloud ~]$ source stackrc
(undercloud) [stack@undercloud ~]$ openstack overcloud node import --introspect --provide overcloud-stackenv.json
Output of above command should be something like below:
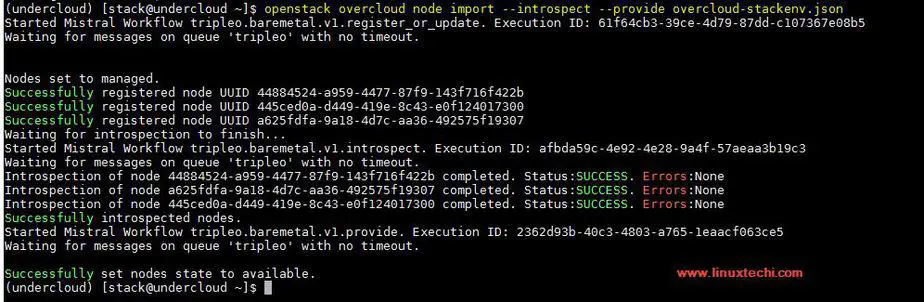
View the overcloud node details using the below command and we have to make sure provisioning state of each node should be available:
(undercloud) [stack@undercloud ~]$ openstack baremetal node list
+--------------------------------------+----------------------+---------------+-------------+--------------------+-------------+
| UUID                                 | Name                 | Instance UUID | Power State | Provisioning State | Maintenance |
+--------------------------------------+----------------------+---------------+-------------+--------------------+-------------+
| 44884524-a959-4477-87f9-143f716f422b | overcloud-compute1   | None          | power off   | available          | False       |
| 445ced0a-d449-419e-8c43-e0f124017300 | overcloud-compute2   | None          | power off   | available          | False       |
| a625fdfa-9a18-4d7c-aa36-492575f19307 | overcloud-controller | None          | power off   | available          | False       |
+--------------------------------------+----------------------+---------------+-------------+--------------------+-------------+
(undercloud) [stack@undercloud ~]$
Set Roles or Profile to overcloud nodes:
To set the role to each overcloud node, use the below commands. VMs with name “overloud-compute1/2” will act as a openstack compute node and VM with name “overcloud-controller” will act as openstack compute node.
(undercloud) [stack@undercloud ~]$ openstack baremetal node set --property capabilities='profile:compute,boot_option:local' 44884524-a959-4477-87f9-143f716f422b
(undercloud) [stack@undercloud ~]$ openstack baremetal node set --property capabilities='profile:compute,boot_option:local' 445ced0a-d449-419e-8c43-e0f124017300
(undercloud) [stack@undercloud ~]$ openstack baremetal node set --property capabilities='profile:control,boot_option:local' a625fdfa-9a18-4d7c-aa36-492575f19307
Now use below openstack command to verify the role of each node,
(undercloud) [stack@undercloud ~]$ openstack overcloud profiles list
+--------------------------------------+----------------------+-----------------+-----------------+-------------------+
| Node UUID                            | Node Name            | Provision State | Current Profile | Possible Profiles |
+--------------------------------------+----------------------+-----------------+-----------------+-------------------+
| 44884524-a959-4477-87f9-143f716f422b | overcloud-compute1   | available       | compute         |                   |
| 445ced0a-d449-419e-8c43-e0f124017300 | overcloud-compute2   | available       | compute         |                   |
| a625fdfa-9a18-4d7c-aa36-492575f19307 | overcloud-controller | available       | control         |                   |
+--------------------------------------+----------------------+-----------------+-----------------+-------------------+
(undercloud) [stack@undercloud ~]$
Step:6 Start deployment of Overcloud Nodes
As of now we have completed all the steps whatever is required for overcloud deployment from undercloud server,
Run the below openstack command from undercloud to start the deployment,
(undercloud) [stack@undercloud ~]$ openstack overcloud deploy --templates --control-scale 1 --compute-scale 2 --control-flavor control --compute-flavor compute
In the above command we are using the options like “–compute-scale 2” and “–control-scale 1“, it means we will use two compute nodes and one controller node.
Please note that the above command will take approx. 40 to 50 minutes or more depending on hardware or vm performance. So, you have to wait until the above command will not finished
Output of the above command should be something like below:
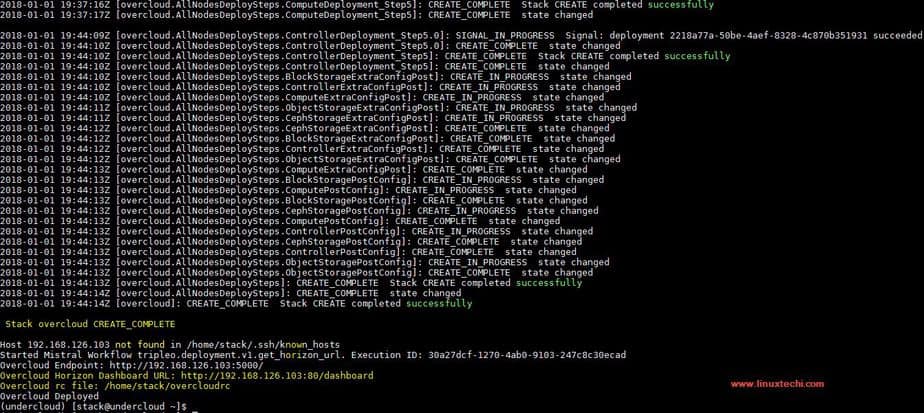
Run the beneath command to view IP address of overcloud nodes
(undercloud) [stack@undercloud ~]$ nova list
+--------------------------------------+-------------------------+--------+------------+-------------+--------------------------+
| ID                                   | Name                    | Status | Task State | Power State | Networks                 |
+--------------------------------------+-------------------------+--------+------------+-------------+--------------------------+
| 8c1a556f-9f79-449b-ae15-d111a96b8349 | overcloud-controller-0  | ACTIVE | -          | Running     | ctlplane=192.168.126.107 |
| 31e54540-79a3-4182-8ecc-6e0f8cd3db11 | overcloud-novacompute-0 | ACTIVE | -          | Running     | ctlplane=192.168.126.101 |
| edab92ce-825f-48c0-ba83-1445572c15b9 | overcloud-novacompute-1 | ACTIVE | -          | Running     | ctlplane=192.168.126.106 |
+--------------------------------------+-------------------------+--------+------------+-------------+--------------------------+
(undercloud) [stack@undercloud ~]$
Connect to Over Cloud nodes using ‘heat-admin‘ user:
(undercloud) [stack@undercloud ~]$ ssh [email protected]
Last login: Tue Jan 16 14:32:55 2018 from gateway
[heat-admin@overcloud-controller-0 ~]$ sudo -i
[root@overcloud-controller-0 ~]# hostname -f
overcloud-controller-0.localdomain
[root@overcloud-controller-0 ~]#
Similarly we can connect to rest of the compute nodes
Once the overcloud has been deployed successfully, all the admin credentials are stored in file “overcloudrc” in stack user’s home directory
(undercloud) [stack@undercloud ~]$ cat ~/overcloudrc
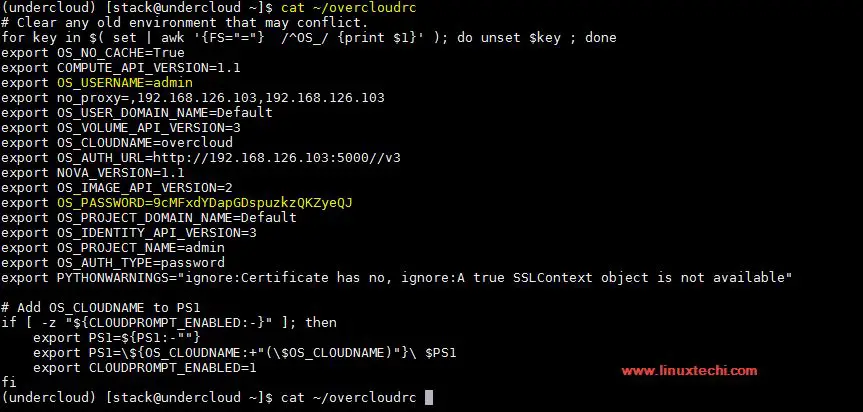
Now try to access the Horizon Dashboard using the credentials mentioned in overcloudrc file.
Open the Web Browser and type the url:
http://192.168.126.103/dashboard
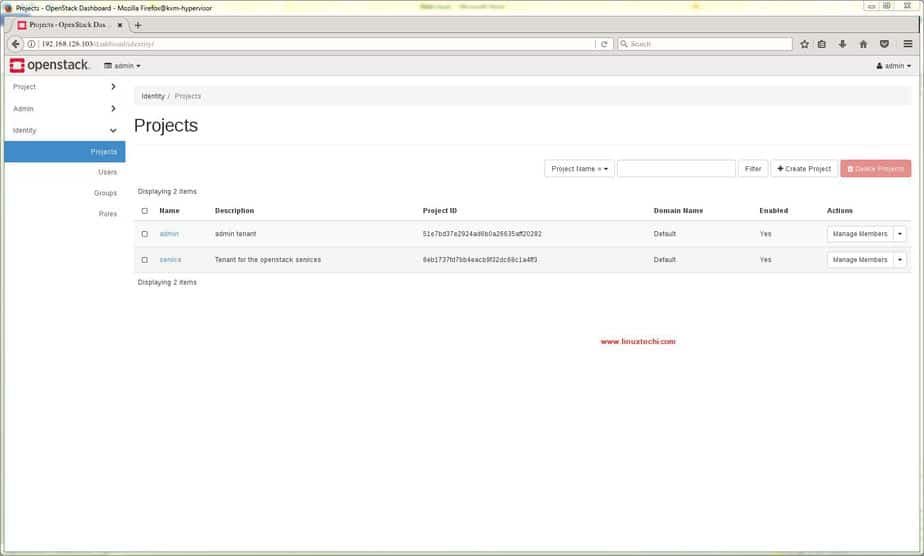
This confirms that overcloud has been deployed successfully. Now Create Projects, Networks and upload cloud images and then you start creating Virtual machines. That’s all from this tutorial, please do share your feedback and comments.
Introspection is going time out in my deployment.
Waiting for introspection to finish…
Waiting for messages on queue ‘tripleo’ with no timeout.
Introspection of node b2a8d39c-f171-4993-9b63-139bcbd83b3c timed out.
Introspection of node aaf8476c-eb59-4b83-8f4c-5b16091f717b timed out.
Introspection of node 200d162b-9cf5-419a-8883-3049176cf8dd timed out.
Retrying 3 nodes that failed introspection. Attempt 1 of 3
Introspection of node 200d162b-9cf5-419a-8883-3049176cf8dd timed out.
Introspection of node aaf8476c-eb59-4b83-8f4c-5b16091f717b timed out.
Introspection of node b2a8d39c-f171-4993-9b63-139bcbd83b3c timed out.
Hi..
I would like to request if you can run this tutorial based on current release such as train or stein at least…I have tried using the same approach as your guideline..but seems so many problems during undercloud and overcloud… I really hope you could update with new openstack release. Thank you sir.
Hi … I got an error due to ntp time sync during overcloud and failed my overcloud deployment.
“`
TASK [Ensure system is NTP time synced] ****************************************
fatal: [overcloud-controller-0]: FAILED! =>
“`
What could be the problem here… mind to share how to resolve it. Thank you