In this post, we will explain how to create partitions with parted command in Linux step by step.
Managing storage devices is one of the essential skills that any Linux user or systems administrator worth his salt needs to have. There are numerous ways of creating disk partitions in Linux, both graphical and on the command-line. In this guide, we feature an opensource tool known as parted. Parted is a collaborative effort of two developers – Andrew Clausen and Lennert Buytenhek.
1) Verify Parted Command-Line Tool
Most modern Linux systems ship with the parted tool. If the command-line is not already installed, proceed, and install it using the commands below:
For Debian / Ubuntu
$ sudo apt install -y parted
For CentOS / RHEL / Rocky Linux / Alma Linux
$ sudo yum install -y parted
Or
$ sudo dnf install -y parted
For Fedora
$ sudo dnf install -y parted
Once installed, you can display the version of parted command as follows
$ sudo parted
This displays additional information including the hard disk volume – in this case, /dev/sda
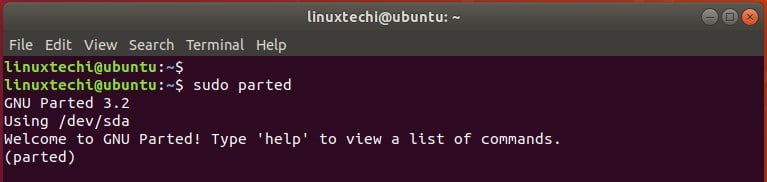
To exit, invoke the command quit as shown.
$ quit
2) List Existing Disk Partitions
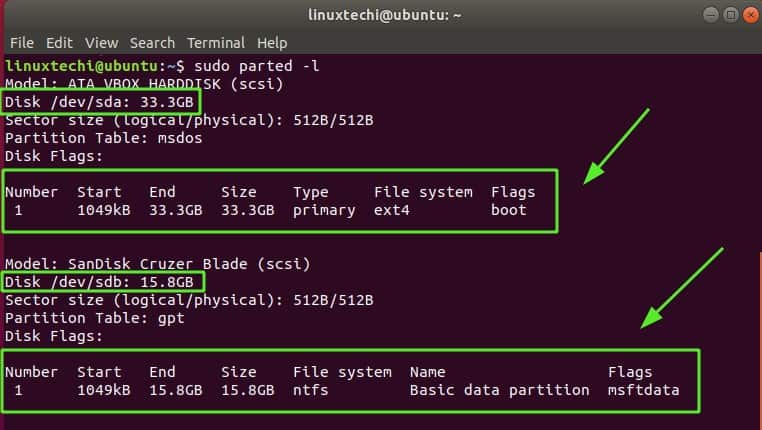
To get an overview of the disk volumes attached to your system, run the parted command shown.
$ sudo parted -l
The command displays a host of information such as
- Model or vendor of the hard disk
- Disk partition & size
- Partition table ( e.g msdos, gpt, bsd, aix, amiga, sun, mac and loop)
- Disk flags (such as size, type, and information about the filesystem)
In our case, we have Ubuntu installed on VirtualBox. In effect, our hard disk (/dev/sda) which is 40GB in size, is a virtual hard disk. We also have an attached external volume labeled /dev/sdb of size 16G.
NOTE: The first partition of the hard drive – /dev/sda – is usually the boot partition and that’s where the bootloader and other OS files are stored. As such, it’s usually not a good idea to create a partition from this disk since it can cause corruption of the bootloader and render your system unbootable.
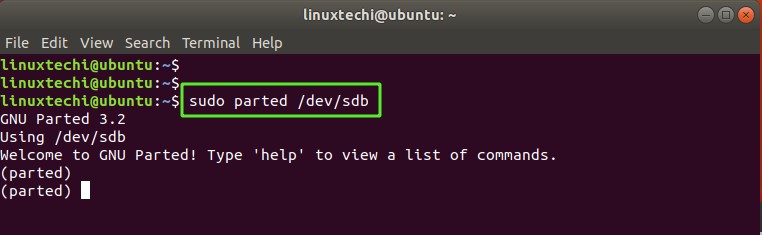
It’s a much safer bet to create new partitions on secondary disks such as /dev/sdb, /dev/sdc, /dev/sdd.
With this in mind, we will create a partition on the removable disk /dev/sdb.
3) Create a partition table
To create a separate partition, First, select the target disk as shown
$ sudo parted /dev/sdb
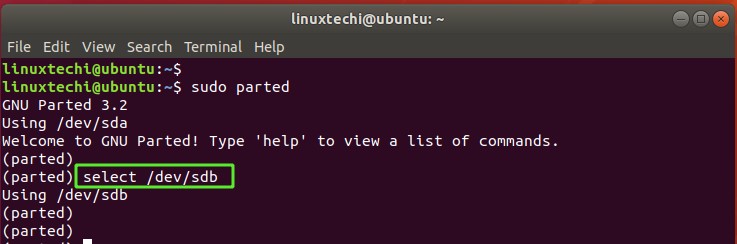
If you are already in the parted prompt, simply use the command to switch to the target disk.
(parted) select /dev/sdb
Next, create a partition table using the mklabel command as follows.
(parted) mklabel gpt
If the disk is still mounted, you will get the warning below.

To proceed without any issues, you first need to unmount the volume. So, quit the parted prompt and unmount as follows:
$ sudo umount /mount/point
Our current partition table for the external volume is GPT. We will set it to msdos partition type by running the command:
(parted) mklabel msdos
You’ll get a warning that the existing disk label will be destroyed and all the data deleted. But don’t worry. Your volume won’t get damaged. Just type ‘Yes’ and hit ENTER.
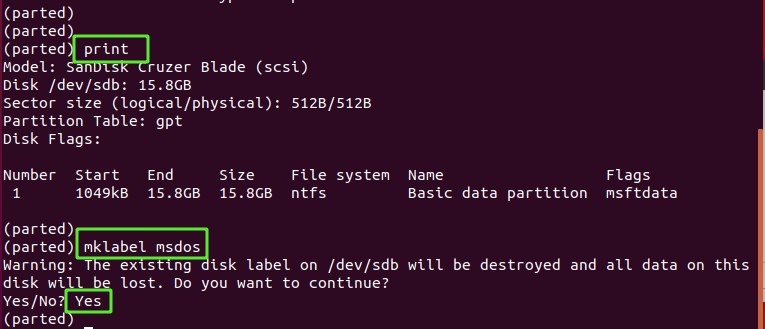
You can verify the change made using the print command as shown.
(parted) print

4) Create the partition with mkpart
After creating the partition table, the next step is to create a new partition. So, run the mkpart command as shown.
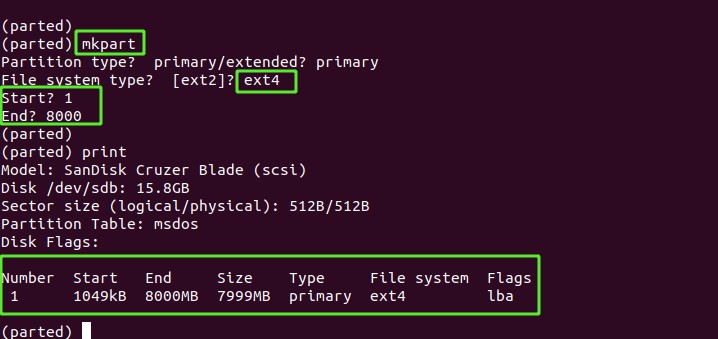
(parted) mkpart
Next, select your preferred partition type. In our case, we selected primary.
Thereafter, you will be prompted to provide a filesystem type. Again, provide your preferred type and hit ENTER. In our case, we decided to go with ext4.
We will create a partition size of 8GB.
For the start value, select 1. For the end value, we will type in 8000 to represent 8000MB which is the equivalent of 8GB. Once done, use the print command to confirm the creation of the new volume.
5) Format the Newly Created Partition with mkfs
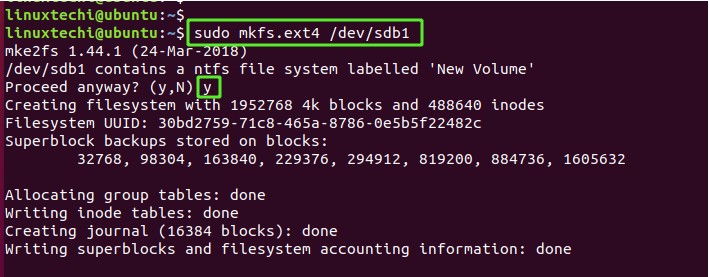
Once the partition is created, it acquires the suffix number 1 – i.e /dev/sdb1. You need to format and mount the partition for you to be able to interact with it.
To format the partition, use the mkfs command as shown. Here, we are formatting the partition as an ext4 filesystem.
$ sudo mkfs.ext4 /dev/sdb1
6) Mount the Partition with Mount Command
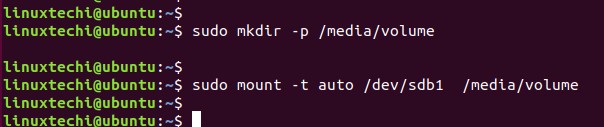
Next, create a mount point using the mkdir command as shown.
$ sudo mkdir -p /media/volume
Then mount the disk partition to the mount point as shown.
$ sudo mount -t auto /dev/sdb1 /media/volume
You can now use the df command to verify that the partition is listed in the output.
And that’s where we wrap up this tutorial. We hope we have shed enough light on how to create disk partitions using the parted command in Linux.
Also Read : How to Create Thin Provisioned Logical Volumes in Linux