In this blog post, we will show you how to setup high availability NFS cluster on RHEL 9 / 8 using pacemaker.
NFS (Network File System) is the most widely server to provide files over network. With NFS server we can share folders over the network and allowed clients or system can access those shared folders and can use them in their applications. When it comes to the production environment then we should configure nfs server in high availability to rule out the single point of failure.
Prerequisites
- Pre-Install RHEL 9/8 on node1 & node2
- Red Hat Subscription or local yum repository
- Root User or Sudo User with Admin access
- Remote SSH Access
Lab Details
- NFS Server 1 (node1.example.net) – 192.168.1.140 – Minimal RHEL 9/8
- NFS Server 2 (node2.example.net) – 192.168.1.150 – Minimal RHEL 9/8
- NFS Server VIP – 192.168.1.151
- Shared Disk of size 20GB
1) Set Host Name and update hosts file
Login to both the nodes and set hostname using hostnamectl command as shown below:
//Node1
$ sudo hostnamectl set-hostname "node1.example.net"

$ exec bash
//Node2
$ sudo hostnamectl set-hostname "node2.example.net"
$ exec bash
Update the /etc/hosts file on both the nodes, add the following content
192.168.1.140  node1.example.net
192.168.1.150  node2.example.net
2) Install High Availability Software Package
On the both the nodes, first enable high availability yum repositories using subscription-manager command.
For RHEL 9 Systems
$ sudo subscription-manager repos –enable=rhel-9-for-x86_64-highavailability-rpms
For RHEL 8 Systems
$ sudo subscription-manager repos –enable=rhel-8-for-x86_64-highavailability-rpms
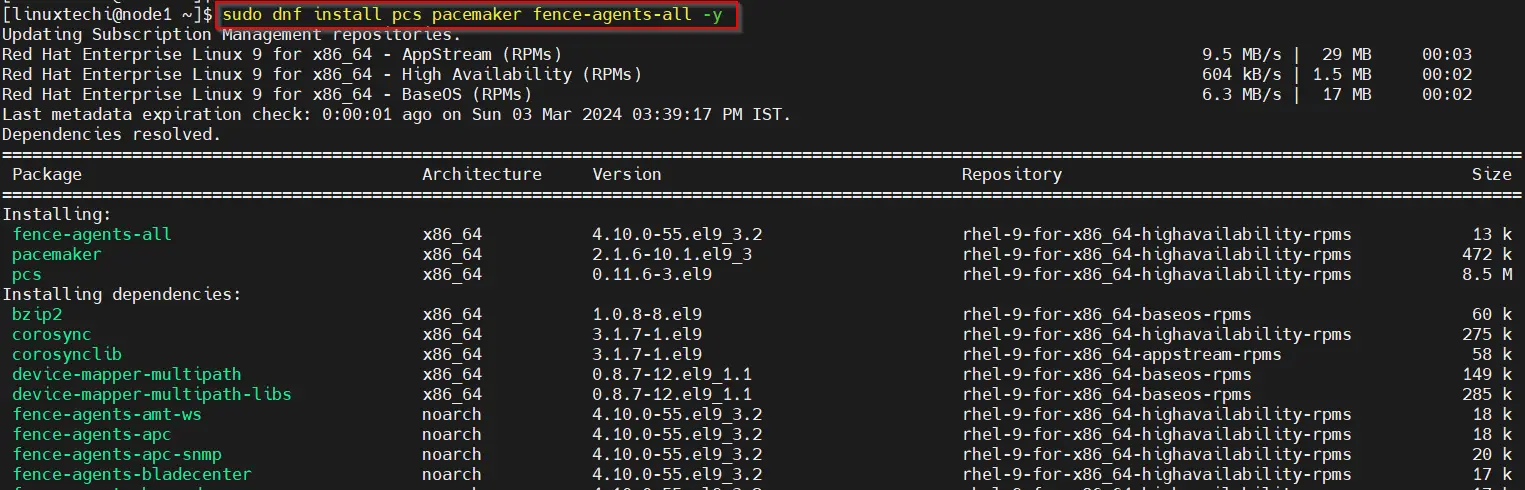
Post enabling the repository, run below command on both the nodes to install high availability software like pcs and pacemaker.
$ sudo dnf install pcs pacemaker fence-agents-all -y
After installing the packages, allow high availability ports in the firewall, run beneath command on both the nodes.
$ sudo firewall-cmd --permanent --add-service=high-availability
$ sudo firewall-cmd --reload
3) Assign Password to hacluster and Start pcsd Service
Whenever we install pcs then it creates a user with name “hacluster”, this user is used by pacemaker to authenticate the cluster nodes. Execute the following echo command on both the nodes.
$ echo "<Password-String>" | sudo passwd --stdin hacluster
Start the PCSD service using systemctl command on both the nodes.
$ sudo systemctl start pcsd && sudo systemctl enable pcsd
4) Authenticate Nodes and Form a Cluster
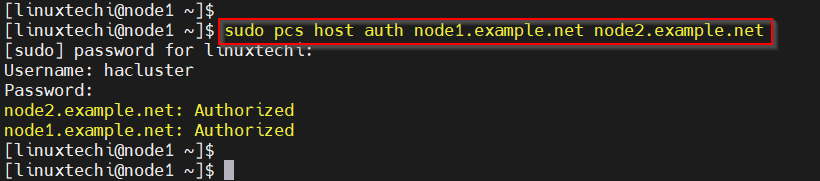
Run the below pcs command from either of the node to authenticate the node. In my case, I am running the command from node1,
$ sudo pcs host auth node1.example.net node2.example.net
Now, form a cluster using these two nodes. Run “pcs cluster setup” command from node1. This command needs cluster name and nodes.
$ sudo pcs cluster setup nfs_cluster --start node1.example.net node2.example.net
$ sudo pcs cluster enable --all
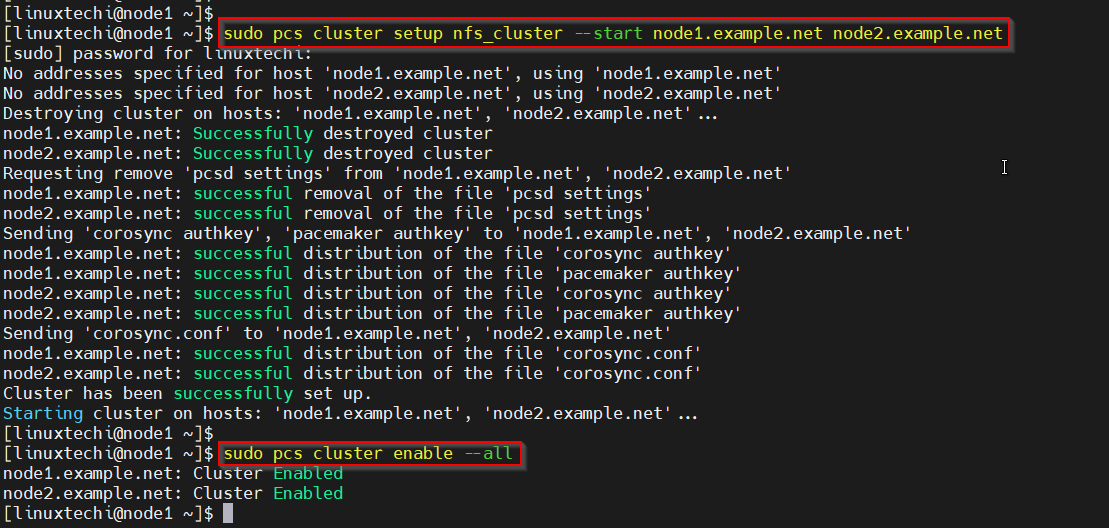
Next, check the cluster status using pcs cluster status command from any node.
$ sudo pcs cluster status

In my lab, we don’t have any fencing agent that’s why we are disabling fencing device using following command.
$ sudo pcs property set stonith-enabled=false
$ sudo pcs property set no-quorum-policy=ignore
Note : In production environments, it is highly recommended to configure the fencing device for your cluster.
If your cluster nodes are the VMware Virtual machines, then you can use “fence_vmware_soap” fencing agent. To configure “fence_vmware_soap” as fencing agent, refer the below logical steps:
a) Verify whether your cluster nodes can reach to VMware hypervisor or Vcenter
# fence_vmware_soap -a <vCenter_IP_address> -l <user_name> -p <password> \
 --ssl -z -v -o list |egrep "(node1.example.net|node2.example.net)"
or
# fence_vmware_soap -a <vCenter_IP_address> -l <user_name> -p <password> \
--ssl -z -o list |egrep "(node1.example.net|node2.example.net)"
if you are able to see the VM names in the output then it is fine, otherwise you need to check why cluster nodes not able to make connection esxi or vcenter.
b) Define the fencing device using below command,
# pcs stonith create vmware_fence fence_vmware_soap \
pcmk_host_map="node1:node1.example.net;node2:node2.example.net" \
ipaddr=<vCenter_IP_address> ssl=1 login=<user_name> passwd=<password>
c) check the stonith status using below command,
# pcs stonith show
5) Install NFS on both the nodes
Run the following dnf command on both the systems to install nfs,
$ sudo dnf install nfs-utils -y
Allow NFS Server ports in the firewall, following firewall-cmd on both the nodes.
$ sudo firewall-cmd --permanent --add-service={nfs,rpc-bind,mountd}
$ sudo firewall-cmd --reload
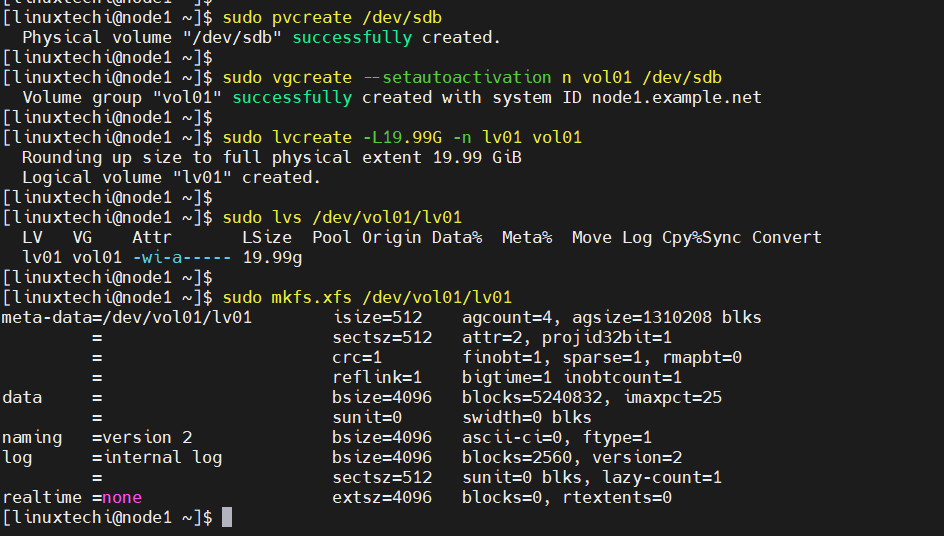
6) Configure Shared Disk for the Cluster
In my lab, we have attached a shared disk of size 20 GB on both the nodes. We will configure LVM on this disk and will format it with XFS file system.
Before using this disk, change the parameter “# system_id_source = “none”” to system_id_source = “uname” in /etc/lvm/lvm.conf file on both the nodes.
Run following sed command from both the systems.
$ sudo sed -i 's/# system_id_source = "none"/ system_id_source = "uname"/g' /etc/lvm/lvm.conf
Next, execute the following set of commands on node1 only to create lvm partition.
$ sudo pvcreate /dev/sdb
$ sudo vgcreate --setautoactivation n vol01 /dev/sdb
$ sudo lvcreate -L19.99G -n lv01 vol01
$ sudo lvs /dev/vol01/lv01
$ sudo mkfs.xfs /dev/vol01/lv01
To have this lvm partition visible on the node2, then run beneath command from node2 only.
$ sudo lvmdevices --adddev /dev/sdb
Next configure NFS share for the nfs service , create the following folders on both the systems
$ sudo mkdir /nfsshare
Now try to mount above create lvm partition on this mount point from any node.
$ sudo lvchange -ay vol01/lv01
$ sudo mount /dev/vol01/lv01 /nfsshare/
$ df -Th /nfsshare/

Great, next umount it is using beneath commands.
$ sudo umount /dev/vol01/lv01
$ sudo  vgchange -an vol01
7) Setup High Availability NFS Cluster on RHEL 9/8
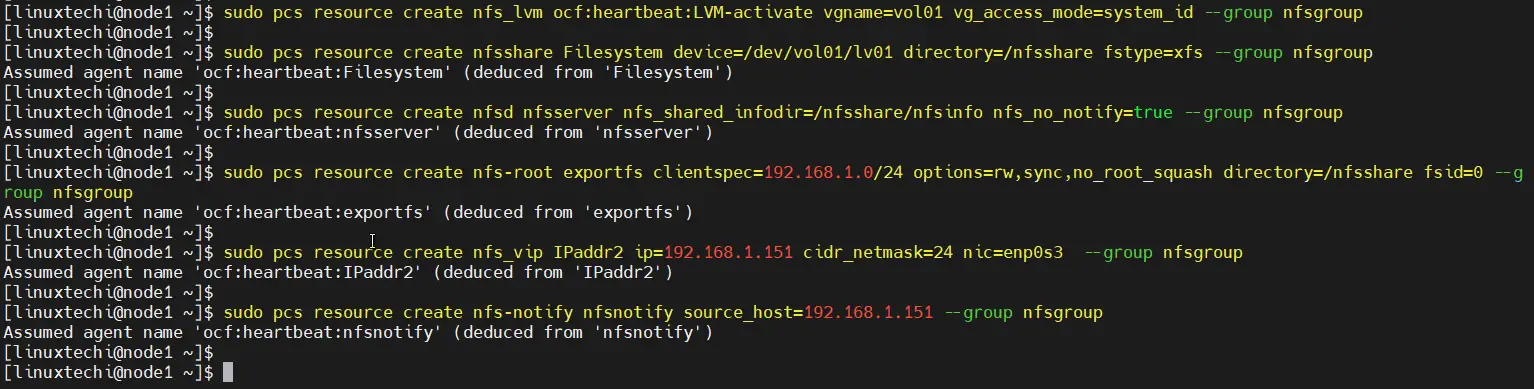
Define the Resource group and cluster resources for your nfs cluster. We have used following resource group and cluster reesources.
- nfsgroup is the group name under which all resources will created.
- nfs_lvm is name of resource for shared lvm volume (/dev/vol01/lv01)
- nfsshare is name of filesystem resource which will be mounted on /nsfshare
- nfsd is nfs-daemon for nfsserver
- nfs-root is the resource which define the allowed client’s specification.
- nfs_vip is the resource for VIP (IPadd2) for nic enp0s3.
- nfs-notify is the resource for NFS reboot notification.
Run the following pcs commands from either of the node.
$ sudo pcs resource create nfs_lvm ocf:heartbeat:LVM-activate vgname=vol01 vg_access_mode=system_id --group nfsgroup
$ sudo pcs resource create nfsshare Filesystem device=/dev/vol01/lv01 directory=/nfsshare fstype=xfs --group nfsgroup
$ sudo pcs resource create nfsd nfsserver nfs_shared_infodir=/nfsshare/nfsinfo nfs_no_notify=true --group nfsgroup
$ sudo pcs resource create nfs-root exportfs clientspec=192.168.1.0/24 options=rw,sync,no_root_squash directory=/nfsshare fsid=0 --group nfsgroup
$ sudo pcs resource create nfs_vip IPaddr2 ip=192.168.1.151 cidr_netmask=24 nic=enp0s3  --group nfsgroup
$ sudo pcs resource create nfs-notify nfsnotify source_host=192.168.1.151 --group nfsgroup
Next verify the cluster resources status,
$ sudo pcs status
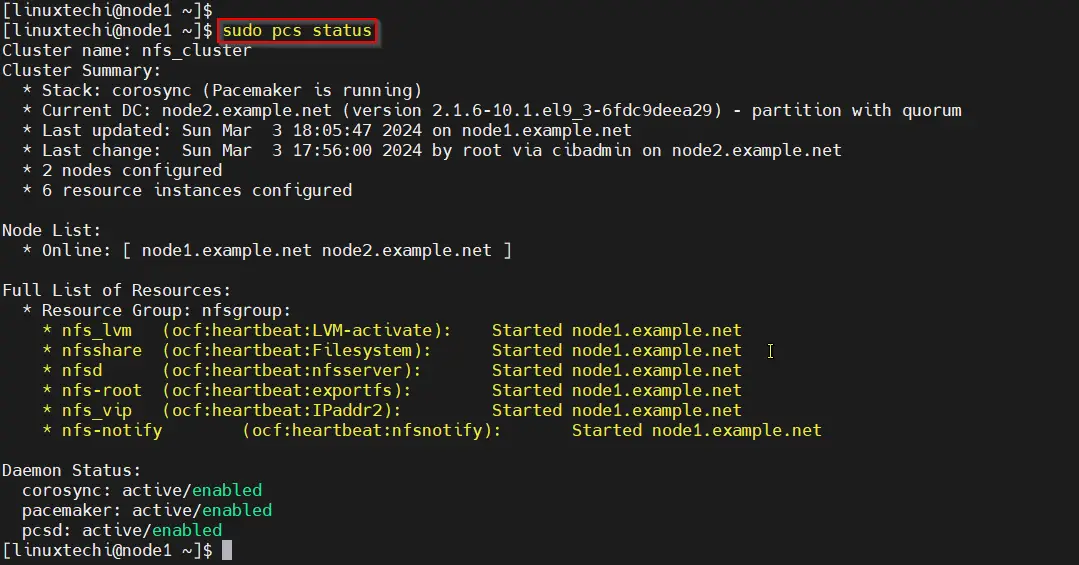
Perfect, output above confirms that all the resources are started successfully on node1.
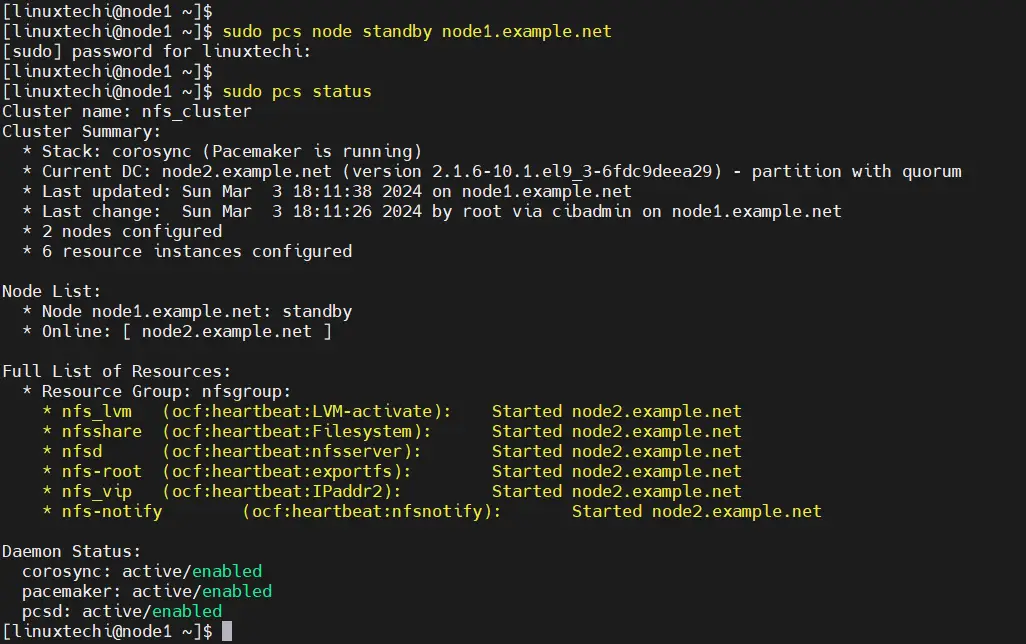
8) Test NFS Cluster Installation
To test nfs cluster installation, put the node1 in standby mode and verify whether resources are moving to node2 automatically.
$ sudo pcs node standby node1.example.net
$ sudo pcs status
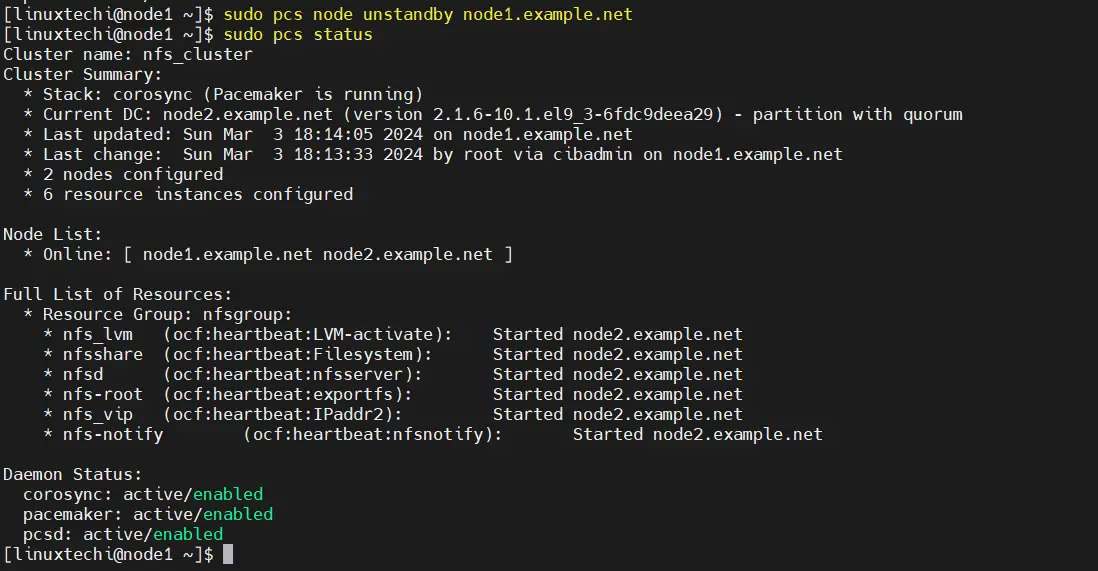
To unstandby the node, run
$ sudo pcs node unstandby node1.example.net
$ sudo pcs status
In order to mount NFS share on the client machine using following mount command.
$ sudo mount -t nfs 192.168.1.151:/nfsshare /mnt
$ df -h /mnt
$ cd /mnt
$ sudo touch test-file
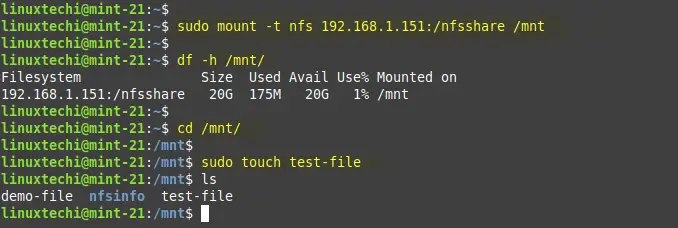
Above output confirms we are able to access the nfs share from the client machine.
That’s all from this guide, we believe that you have found it informative and useful. Feel free to post your queries and feedback in below comments section.

could you please share the possible documentation if i use dell idrac for fencing …….
Hi Pradeep,
I have got this error after applying step4: Define Fencing device for each cluster node.
Error: Error: Agent ‘disk_fencing’ is not installed or does not provide valid metadata: Agent disk_fencing not found or does not support meta-data: Invalid argument (22)
Metadata query for stonith:disk_fencing failed: Input/output error
Hi,
I tried, everything went smoothly except the last step – moving NFS shares on client.
I just could mount it on the nfs1.example.com, not another node.
The “ip a” show that the virtual floating IP was linked to the nfs1 node, not the nfs2 node, and can not ping from nfs2.
Any suggestions?
hi ,
i`m looking for Rhel HA with KVM guest cluster ?
Hi, thanks for the artical, i’m not able to mount the nfs using the vip:
[root@ibm-cli ~]# mount 192.168.56.100:/ /mnt/nfsshare/
mount: wrong fs type, bad option, bad superblock on 192.168.56.100:/,
missing codepage or helper program, or other error
(for several filesystems (e.g. nfs, cifs) you might
need a /sbin/mount. helper program)
In some cases useful info is found in syslog – try
dmesg | tail or so.
Here is the result of lsblk, sdb1 as fencing device and sdc1 shared storage:
[root@nfs1 ~]# lsblk -f
NAME FSTYPE LABEL UUID MOUNTPOINT
sda
├─sda1 xfs a13287c6-e902-4162-8c96-fdbc42d487a0 /boot
└─sda2 LVM2_me M4KyTZ-1BPU-aWgE-8Um0-0gKf-lPDK-dDUdhS
├─centos-root
xfs ddf9c038-feec-45e0-83fe-be5b62843499 /
└─centos-swap
swap 15a46aa8-2cf1-4c94-ae6b-982b7a38c249 [SWAP]
sdb
└─sdb1 xfs 800d010e-369c-4b33-a159-be1fab3064eb
sdc
└─sdc1 xfs 1ea91760-f20a-4358-a51a-7fce3760b72e
sr0 iso9660 CentOS 7 x86_64
2019-09-11-18-50-31-00
fixed with the installation of nfs-utils package.
How are these shared disks created for the fencing and the nfs share? “In this tutorial we are using a shared disk of size 1 GB (/dev/sdc) as a fencing device.” How is this shared disk created / mounted?
Isn’t the shared disk still a single point of failure?
Hello .
Thanks for the article . it worked!! However ,i it did not work when i partitioned sdb1 as LVM volume
Best regards