It is always recommended to assign a static IP address to a Linux system because static ip address will be persistent across the reboots. Recently canonical has released its stable operating system “Ubuntu 20.04 LTS (Focal Fossa)” for both desktop and servers. In this article we will demonstrate how to assign a static ip address on Ubuntu 20.04 LTS Server and desktop.
Assign Static IP Address On Ubuntu 20.04 LTS Server
In Ubuntu 20.04 LTS server, network configuration is controlled and managed by netplan utility. But during the installation, cloud-init configure a dynamic ip to interface on server if the dhcp server is available. so, to configure a static ip, first we must make sure and confirm that network interface is not managed by cloud-init.
Open cloud-init file “/etc/cloud/cloud.cfg.d/subiquity-disable-cloudinit-networking.cfg” and make sure entry “network: {config: disabled}” is there. In case this entry is missing, then add it manually.
sysadm@linuxtechi:~$ cat /etc/cloud/cloud.cfg.d/subiquity-disable-cloudinit-networking.cfg
network: {config: disabled}
sysadm@linuxtechi:~$
Use “ip addr show” command from the console to view ip address,
sysadm@linuxtechi:~$ ip add show
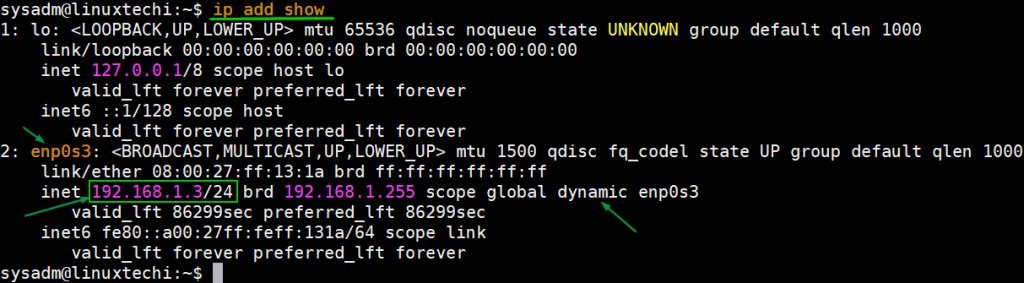
As we can see above, a dynamic ip is assigned automatically on interface card “enp0s3”. So, to make this ip address static, we must edit the netplan configuration file “/etc/netplan/00-installer-config.yaml”.
sysadm@linuxtechi:~$ sudo vi /etc/netplan/00-installer-config.yaml
# This is the network config written by 'subiquity'
network:
  ethernets:
    enp0s3:
      dhcp4: true
  version: 2
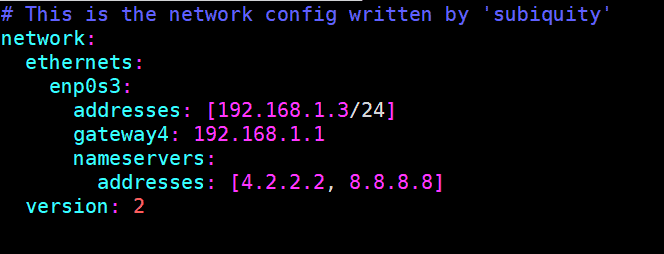
Above are the default entries, which shows that interface “enp0s3” is getting the IP from DHCP server. As it is an yaml file, so while making the changes in the file we must follow correct indentation. Add the following lines to the yaml file,
network:
  ethernets:
    enp0s3:
      addresses: [192.168.1.3/24]
      gateway4: 192.168.1.1
      nameservers:
        addresses: [4.2.2.2, 8.8.8.8]
  version: 2
save and close the file.
Run the following “netplan apply” command to make the above changes into the effect.
sysadm@linuxtechi:~$ sudo netplan apply
sysadm@linuxtechi:~$
Now run “ip addr show” and “ip route show” command to view ip address and route details.
sysadm@linuxtechi:~$ ip add show
sysadm@linuxtechi:~$ ip route show
Output of above command would look like below,

Perfect, output confirms that Static IP has been assigned successfully on interface ‘enp0s3‘. Even if we reboot the server, this ip address will be consistent.
Now, let’s move to Ubuntu 20.04 LTS desktop.
Assign Static IP Address on Ubuntu 20.04 LTS Desktop
Network configuration in Ubuntu desktop is controlled by network manager. Configuring a static ip address on Ubuntu 20.04 desktop is very easy. Login to your desktop environment and click on network icon and then choose wired settings.
![]()
In the next window, Click on ‘gear box’ icon under wired option,
![]()
In the next window, Choose IPV4 Tab and then select Manual and specify the IP details like IP address, netmask, gateway and DNS Server IP.
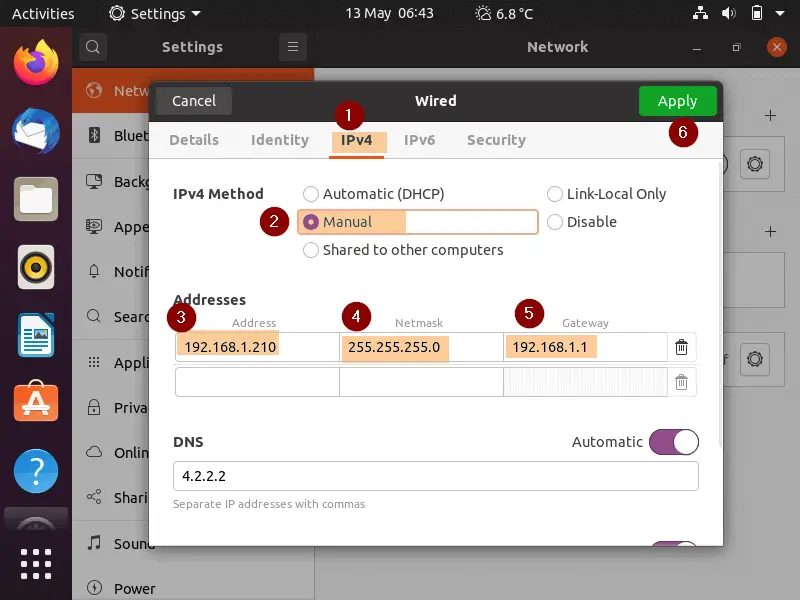
Click on Apply to save these changes and we must disable and enable interface once to assign the ip address to interface.
Once you enable and disable the interface then static IP should be assigned to the interface, we can verify by looking at the Details Tab from Wired Settings.
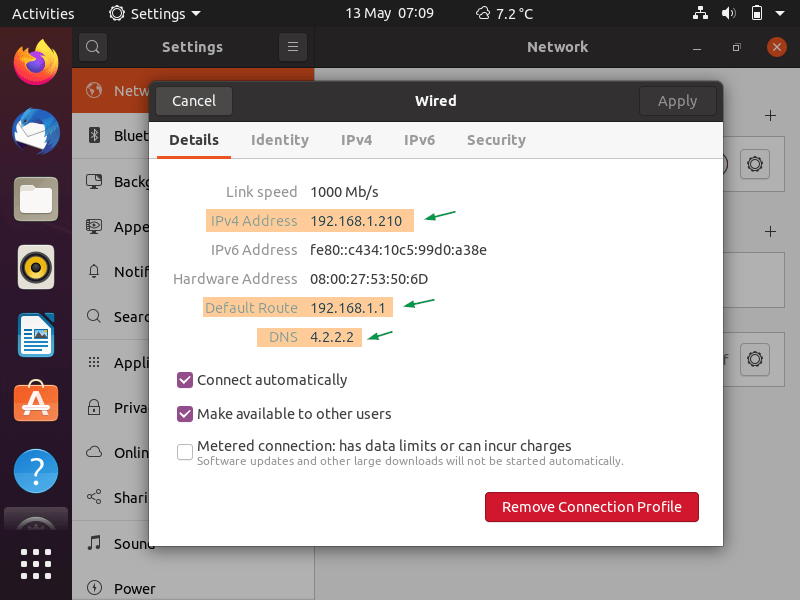
Perfect, above confirms that static ip address has been assigned to the interface successfully. This conclude the article; I hope these steps help you to configure static IP Address on your Ubuntu 20.04 LTS server and desktop. Please do share your feedback and comments.


Thanks for the excellent article,
It is always recommended to assign a static IP address to a Linux system because static ip address will be persistent across the reboots. that is understood.
where exactly i see the advantage of assigning static ip address to my linux desktop?
How circled point 3, 4, 5 in IPv4 tab are assigned, especially entries 192.168.1.210 and 255.255.255.0. If these two are explained, then it will be great.
ok, ifconfig and netstat -r gives netmask and gateway. but still i would like to know the advantage of assigning static ip address to my linux desktop preferably with example applications. thanks.
Imagine you open a network service on your linux desktop, let’s assume it is a web server running on port 80, and you want to expose this service to the internet.
You would have to add a port translation rule into your internet box to forward connections on your public ip to your linux desktop system. And the configuration in the box is static, you need a fixed and consistent ip addr on your internal network.
You achieve that either with static ip that you assign by yourself, or by configuring the dhcp server inside your internet box to reserve an ip associated to your linux destop mac address.
Hi Narayan,
If your desktop is connected to the modem or a switch where DHCP server is configured with subnet “192.168.1.0/24”. So when your desktop tries to get ip from DHCP server then it will always picks one ip from the pool “192.168.1.2 – 192.168.1.254” . But if you want to map a fixed ip to desktop then you can assign that IP as static.
$ip addr show just hung my SSH session. I don’t know how long it will take to time out.
nice but i cannot follow your tutorial cause i just using phone
Hehe
Thank You Very Much My Problem has fixed now All credit goes to you 🙂
Hello, I’m running ubuntu server 20.04 on a hyper-v environment, i did all steps in the page, but when I want to run update, can´t connect to internet. Please help.
I got the same problem. I’m running ubuntu 20.04 on virtualbox. I fixed it by changing the “gateway4: 192.168.1.1” to “gateway4: 192.168.0.1”. Flipping the 1 to a 0, or to the same number as the one in my own ip in that place.
Happy debugging!
Thanks for the good informations…
Useful article. I am using usb broadband modem and for my case it was also useful to use such command to find out default gateway
$ ip route | grep default
It has given: default via 10.1.1.3
I saw this link at askubuntu.com
I was having issue statically assigning IP in ubuntu
and after following your steps it worked.
Thanks so much and keep it up