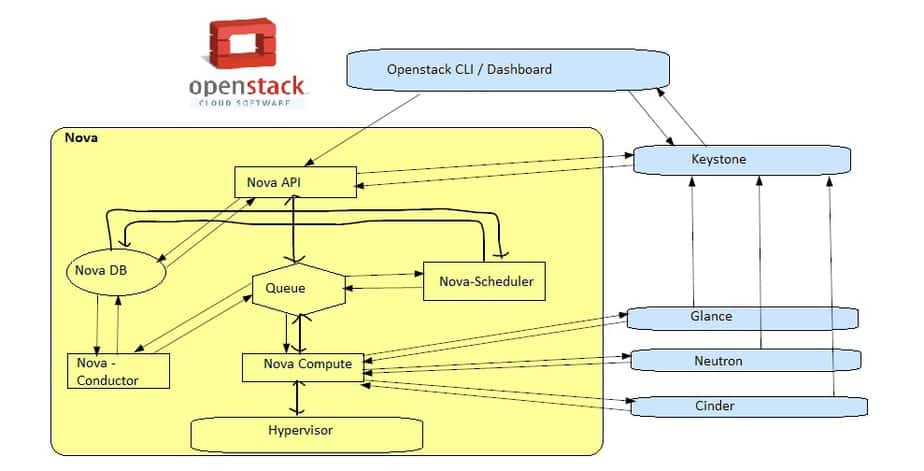
Have you ever think what happened in the background whenever we create an instance or virtual machine either via Openstack cli or dashboard, In this this article we will elaborate step by step VM or instance creation in Openstack. All the Openstack components communicate with each other with API using Auth-token.
Creating a Virtual Machine in OpenStack via OpenStack CLI
Source the credential file and then execute the nova-boot command,
# nova boot --flavor m1.small --image centos7 --nic net-id={private_network_id} --security-group norprod_sec_grp --key-name my_key stack_testvm
Once nova boot command is executed then following are steps are executed behind the scene,
Step:1) The Horizon Dashboard or OpenStack CLI gets user credentials and authenticates with identity service via REST API
- The identity service (Keystone) authenticate the user with the user credentials and then generates and send back an auth-token, that auth-token which will be used for sending the request to other components through REST-Call
Step:2) The Dashboard or OpenStack CLI converts new instance request specified in launch instance or nova boot command to a REST API request and sent it to nova-api
Step:3) Then nova-api service gets the request and send that request to the identity service (Keystone) for validation of auth-token and access permission,
- Keystone service validates the token and send the updated authentication headers with roles along with the permissions
Step:4) After getting the repsonse from keystone, then nova-api checks for conflicts with nova-database and then it creates initial database entry for new instance or VM.
Step:5) nova-api sends the rpc.call request to nova-scheduler expecting to get updated instance entry with host id specified
Step:6) Now nova-scheduler picks the request from the queue
Step:7) nova-scheduler talks to nova-database to locate an appropriate host using filtering and weighing mechanism,
- nova-scheduler returns the updated instance entry with the appropriate host ID after filtering and weighing
- nova-scheduler sends the rpc.cast request to nova compute for launching an instance on the appropriate host
Step:8) nova-compute picks the request from the queue and it sends the rpc.call request to nova-conductor to get the VM or instance info such as host id and flavor (RAM,CPU and Disk)
Step:9) nova-conductor takes the request from queue and communicate with nova-database,
- nova-conductor gets the instance information
- now nova-compute picks the instance information from the queue
Step:10) nova-compute connects to glance-api by making a REST Call using auth-token and then nova-compute uses the image id to get the image URI from image service and loads the image from image storage
Step:11) glance-api validates the auth-token with keystone and after that nova-compute gets the image metadata
Step:12) Nova-compute make the REST-call by passing the auth-token to Network API (Neutron) to allocate and configure network so that vm gets the IP address
Step:13) Neutron-server validates the auth-token with keystone and after that nova-compute retrieves the network information.
Step:14) Nova-Compute makes the REST-call by passing the auth-token to Volume API to attach the volume to the instance or VM.
Step:15) cinder-api validates the auth-token with keystone and then nova-compute gets the block storage information.
Step:16) nova-compute generates data for the hypervisor driver and executes the request on the hypervisor using libvirt or API and then finally a VM is created on the hypervior. We can see that VM in Dashboard and also using “nova list” command.
That’s all from the article, i hope you find this article informative. Please do share your feedback and comments.
Awesome article… thanks
I have One question with which ID we can monitor the whole process of Instance to Check here exactly it is failing.
Thanks in Advance.
May i know how nova-scheduler choose host. what is Host ID and where it will get Host ID.
Its helpful…to understand the basic flow..
Gud Inf for all, who want to know about Openstack….. Thanks for this article.
If want to add Trove and install database in above , where will it fit.
Good Information , Thanks for the initiative