As we all know that squid is a caching proxy server which supports the protocols like HTTP, HTTPS, FTP and more. In other words, squid is known as a web proxy server which helps the ISPs and other organization to reduce their bandwidth and it also considerably improve the response time as it cache the most frequently content locally. Whenever a new request comes then squid serves it from its cache if it is cached otherwise it will fetch it from remote server and save its content in cache for future requests.
In this article we will demonstrate how to configure two node squid (proxy server) clustering using pacemaker on CentOS 7 or RHEL 7 system.
Following are my lab details that I have used for this article,
- Squid Server 1 (squid01.linuxtechi.lan) – 192.168.1.21 – Minimal CentOS 7 / RHEL 7
- Squid Server 2 (squid02.linuxtechi.lan) – 192.168.1.22 – Minimal CentOS 7 / RHEL 7
- Squid Server VIP – 192.168.1.20
- Firewall enabled
- SELinux enabled
Step:1) Add the hostname in /etc/hosts file and apply all the updates
Add the following lines on both squid server’s /etc/hosts file.
192.168.1.21 squid01.linuxtechi.lan squid01
192.168.1.22 squid02.linuxtechi.lan squid02
Install all the updates using beneath yum update command and then reboot the nodes
[root@squid01 ~]# yum update -y && reboot
[root@squid02 ~]# yum update -y && reboot
Step:2) Install Pacemaker and fencing agents packages on both squid servers
Execute the following yum command on both the servers to install pacemaker, pcs and fencing packages,
[root@squid01 ~]# yum install pcs pacemaker fence-agents-all -y
[root@squid02 ~]# yum install pcs pacemaker fence-agents-all -y
Once above packages are installed on both servers then start & enable the pacemaker (pcsd) service using below commands,
[root@squid01 ~]# systemctl start pcsd.service
[root@squid01 ~]# systemctl enable pcsd.service

[root@squid02 ~]# systemctl start pcsd.service
[root@squid02 ~]# systemctl enable pcsd.service
As in my lap setup OS firewall service is running and enabled, so configure the firewall rules for high availability or clustering service, execute the following “firewall-cmd” commands on the squid severs,
[root@squid01 ~]# firewall-cmd --permanent --add-service=high-availability
success
[root@squid01 ~]# firewall-cmd --reload
success
[root@squid01 ~]#
[root@squid02 ~]# firewall-cmd --permanent --add-service=high-availability
success
[root@squid02 ~]# firewall-cmd --reload
success
[root@squid02 ~]#
Step:3) Authorize squid servers and form a squid cluster
To form a cluster both nodes / servers should authorize itself, let’s first set the password of “hacluster” user,
[root@squid01 ~]# echo "password_here" | passwd --stdin hacluster
[root@squid02 ~]# echo "password_here" | passwd --stdin hacluster
Now use the below “pcs cluster auth” command from any of the squid server to authorize both servers using hacluster credentials.
[root@squid01 ~]# pcs cluster auth squid01.linuxtechi.lan squid02.linuxtechi.lan
Username: hacluster
Password:
squid02.linuxtechi.lan: Authorized
squid01.linuxtechi.lan: Authorized
[root@squid01 ~]#
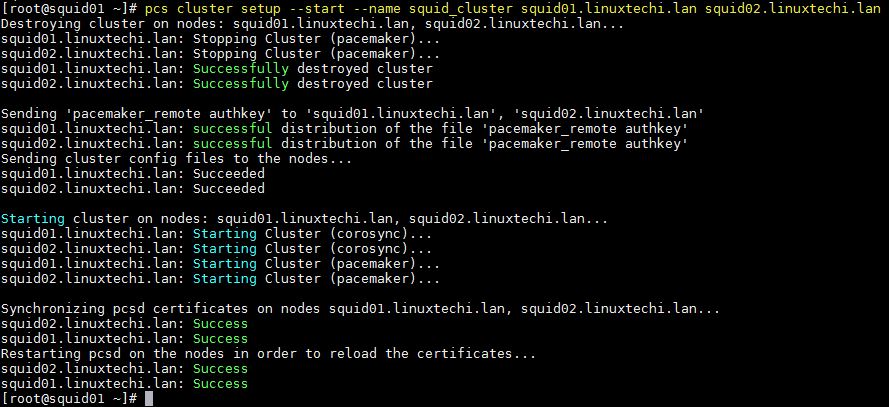
Use below “pcs cluster setup” command from any of the node to form a cluster, in my case I am running it from squid01 and name of my cluster is “squid_cluster”
[root@squid01 ~]# pcs cluster setup --start --name squid_cluster squid01.linuxtechi.lan squid02.linuxtechi.lan
Output of above command should be something like below:
Enable the pcs cluster service so that it will be started automatically during the reboot, execute the below command from any of squid server
[root@squid01 ~]# pcs cluster enable --all
squid01.linuxtechi.lan: Cluster Enabled
squid02.linuxtechi.lan: Cluster Enabled
[root@squid01 ~]#
Use the below commands to verify the cluster status,
[root@squid01 ~]# pcs cluster status
[root@squid01 ~]# pcs status
Step:4) Install Squid package on both servers and disable fencing
Execute the following yum command on both the servers to install squid (proxy server) packages,
[root@squid01 ~]# yum install squid -y
[root@squid02 ~]# yum install squid -y
Allow the squid port (3128) in OS firewall using following command
[root@squid01 ~]# firewall-cmd --permanent --add-service=squid
success
[root@squid01 ~]# firewall-cmd --reload
success
[root@squid01 ~]#
[root@squid02 ~]# firewall-cmd --permanent --add-service=squid
success
[root@squid02 ~]# firewall-cmd --reload
success
[root@squid02 ~]#
In my lab I don’t have any fencing agent or device, so I am disabling it using the beneath commands,
[root@squid01 ~]# pcs property set stonith-enabled=false
[root@squid01 ~]# pcs property set no-quorum-policy=ignore
[root@squid01 ~]#
Step:5) Configure Squid Cluster resources and cluster group
In my lab setup I have two shared disks of size 1GB and 12 GB, these disks are assigned to both servers.
In cluster we will mount the /etc/squid (i.e squid configuration files) file system on 1 GB disk and “/var/spool/squid” ( i.e squid cache directory) will be mounted on 12 GB disk
- /dev/sdb (1 GB Disk) – /etc/squid
- /dev/sdc (12 GB disk) – /var/spool/squid
As these disks are visible on both squid servers, so create a partition on /dev/sdb & /dev/sdc using fdisk command from either of squid server and then format them with xfs file system using mkfs.xfs command
Currently all the squid configuration files are on local folder /etc/squid, Copy the data from local filesystem /etc/squid to shared disk (/dev/sdb1)
[root@squid01 ~]# mount /dev/sdb1 /mnt/
[root@squid01 ~]# cp -av /etc/squid/* /mnt/
[root@squid01 ~]# umount /mnt/
Now create two filesystem resource , one for /etc/squid file system and one for /var/spool/squid
Execute the following “pcs resource create” command from any of the squid server to create file system resource, in my case taking the file system resource name as “squidfs1” & “squidfs2” and group name as “squidgrp”
[root@squid01 ~]# pcs resource create squidfs1 Filesystem device=/dev/sdb1 directory=/etc/squid fstype=xfs --group squidgrp
[root@squid01 ~]# pcs resource create squidfs2 Filesystem device=/dev/sdc1 directory=/var/spool/squid fstype=xfs --group squidgrp
[root@squid01 ~]#
Define the squid (systemd service) resource using pcs resource command, execute the beneath command from any of the squid server
[root@squid01 ~]# pcs resource create proxy systemd:squid op monitor interval=10s --group squidgrp
[root@squid01 ~]#
Define squid vip for your cluster, in my case i will be using “192.168.1.20” as squid vip , this IP will float between these servers, end users or squid clients will use this IP as squid proxy server IP while configuring their proxy settings and also use the default squid port 3128.
[root@squid01 ~]# pcs resource create squid_vip ocf:heartbeat:IPaddr2 ip=192.168.1.20 cidr_netmask=24 op monitor interval=30s --group squidgrp
[root@squid01 ~]#
Now verify the whether all the cluster resources are started or not. Run “pcs status” command from any of squid server
[root@squid01 ~]# pcs status
Cluster name: squid_cluster
Stack: corosync
Current DC: squid01.linuxtechi.lan (version 1.1.19-8.el7_6.4-c3c624ea3d) - partition with quorum
Last updated: Wed Mar 27 06:59:59 2019
Last change: Wed Mar 27 06:59:02 2019 by root via cibadmin on squid01.linuxtechi.lan

2 nodes configured
4 resources configured

Online: [ squid01.linuxtechi.lan squid02.linuxtechi.lan ]
Full list of resources:
 Resource Group: squidgrp
     squidfs1   (ocf::heartbeat:Filesystem):    Started squid01.linuxtechi.lan
     squidfs2   (ocf::heartbeat:Filesystem):    Started squid01.linuxtechi.lan
     proxy      (systemd:squid):        Started squid01.linuxtechi.lan
     squid_vip  (ocf::heartbeat:IPaddr2):       Started squid01.linuxtechi.lan

Daemon Status:
  corosync: active/enabled
  pacemaker: active/enabled
  pcsd: active/enabled
[root@squid01 ~]#
As we can see above, all the resources are started on squid01 server. Let’s verify the Squid Service status and squid vip
[root@squid01 ~]# systemctl status squid
[root@squid01 ~]# ip a s
Output of above two commands should be something like below:

That’s all from this article, now you can configure the ACLs that suits to your environment in /etc/squid.conf file. Please do share your feedback and comments.


hello dear sir,
very good tutorial sir kindly create a tutorial how to setup squid proxy for HTTPS thanks
How to troubleshoot?
Resource Group: squidgrp
squidfs1 (ocf::heartbeat:Filesystem): Stopped
squidfs2 (ocf::heartbeat:Filesystem): Stopped
proxy (systemd:squid): Started[ squid-node1 squid-node2 ]
squid_vip (ocf::heartbeat:IPaddr2): Stopped
Try to restart pcs service across the cluster and view the pacemaker logs and message file.
Hi Pradeep, thanks for the how to. Its very useful.
I’m curious about handling network issues. How do you prevent a network problem from taking your entire squid HA offline?
For example, if the switch goes out monetarily which squid will take over? I understand you can set up STONITH to shutdown the alternate server in case of a failure, which you haven’t done here. But even so, with a network hiccup, how would the system know which node to shut down?