Podman is a free and open-source daemonless container platform that was built to develop, manage and deploy containers and pods on a Linux environment. Pods are group of containers which are usually deployed on the same host system.
Podman is gradually replacing docker which is another containerization platform that developers use to deploy their applications together with dependencies and libraries. The main difference between the two is that while docker is a daemon that can be started, enabled, stopped and restarted, podman is not. Podman is considered more secure due to its audit logging capability in containers. The auditing plays a very crucial role in monitoring the processes that are running in a container.
Let’s now take you from A to Z on how to install podman and how to run and manage containers with podman.
Installing podman on CentOS 8
To install podman on CentOS 8, simply log in as the root user and run the command:
[root@linuxtechi ~]# dnf install podman
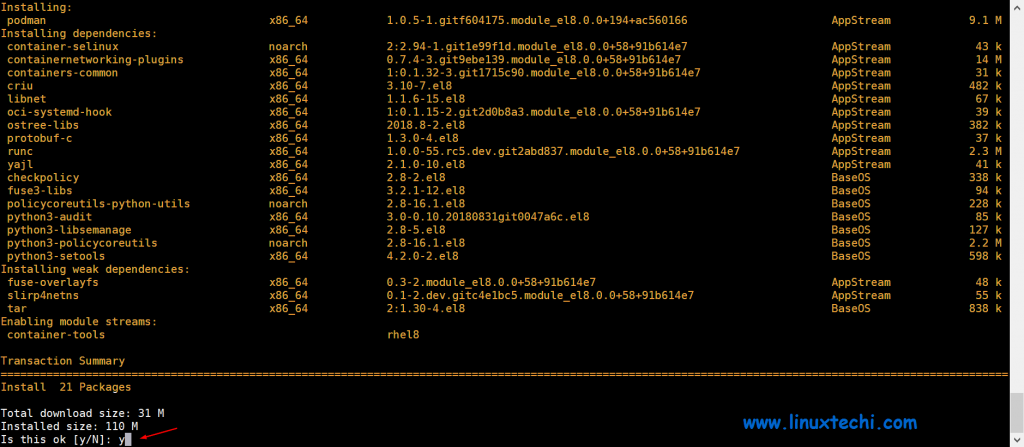
Installing podman on RHEL 8
Run below command to install Podman on RHEL 8 System
[root@linuxtechi ~]# dnf module install container-tools -y
After the successful installation process , check the version of podman using the command:
[root@linuxtechi ~]# podman --version
podman version 1.0.5
[root@linuxtechi ~]#
Run below command to view podman system information
[root@linuxtechi ~]# podman info
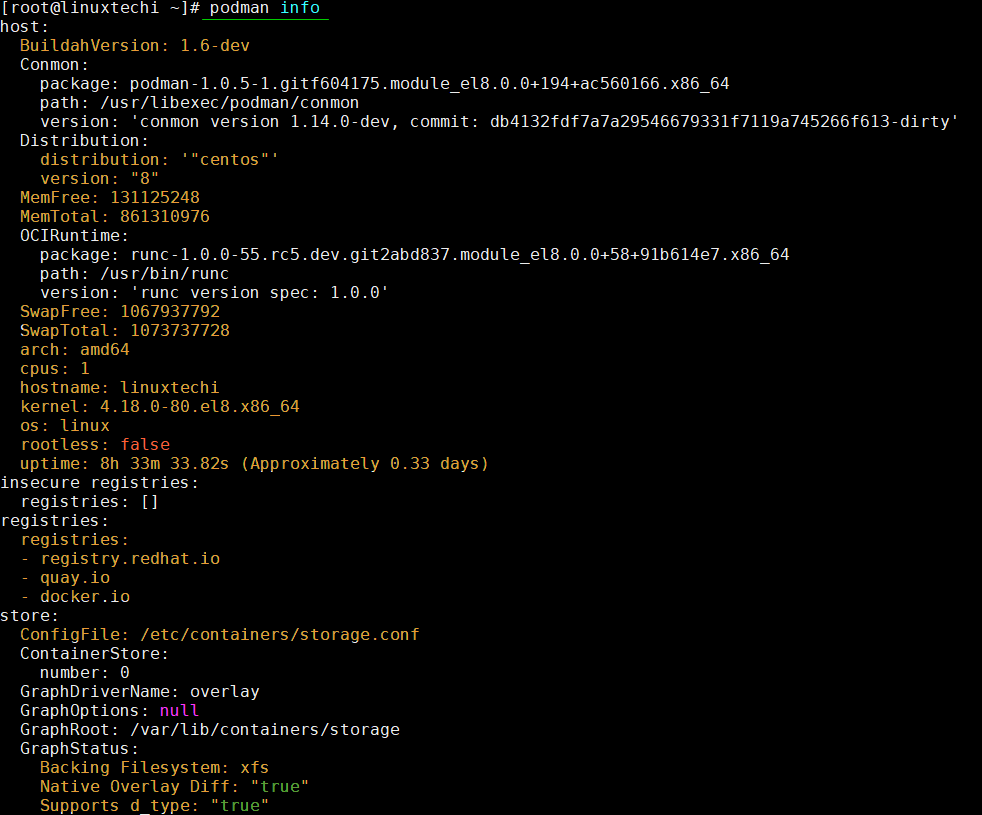
This is a confirmation that podman has been successfully installed.
Search and Download Containers Image with Podman
Let’s now shift gears and see the various operations that we can carry out with podman. To search an image, use the syntax
# podman search image_name
For example, to search for the image of Fedora System, execute the command:
[root@linuxtechi ~]# podman search fedora
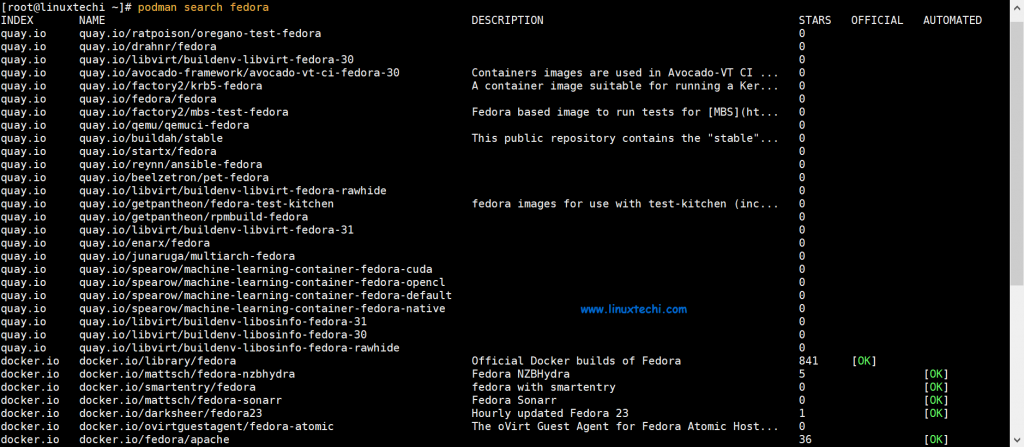
In the output, you get to see the registry from which you are searching for, in this case, quay.io and a brief description of the images.
To download the image, simply run
# podman pull image_name
We will download 2 additional images, Fedora and Ubuntu
[root@linuxtechi ~]# podman pull fedora
[root@linuxtechi ~]# podman pull ubuntu

To view the downloaded images, run the command:
[root@linuxtechi ~]# podman images
REPOSITORY                 TAG      IMAGE ID       CREATED        SIZE
docker.io/library/ubuntu   latest   549b9b86cb8d   35 hours ago   66.6 MB
docker.io/library/fedora   latest   f0858ad3febd   7 weeks ago    201 MB
[root@linuxtechi ~]#
Run containers with podman
To run a container using a Fedora image that prints out a message on the screen, run:
[root@linuxtechi ~]# podman run --rm fedora /bin/echo "Hello Geeks! Welcome to Podman"
Hello Geeks! Welcome to Podman
[root@linuxtechi ~]#
Note: Above command will also remove the container after displaying the message.
Launch a container using ubuntu image, let’s assume container name is “web-ubuntu”
[root@linuxtechi ~]# podman run -dit --name web-ubuntu -p 80:80 ubuntu
0ffe7bd1c08d89f4443f3fe81a18163a3d0c52ba53ce834c30643fb4678e8be9
[root@linuxtechi ~]#
Above podman command will start a container and will redirect 80 port requests from podman system to web-space container on port 80.
Launch one more container using Fedora image with name db-space, attach an additional volume to this container (/opt/dbspace)
[root@linuxtechi ~]# podman run -dit --name db-space -v /opt/dbspace:/mnt -p 3306:3306 fedora
9fe2ae21ca6373b827db3e965300920b1bc1a9cf19206031f1c8819889e12520
[root@linuxtechi ~]#
Above podman command will start a container and attach a folder as a volume “/opt/dbspace” and also redirect 3306 port request from podman system to db-space container on 3306 port.
To view only running containers, execute below podman command:
[root@linuxtechi ~]# podman ps
CONTAINER ID  IMAGE                            COMMAND    CREATED         STATUS             PORTS                   NAMES
9fe2ae21ca63  docker.io/library/fedora:latest  /bin/bash  14 minutes ago  Up 14 minutes ago  0.0.0.0:3306->3306/tcp  db-space
0ffe7bd1c08d  docker.io/library/ubuntu:latest  /bin/bash  15 minutes ago  Up 15 minutes ago  0.0.0.0:80->80/tcp      web-ubuntu
[root@linuxtechi ~]#
To list all containers, whether stopped or running execute the command:
[root@linuxtechi ~]# podman ps -a
CONTAINER ID  IMAGE                            COMMAND    CREATED             STATUS                         PORTS                   NAMES
22ca547d980f  docker.io/library/ubuntu:latest  /bin/bash  About a minute ago  Exited (0) About a minute ago                          wiki-container
9fe2ae21ca63  docker.io/library/fedora:latest  /bin/bash  15 minutes ago      Up 15 minutes ago              0.0.0.0:3306->3306/tcp  db-space
0ffe7bd1c08d  docker.io/library/ubuntu:latest  /bin/bash  16 minutes ago      Up 16 minutes ago              0.0.0.0:80->80/tcp      web-ubuntu
[root@linuxtechi ~]#
You can inspect a container using its ID by running:
[root@linuxtechi ~]# podman inspect 0ffe7bd1c08d

To obtain existing container’s shell prompt,use below “podman attach” command, in this case, accessing db-space container via its id, use the command
# podman attach <Container_ID>
[root@linuxtechi ~]# podman attach 9fe2ae21ca63
[root@9fe2ae21ca63 /]#
To come out of container’s shell prompt without exiting or stopping it, use the keys “ctrl+p+q”
Viewing containers’ logs
To view logs generated by a specifc container, use the syntax:
# podman logs <Container_ID>
For example,
[root@linuxtechi ~]# podman logs 9fe2ae21ca63
To view the latest logs run
[root@linuxtechi ~]# podman logs --latest 9fe2ae21ca63
If you desire to view the logs in real time, use the -f option as shown
# podman logs -f <Container_ID>
[root@linuxtechi ~]# podman logs -f 9fe2ae21ca63
Removing containers with podman
Once you are satisfied working with your containers, you can choose to remove them. But first, list all the containers
[root@linuxtechi ~]# podman ps -a
To delete a single container, use the rm option followed by the container-id as shown in the command below.
Let’s suppose we want to delete “wiki-container”
[root@linuxtechi ~]# podman rm 22ca547d980f
22ca547d980f3051d72eb9f475777e31244c78fc038c41e0250c7d5fe44cdbc5
[root@linuxtechi ~]#
Note: In case container is running and want to delete it without stopping it then using -f option along with rm, example is shown below,
root@linuxtechi ~]# podman rm 22ca547d980f
Managing container pods in podman
In this section, we look at how you can manage pods using podman. Pods are like what you would find in a Kubernetes setup.
To create a pod, say a pod called webserver, run the command:
[root@linuxtechi ~]# podman pod create --name webserver
920653c492450f295f92036910649542d40b80d10cc95b836acb30eb91a579ef
[root@linuxtechi ~]#
To list the pods, run below podman command,
[root@linuxtechi ~]# podman pod list
POD ID         NAME        STATUS    CREATED              # OF CONTAINERS   INFRA ID
920653c49245   webserver   Running   About a minute ago   1                 87adc0272afc
[root@linuxtechi ~]#
Upon creating a new pod, you will notice that it bears a container called infra. It’s main purpose is to accommodate namespaces which are associated with the pod and this allows the pod to communicate with other containers.
[root@linuxtechi ~]# podman ps -a --pod

You can add a container to a pod by running:
[root@linuxtechi ~]# podman run -dt --pod webserver centos:latest top
Run below podman command to verify whthere container is added to pod or not
[root@linuxtechi ~]# podman ps -a --pod
Output of above both commands:
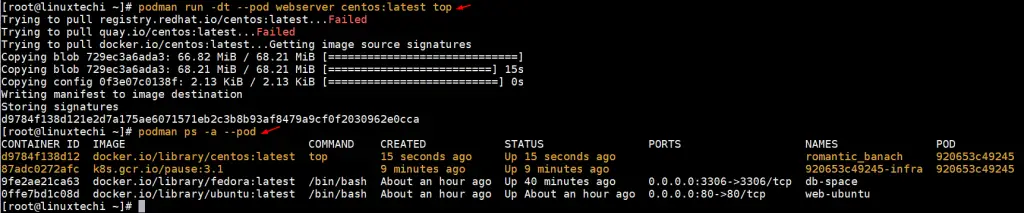
Output confirms that we have successfully launch a container to the pod. That’s all from this article.
Conclusion
Podman is making leaps and bounds in the containerization ecosystem and looks promising as it gradually takes the place of Docker. While Docker is certainly going to be around for a while, we cannot stress enough that Podman’s future looks bright. In this topic you learned how to install and use Podman to run containers
Is there a replacement for docker-compose too?
Yes, but it is not feature complete yet: https://github.com/containers/podman-compose/