Linux is loved by developers and enthusiasts alike. You can do lots of things you usually can’t do on operating systems such as windows and OSX.
Linux is the best operating system for programmers, developers, and anyone who wants to understand operating systems properly. Now Linux has many functions and capabilities. Today you are going to learn about Linux pgrep and pkill command and how you can use them to make your Linux experience worthwhile. As name suggests pgrep command is used to search the process based on name and pkill command will terminate or kill the process based on the name.
Prerequisites
- A Linux operating system (screenshots are from a centos / rhel machine)
pgrep command
Syntax: # pgrep [options] pattern
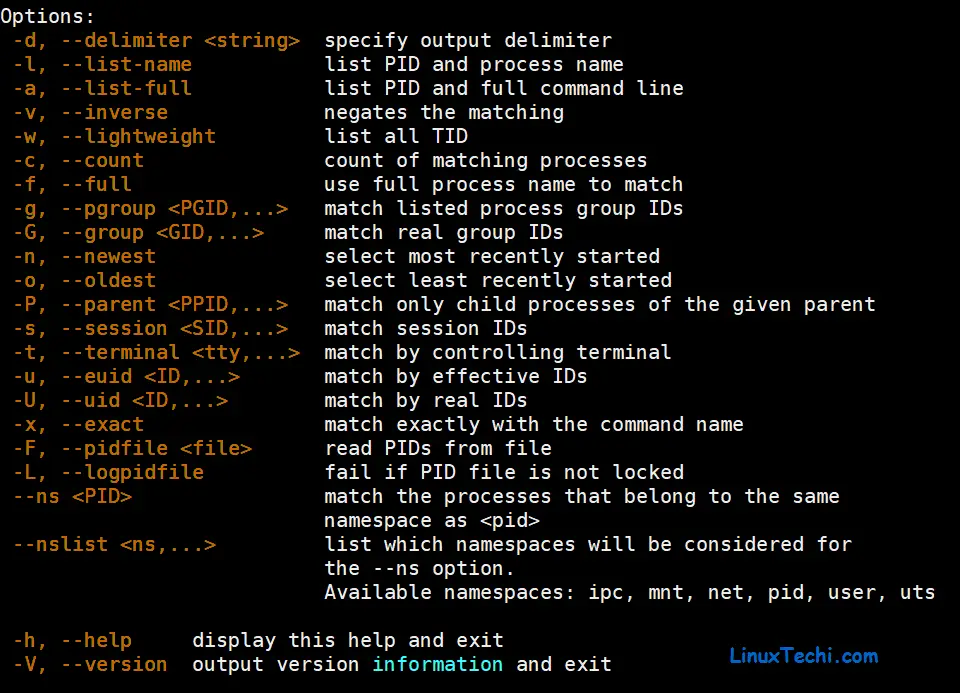
Most Linux users recognize the grep command which is used to find specific words or characters. pgrep works in almost the same way. The pgrep command is used while searching for processes (based on name) that are running on the system at the time of use.
Let’s deep dive into pgrep command examples,
Example:1) List Process ID owned by specific user (-u)
When used, pgrep lists the process IDs which match the criteria that you specify. For example, when you type;
[root@linuxtechi ~]# pgrep -u apache httpd
1274
1275
1278
1282
1283
1284
1286
1291
[root@linuxtechi ~]#
The system lists all processes called httpd that are owned by apache user.
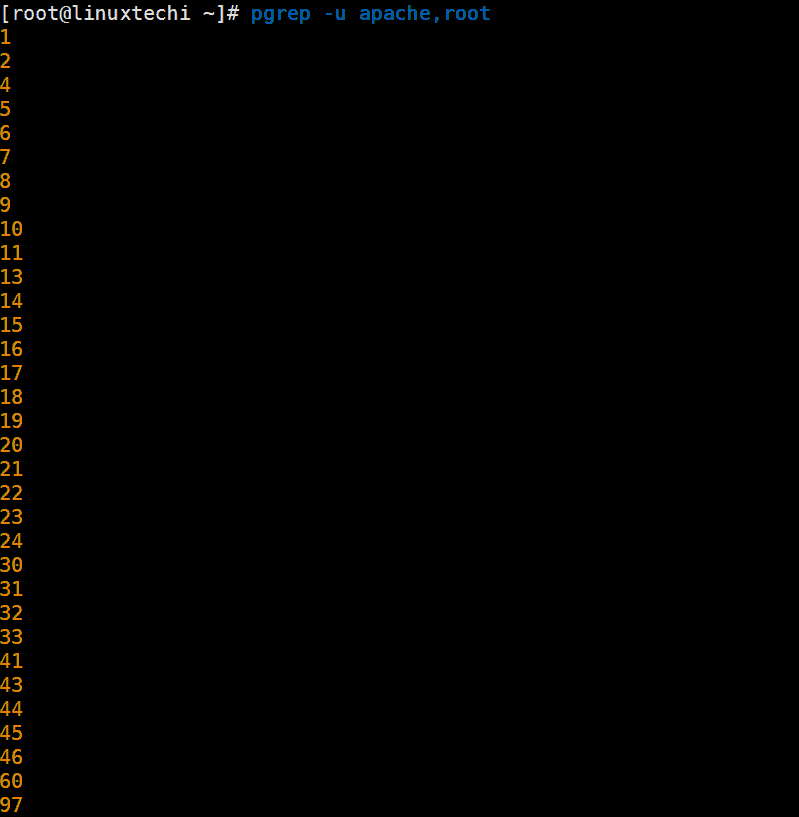
Example:2) List all processes owned by multiple users
Let’s assume we want to list all processes owned by root and apache user, execute following command,
[root@linuxtechi ~]# pgrep -u apache,root
Here users are separated by commas (,)
Output:
Example:3) Count Number of Matching Process (-c)
Let’s suppose we want to count number process owned by apache and root user, run the beneath command
[root@linuxtechi ~]# pgrep -u apache -c
8
[root@linuxtechi ~]# pgrep -u root -c
95
[root@linuxtechi ~]#
In above command, ‘-c’ option is used to count number of process associated to a user.
Example:4) List Process IDs along with process name (-l & -a)
Let’s suppose we want to list process ids and process name associated to a user, then use -l or -a option in pgrep command. -l option will list only process name whereas -a will list full path of process name,
[root@linuxtechi ~]# pgrep -u apache -l
4353 httpd
4354 httpd
4355 httpd
4356 httpd
4357 httpd
4358 httpd
4359 httpd
4360 httpd
[root@linuxtechi ~]#

[root@linuxtechi ~]# pgrep -u apache -a
4353 /usr/sbin/httpd -DFOREGROUND
4354 /usr/sbin/httpd -DFOREGROUND
4355 /usr/sbin/httpd -DFOREGROUND
4356 /usr/sbin/httpd -DFOREGROUND
4357 /usr/sbin/httpd -DFOREGROUND
4358 /usr/sbin/httpd -DFOREGROUND
4359 /usr/sbin/httpd -DFOREGROUND
4360 /usr/sbin/httpd -DFOREGROUND
[root@linuxtechi ~]#
Example 5) List the process ids associated to a user using custom delimiter (-d)
Use ‘-d’ option in pgrep to list process ids of user by using custom delimiter, let’s suppose we list the process ids associated to apache user separated by comma (,) or space.
[root@linuxtechi ~]# pgrep -u apache -d,
4353,4354,4355,4356,4357,4358,4359,4360
[root@linuxtechi ~]# pgrep -u apache -d" "
4353 4354 4355 4356 4357 4358 4359 4360
[root@linuxtechi ~]#
Example:6) List newest process name and it’s id (-n)
Let’s assume we want to list newest process name and its ids owned by root user, execute below pgrep command
Syntax:
# pgrep -u <user> -n -l
[root@linuxtechi ~]# pgrep -u root -n -l
11255 kworker/0:2
[root@linuxtechi ~]#
Example:7) List oldest process name and its id (-o)
Let’s suppose we want to list oldest process name and it’s ids owned by root user, run below pgrep command
Syntax:
# pgrep -u <user> -o -l
[root@linuxtechi ~]# pgrep -u root -o -l
1 systemd
[root@linuxtechi ~]#
Example:8) Search Process with its name
Let’s suppose we want list all process ids associated to postgres process
[root@linuxtechi ~]# pgrep postgres -l
1233 postgres
1234 postgres
4465 postgres
4469 postgres
[root@linuxtechi ~]#
And that’s how we use pgrep. Let’s move to pkill command
pkill command
The pkill command is used to kill processes through the command line. As opposed to the kill command, pkill doesn’t need you to put the ID of the process you’re trying to terminate.
So how do you use pkill? Simple, type pkill with the process name that you want to kill as input.
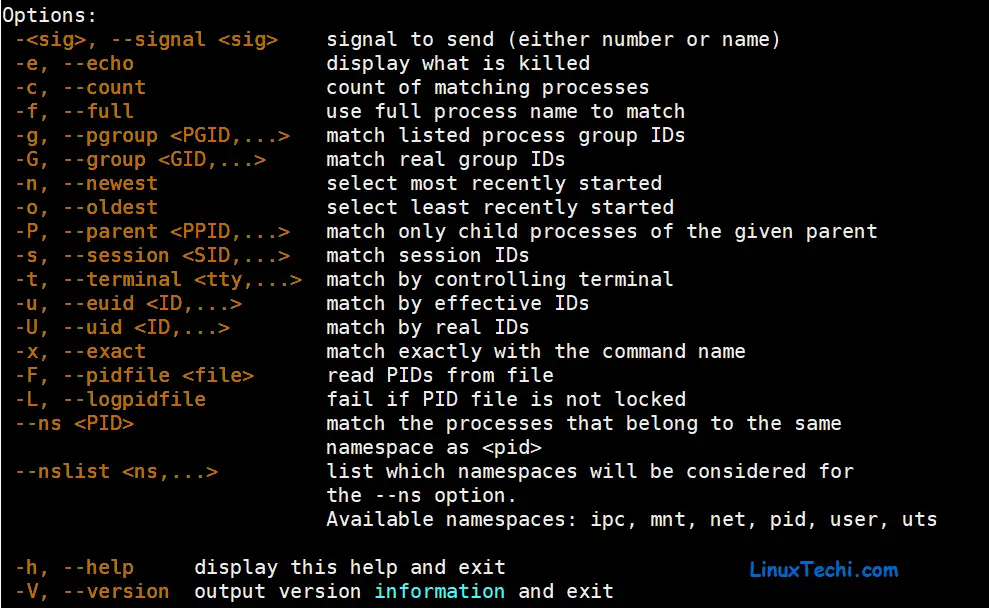
Syntax:
# pkill [options] <pattern>
Example:9) Kill process by its name (pkill {process_name})
For instance, if you would like to kill the postgres process, you simply type;
[root@linuxtechi ~]# pkill postgres
[root@linuxtechi ~]#
If the postgres process is running, then it will be terminated instantly.
Example:10) Kill process by sending different signal (–signal)
By default pkill command use “SIGTERM” signal during its execution. We can change this default signal using “–signal” option in pkill command, for instance,
[root@linuxtechi ~]# pkill --signal SIGKILL postgres
[root@linuxtechi ~]#
Example:11) kill process based on the full command (-f)
We can instruct the pkill command to kill a process based on full command instead of process name using the -f option. What does this mean? Let’s say two ping commands are running on your system.
ping google.com
ping linuxtechi.com
Now, if the requirement is only to terminate the ‘ping google.com’ command using pkill. You can use pkill the following way:
[root@linuxtechi ~]# pkill -f "ping google.com"
[root@linuxtechi ~]#
Notice the -f option is used. If you had used;
[root@linuxtechi ~]# pkill ping
then both the commands will be terminated.
Final Thoughts
In this guide, you have learned all about the commands pgrep, and pkill using practical examples.
In summary, pgrep is a command used while searching for processes that are running on the system at the time of use. Its syntax is pgrep [options] pattern.
On the other hand, pkill is used to kill processes through the command line. Its syntax is pkill [options] <pattern>.
You can use the two commands to take advantage of Linux’s ability and flexibility further. Now that you have all the info, what do you think? Please leave a comment, and we’ll be happy to respond.