As we all of know that VirtualBox is the most commonly used virtualization tool used at desktop level, In other words we can say it is a cross platform virtualization software which is used to create and manage virtual machines (VMs) on Windows, Mac OS and Linux like distributions (Ubuntu, Debian, CentOS, RHEL and SUSE).
Recently Oracle has released latest version of VirtualBox 6.0, this release has some new improved features, someone of them are listed below,
- Introduction of new file manager, which allows to copy files between guest(VM) and host
- Export Virtual machine to Oracle Cloud Infrastructure
- Improved user interface
- 3D graphics support for Windows VMs
- Introduction of vboximg-mount utility for Apple host, which allows to access the content VM disk on the host
In this article we will learn how to install latest version of VirtualBox 6.0 on Ubuntu 18.04 LTS / 18.10 desktop and CentOS 7
Installation Steps of VirtualBox 6.0 on Ubuntu 18.04 LTS / 18.10
1) Open the terminal and run the following commands to add VirtualBox 6 repo keys
pkumar@linuxtechi:~$ wget -q https://www.virtualbox.org/download/oracle_vbox_2016.asc -O- | sudo apt-key add -
OK
pkumar@linuxtechi:~$
pkumar@linuxtechi:~$ wget -q https://www.virtualbox.org/download/oracle_vbox.asc -O- | sudo apt-key add -
OK
pkumar@linuxtechi:~$
2) Execute the beneath command to enable VirtualBox 6.0 repository
pkumar@linuxtechi:~$ sudo add-apt-repository "deb [arch=amd64] http://download.virtualbox.org/virtualbox/debian $(lsb_release -cs) contrib"
3) Install VirtualBox 6.0 using apt-get command
Run the following apt-get command to install VirtualBox 6.0,
pkumar@linuxtechi:~$ sudo apt-get update
pkumar@linuxtechi:~$ sudo apt-get install virtualbox-6.0 -y
Installation Steps of VirtualBox 6.0 on CentOS 7
Open the terminal and create VirtualBox repo file under the folder “/etc/yum.repos.d”
[root@linuxtechi ~]# vi /etc/yum.repos.d/virtualbox.repo
[virtualbox]
name=Oracle Linux / RHEL / CentOS-$releasever / $basearch - VirtualBox
baseurl=http://download.virtualbox.org/virtualbox/rpm/el/$releasever/$basearch
enabled=1
gpgcheck=1
repo_gpgcheck=1
gpgkey=https://www.virtualbox.org/download/oracle_vbox.asc
Save and exit the file
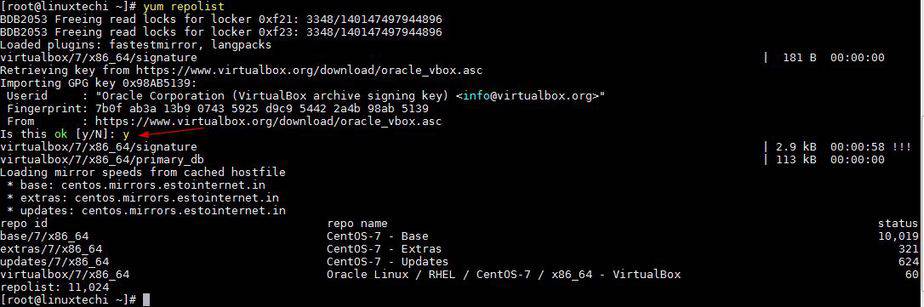
Update yum repositories index using “yum repolist” command and press “y” to accept VirtualBox repo keys
[root@linuxtechi ~]# yum repolist
Output of above command would be something like below
Now Install VirtualBox 6.0 rpm package using below yum command,
[root@linuxtechi ~]# yum install VirtualBox-6.0 -y
Above command will create vboxusers group and VirualBox user. It will add the VirtualBox user to the group and build kernel modules that are required for virtualbox 6.0
Troubleshooting:
In case you get errors related to “KERN_DIR” while installing VirtualBox 6.0, then try to set the below variable,
[root@linuxtechi ~]# KERN_DIR=/usr/src/kernels/`uname -r`-`uname -m`
[root@linuxtechi ~]# export KERN_DIR
In case you are facing kernel rebuild module errors while installing VirtualBox 6.0, then try below steps
[root@linuxtechi ~]# yum update -y
[root@linuxtechi ~]# /usr/lib/virtualbox/vboxdrv.sh setup
Installation of VirtualBox 6.0 Extension Pack on Ubuntu 18.04 / 18.10 / CentOS 7
Note: Below steps are applicable for CentOS 7 system too
Download the virtualbox 6.0 extension pack file using wget command
pkumar@linuxtechi:~$ wget https://download.virtualbox.org/virtualbox/6.0.0/Oracle_VM_VirtualBox_Extension_Pack-6.0.0.vbox-extpack
Once the extension pack file is downloaded, run the below VBoxManage command to install the extension pack,
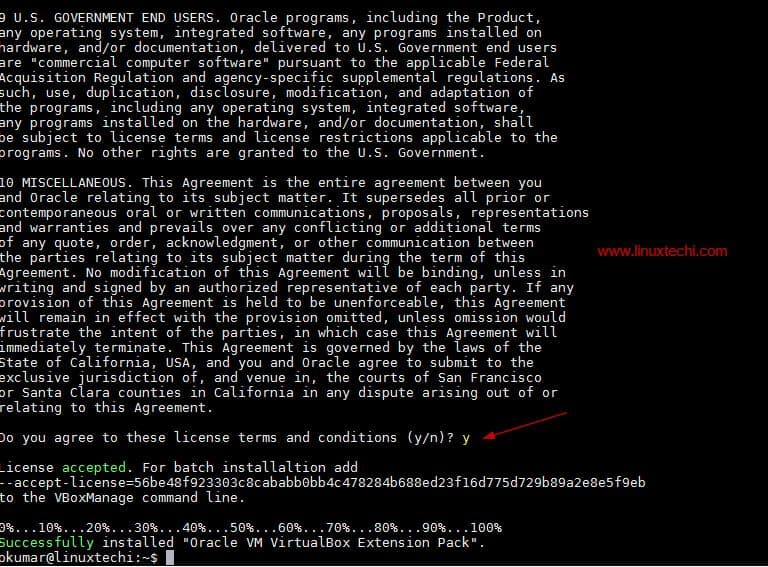
pkumar@linuxtechi:~$ sudo VBoxManage extpack install Oracle_VM_VirtualBox_Extension_Pack-6.0.0.vbox-extpack
Above command will prompt us to accept Oracle License, so type ‘y’ and hit enter and once the command is executed successfully, we will get the output something like below,
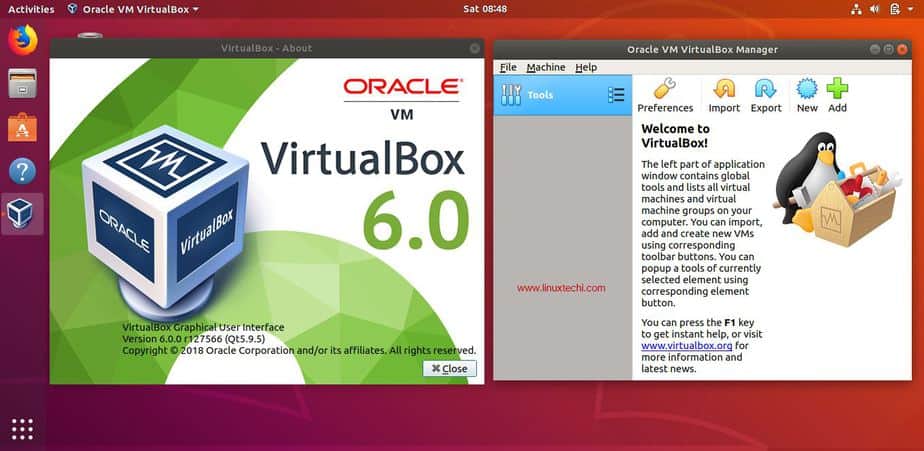
Access VirtualBox 6.0 on Ubuntu 18.04 / 18.10
From search box, type virtualbox and then click on virtualbox icon,
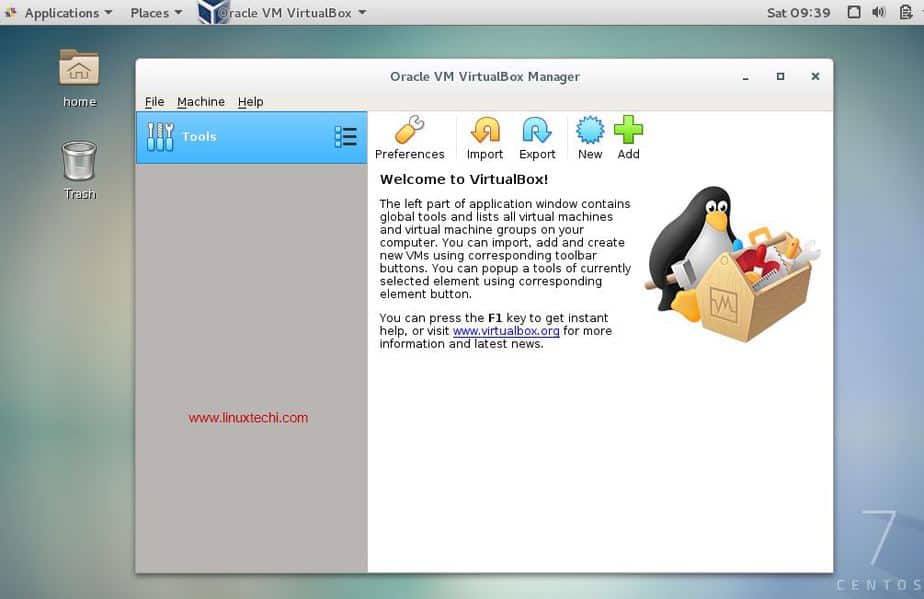
Access VirtualBox 6.0 on CentOS 7
Go to Applications –> System Tools –> Click on VirtualBox Icon
This confirms that we have successfully installed VirtualBox 6.0, that’s all from this article.Please do share your feedback and comments
Read More on : How to Manage Oracle VirtualBox Virtual Machines from Command Line
Is Oracle VM VirtualBox 6 paid or OSFW?
Hi Viktor,
Oracle VM VirtualBox 6 is open source software comes under GNU General Public License (GPL) version 2
I unistalled v 5.2 and followed these steps. I get the following error msg when attempting to run 6.0 on Ubuntu 18.04:
RTR3InitEx failed with rc=-1912 (rc=-1912)
The VirtualBox kernel modules do not match this version of VirtualBox. The installation of VirtualBox was apparently not successful.
Hi Nathan,
I would suggest first do complete clean of your existing VirtualBox installation using the following command,
$ sudo apt autoremove –purge virtualbox*
Then try to install VirtualBox 6