In this guide, we demonstrate how to install KVM on Rocky Linux 9 / Alma Linux 9.
KVM, short for Kernel Virtualization Machine, is an opensource virtualization platform designed for the Linux kernel. It’s a type 1 hypervisor, or commonly referred to as a bare metal hypervisor. It allows users to create and manage multiple guest machines which can be spun from either Linux or Windows operating systems.
Like most virtualization platforms, it abstracts hardware resources such as CPU, memory, storage, network, graphics etc. and allocates them to guest machines which run independently of the host.
Prerequisites
- Pre Installed Rocky Linux 9 / AlmaLinux 9
- Sudo User with admin rights
- Internet Connectivity
1) Verify if hardware Virtualization is Enabled
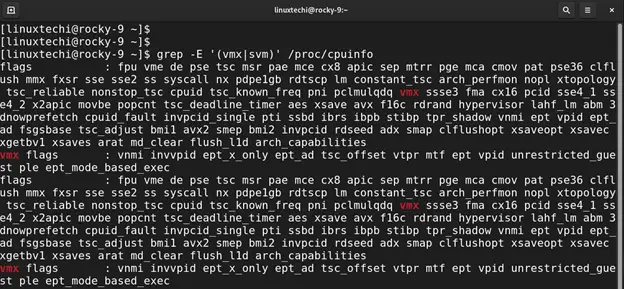
To start off, you need to verify if your system has the virtualization feature enabled. On most modern systems, this feature comes already enabled in the BIOS. But just to be sure, you can verify if virtualization is enabled as shown.
The command probes for the presence of vmx (Virtual Machine Extension) which is a CPU flag for Intel hardware virtualization or svm which is the flag for AMD hardware virtualization.
$ cat /proc/cpuinfo | egrep "vmx|svm"
From the following output, you can see that our system has Intel Hardware virtualization enabled.
2) Install KVM on Rocky Linux 9 / AlmaLinux 9
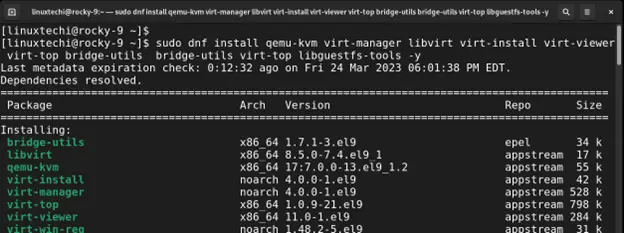
Once you have ensured that virtualization is enabled, the next step is to install KVM and management tools. To do so, run the following dnf command.
$ sudo dnf install qemu-kvm virt-manager libvirt virt-install virt-viewer virt-top bridge-utils bridge-utils virt-top libguestfs-tools -y
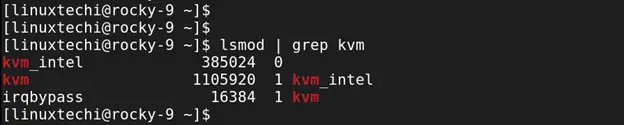
Once the installation is complete, run the following command to check if the required KVM modules have been loaded.
$ lsmod | grep kvm
You should get the following output to confirm that the necessary modules have been loaded.
3) Start and Enable the libvirtd daemon
In the next step, be sure to start the libvirtd daemon. This is a server-side daemon component that runs and manages tasks on virtualized guests. It is used to manage virtualization technologies such as Xen, KVM, and ESXi to mention a few.
To start the libvirtd daemon, run the command:
$ sudo systemctl start libvirtd
Be sure to enable the service to start on boot time.
$ sudo systemctl enable --now libvirtd
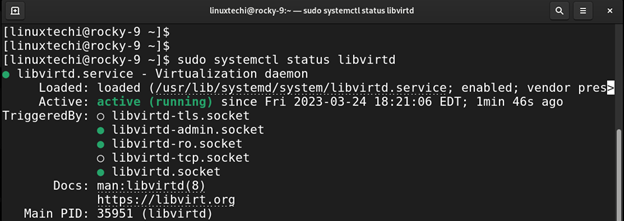
Verify that the libvirtd daemon is running as follows.
$ sudo systemctl status libvirtd
4) Setup the Bridge Interface
So far, we have installed KVM, and all the management tools and we can, in fact, proceed to spin up a virtual machine. However, it would be nice if we can access the VMs from outside the hypervisor network. To accomplish this, we need to create a bridge interface.
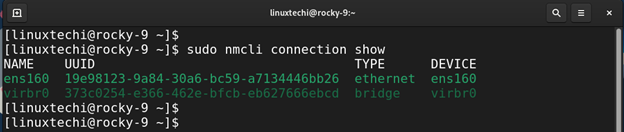
First, identify the network interfaces on your system.
$ sudo nmcli connection show
From the output, ens160 is the active network interface, be sure to take note of the interface in your case as you will use it along the way.
To begin creating the bridge, first, delete the connection using its UUID in the following syntax.
$ sudo nmcli connection delete UUID
In our case, the command will be:
$ sudo nmcli connection delete 19e98123-9a84-30a6-bc59-a7134446bb26
You will get a confirmation that the connection has successfully been deleted.

Before proceeding any further, it would be prudent to have the following details at hand:
- BRIDGE NAME – Preferred name of the new bridge (e.g. “br1”)
- DEVICE NAME – This is the name of your network interface. This will serve as the bridge slave (e.g., “ens160”)
- IP ADDRESS/SUBNET – The IP address and subnet for the bridge network (e.g., “192.168.2.50/24”). Note that this should correspond with your network subnet and IP addressing.
- GATEWAY – Default gateway address of your network (e.g. “192.168.2.1”)
- DNS1 and DNS2 – Preferred DNS addresses (e.g. “8.8.8.8” and “8.8.4.4”)
Moving on, create a new bridge interface using the following syntax.
$ sudo nmcli connection add type bridge autoconnect yes con-name BRIDGE NAME ifname BRIDGE NAME
In our case, br1 is the preferred bridge interface name. Therefore, the command will be as shown.
$ sudo nmcli connection add type bridge autoconnect yes con-name br1 ifname br1

In the next steps, you will modify the bridge by specifying the IP subnet, Gateway, and DNS values.
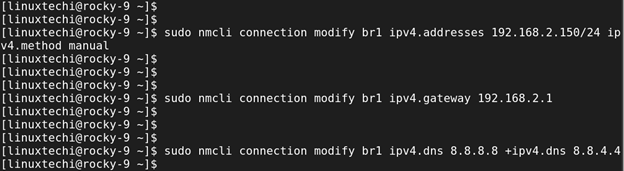
Start off by specifying the IP subnet using the following syntax.
$ sudo nmcli connection modify BRIDGE NAME ipv4.addresses IP ADDRESS/SUBNET ipv4.method manual
According to our setup, the command will be.
$ sudo nmcli connection modify br1 ipv4.addresses 192.168.2.150/24 ipv4.method manual
Next, specify the gateway address using the following syntax
$ sudo nmcli connection modify BRIDGE NAME ipv4.gateway GATEWAY
According to our network, the command takes the following format.
$ sudo nmcli connection modify br1 ipv4.gateway 192.168.2.1
The syntax for the DNS address is as follows.
$ sudo nmcli connection modify BRIDGE NAME ipv4.dns DNS1 +ipv4.dns DNS2
And the command takes the following format.
$ sudo nmcli connection modify br1 ipv4.dns 8.8.8.8 +ipv4.dns 8.8.4.4
Thereafter, use the following command to add the bridge slave.
$ sudo nmcli connection add type bridge-slave autoconnect yes con-name DEVICE NAME ifname DEVICE NAME master BRIDGE NAME
Using our values, the command is as shown.
$ sudo nmcli connection add type bridge-slave autoconnect yes con-name ens160 ifname ens160 master br1
You will get the following confirmation that the bridge slave was successfully added. Keep in mind that the bridge slave is your network interface or adapter.

To confirm that the bridge was created, run the following command:
$ sudo nmcli connection show
From the output, you can see that the bridge interface is listed.

To activate it, run the command:
$ sudo nmcli connection up br1

In addition, you can verify this using the ip addr command.
$ ip addr | grep br1

Lastly, edit the bridge configuration file.
$ sudo vi /etc/qemu-kvm/bridge.conf
Add the following line.
allow all
Then restart the virtualization daemon to apply the change
$ sudo systemctl restart libvirtd
5) Create a Virtual Machine
With KVM installed and the bridge connection configured, let’s now create a virtual machine. Before doing, assign the necessary ownership right to the logged-in user in order to run commands without switching to root.
$ sudo chown -R $USER:libvirt /var/lib/libvirt/
On the command line, we will create a virtual machine using Ubuntu 20.04 ISO image using the following syntax.
$ virt-install \
--name Ubuntu \
--ram 2048 \
--vcpus 2 \
--disk path=/var/lib/libvirt/images/ubuntu-20.04.img,size=15 \
--os-variant ubuntu20.04 \
--network bridge=br1,model=virtio \
--graphics vnc,listen=0.0.0.0 \
--console pty,target_type=serial \
--cdrom /home/linuxtechi/Downloads/ubuntu-20.04.4-desktop-amd64.iso
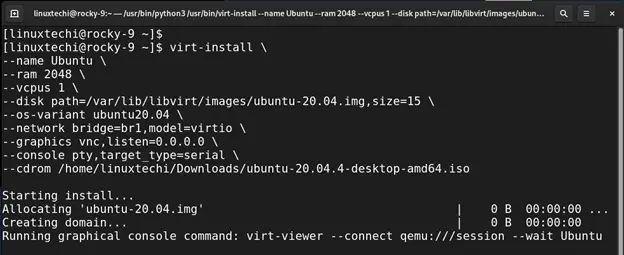
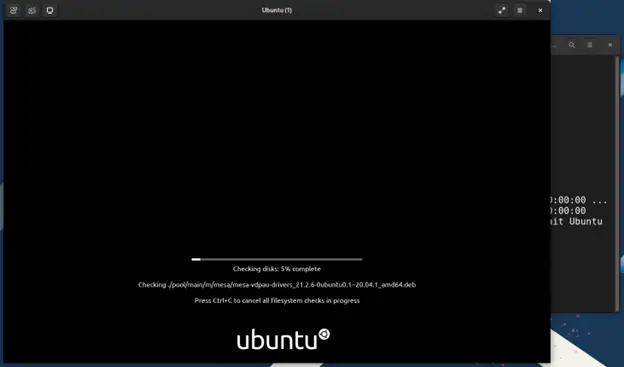
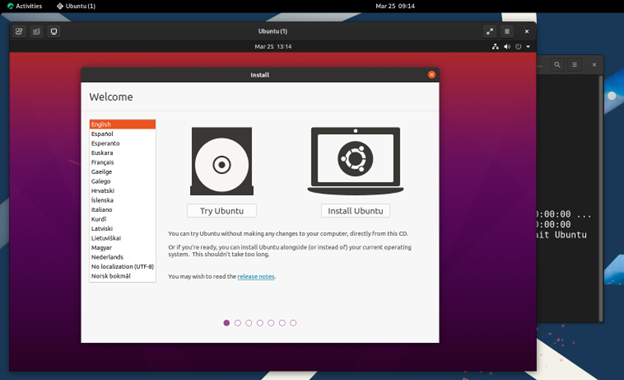
Once the command is executed, the graphical screen session will be launched, and the installation of the guest operating system will commence.
Conclusion
This concludes our article on how to install KVM on Rocky Linux 9 / AlmaLinux 9 Your feedback s highly welcome.
Also Read: How to Manage KVM Virtual Machines with Cockpit Web Console