Kubernetes is a cluster and orchestration engine for docker containers. In other words Kubernetes is an open source software or tool which is used to orchestrate and manage docker containers in cluster environment. Kubernetes is also known as k8s and it was developed by Google and donated to “Cloud Native Computing foundation”
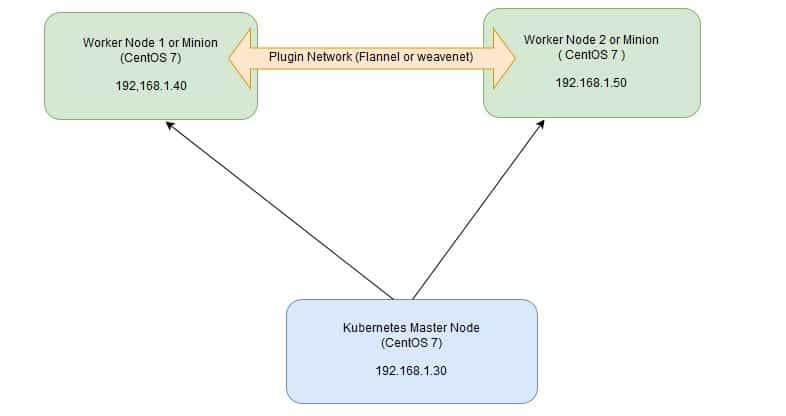
In Kubernetes setup we have one master node and multiple nodes. Cluster nodes is known as worker node or Minion. From the master node we manage the cluster and its nodes using ‘kubeadm‘ and ‘kubectl‘ command.
Kubernetes can be installed and deployed using following methods:
- Minikube ( It is a single node kubernetes cluster)
- Kops ( Multi node kubernetes setup into AWS )
- Kubeadm ( Multi Node Cluster in our own premises)
In this article we will install latest version of Kubernetes 1.7 on CentOS 7 / RHEL 7 with kubeadm utility. In my setup I am taking three CentOS 7 servers with minimal installation. One server will acts master node and rest two servers will be minion or worker nodes.
On the Master Node following components will be installed
- API Server – It provides kubernetes API using Jason / Yaml over http, states of API objects are stored in etcd
- Scheduler – It is a program on master node which performs the scheduling tasks like launching containers in worker nodes based on resource availability
- Controller Manager – Main Job of Controller manager is to monitor replication controllers and create pods to maintain desired state.
- etcd – It is a Key value pair data base. It stores configuration data of cluster and cluster state.
- Kubectl utility – It is a command line utility which connects to API Server on port 6443. It is used by administrators to create pods, services etc.
On Worker Nodes following components will be installed
- Kubelet – It is an agent which runs on every worker node, it connects to docker and takes care of creating, starting, deleting containers.
- Kube-Proxy – It routes the traffic to appropriate containers based on ip address and port number of the incoming request. In other words we can say it is used for port translation.
- Pod – Pod can be defined as a multi-tier or group of containers that are deployed on a single worker node or docker host.
Installations Steps of Kubernetes 1.7 on CentOS 7 / RHEL 7
Perform the following steps on Master Node
Step 1: Disable SELinux & setup firewall rules
Login to your kubernetes master node and set the hostname and disable selinux using following commands
~]# hostnamectl set-hostname 'k8s-master'
~]# exec bash
~]# setenforce 0
~]# sed -i --follow-symlinks 's/SELINUX=enforcing/SELINUX=disabled/g' /etc/sysconfig/selinux
Set the following firewall rules.
[root@k8s-master ~]# firewall-cmd --permanent --add-port=6443/tcp
[root@k8s-master ~]# firewall-cmd --permanent --add-port=2379-2380/tcp
[root@k8s-master ~]# firewall-cmd --permanent --add-port=10250/tcp
[root@k8s-master ~]# firewall-cmd --permanent --add-port=10251/tcp
[root@k8s-master ~]# firewall-cmd --permanent --add-port=10252/tcp
[root@k8s-master ~]# firewall-cmd --permanent --add-port=10255/tcp
[root@k8s-master ~]# firewall-cmd --reload
[root@k8s-master ~]# modprobe br_netfilter
[root@k8s-master ~]# echo '1' > /proc/sys/net/bridge/bridge-nf-call-iptables
Note: In case you don’t have your own dns server then update /etc/hosts file on master and worker nodes
192.168.1.30 k8s-master
192.168.1.40 worker-node1
192.168.1.50 worker-node2
Disable Swap in all nodes using “swapoff -a” command and remove or comment out swap partitions or swap file from fstab file
Step 2: Configure Kubernetes Repository
Kubernetes packages are not available in the default CentOS 7 & RHEL 7 repositories, Use below command to configure its package repositories.
[root@k8s-master ~]# cat <<EOF > /etc/yum.repos.d/kubernetes.repo
> [kubernetes]
> name=Kubernetes
> baseurl=https://packages.cloud.google.com/yum/repos/kubernetes-el7-x86_64
> enabled=1
> gpgcheck=1
> repo_gpgcheck=1
> gpgkey=https://packages.cloud.google.com/yum/doc/yum-key.gpg
>         https://packages.cloud.google.com/yum/doc/rpm-package-key.gpg
> EOF [root@k8s-master ~]#
Step 3: Install Kubeadm and Docker
Once the package repositories are configured, run the beneath command to install kubeadm and docker packages.
[root@k8s-master ~]# yum install kubeadm docker -y
Start and enable kubectl and docker service
[root@k8s-master ~]# systemctl restart docker && systemctl enable docker
[root@k8s-master ~]# systemctl  restart kubelet && systemctl enable kubelet
Step 4: Initialize Kubernetes Master with ‘kubeadm init’
Run the beneath command to initialize and setup kubernetes master.
[root@k8s-master ~]# kubeadm init
Output of above command would be something like below
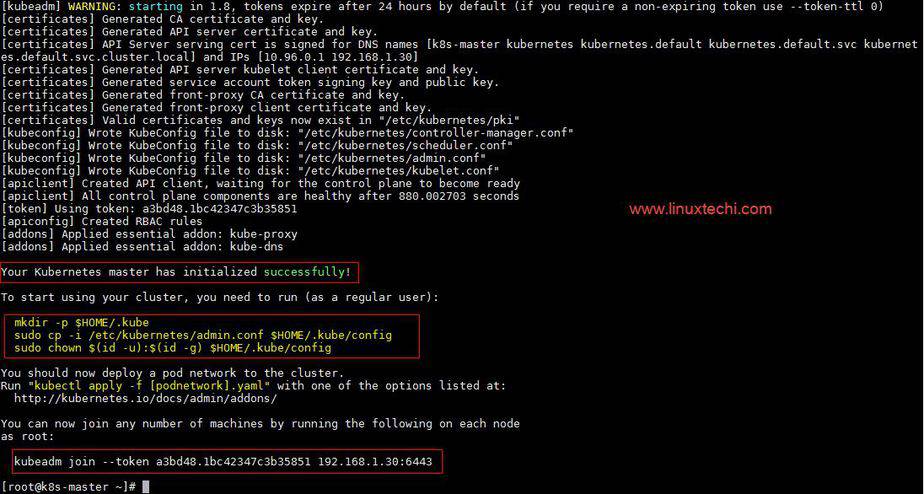
As we can see in the output that kubernetes master has been initialized successfully. Execute the beneath commands to use the cluster as root user.
[root@k8s-master ~]# mkdir -p $HOME/.kube
[root@k8s-master ~]# cp -i /etc/kubernetes/admin.conf $HOME/.kube/config
[root@k8s-master ~]# chown $(id -u):$(id -g) $HOME/.kube/config
Step 5: Deploy pod network to the cluster
Try to run below commands to get status of cluster and pods.
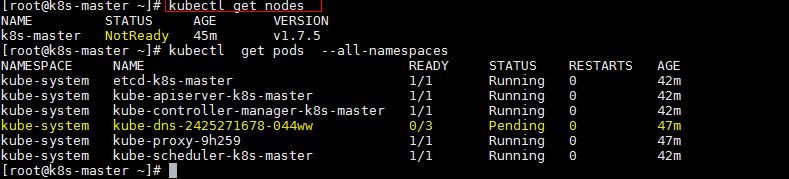
To make the cluster status ready and kube-dns status running, deploy the pod network so that containers of different host communicated each other. POD network is the overlay network between the worker nodes.
Run the beneath command to deploy network.
[root@k8s-master ~]# export kubever=$(kubectl version | base64 | tr -d '\n')
[root@k8s-master ~]# kubectl apply -f "https://cloud.weave.works/k8s/net?k8s-version=$kubever"
serviceaccount "weave-net" created
clusterrole "weave-net" created
clusterrolebinding "weave-net" created
daemonset "weave-net" created
[root@k8s-master ~]#
Now run the following commands to verify the status
[root@k8s-master ~]# kubectl get nodes
NAME         STATUS    AGE       VERSION
k8s-master   Ready     1h        v1.7.5
[root@k8s-master ~]# kubectl  get pods  --all-namespaces
NAMESPACE     NAME                                 READY     STATUS    RESTARTS   AGE
kube-system   etcd-k8s-master                      1/1       Running   0          57m
kube-system   kube-apiserver-k8s-master            1/1       Running   0          57m
kube-system   kube-controller-manager-k8s-master   1/1       Running   0          57m
kube-system   kube-dns-2425271678-044ww            3/3       Running   0          1h
kube-system   kube-proxy-9h259                     1/1       Running   0          1h
kube-system   kube-scheduler-k8s-master            1/1       Running   0          57m
kube-system   weave-net-hdjzd                      2/2       Running   0          7m
[root@k8s-master ~]#
Now let’s add worker nodes to the Kubernetes master nodes.
Perform the following steps on each worker node
Step 1: Disable SELinux & configure firewall rules on both the nodes
Before disabling SELinux set the hostname on the both nodes as ‘worker-node1’ and ‘worker-node2’ respectively
~]# setenforce 0
~]# sed -i --follow-symlinks 's/SELINUX=enforcing/SELINUX=disabled/g' /etc/sysconfig/selinux
~]# firewall-cmd --permanent --add-port=10250/tcp
~]# firewall-cmd --permanent --add-port=10255/tcp
~]# firewall-cmd --permanent --add-port=30000-32767/tcp
~]# firewall-cmd --permanent --add-port=6783/tcp
~]# firewall-cmd  --reload
~]# echo '1' > /proc/sys/net/bridge/bridge-nf-call-iptables
Step 2: Configure Kubernetes Repositories on both worker nodes
~]# cat <<EOF > /etc/yum.repos.d/kubernetes.repo
> [kubernetes]
> name=Kubernetes
> baseurl=https://packages.cloud.google.com/yum/repos/kubernetes-el7-x86_64
> enabled=1
> gpgcheck=1
> repo_gpgcheck=1
> gpgkey=https://packages.cloud.google.com/yum/doc/yum-key.gpg
>         https://packages.cloud.google.com/yum/doc/rpm-package-key.gpg
> EOF
Step 3: Install kubeadm and docker package on both nodes
[root@worker-node1 ~]# yum  install kubeadm docker -y
[root@worker-node2 ~]# yum  install kubeadm docker -y
Start and enable docker service
[root@worker-node1 ~]# systemctl restart docker && systemctl enable docker
[root@worker-node2 ~]# systemctl restart docker && systemctl enable docker
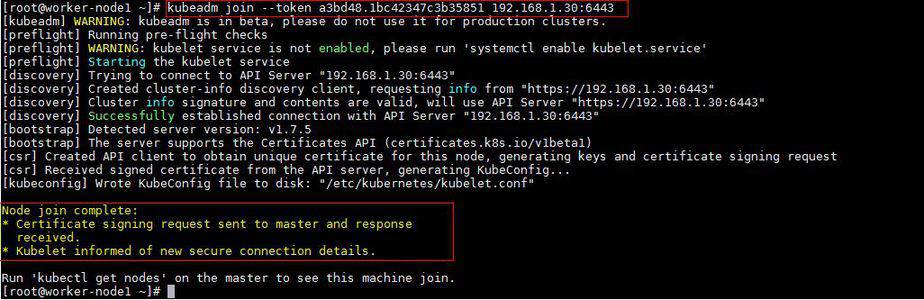
Step 4: Now Join worker nodes to master node
To join worker nodes to Master node, a token is required. Whenever kubernetes master initialized , then in the output we get command and token. Copy that command and run on both nodes.
[root@worker-node1 ~]# kubeadm join --token a3bd48.1bc42347c3b35851 192.168.1.30:6443
Output of above command would be something like below
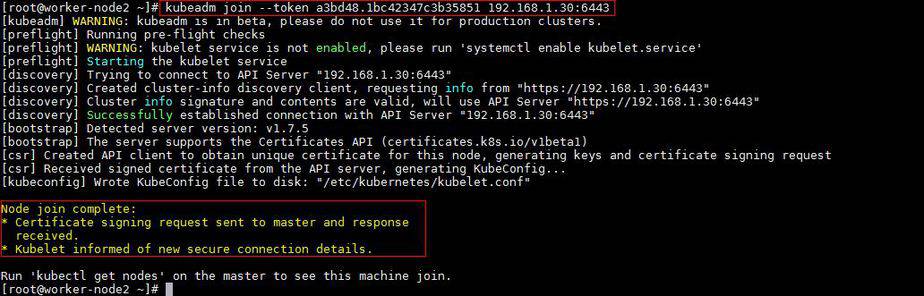
[root@worker-node2 ~]# kubeadm join --token a3bd48.1bc42347c3b35851 192.168.1.30:6443
Output would be something like below
Now verify Nodes status from master node using kubectl command
[root@k8s-master ~]# kubectl get nodes
NAME           STATUS    AGE       VERSION
k8s-master     Ready     2h        v1.7.5
worker-node1   Ready     20m       v1.7.5
worker-node2   Ready     18m       v1.7.5
[root@k8s-master ~]#
As we can see master and worker nodes are in ready status. This concludes that kubernetes 1.7 has been installed successfully and also we have successfully joined two worker nodes. Now we can create pods and services.
Please share your feedback and comments in case this article helps you to install latest version of kubernetes 1.7
Hii..
I am getting the error while kubeadm join comment in worker node
Couldn’t validate the identity the API server: abort connecting to the API server after timeout of 5m0s
Please give me the solution.
Currently Stuck when trying to run ‘kubeadm init’ command.
Getting Error below from ‘systemctl status kubelet’
plugin portmap does not support config version “0.4.0” failed to find plugin “firewall” in path [/opt/cni/bin]]
update cni config: no valid networks found in /etc/cni/net.d
Please advise.
this solved my problem:
cp /usr/libexec/cni/firewall /opt/cni/bin
Hi Team,
I installed the master node successfully.But When I check the status of a master node it’s in Not ready Status.
kubectl get nodes
NAME STATUS ROLES AGE VERSION
hoonartek001 NotReady master 19h v1.18.0
Any one can help me on this.
To make the cluster status ready and kube-dns status running, deploy the pod network so that containers of different host communicated each other. POD network is the overlay network between the worker nodes.
Run the beneath command to deploy network.
[root@k8s-master ~]# export kubever=$(kubectl version | base64 | tr -d ‘\n’)
[root@k8s-master ~]# kubectl apply -f “https://cloud.weave.works/k8s/net?k8s-version=$kubever”
You should have missed this step
Hi,
There are no packages available under “https://packages.cloud.google.com/yum/repos/kubernetes-el7-x86_64/Packages”.
Can anyone suggest any other package Kubernetes-el7-x86 package location?
New to Kubernetes and I am getting the following error on my node can someone please help me solve this. I understand why its throwing the error but where is it getting the centos7_2.linuxvmimages.local. I don’t have this in my /etc/hosts. What do I need to update.
would really appreciate some help to understand this.
W0509 13:03:45.507894 2706 join.go:346] [preflight] WARNING: JoinControlPane.controlPlane settings will be ignored when control-plane flag is not set.
nodeRegistration.name: Invalid value: “centos7_2.linuxvmimages.local”: a DNS-1123 subdomain must consist of lower case alphanumeric characters, ‘-‘ or ‘.’, and must start and end with an alphanumeric character (e.g. ‘example.com’, regex used for validation is ‘[a-z0-9]([-a-z0-9]*[a-z0-9])?(\.[a-z0-9]([-a-z0-9]*[a-z0-9])?)*’)
To see the stack trace of this error execute with –v=5 or higher
solved this by forcing the node name. Past the kubeadm join token and at the end append –node-name
Hi,
I like to add second master node and then I will configure load balancing using nginx.
Has anyone added the second master node?
Please advise.
Hi Vishal,
Did you manage to get an answer why you was getting this error? Any idea how to resolve it?
Thank you. I love how you broke up the setup to master and worker nodes; something I struggled to find on the net.
Thank you very much for the detailed instructions and explanation. Configured successfully
Hi Pradeep,
Thank you for the above information.
Can you please give the steps for adding windows node to Kubernetes cluster.