How to Install Kubernetes (k8s) 1.7 on CentOS 7 / RHEL 7

Kubernetes is a cluster and orchestration engine for docker containers. In other words Kubernetes is  an open source software or tool which is used to orchestrate and manage docker containers in cluster environment. Kubernetes is also known as k8s and it was developed by Google and donated to “Cloud Native Computing foundation”

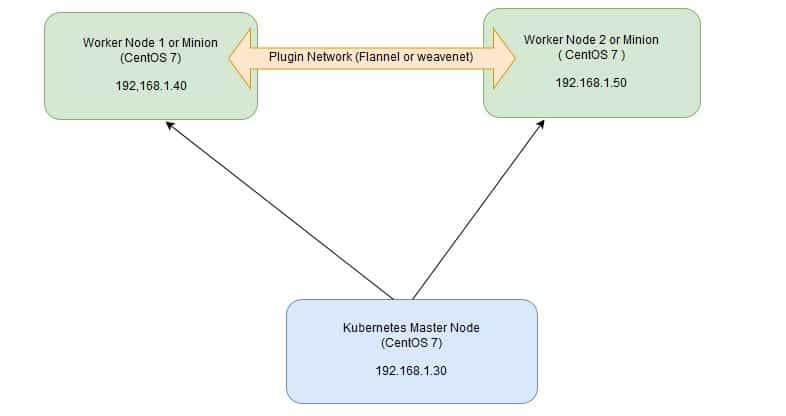
In Kubernetes setup we have one master node and multiple nodes. Cluster nodes is known as worker node or Minion. From the master node we manage the cluster and its nodes using ‘kubeadm‘ and ‘kubectl‘  command.

Kubernetes can be installed and deployed using following methods:

  • Minikube ( It is a single node kubernetes cluster)
  • Kops ( Multi node kubernetes setup into AWS )
  • Kubeadm ( Multi Node Cluster in our own premises)

In this article we will install latest version of Kubernetes 1.7 on CentOS 7 / RHEL 7 with kubeadm utility. In my setup I am taking three CentOS 7 servers with minimal installation. One server will acts master node and rest two servers will be minion or worker nodes.

Kubernetes-settup-Diagram

On the Master Node following components will be installed

  • API Server  – It provides kubernetes API using Jason / Yaml over http, states of API objects are stored in etcd
  • Scheduler  – It is a program on master node which performs the scheduling tasks like launching containers in worker nodes based on resource availability
  • Controller Manager – Main Job of Controller manager is to monitor replication controllers and create pods to maintain desired state.
  • etcd – It is a Key value pair data base. It stores configuration data of cluster and cluster state.
  • Kubectl utility – It is a command line utility which connects to API Server on port 6443. It is used by administrators to create pods, services etc.

On Worker Nodes following components will be installed

  • Kubelet – It is an agent which runs on every worker node, it connects to docker  and takes care of creating, starting, deleting containers.
  • Kube-Proxy – It routes the traffic to appropriate containers based on ip address and port number of the incoming request. In other words we can say it is used for port translation.
  • Pod – Pod can be defined as a multi-tier or group of containers that are deployed on a single worker node or docker host.

Installations Steps of Kubernetes 1.7 on CentOS 7 / RHEL 7

Perform the following steps on Master Node

Step 1: Disable SELinux & setup firewall rules

Login to your kubernetes master node and set the hostname and disable selinux using following commands

~]# hostnamectl set-hostname 'k8s-master'
~]# exec bash
~]# setenforce 0
~]# sed -i --follow-symlinks 's/SELINUX=enforcing/SELINUX=disabled/g' /etc/sysconfig/selinux

Set the following firewall rules.

[root@k8s-master ~]# firewall-cmd --permanent --add-port=6443/tcp
[root@k8s-master ~]# firewall-cmd --permanent --add-port=2379-2380/tcp
[root@k8s-master ~]# firewall-cmd --permanent --add-port=10250/tcp
[root@k8s-master ~]# firewall-cmd --permanent --add-port=10251/tcp
[root@k8s-master ~]# firewall-cmd --permanent --add-port=10252/tcp
[root@k8s-master ~]# firewall-cmd --permanent --add-port=10255/tcp
[root@k8s-master ~]# firewall-cmd --reload
[root@k8s-master ~]# modprobe br_netfilter
[root@k8s-master ~]# echo '1' > /proc/sys/net/bridge/bridge-nf-call-iptables

Note: In case you don’t have your own dns server then update /etc/hosts file on master and worker nodes

192.168.1.30 k8s-master
192.168.1.40 worker-node1
192.168.1.50 worker-node2

Disable Swap in all nodes using “swapoff -a” command and remove or comment out swap partitions or swap file from fstab file

Step 2: Configure Kubernetes Repository

Kubernetes packages are not available in the default CentOS 7 & RHEL 7 repositories, Use below command to configure its package repositories.

[root@k8s-master ~]# cat <<EOF > /etc/yum.repos.d/kubernetes.repo
> [kubernetes]
> name=Kubernetes
> baseurl=https://packages.cloud.google.com/yum/repos/kubernetes-el7-x86_64
> enabled=1
> gpgcheck=1
> repo_gpgcheck=1
> gpgkey=https://packages.cloud.google.com/yum/doc/yum-key.gpg
>         https://packages.cloud.google.com/yum/doc/rpm-package-key.gpg
> EOF [root@k8s-master ~]#

Step 3: Install Kubeadm and Docker

Once the package repositories are configured, run the beneath command to install kubeadm and docker packages.

[root@k8s-master ~]# yum install kubeadm docker -y

Start and enable kubectl and docker service

[root@k8s-master ~]# systemctl restart docker && systemctl enable docker
[root@k8s-master ~]# systemctl  restart kubelet && systemctl enable kubelet

Step 4: Initialize Kubernetes Master with ‘kubeadm init’

Run the beneath command to  initialize and setup kubernetes master.

[root@k8s-master ~]# kubeadm init

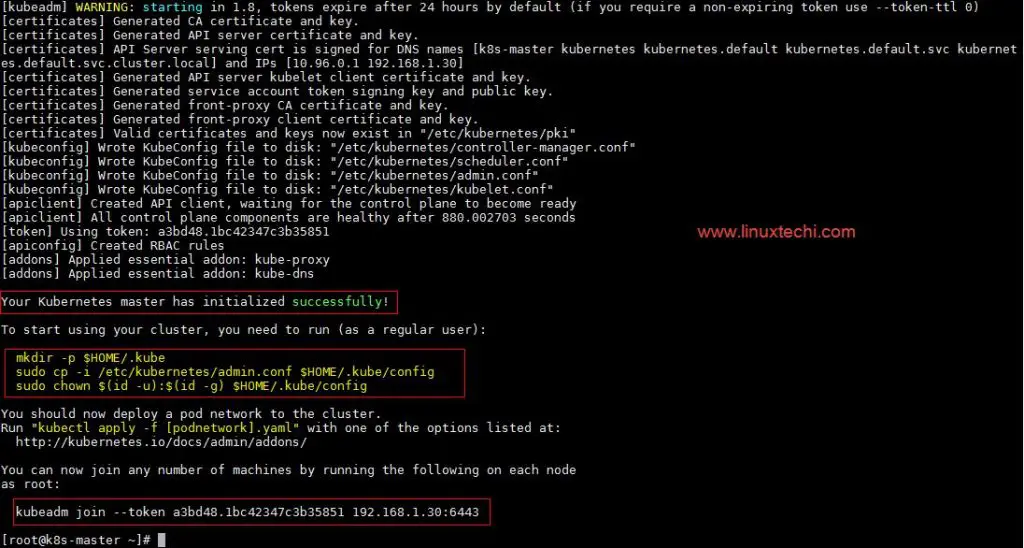
Output of above command would be something like below

kubeadm-init-output

As we can see in the output that kubernetes master has been initialized successfully. Execute the beneath commands to use the cluster as root user.

[root@k8s-master ~]# mkdir -p $HOME/.kube
[root@k8s-master ~]# cp -i /etc/kubernetes/admin.conf $HOME/.kube/config
[root@k8s-master ~]# chown $(id -u):$(id -g) $HOME/.kube/config

Step 5: Deploy pod network to the cluster

Try to run below commands to get status of cluster and pods.

kubectl-get-nodes

To make the cluster status ready and kube-dns status running, deploy the pod network so that containers of different host communicated each other.  POD network is the overlay network between the worker nodes.

Run the beneath command to deploy network.

[root@k8s-master ~]# export kubever=$(kubectl version | base64 | tr -d '\n')
[root@k8s-master ~]# kubectl apply -f "https://cloud.weave.works/k8s/net?k8s-version=$kubever"
serviceaccount "weave-net" created
clusterrole "weave-net" created
clusterrolebinding "weave-net" created
daemonset "weave-net" created
[root@k8s-master ~]#

Now run the following commands to verify the status

[root@k8s-master ~]# kubectl get nodes
NAME         STATUS    AGE       VERSION
k8s-master   Ready     1h        v1.7.5
[root@k8s-master ~]# kubectl  get pods  --all-namespaces
NAMESPACE     NAME                                 READY     STATUS    RESTARTS   AGE
kube-system   etcd-k8s-master                      1/1       Running   0          57m
kube-system   kube-apiserver-k8s-master            1/1       Running   0          57m
kube-system   kube-controller-manager-k8s-master   1/1       Running   0          57m
kube-system   kube-dns-2425271678-044ww            3/3       Running   0          1h
kube-system   kube-proxy-9h259                     1/1       Running   0          1h
kube-system   kube-scheduler-k8s-master            1/1       Running   0          57m
kube-system   weave-net-hdjzd                      2/2       Running   0          7m
[root@k8s-master ~]#

Now let’s add worker nodes to the Kubernetes master nodes.

Perform the following steps on each worker node

Step 1: Disable SELinux & configure firewall rules on both the nodes

Before disabling SELinux set the hostname on the both nodes as ‘worker-node1’ and ‘worker-node2’ respectively

~]# setenforce 0
~]# sed -i --follow-symlinks 's/SELINUX=enforcing/SELINUX=disabled/g' /etc/sysconfig/selinux
~]# firewall-cmd --permanent --add-port=10250/tcp
~]# firewall-cmd --permanent --add-port=10255/tcp
~]# firewall-cmd --permanent --add-port=30000-32767/tcp
~]# firewall-cmd --permanent --add-port=6783/tcp
~]# firewall-cmd  --reload
~]# echo '1' > /proc/sys/net/bridge/bridge-nf-call-iptables

Step 2: Configure Kubernetes Repositories on both worker nodes

~]# cat <<EOF > /etc/yum.repos.d/kubernetes.repo
> [kubernetes]
> name=Kubernetes
> baseurl=https://packages.cloud.google.com/yum/repos/kubernetes-el7-x86_64
> enabled=1
> gpgcheck=1
> repo_gpgcheck=1
> gpgkey=https://packages.cloud.google.com/yum/doc/yum-key.gpg
>         https://packages.cloud.google.com/yum/doc/rpm-package-key.gpg
> EOF

Step 3: Install kubeadm and docker package on both nodes

[root@worker-node1 ~]# yum  install kubeadm docker -y
[root@worker-node2 ~]# yum  install kubeadm docker -y

Start and enable docker service

[root@worker-node1 ~]# systemctl restart docker && systemctl enable docker
[root@worker-node2 ~]# systemctl restart docker && systemctl enable docker

Step 4: Now Join worker nodes to master node

To join worker nodes to Master node, a token is required. Whenever kubernetes master initialized , then in the output we get command and token.  Copy that command and run on both nodes.

[root@worker-node1 ~]# kubeadm join --token a3bd48.1bc42347c3b35851 192.168.1.30:6443

Output of above command would be something like below

kubeadm-node1

[root@worker-node2 ~]# kubeadm join --token a3bd48.1bc42347c3b35851 192.168.1.30:6443

Output would be something like below

kubeadm-join-node2

Now verify Nodes status from master node using kubectl command

[root@k8s-master ~]# kubectl get nodes
NAME           STATUS    AGE       VERSION
k8s-master     Ready     2h        v1.7.5
worker-node1   Ready     20m       v1.7.5
worker-node2   Ready     18m       v1.7.5
[root@k8s-master ~]#

As we can see master and worker nodes are in ready status. This concludes that kubernetes 1.7 has been installed successfully and also we have successfully joined two worker nodes.  Now we can create pods and services.

Please share your feedback and comments in case this article helps you to install latest version of kubernetes 1.7
109 thoughts on “How to Install Kubernetes (k8s) 1.7 on CentOS 7 / RHEL 7”

  1. Thank you very much for your sharing! Please let me ask one question, could baseurl in Kubernetes Repositories file be changed to other URL which can be accessed from china? since domain google.com isn’t available from china.

    Reply
  2. Hi Would you know what would cause this error on Kubelet?
    Oct 04 08:09:19 kube1 kubelet[5811]: error: failed to run Kubelet: failed to create kubelet: misconfiguration: kubelet cgroup driver: “systemd” is different from docker cgroup driver:
    Oct 04 08:09:19 kube1 systemd[1]: kubelet.service: main process exited, code=exited, status=1/FAILURE
    Oct 04 08:09:19 kube1 systemd[1]: Unit kubelet.service entered failed state.
    Oct 04 08:09:19 kube1 systemd[1]: kubelet.service failed.

    Reply
    • You may check this section in the link

      https://kubernetes.io/docs/setup/independent/install-kubeadm/#installing-kubeadm-kubelet-and-kubectl

      Here we need to make sure that both docker and kubernetes should have same cgroup. It should be either systemd or cgroupfs. I have got same error and I have done the below.

      [root@kube-master ~]# grep cgroup /etc/systemd/system/kubelet.service.d/10-kubeadm.conf
      Environment=”KUBELET_CGROUP_ARGS=–cgroup-driver=cgroupfs”
      [root@kube-master ~]# docker info | grep -i cgroup
      WARNING: You’re not using the default seccomp profile
      Cgroup Driver: systemd
      [root@kube-master ~]# sed -i ‘s/KUBELET_CGROUP_ARGS=–cgroup-driver=cgroupfs/KUBELET_CGROUP_ARGS=–cgroup-driver=systemd/g’ /etc/systemd/system/kubelet.service.d/10-kubeadm.conf
      [root@kube-master ~]# grep cgroup /etc/systemd/system/kubelet.service.d/10-kubeadm.conf
      Environment=”KUBELET_CGROUP_ARGS=–cgroup-driver=systemd”
      [root@kube-master ~]# systemctl daemon-reload
      [root@kube-master ~]# systemctl restart kubelet

      I have done the above steps on both master and nodes.

      Reply
    • Also, `firewall-cmd –reload` should be changed to `firewall-cmd –reload` and it must be noted that this particular command must be run with sudo.

      Reply
      • Same step has to be added in the worker nodes.
        modprobe br_netfilter

        Also all these are temporary and goes away on reboot.

        To make modprobe br_netfilter permanent execute the below command.
        # echo “br_netfilter” > /etc/modules-load.d/br_netfilter.conf

        To make # echo ‘1’ > /proc/sys/net/bridge/bridge-nf-call-iptables execute the below command.
        # echo “net.bridge.bridge-nf-call-iptables = 1” >> /etc/sysctl.conf

        Reply
  3. I see when i reboot my master k8s server, im not able to get any pods details and keep getting error

    The connection to the server 10.0.0.29:6443 was refused – did you specify the right host or port?

    I see etcd deosnt support server reboot and master server always should be up and running. if this the case then how can we support it. it may possible that our servers get down for any reason. please help. this is really bothering me. I see document is missing very important steps. i have been strugling with server reboot option and nothing helps me.
    my env is centos 7
    i have already done with following steps

    mkdir -p $HOME/.kube
    sudo cp -i /etc/kubernetes/admin.conf $HOME/.kube/config
    sudo chown $(id -u):$(id -g) $HOME/.kube/config

    i see only option i have after server reboot to run kubeadm reset and then kubeadm init. If this is the case then it is very disappointing because in DC env, there are several servers and they get down on and off.
    please help me how to resolve failure after server reboot.

    Reply
    • Hi,
      We’re running into the same issue. After a restart the master k8s server did’t start, all the k8s docker containers are stopped (Exit code 255).
      Thanks for the tip for using the kubeadm resett and init commands as a temp fix. Did you find any other permanent solutions?

      P.S. We’re running on Ubuntu 16.04.4

      Reply
  4. Great article.

    One comment / question, this will only work for CentOS 7 and not for RHEL . . or . . ?
    The newest docker CE versions (17.06 and above) won’t install on redhat, only docker EE.

    yum install docker -> No package docker available.

    Or did I mis something . . .?

    Reply
  5. When I installed packages on Amazon. I get an error:
    Error: Package: kubelet-1.8.1-0.x86_64 (kubernetes)
    Requires: iptables >= 1.4.21
    Installed: iptables-1.4.18-1.22.amzn1.x86_64 (installed)
    iptables = 1.4.18-1.22.amzn1

    I solved this problem:
    yum install ‘ftp://fr2.rpmfind.net/linux/centos/7.3.1611/os/x86_64/Packages/iptables-1.4.21-17.el7.x86_64.rpm’

    Reply
  6. The file /etc/sysconfig/selinux as supplied by CentOS is a symlink to /etc/selinux/config but running your sed command will _break_ that link and result in two separate files. You would need to use ‘–follow-symlinks’ on the sed command to preserve the symlink.

    Reply
    • so “sed -i ‘s/SELINUX=enforcing/SELINUX=disabled/g’ /etc/sysconfig/selinux” will not work and once you restart machine, you will get selinux enabled
      you need to use “sed -i –follow-symlinks ‘s/SELINUX=enforcing/SELINUX=disabled/g’ /etc/sysconfig/selinux”

      Reply
  7. Hi Pradeep,

    I followed your instruction and my Cluster is up and Running on CentOS 7, but while I deploy any container I see below errors.

    Error on /var/log/messages
    failed to read pod IP from plugin/docker: NetworkPlugin cni failed on the status hook for pod Unexpected command output Device “eth0”

    Error from kubelet log
    pod_workers.go:182] Error syncing pod 978265f7-b
    helpers.go:468] PercpuUsage had 0 cpus, but the
    remote_runtime.go:115] StopPodSandbox “94f7ad2e4
    kuberuntime_manager.go:780] Failed to stop sandb
    kuberuntime_manager.go:580] killPodWithSyncResul
    pod_workers.go:182] Error syncing pod 978265f7-b

    ContainerCreating from Long time
    tomcat tomcat-7cc899d96f-59zcd 0/1 ContainerCreating 0 9h

    Tried to deploy Dashboard but that too fails
    kube-system kubernetes-dashboard-747c4f7cf-cv6np 0/1 Init:0/1 0 4h

    Please advise what is issue here

    Best Regards
    Ganesh Kumar

    Reply
  8. Hi, Can we use the kubeadm join command to make master node join as worker . mean to say can I make master/worker on the same node?

    Reply
  9. Hi, I keep getting some http failures while doing “kubeadm init”:
    [kubelet-check] It seems like the kubelet isn’t running or healthy.
    [kubelet-check] The HTTP call equal to curl -sSL ‘http://localhost:10255/healthz’ failed with error: Get ‘http://localhost:10255/healthz’: dial tcp [::1]:10255: getsockopt: connection refused.
    [kubelet-check] It seems like the kubelet isn’t running or healthy.
    [kubelet-check] The HTTP call equal to curl -sSL ‘http://localhost:10255/healthz’ failed with error: Get ‘http://localhost:10255/healthz’: dial tcp [::1]:10255: getsockopt: connection refused.

    Any idea?

    Reply
  10. Hi,

    I followed this tutorial to setup kubernetes on CentOS. I have set the cluster to be able to schedule pods on master to make a single node cluster. I have also created a custom namespace ‘test’ and deployed a busybox pod on it. I can lookup the busybox pod in the test namespace from a busybox pod in the default namespace but not vice versa.

    $ kubectl exec -ti busybox — nslookup busybox.test [OK]

    $ kubectl -n smartvend exec busybox — nslookup kubernetes.default

    Name: kubernetes.default
    Address 1: 10.96.0.1 kubernetes.default.svc.cluster.local
    nslookup: can’t resolve ‘(null)’: Name does not resolve

    $ kubectl -n test exec -ti busybox — nslookup busybox.default [NOT OK]

    nslookup: can’t resolve ‘(null)’: Name does not resolve

    $ kubectl -n test exec -ti busybox — nslookup busybox2.test [NOT OK]

    nslookup: can’t resolve ‘(null)’: Name does not resolve

    Seems there might be a problem in dealing with a custom namespace? Is there anything I should do to make this work?

    Reply
  11. [root@k8s-master net]# systemctl restart kubelet && systemctl enable kubelet
    Failed to restart kubelet.service: Unit not found.

    Reply
  12. Hi Pradeep,

    Pls assist me on my below errors,

    [root@k8s-master net]# kubeadm init
    [kubeadm] WARNING: kubeadm is in beta, please do not use it for production clusters.
    [init] Using Kubernetes version: v1.8.4
    [init] Using Authorization modes: [Node RBAC]
    [preflight] Running pre-flight checks
    [preflight] WARNING: firewalld is active, please ensure ports [6443 10250] are open or your cluster may not function correctly
    [preflight] Some fatal errors occurred:
    running with swap on is not supported. Please disable swap
    [preflight] If you know what you are doing, you can skip pre-flight checks with `–skip-preflight-checks`

    Reply
  13. Can someone tell me how to determine the cluster CIDR of the master node which I have initialized using `kubeadm init` as detailed in this article? My master node is on CentOS 7 and I am trying to join a Windows node to the cluster and it requires me to pass the Cluster CIDR to the script.

    Reply
  14. Hi

    I am getting Node status is “Not Ready” when it connected to master node for the first time.

    # kubectl get nodes
    NAME STATUS ROLES AGE VERSION
    labserver NotReady 1h v1.9.0
    rhel74 Ready master 3h v1.9.0

    Reply
  15. thank so much for your blog.
    i am getting this error on ‘https://10.0.1.166:6443/’

    {
    “kind”: “Status”,
    “apiVersion”: “v1”,
    “metadata”: {

    },
    “status”: “Failure”,
    “message”: “forbidden: User \”system:anonymous\” cannot get path \”/\””,
    “reason”: “Forbidden”,
    “details”: {

    },
    “code”: 403
    }

    please help me

    Reply
  16. Hi,

    After “kubeadm join” is executed on the node, weave-net fails to start.

    On the node, “journalctl -xe” shows:
    reflector.go:205] github.com/weaveworks/weave/prog/weave-npc/main.go:229: Failed to list *v1.Pod: Get ‘https://10.96.0.1:443/api/v1/pods?resourceVersion=0’: dial tcp 10.96.0.1:443: i/o timeout

    But the kube-apiserver is ‘https://192.168.56.109:6443’.

    And I tried with curl -k ‘https://192.168.56.109:6443//api/v1/pods’ on the node:
    {
    “kind”: “Status”,
    “apiVersion”: “v1”,
    “metadata”: {

    },
    “status”: “Failure”,
    “message”: “pods is forbidden: User \”system:anonymous\” cannot list pods at the cluster scope”,
    “reason”: “Forbidden”,
    “details”: {
    “kind”: “pods”
    },
    “code”: 403

    but no response with curl -k ‘https://10.96.0.1:443/api/v1/pods’.

    Any help is appreciated.
    Thanks.

    Reply
  17. Could you share steps if the master server is restarted will the services come itself or what is the procedure you recommend to start and ensure node(minions) sync together.
    Also where does the etcd,kube-apiserver,scheduler,controller-manager,flannel/weave, configuration available.
    How to start individually

    Reply
  18. Hey Pradeep

    Thanks for very useful tutorial
    I just successfully completed a cluster build, using k8s 1.9.3 and docker 1.12.6 (centos 7)

    Only two comments:
    1. When setting up the MASTER:
    no need to do `systemctl restart kubelet` before running the `kubeadm init`.
    Just do the `systemctl enable kublet` and then run `kubeadm init` which will set everything up and start the kublet service.

    If you try to start it before the init part – it will error out, complaining about being unable to load some CA certs.

    2. When adding the firewall rules for the worker nodes:
    the bridge config `echo ‘1’ > /proc/sys/net/bridge/bridge-nf-call-iptables` will fail, as the file does not exist yet.

    do the first step would be to:
    – install kubeadm and docker
    – enable and start docker service
    – enable kubelet service
    – join the node to cluster, which will automatically start kublet service

    ALSO:
    if you are using a minimal install from ISO (like I was – on virtual machines, with just default install settings). Make sure you disable swap !
    None of the kubeadm stuff will work if your machines have active swap (it will error out, complaining about it, asking you to disable it).

    Reply
  19. I have made a cluseter , in which master is not in ready state , how master can be bring up to ready state and how to assign role of worker nodes?

    [root@k8s-master tmp]# kubectl get nodes
    NAME STATUS ROLES AGE VERSION
    k8s-master NotReady master 38m v1.9.3
    worker-node1 Ready 35m v1.9.3
    worker-node2 Ready 37m v1.9.3

    Reply
    • Even I have the similar issues; don’t know how to make it work yet…there should be very specific reason for it to not to come READY state..

      [root@etcd2 ~]# kubectl get nodes
      NAME STATUS ROLES AGE VERSION
      etcd1.hdp3.cisco.com Ready 48m v1.18.3
      etcd2.hdp3.cisco.com NotReady master 136m v1.18.3
      etcd3.hdp3.cisco.com Ready 48m v1.18.3

      [root@etcd2 ~]# kubectl get pods –all-namespaces
      NAMESPACE NAME READY STATUS RESTARTS AGE
      kube-system coredns-66bff467f8-25pg4 1/1 Running 0 133m
      kube-system coredns-66bff467f8-r64mg 1/1 Running 0 133m
      kube-system etcd-etcd2.hdp3.cisco.com 1/1 Running 1 133m
      kube-system kube-apiserver-etcd2.hdp3.cisco.com 1/1 Running 1 133m
      kube-system kube-controller-manager-etcd2.hdp3.cisco.com 1/1 Running 1 133m
      kube-system kube-proxy-9vm77 1/1 Running 0 45m
      kube-system kube-proxy-pk2bh 1/1 Running 1 133m
      kube-system kube-proxy-z2tv7 1/1 Running 0 46m
      kube-system kube-scheduler-etcd2.hdp3.cisco.com 1/1 Running 1 133m
      kube-system weave-net-6cnmh 2/2 Running 0 25m
      kube-system weave-net-h4gr5 2/2 Running 0 25m
      kube-system weave-net-tb4td 2/2 Running 0 25m

      Reply
  20. Hi Pradeep,

    Thank you very much for sharing this. I was struggling to set kubernetes for a period of time. Your article helped a lot and I configured kubernetes cluster successfully. Thanks again.

    Reply
  21. I successfully installed kubernetes cluster but getting error once i tried to access Web UI :

    {
    “kind”: “Status”,
    “apiVersion”: “v1”,
    “metadata”: {

    },
    “status”: “Failure”,
    “message”: “services \”kube-dns:dns\” is forbidden: User \”system:anonymous\” cannot get services/proxy in the namespace \”kube-system\””,
    “reason”: “Forbidden”,
    “details”: {
    “name”: “kube-dns:dns”,
    “kind”: “services”
    },
    “code”: 403
    }

    Reply
  22. Hi Pradeep, Thanks for this article. I am using flannel instead of weave for network overlay. When I do an ifconfig on my master and worker node, my docker0(172.17.xx.xx) and flannel1(10.244.xx.xx) interfaces have different IP subnets. It is not clear to me(maybe due to lack of understanding) whether I need explicitly install and configure =flanneld (using yum install flanneld) on the master and worker nodes. Or does the kubectl apply -f ..flannel.yml does that for me?

    Reply
    • Yeah disable security on the whole machine – great idea.

      The right way to handle a security (selinux) error in software is:
      sealert -a /var/log/audit/audit.log

      Reply
  23. Hi Pradeep thanks for article. can you suggest me fix for this is error “modprobe: FATAL: Module br_netfilter not found.non-zero return code” i am stuck at initial point.

    Thanks in Advance !

    Reply
  24. Thank you. The best tutorial. Please add about situation with two ethernet interfaces. Wen I try it with first – HostOnly and second bridge^ I can not start master correctrly

    Reply
  25. While good for Centos 7.5, these notes do not transfer to RHEL7.5 and its pretty obvious its not even tested as the differences are not highlighted.

    Reply
  26. Hi. Setting up the k8s cluster worked great but after installing the kubernetes Dashboard it is not accessible. We come up with an error:’dial tcp 10.x.x.6:8443: connect: no route to host’. We’ve tried a ton of fixes but still cannot access the Dashboard. Any ideas?

    Reply
  27. Hi
    Thanks for this article. I now have Kubernetes master and the nodes connected. However, I had some issues doing so when I ran the ‘join’ step. I was getting the reply that the certificate is not yet ready and is not valid.

    Bringing up ntpd on all the master and nodes helped. I think that is an important step that should be added. While bringing up docker and kubeadm, ntpd can also be added.

    thanks
    Sam

    Reply
  28. Hi, now is octuber, 2018 but I decide follow this tutorial, but get a error when I run:
    >> kubeadmin init
    “preflight] Some fatal errors occurred:
    [ERROR SystemVerification]: unsupported docker version: 18.09.0
    [preflight] If you know what you are doing, you can make a check non-fatal with `–ignore-preflight-errors=…`”

    My distro is a Red Hat Enterprise Linux Server 7.6

    How i can solve this?

    Reply
    • Hi Alexandre,
      It seems docker(18.09 version) is already installed on the Red had distro.
      Kubeadm wont support this version currently.So you need to remove the existing docker and install the appropriate one.

      Reply
  29. Hi, I am getting the below error when i run kubeadm init in master node. Your help / suggestion will be valuable.

    kubeadm init
    [init] Using Kubernetes version: v1.13.0
    [preflight] Running pre-flight checks
    error execution phase preflight: [preflight] Some fatal errors occurred:
    [ERROR NumCPU]: the number of available CPUs 1 is less than the required 2
    [preflight] If you know what you are doing, you can make a check non-fatal with `–ignore-preflight-errors=…

    Reply
  30. I followed the instruct and the master come up no problem. But I install the node and ran the join command I got NotReady for the node machine.
    [oracle@dev01 ~]$ kubectl get nodes –all-namespaces
    NAME STATUS ROLES AGE VERSION
    dev01 Ready master 68m v1.13.0
    dev02 NotReady 59m v1.13.0

    Reply
  31. I never heard about kubernet but was able to install following this tutorial. Had a few struggles with join the nodes but that was because was my first time, but I couldn’t do it without and neither have found a better tutorial. Simply the best

    Reply
  32. Installing kubeadm in my machine failed:
    Public key for 53edc739a0e51a4c17794de26b13ee5df939bd3161b37f503fe2af8980b41a89-cri-tools-1.12.0-0.x86_64.rpm is not installed

    Installing the GPG keys manually did the trick:
    rpm –import ‘https://packages.cloud.google.com/yum/doc/yum-key.gpg’
    rpm –import ‘https://packages.cloud.google.com/yum/doc/rpm-package-key.gpg’

    Reply
  33. I searched / read many websites to setup K8S setup. None of them not explained clear. You are the best best best one.

    Reply
  34. getting below error message, while i am trying to fetch nodes.. what should i do:
    [root@kubernetes docker]# kubectl get nodes
    The connection to the server 192.168.2.133:6443 was refused – did you specify the right host or port?
    [root@kubernetes docker]#

    Reply
  35. Hi,

    Can you kindly share how to install the Dashboard and access it on a browser which is not on the k8s master

    Regards,
    Gaurav

    Reply
  36. In RHEL7.4 Master, After i configured repo, docket didnt install, do i need to install it in separate steps. Because of this, not able to setup k8s clauster

    Reply
  37. Hi team,

    I am getting

    modprobe: FATAL: Module br_netfilter not found.

    After this -> [root@k8s-master ~]# modprobe br_netfilter

    Google says its a problem related to Centos 7, I used Centos 7.2115 minimal iso

    Can anybody help me !

    Reply
  38. I am using CentOS on Virtual box with minimal CentOS version, when I try to run yum install kubeadm docker -y, I am getting Failing package is: kubectl-1.15.2-0.x86_64, I am not able to figure out why any help much appreciated.

    Reply
  39. On master node:
    [root@k8s-master kiran]# kubectl get nodes
    NAME STATUS ROLES AGE VERSION
    k8s-master Ready master 17m v1.15.3
    myhost NotReady 11s v1.15.3
    [root@k8s-master kiran]#
    [root@k8s-master kiran]#

    But on worker node:
    [root@myhost vagrant]# kubectl get nodes
    The connection to the server localhost:8080 was refused – did you specify the right host or port?
    [root@myhost vagrant]#

    Reply
  40. I have successfully deployed master and worker node and joined them but i am getting error while deploying POD on cluster node my POD still remains in “container creating state” ,can any one have some idea regarding the issue.

    Reply
  41. I’m very new to K8. I have made it to the step where it says “Now let’s add worker nodes to the Kubernetes master nodes.” and I’m lost. At what point do the worker nodes show?

    # kubectl get pods –all-namespaces
    NAMESPACE NAME READY STATUS RESTARTS AGE
    kube-system coredns-5644d7b6d9-kh7rr 1/1 Running 1 53m
    kube-system coredns-5644d7b6d9-sdt9f 1/1 Running 1 53m
    kube-system etcd-k8s-master 1/1 Running 1 52m
    kube-system kube-apiserver-k8s-master 1/1 Running 1 52m
    kube-system kube-controller-manager-k8s-master 1/1 Running 1 53m
    kube-system kube-proxy-lhkrj 1/1 Running 1 53m
    kube-system kube-scheduler-k8s-master 1/1 Running 1 53m
    kube-system weave-net-9x2xs 2/2 Running 3 51m
    kubernetes-dashboard dashboard-metrics-scraper-566cddb686-p8wj7 1/1 Running 1 41m
    kubernetes-dashboard kubernetes-dashboard-7b5bf5d559-thskk 1/1 Running 1 41m

    # kubectl get nodes
    NAME STATUS ROLES AGE VERSION
    k8s-master Ready master 56m v1.16.1

    Reply
  42. Just an FYI with version 1.16.2 I wasn’t able to do:
    echo ‘1’ > /proc/sys/net/bridge/bridge-nf-call-iptables
    on my nodes until after I started docker. I was getting “file doesn’t exist”.

    Otherwise this has been a superb guide. Also being new to kubernetes, I wouldn’t mind some detail on what the “deploy network” section is actually doing 🙂 For setting this up when I don’t have access to cloud.weave.works

    Reply
  43. Worker node looks like hanged after kubectl join command like below:

    [preflight] Running pre-flight checks
    [WARNING IsDockerSystemdCheck]: detected “cgroupfs” as the Docker cgroup driver. The recommended driver is “systemd”. Please follow the guide at ‘https://kubernetes.io/docs/setup/cri/’
    [WARNING FileExisting-tc]: tc not found in system path
    [WARNING Service-Kubelet]: kubelet service is not enabled, please run ‘systemctl enable kubelet.service’

    How to diagnose the issue..

    Reply
  44. You need to do the modprobe which you first did on the master. then that directory will appeare and you can add the bridge flag.

    Reply
    • this didn’t work.
      I used 1. modprobe br_netfilter
      2. echo ‘1’ > /proc/net/bridge/bridge-nf-call-iptables

      Still got hanged

      Reply
  45. Hi thanks for your amazing stuff.
    I’m stuck in one place, after giving command “kubeadm join”.
    Query: after the execution of kubeadm join…… it got hanged at [preflight] running preflight check

    Reply
  46. Really perfect tutorial
    but there is an issue in kubeam init
    you need to make the command as follow
    kubeadm init –pod-network-cidr=10.17.0.0/16 –service-cidr=10.18.0.0/24

    Reply
  47. Great man is there any way for creating 5 node cluster with 5 vm with having same rang ip and is it fine to have two master node and three worker node or vice versa what is the best practices

    Regards,

    Reply
  48. Great article. I installed without issues.
    One step to add is that kubernetes requires swap off on all nodes
    swapoff -a
    on all nodes

    Thanks for the help

    Reply
  49. Hi,

    I have done all these steps and “kubeadm config images pull” also works but “kubeadm init” fails with “[kubelet-check] Initial timeout of 40s passed” .
    Using Kubernetes version: v1.17.3

    Can anyone please help here to resolve the issue.

    Reply
  50. Hii..
    I am getting the error while kubeadm join comment in worker node
    Couldn’t validate the identity the API server: abort connecting to the API server after timeout of 5m0s

    Please give me the solution.

    Reply
  51. Currently Stuck when trying to run ‘kubeadm init’ command.

    Getting Error below from ‘systemctl status kubelet’

    plugin portmap does not support config version “0.4.0” failed to find plugin “firewall” in path [/opt/cni/bin]]
    update cni config: no valid networks found in /etc/cni/net.d

    Please advise.

    Reply
  52. Hi Team,

    I installed the master node successfully.But When I check the status of a master node it’s in Not ready Status.

    kubectl get nodes
    NAME STATUS ROLES AGE VERSION
    hoonartek001 NotReady master 19h v1.18.0

    Any one can help me on this.

    Reply
    • To make the cluster status ready and kube-dns status running, deploy the pod network so that containers of different host communicated each other. POD network is the overlay network between the worker nodes.

      Run the beneath command to deploy network.

      [root@k8s-master ~]# export kubever=$(kubectl version | base64 | tr -d ‘\n’)
      [root@k8s-master ~]# kubectl apply -f “https://cloud.weave.works/k8s/net?k8s-version=$kubever”

      You should have missed this step

      Reply
  53. Hi,

    There are no packages available under “https://packages.cloud.google.com/yum/repos/kubernetes-el7-x86_64/Packages”.

    Can anyone suggest any other package Kubernetes-el7-x86 package location?

    Reply
  54. New to Kubernetes and I am getting the following error on my node can someone please help me solve this. I understand why its throwing the error but where is it getting the centos7_2.linuxvmimages.local. I don’t have this in my /etc/hosts. What do I need to update.

    would really appreciate some help to understand this.

    W0509 13:03:45.507894 2706 join.go:346] [preflight] WARNING: JoinControlPane.controlPlane settings will be ignored when control-plane flag is not set.
    nodeRegistration.name: Invalid value: “centos7_2.linuxvmimages.local”: a DNS-1123 subdomain must consist of lower case alphanumeric characters, ‘-‘ or ‘.’, and must start and end with an alphanumeric character (e.g. ‘example.com’, regex used for validation is ‘[a-z0-9]([-a-z0-9]*[a-z0-9])?(\.[a-z0-9]([-a-z0-9]*[a-z0-9])?)*’)
    To see the stack trace of this error execute with –v=5 or higher

    Reply
  55. Hi,

    I like to add second master node and then I will configure load balancing using nginx.

    Has anyone added the second master node?

    Please advise.

    Reply
  56. Hi Pradeep,

    Thank you for the above information.
    Can you please give the steps for adding windows node to Kubernetes cluster.

    Reply
  57. Hi,

    Can you please help to get below issue.

    [root@k8s-master ~]# kubectl get cs
    Warning: v1 ComponentStatus is deprecated in v1.19+
    NAME STATUS MESSAGE ERROR
    controller-manager Unhealthy Get “http://127.0.0.1:10252/healthz”: dial tcp 127.0.0.1:10252: connect: connection refused
    scheduler Unhealthy Get “http://127.0.0.1:10251/healthz”: dial tcp 127.0.0.1:10251: connect: connection refused
    etcd-0 Healthy {“health”:”true”}
    [root@k8s-master ~]#

    Reply
  58. Any input to get rid of this issue..

    [init] Using Kubernetes version: v1.25.2
    [preflight] Running pre-flight checks
    error execution phase preflight: [preflight] Some fatal errors occurred:
    [ERROR CRI]: container runtime is not running: output: time=”2022-10-13T06:29:20-07:00″ level=fatal msg=”unable to determine runtime API version: rpc error: code = Unavailable desc = connection error: desc = \”transport: Error while dialing dial unix /var/run/containerd/containerd.sock: connect: no such file or directory\””
    , error: exit status 1
    [preflight] If you know what you are doing, you can make a check non-fatal with `–ignore-preflight-errors=…`
    To see the stack trace of this error execute with –v=5 or higher

    Reply
    • Assuming you are following the exact steps and have docker installed.
      Run the below and it may solve the issue
      mv /etc/containerd/config.toml /etc/containerd/config.toml.bak
      systemctl restart containerd
      kubeadm init

      Reply
  59. To get the weave net running on the latest k8s versions
    instead of the installing the weave-net as mentioned in the post as below

    kubectl apply -f “https://cloud.weave.works/k8s/net?k8s-version=$kubever”

    Run

    kubectl apply -f ‘https://github.com/weaveworks/weave/releases/download/v2.8.1/weave-daemonset-k8s.yaml’

    Reply

Leave a Reply to Nil Cancel reply