Foreman is a free and open source Configuration and provisioning tool which can be installed on Red Hat, CentOS, Scientific Linux, Debian and Ubuntu Systems. With Forman tool we can easily provision Virtual machines and bare metal servers and then configure the installed systems using the configuration tools like Puppet and Ansible. Whenever we install Foreman server then it automatically installs Puppet master on it.
With help of Foreman GUI, system administrators can apply specific puppet modules to the registered servers to do the repetitive tasks and can also easily automate day to day operations tasks.
In this tutorial, we will walk through the installation steps of Foreman 1.16 on Debian 9 and Ubuntu 16.04 Server.
Following are the Minimum System Requirements for Foreman server:
- 4 GB RAM (When Puppet Master is installed on same foreman Server)
- 2 Core CPU
- Freshly installed Debian 9 / Ubuntu 16.04
Beneath is the my lab setup details for foreman Server
- IP address of Foreman Server is “192.168.1.20”
- Hostname of Foreman Server “foreman.linuxtechi.com”
- Puppet Master 5 will be installed on Foreman server
- OS : Debian 9 / Ubuntu 16.04 LTS Server
Let’s login to Debian 9 / Ubuntu 16.04 LTS system
Step:1) Configure Hostname and update its entries in hosts file
Use systemctl command to configure hostname of your system.
$ sudo hostnamectl set-hostname "foreman.linuxtechi.com"
$ exec bash
Update your’s system hostname entries in /etc/hosts file.
192.168.1.20 foreman.linuxtechi.com foreman
Step:2) Enable required repositories for Foreman & Puppet
For Debian 9 system:
Enable Puppet 5 Repositories using below commands
linuxtechi@foreman:~$ sudo apt-get -y install ca-certificates
linuxtechi@foreman:~$ wget https://apt.puppetlabs.com/puppet5-release-stretch.deb
linuxtechi@foreman:~$ sudo dpkg -i puppet5-release-stretch.deb
Enable Foreman 1.16 repositories using below commands
linuxtechi@foreman:~$ echo "deb http://deb.theforeman.org/ stretch 1.16" | sudo tee /etc/apt/sources.list.d/foreman.list
linuxtechi@foreman:~$ echo "deb http://deb.theforeman.org/ plugins 1.16" | sudo tee -a /etc/apt/sources.list.d/foreman.list
linuxtechi@foreman:~$ wget -q https://deb.theforeman.org/pubkey.gpg -O- | sudo apt-key add -
OK
linuxtechi@foreman:~$
For Ubuntu 16.04 LTS system
Enable Puppet 5 Repositories
linuxtechi@foreman:~$ sudo  apt-get -y install ca-certificates
linuxtechi@foreman:~$ wget https://apt.puppetlabs.com/puppet5-release-xenial.deb
linuxtechi@foreman:~$ sudo  dpkg -i puppet5-release-xenial.deb
Enable Foreman 1.16 repositories
linuxtechi@foreman:~$ echo "deb http://deb.theforeman.org/ xenial 1.16" | sudo tee /etc/apt/sources.list.d/foreman.list
linuxtechi@foreman:~$ echo "deb http://deb.theforeman.org/ plugins 1.16" | sudo tee -a /etc/apt/sources.list.d/foreman.list
linuxtechi@foreman:~$ wget -q https://deb.theforeman.org/pubkey.gpg -O- | sudo apt-key add -
OK
linuxtechi@foreman:~$
Step:3) Download ‘foreman-installer’ using apt-get command
Run the beneath command to install foreman-installer,
linuxtechi@foreman:~$ sudo apt-get update && sudo apt-get -y install foreman-installer
Foreman-installer is the installation tool for foreman.
Step:4) Install Foreman using ‘foreman-installer’
Run the foreman-installer command to install foreman server, by default foreman installer will install and configure following components:
- Foreman Web UI ( Apache HTTP with SSL)
- Smart Proxy
- Puppet Master
- Puppet agent
- TFTP Server
linuxtechi@foreman:~$ sudo foreman-installer --foreman-admin-username admin --foreman-admin-password "Foreman@123#"
Once the installation is completed successfully, we will get output something like below:

In case OS firewall is enabled and running on your system then open the followings ports for foreman server
linuxtechi@foreman:~$ sudo ufw allow 53/tcp
Rule added
Rule added (v6)
linuxtechi@foreman:~$ sudo ufw allow 67:69/tcp
Rule added
Rule added (v6)
linuxtechi@foreman:~$ sudo ufw allow 80/tcp
Rule added
Rule added (v6)
linuxtechi@foreman:~$ sudo ufw allow 443/tcp
Rule added
Rule added (v6)
linuxtechi@foreman:~$ sudo ufw allow 3000/tcp
Rule added
Rule added (v6)
linuxtechi@foreman:~$ sudo ufw allow 3306/tcp
Rule added
Rule added (v6)
linuxtechi@foreman:~$ sudo ufw allow 5910:5930/tcp
Rule added
Rule added (v6)
linuxtechi@foreman:~$ sudo ufw allow 5432/tcp
Rule added
Rule added (v6)
linuxtechi@foreman:~$ sudo ufw allow 8140/tcp
Rule added
Rule added (v6)
linuxtechi@foreman:~$ sudo ufw allow 8443/tcp
Rule added
Rule added (v6)
linuxtechi@foreman:~$
Note: In my case while installing foreman, I was getting this error “Error executing SQL; psql returned pid 32532 exit 1: ‘ERROR: invalid locale name: “en_US.utf8”, I resolved this error by executing the below command:
linuxtechi@foreman:~$ sudo dpkg-reconfigure locales
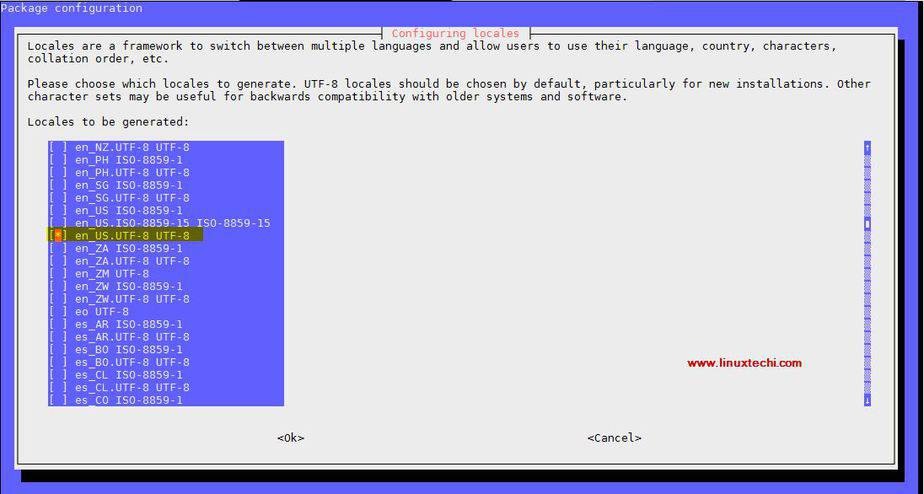
Select “en_US.UTF-8 UTF-8” and then select OK and reboot the machine and then re-run the foreman-installer command.
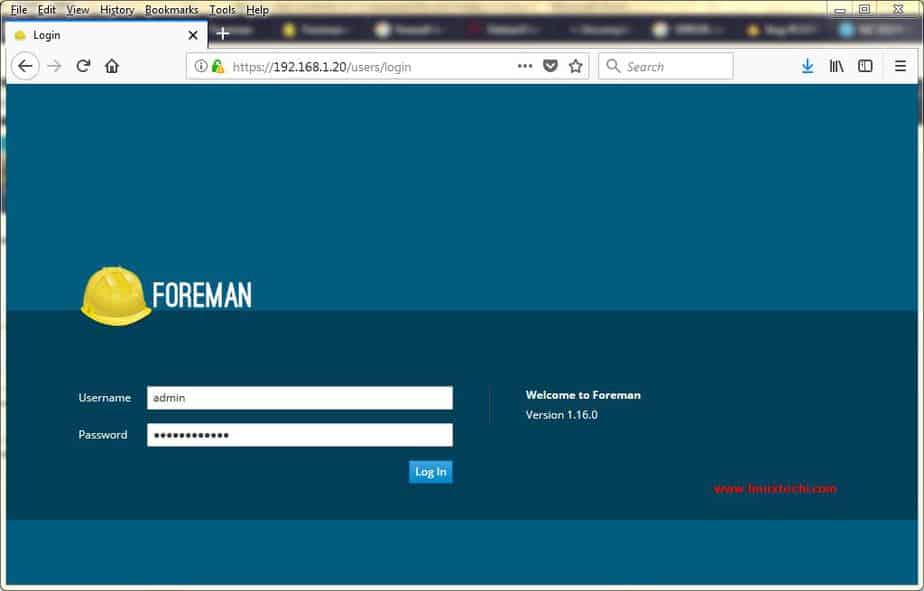
Step:5) Access Foreman Web UI
We can access Foreman Web UI using the following url:
https://{Foreman_Server_IP}
or
https://{Hostname_Foreman_Server}
Use the user name as “admin” and password that we specify in foreman-installer command,
Go to Hosts Tab –> Click on “All Hosts”
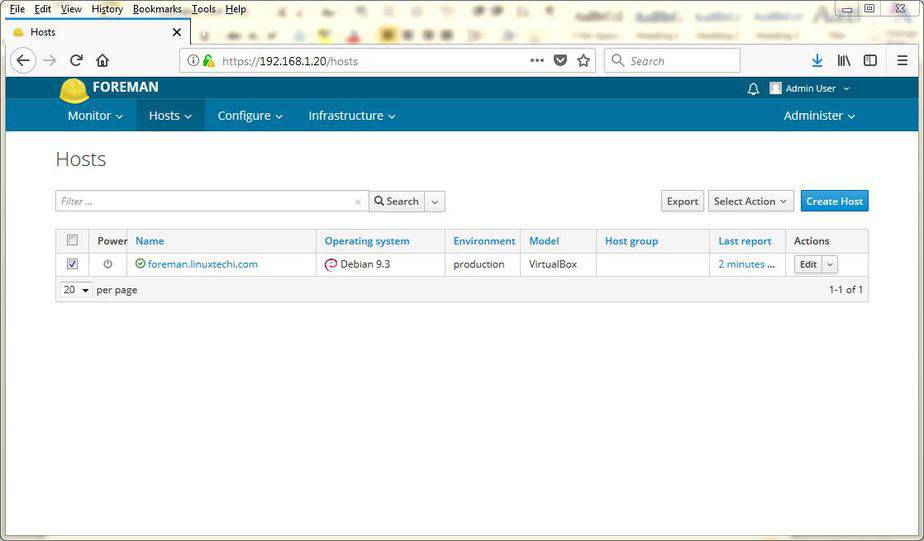
As of now, only one host is registered i.e our foreman server. Whenever we register new servers to the foreman then those servers will listed here. Apart from this, production environment is also created by default and all the servers will be registered to the default env. You can create your environments that suits to your organization from Foreman UI.
Download and Import NTP puppet module on Foreman Server
Use the below command to download ntp puppet module from “forge.puppet.com”
linuxtechi@foreman:~$ sudo su -
root@foreman:~# puppet module install puppetlabs-ntp -i /etc/puppetlabs/code/modules/
We will get the output something like below:

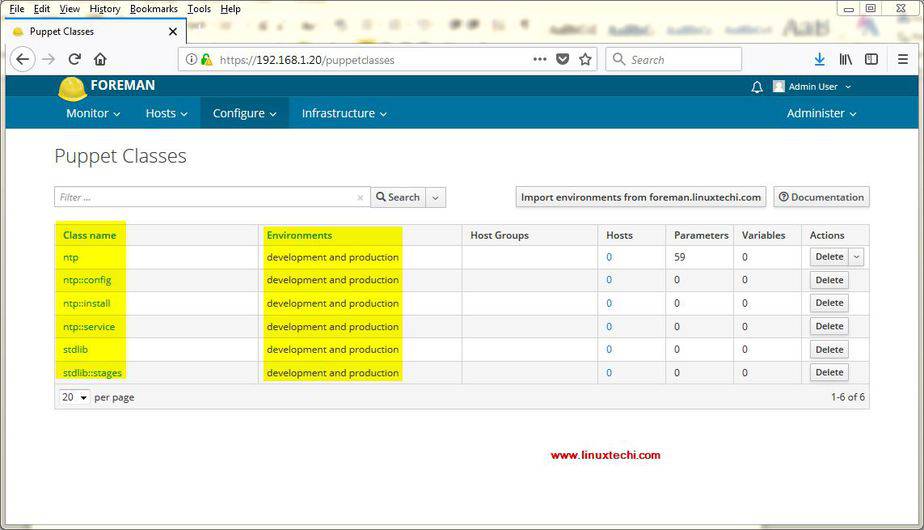
Import the installed NTP module into the foreman dashboard
From the dashboard go to Configure Tab –> Select Puppet –> Classes , Click on Import

Select the environments that you want to attach this module, in my case I am going to attach it to Production and development.
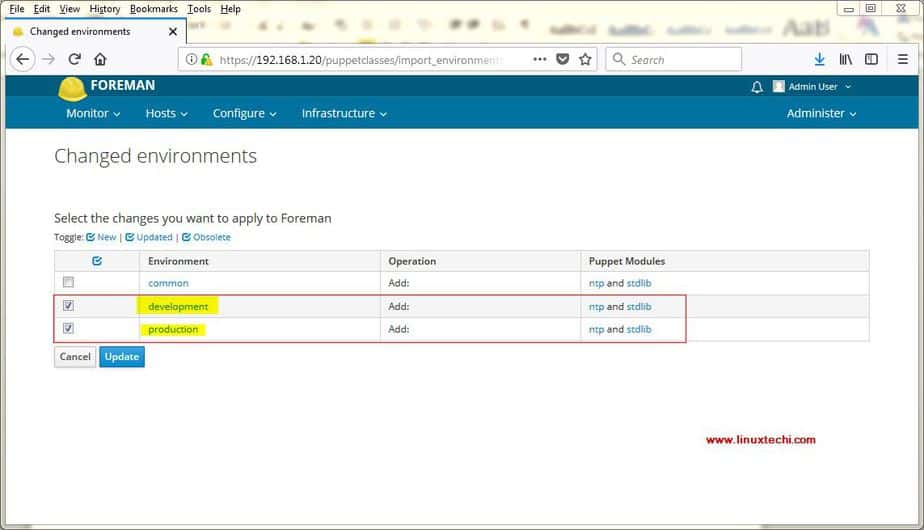
Click on Update,
We will get the next window something like below:
Let’s register a CentOS 7 host to foreman dashboard and then we will attach ntp module to it,
Registering a CentOS 7 Server
Login to the system and enable puppetlabs yum repository and then install puppet package
[root@mx2 ~]# yum install https://yum.puppetlabs.com/puppet5/puppet5-release-el-7.noarch.rpm -y
[root@mx2 ~]# yum install puppet -y
Note: In case you don’t have the DNS server, then add entries in the hosts file, In my case I have added the following lines in /etc/hosts file
192.168.1.20  foreman.linuxtechi.com
192.168.1.2    mx2.linuxtechi.com
Run the below command from your centos 7 server to register this machine in puppet master & foreman dashboard.
[root@mx2 ~]# /opt/puppetlabs/bin/puppet agent -td --server=foreman.linuxtechi.com
You will get the output of command something like below:
……………………………………………………
Debug: Finishing transaction 22347940
Info: Creating a new SSL key for mx2.linuxtechi.com
Info: Caching certificate for ca
Info: csr_attributes file loading from /etc/puppet/csr_attributes.yaml
Info: Creating a new SSL certificate request for mx2.linuxtechi.com
Info: Certificate Request fingerprint (SHA256): A4:D3:15:0D:8D:10:48:93:96:1D:E4:61:5F:F7:F6:B4:CB:C2:01:F4:4C:02:99:37:03:2C:9E:24:0E:30:CF:CC
Debug: Using cached certificate for ca
Info: Caching certificate for ca
Debug: Using cached certificate_request for mx2.linuxtechi.com
Debug: Using cached certificate for ca
Debug: Using cached certificate for ca
Exiting; no certificate found and waitforcert is disabled
[root@mx2 ~]#
It means we have to manually sign the certificate of CentOS 7 server from foreman machine. To sign the certificate from foreman dashboard, refer the below steps
From the Infrastructure Tab –> Select Smart Proxies and then click on Edit option and select “Certificates”

Now sign the certificate of the machine whose state is pending, example is shown below:
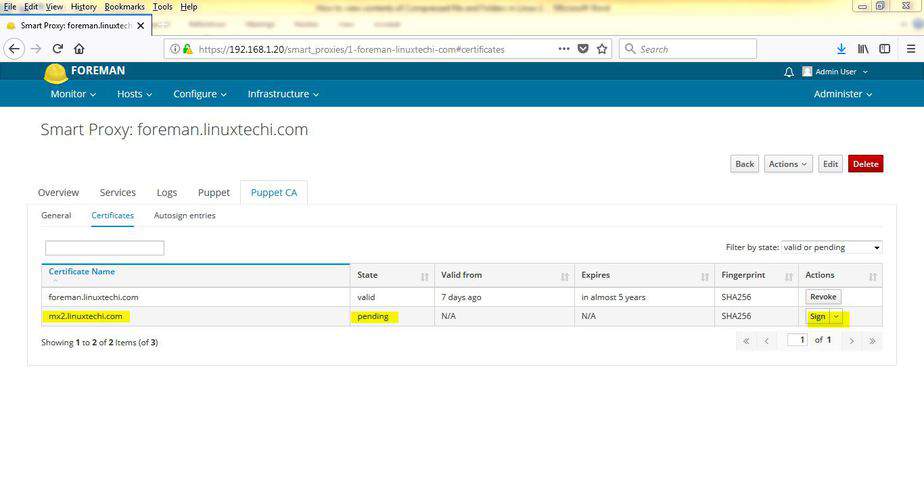
Click on sign
Refer the below steps To Configure Autosign
From the Infrastructure Tab –> Select Smart Proxies and then click on Edit option and select “Autosign”
Create a autosign entry and specify the domain name for which we want foreman should autosign the certificates
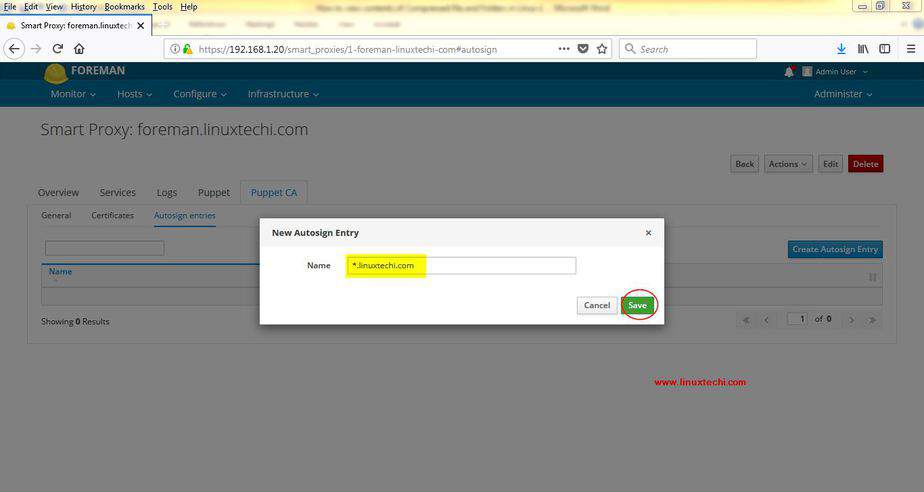
Click on Save. Next time whenever any server from domain “linuxtechi.com” is registered to Foreman server then it will automatically signed,
Now again go to CentOS 7 server and re-run the puppet agent command, this time command should be executed successfully,
[root@mx2 ~]# /opt/puppetlabs/bin/puppet agent -td --server=foreman.linuxtechi.com
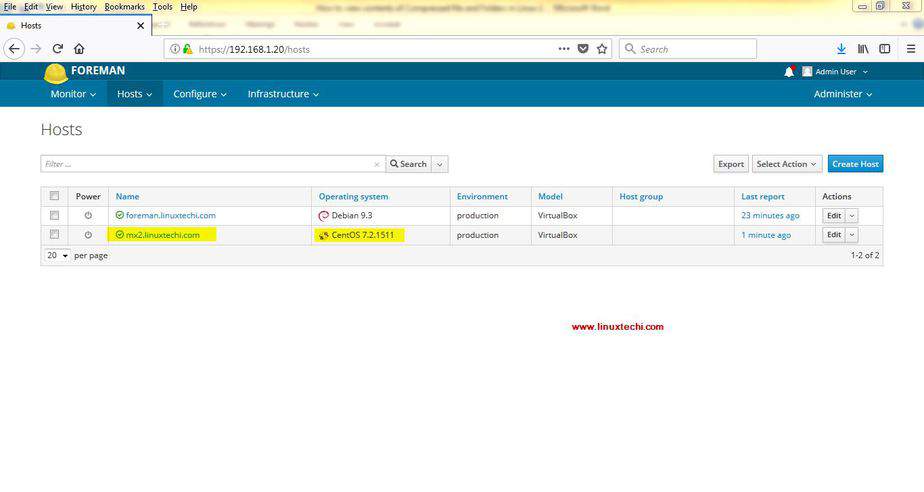
Verify the host from Dashboard, From Hosts Tab –> Select “All Hosts“, there we will our newly registered host ( CentOS 7 Server)
Let’s attach the NTP module to the newly registered Server (mx2.linuxtechi.com), Select the host and Click on Edit, then go to “Puppet Classes” Tab
Click on ‘+’ sign in front of ntp to add the module and then click on ‘Submit‘

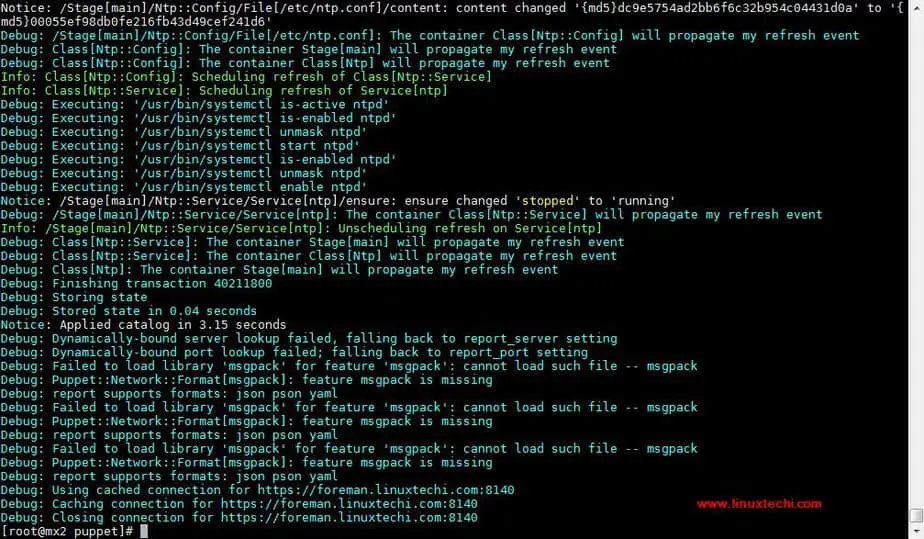
Go to CentOS7 Server and re-run the puppet agent command, this time it will configure ntp on your CentOS 7 server.
[root@mx2 puppet]# /opt/puppetlabs/bin/puppet agent -td --server=foreman.linuxtechi.com
Output of above command will be something like below:
This confirms that CentOS 7 server has registered and configured successfully via foreman Server. It also concludes the article as well, please do share your comments in the comments section below.
Read more on “Bare metal and Virtual Machine Provisioning through Foreman Server“