Foreman is a free and open source tool that can provision bare metal and create virtual machine instances under public and provide cloud. Apart from the provision it is also used for configuring your system using puppet, it can perform perform all the repetitive task automatically using Puppet, chef, Salt and Ansible. Though Puppet is the default configuration tool that is being installed when we install Foreman server.
In our previous article we have already discussed “How to install Foreman Server on CentOS 7”
In this article we will walk through the steps how bare metal and virtual machines are provisioned through foreman server. I am assuming foreman server is already installed on CentOS 7 / RHEL 7.
Step:1 Create the installation media
Let’s assume we want to install CentOS 7 as a operating system on bare metal servers or in virtual machines. For that first we need to create installation media from Foreman Dashboard.
Before creating installation media let’s share the contents of CentOS 7 ISO file via ftp. In my case i have already install ftp (vsftpd) on foreman server itself and copy the contents of CentOS 7 ISO file in “/var/ftp/pub/CentOS_7_x86_64“.
[root@foreman ~]# mkdir /var/ftp/pub/CentOS_7_x86_64
[root@foreman ~]# mount /dev/cdrom /mnt/
[root@foreman ~]# cp -apv /mnt/* /var/ftp/pub/CentOS_7_x86_64/
Now Login to your Foreman Dashboard , Go to Hosts Tab –> Select ‘Installation media‘ and Click on ‘New Medium‘ & Specify the followings
Name of Installation Media : CentOS_x86_64
Path : ftp://172.168.10.51/pub/CentOS_7_x86_64/
Choose Family as “Red Hat”
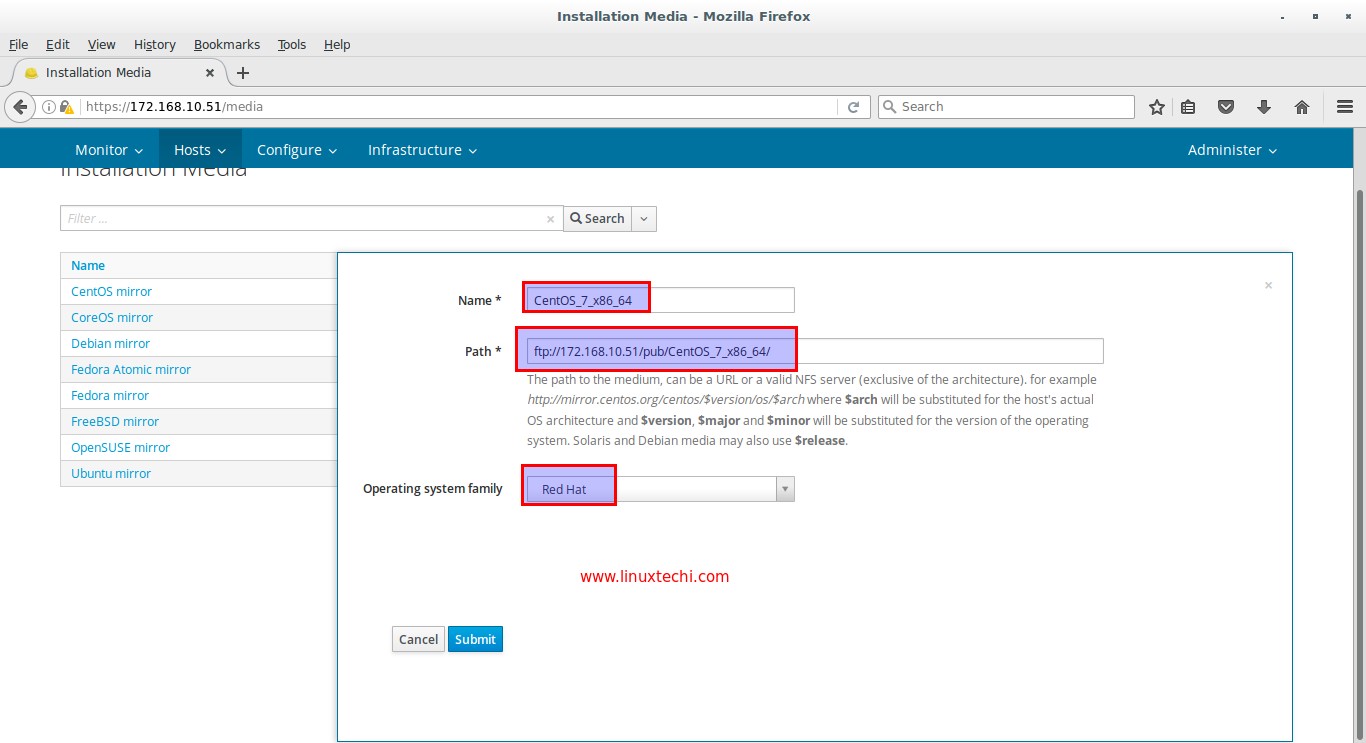
click on “Submit”
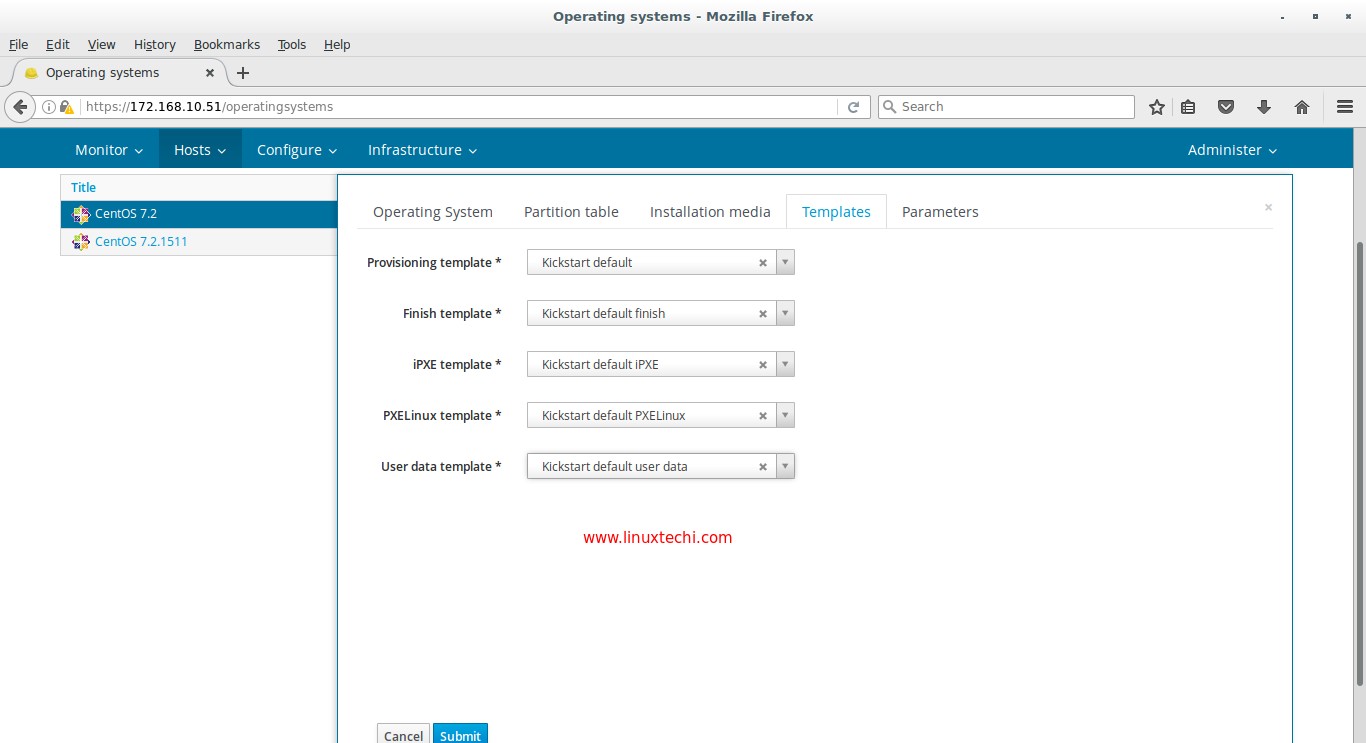
Step:2 Define the Operating System and Associate Templates
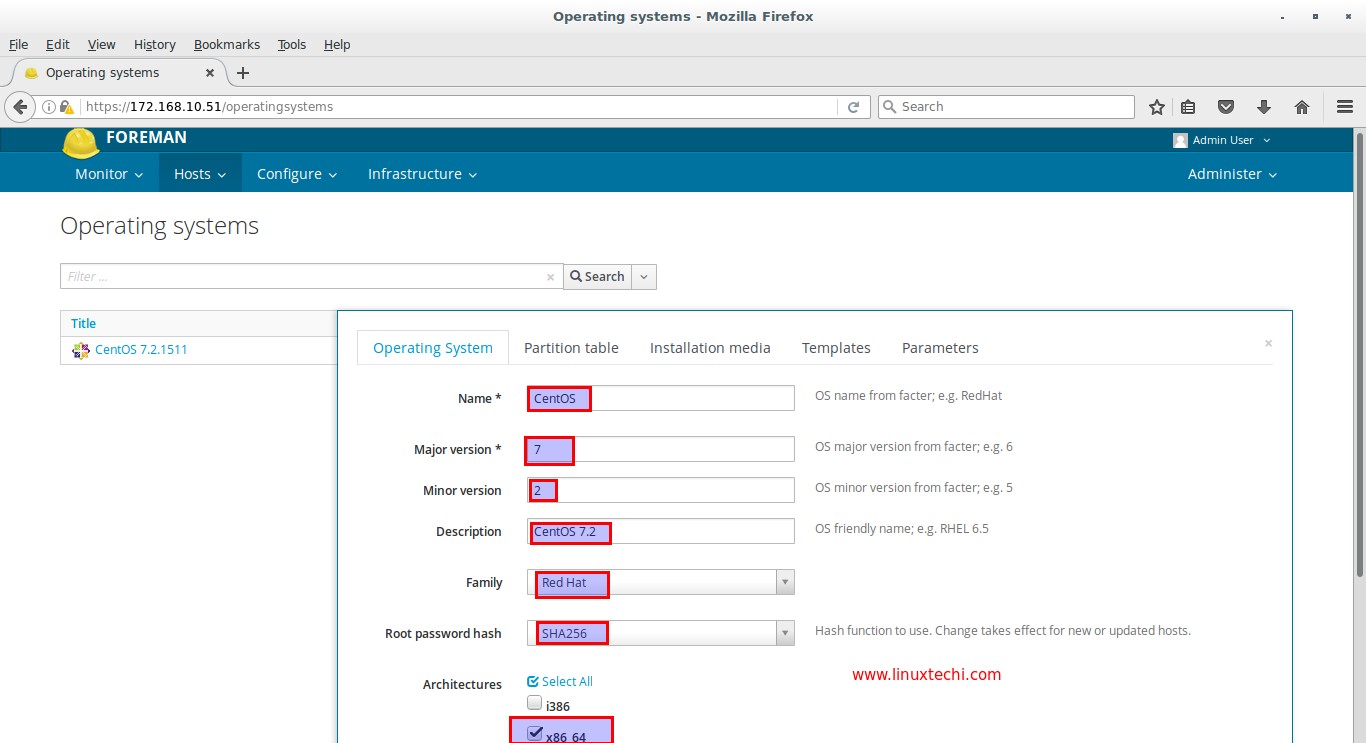
From your Foreman dashboard , Go to Hosts Tab –> Select “Operating systems” and then click on ‘New Operating system‘
From the Operating System Tab define the Name of the OS, its Major version and minor version, Description, Family and its Architectures. In my case i am putting the followings
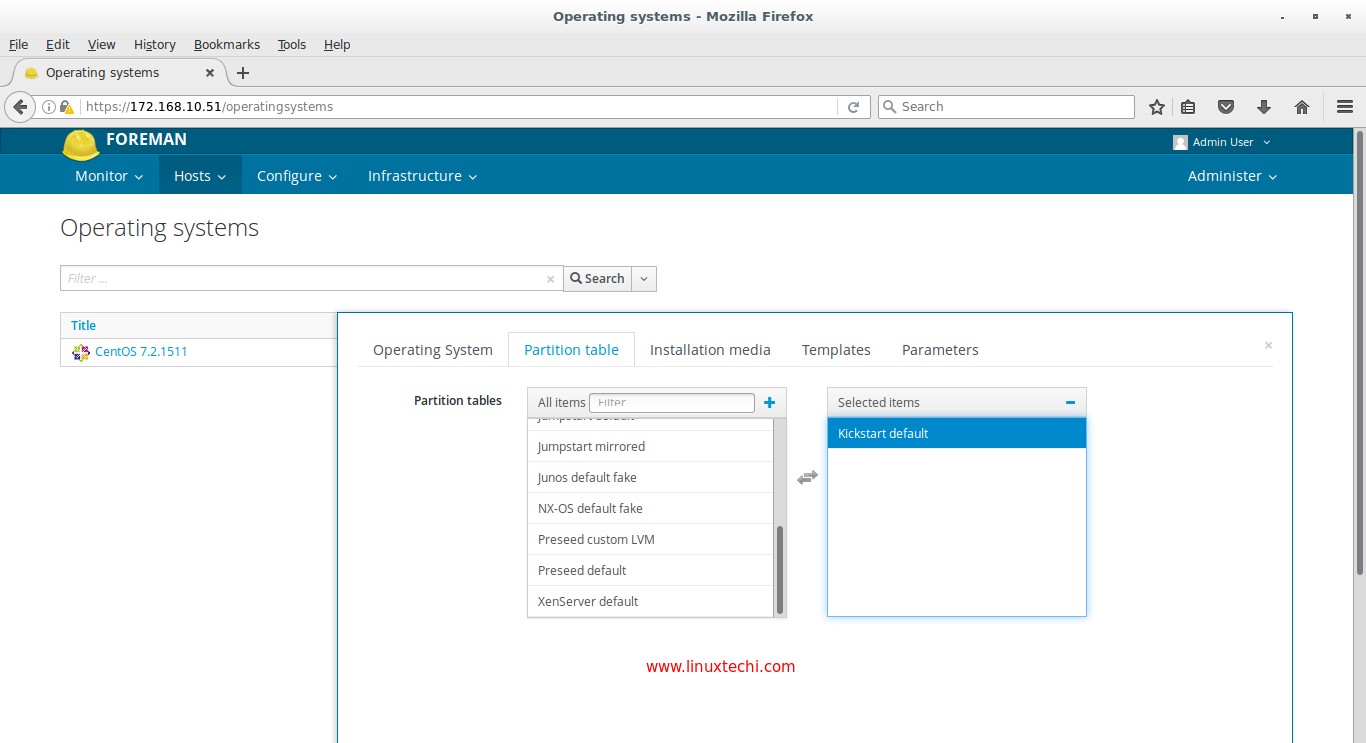
Click on Partition Table Tab and Select “Default Kickstart”
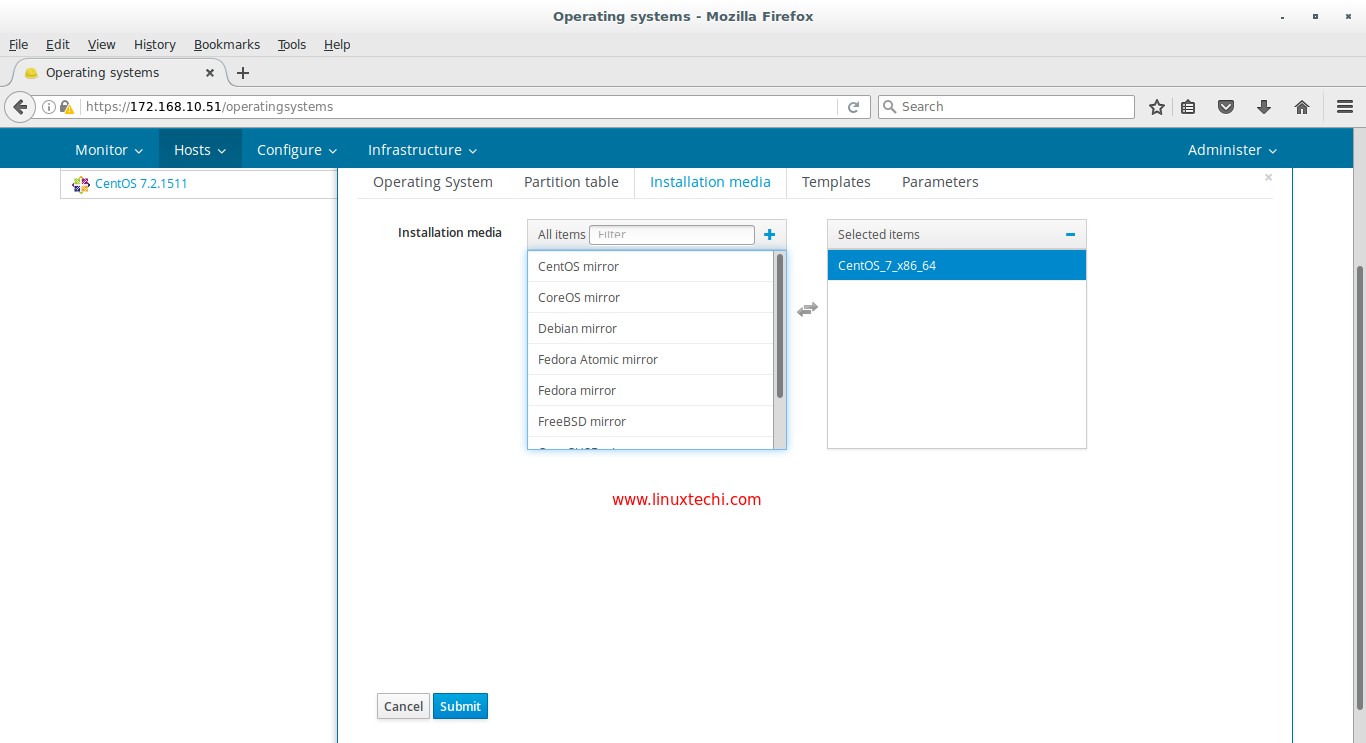
Now Associate the Installation Media to this Operating system , Click on “Installation media” Tab and Select “CentOS_7_x86_64”
Click on Submit, We will come back here again once we define the templates for the newly created Operating system and then we will associate these templates from templates Tab.
To define the Templates for the Operating system , Go to Hosts Tab –> Select Provisioning Templates .
We will define 5 templates for our Operating system “CentOS 7.2“, These are highlighted in below screen.
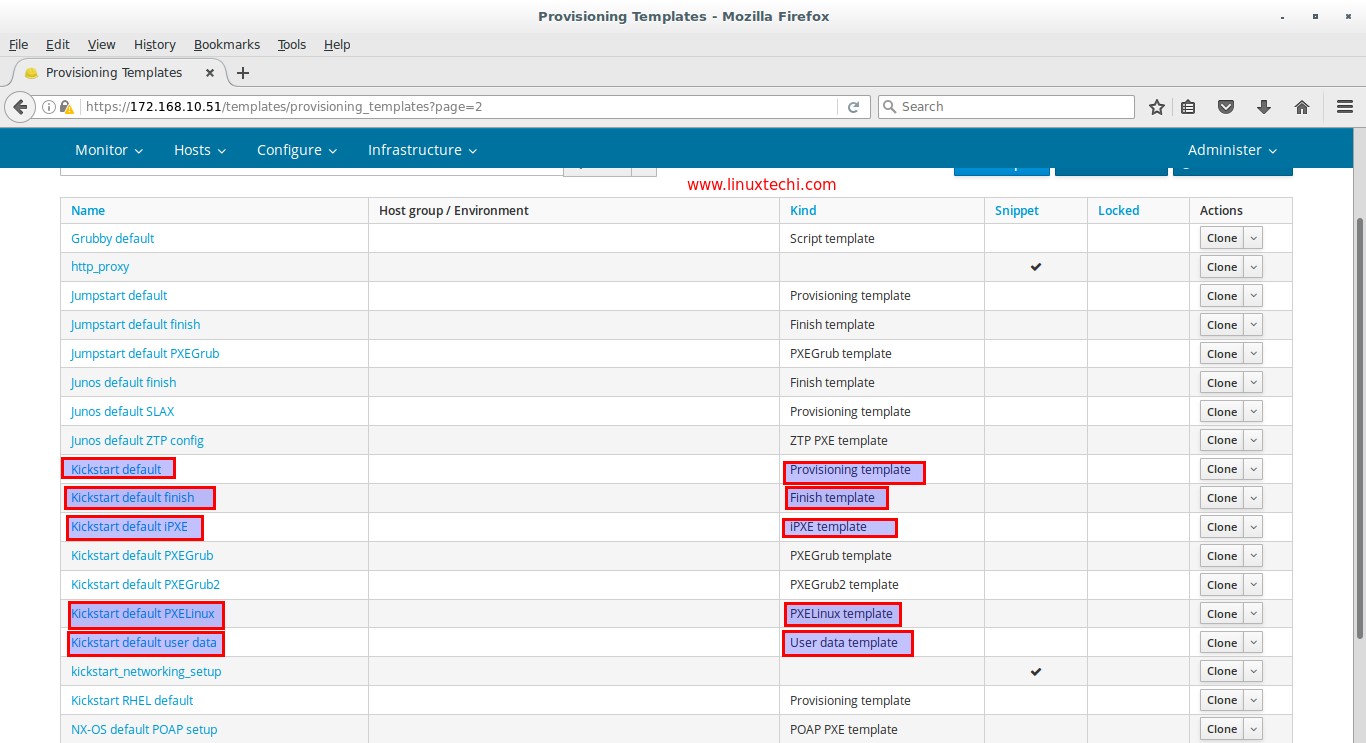
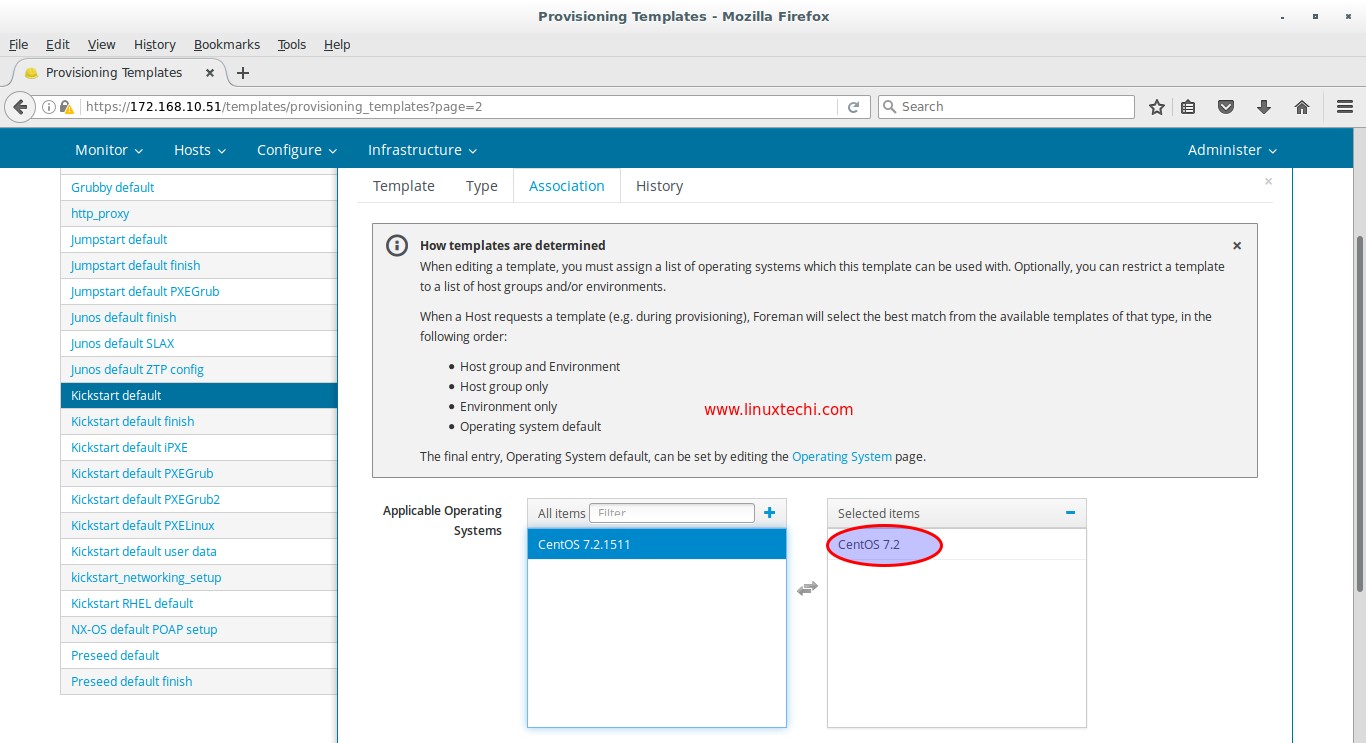
Click on the “Provisioning template” i.e Kickstart default and associate the template to our operating System “CentOS 7.2”
Click on submit.
Similarly Associate the remaining 4 templates to our operating system “CentOS 7.2”
Now again go to Hosts Tab –> Select Operating system, Click on CentOS 7.2, Associate the templates from Associate tab
Click on Submit.
Step:3 Configure Provisioning Setup
Now from Infrastructure Tab Go to ‘Provisioning setup‘ and Click on “foreman.example.com” (i.e provisioning host in my case) , Specify the subnet name and other details like starting and ending ip of the subnet, as per my case i have used the followings :
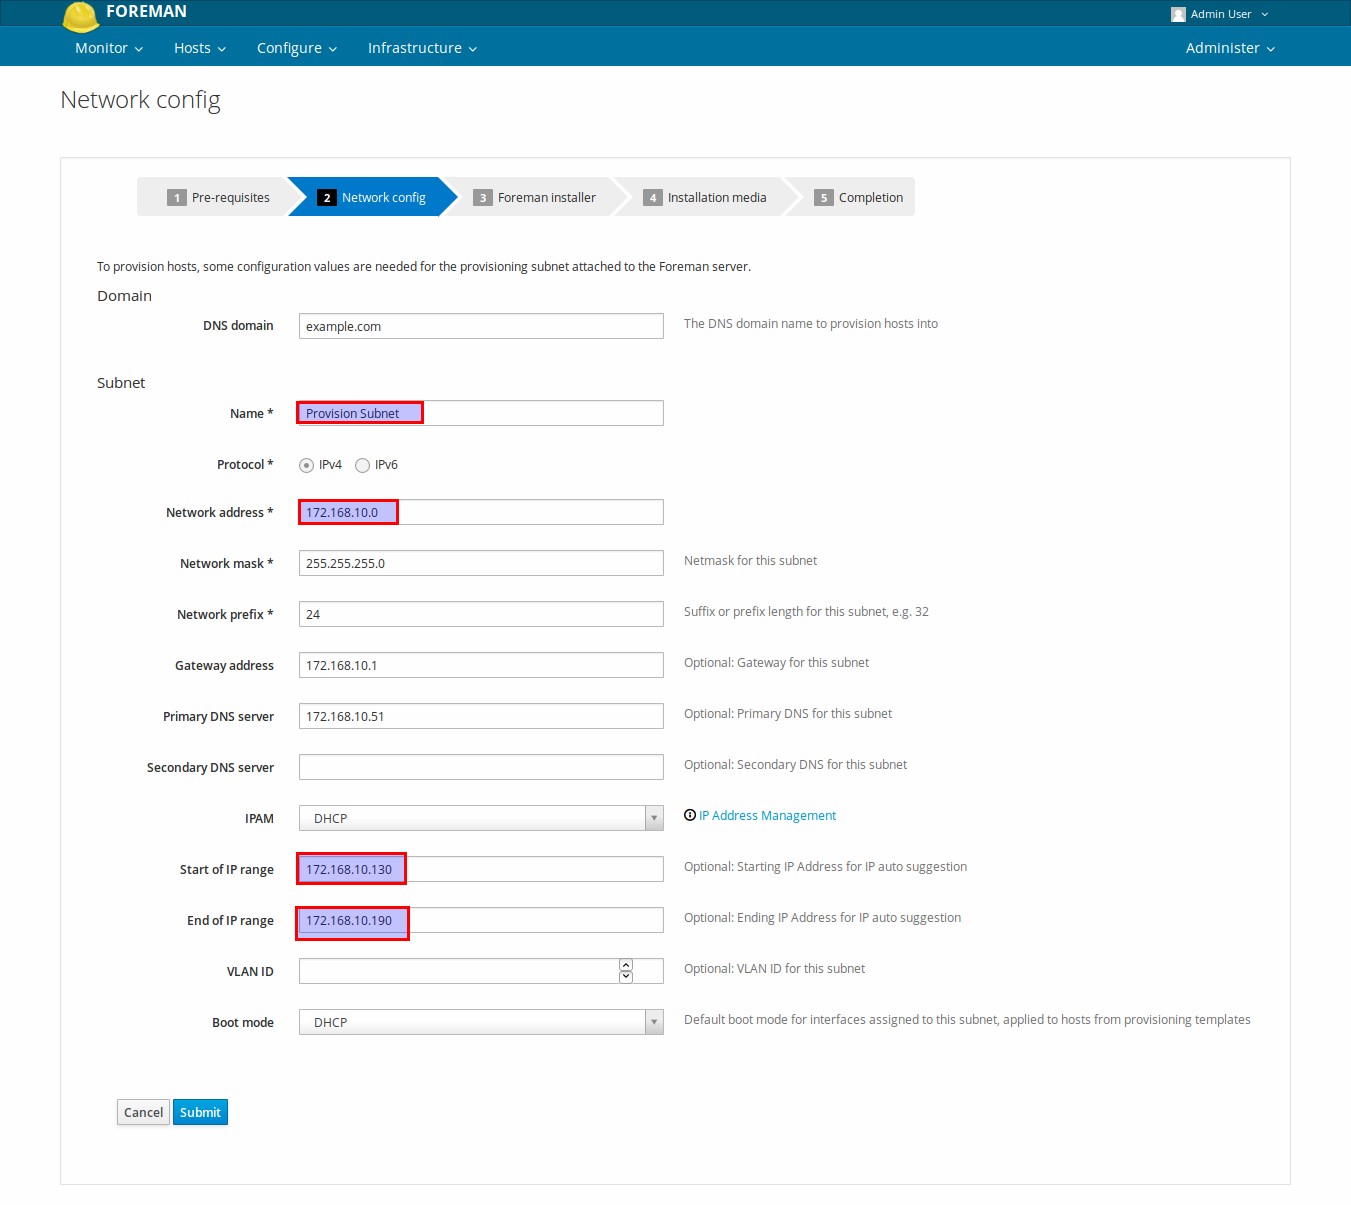
click on Submit.
Next Screen will appear and will look like below.
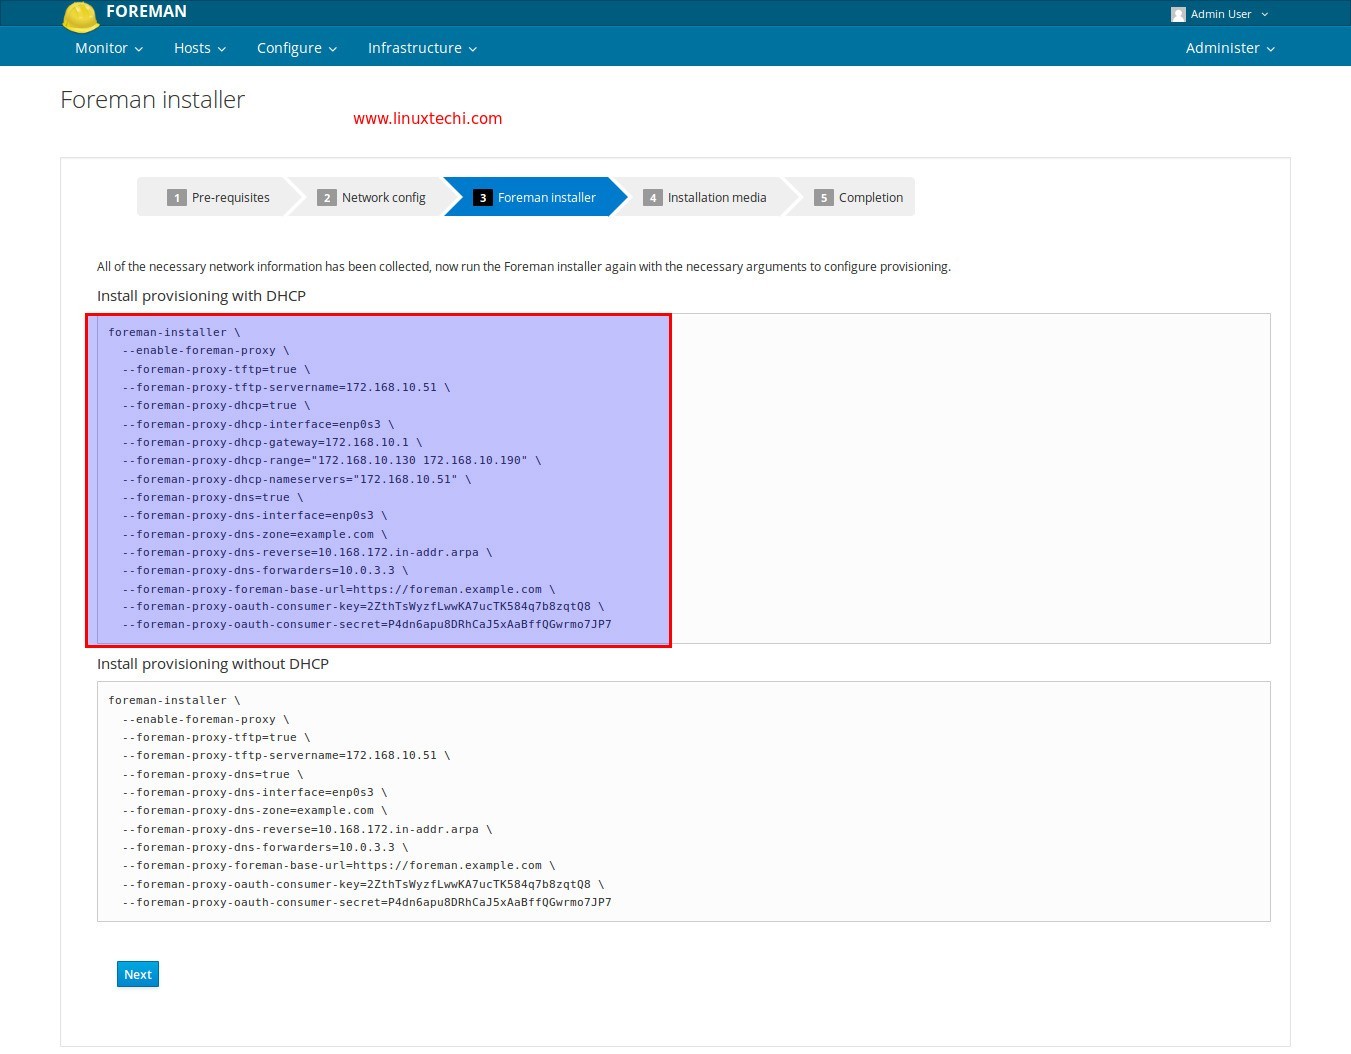
Copy the code under the option “Install provisioning with DHCP” and paste it on the foreman server. Once the installer command is completed then click on ‘Next‘

From “Installation Media” Tab select the installation medium (CentOS_7_x86_64) that we have created in above steps.
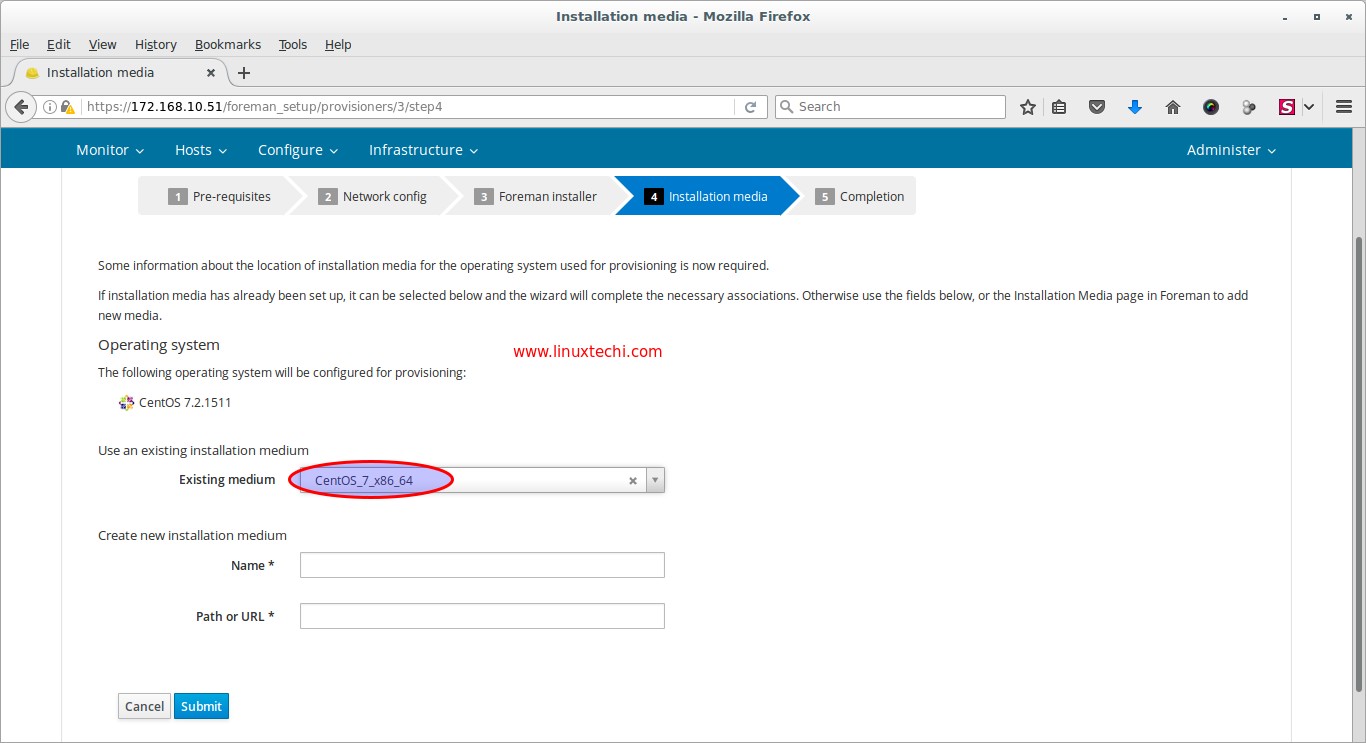
Click on Submit
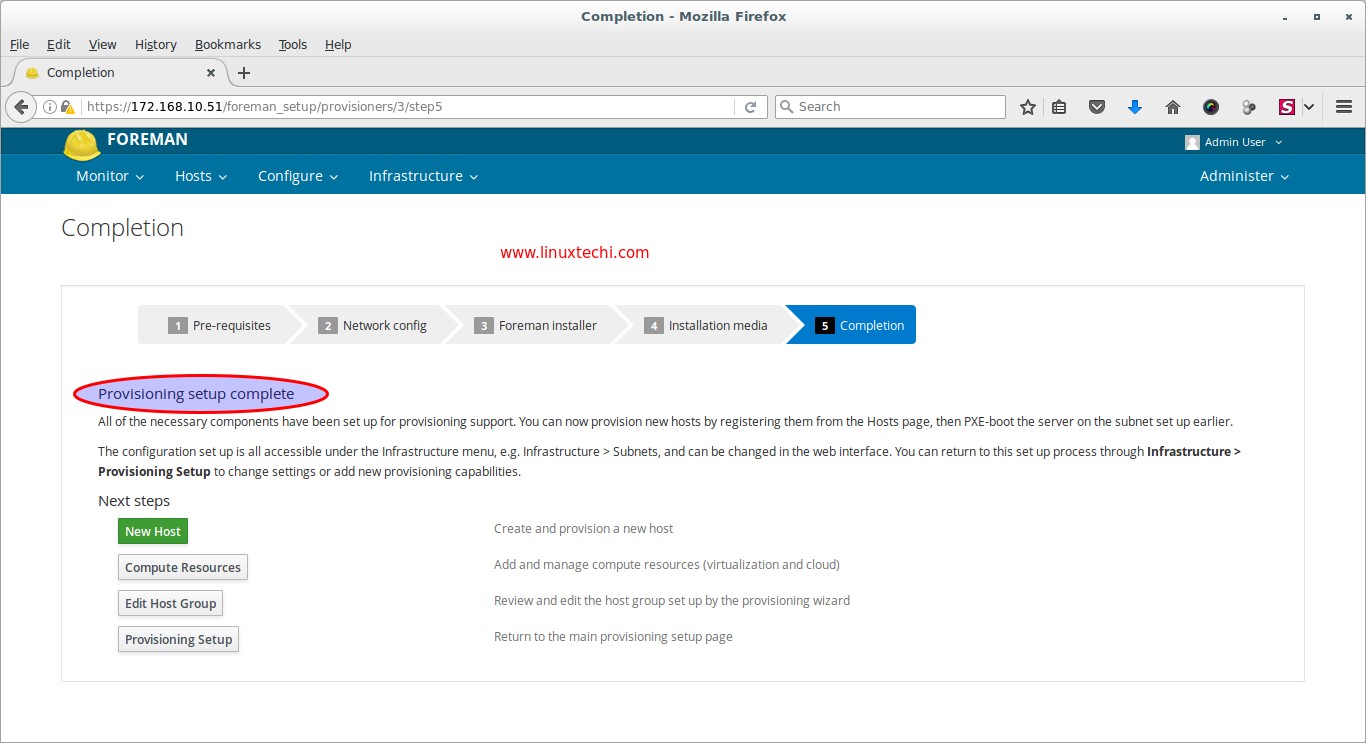
As we can see Provisioning Setup is completed. Our next task is to create the Host .
Step:4 (optional) Edit Provisioning Template kickstart Default.
This step is optional in case if your provision subnet has Internet connectivity because during provisioning installer will try to install puppet package from external repositories. In Case if you don’t have Internet connectivity then create your repository for puppet packages and update the repository info in provisioning template. In my case i have downloaded the required puppet package and its dependencies under the folder “/var/ftp/pub/puppet_rpms/”
Go to “Provisioning Templates” from Hosts Tab , Select the “Kickstart default”
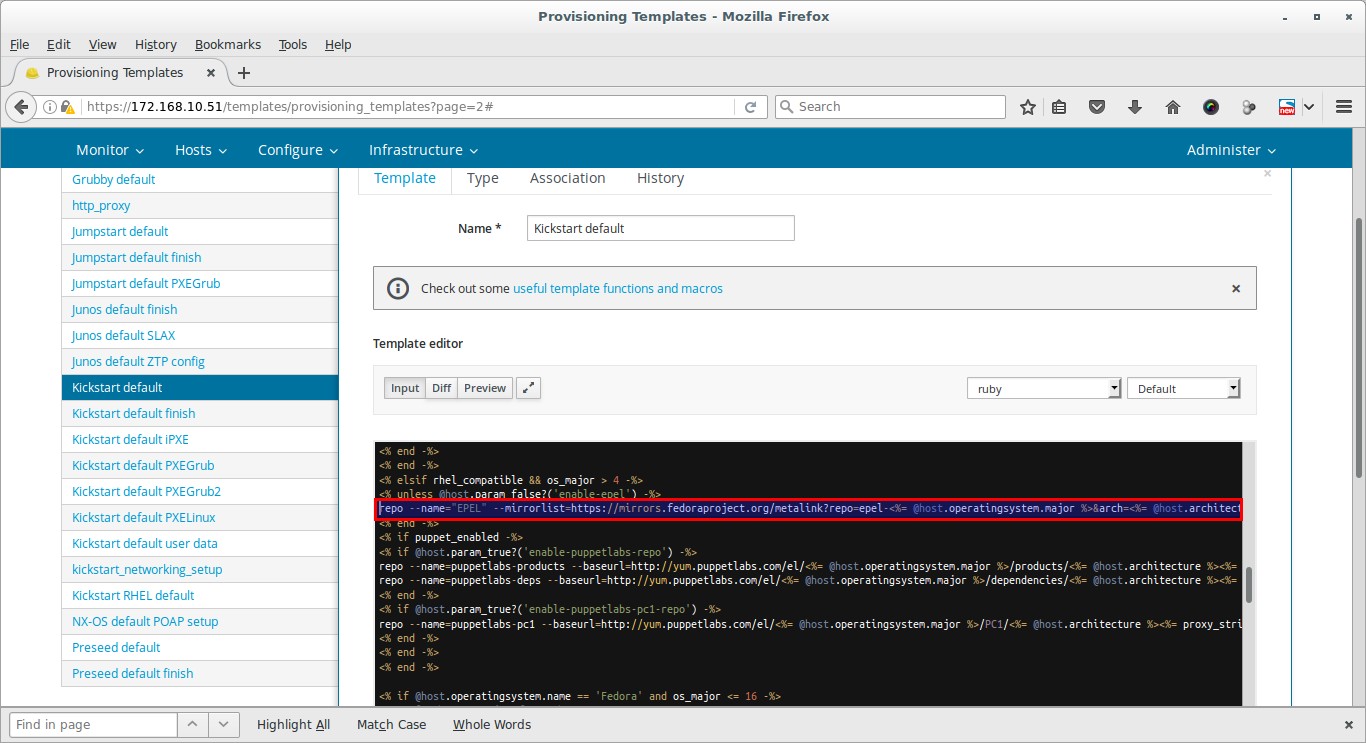
Replace above highlighted code with below line
repo --name=”puppet-pkg” --baseurl=ftp://172.168.10.51/pub/puppet_rpms/
From this template file also remove epel-release package from the package list.Once you are done with these two changes , click on submit to save these changes.
Step:5 Create New Host for Provisioning
From the Hosts Tab –> Select New Host, Specify the name, Host Group and other required parameters.
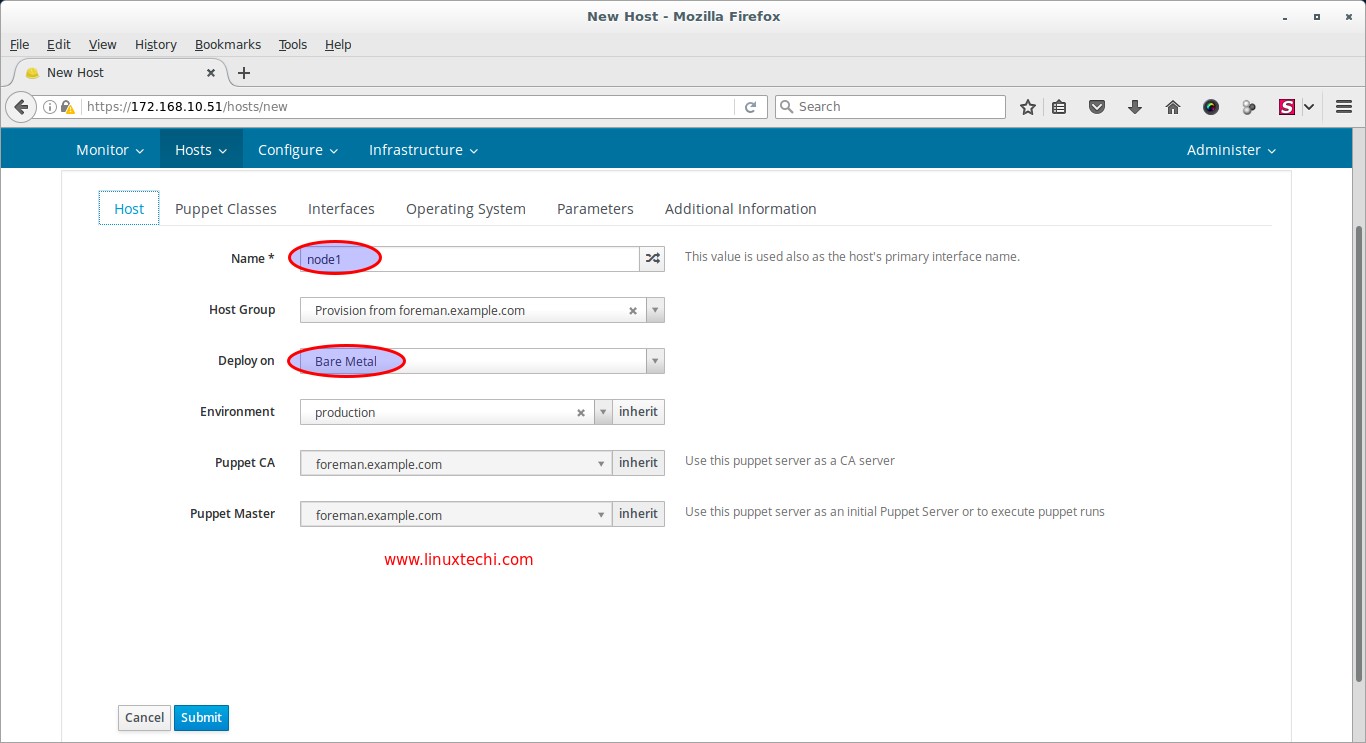
From the ‘Puppet Classes‘ we can attach the puppet class or modules to this host, which will be executed after the OS installation. In my case i am not touching this Tab
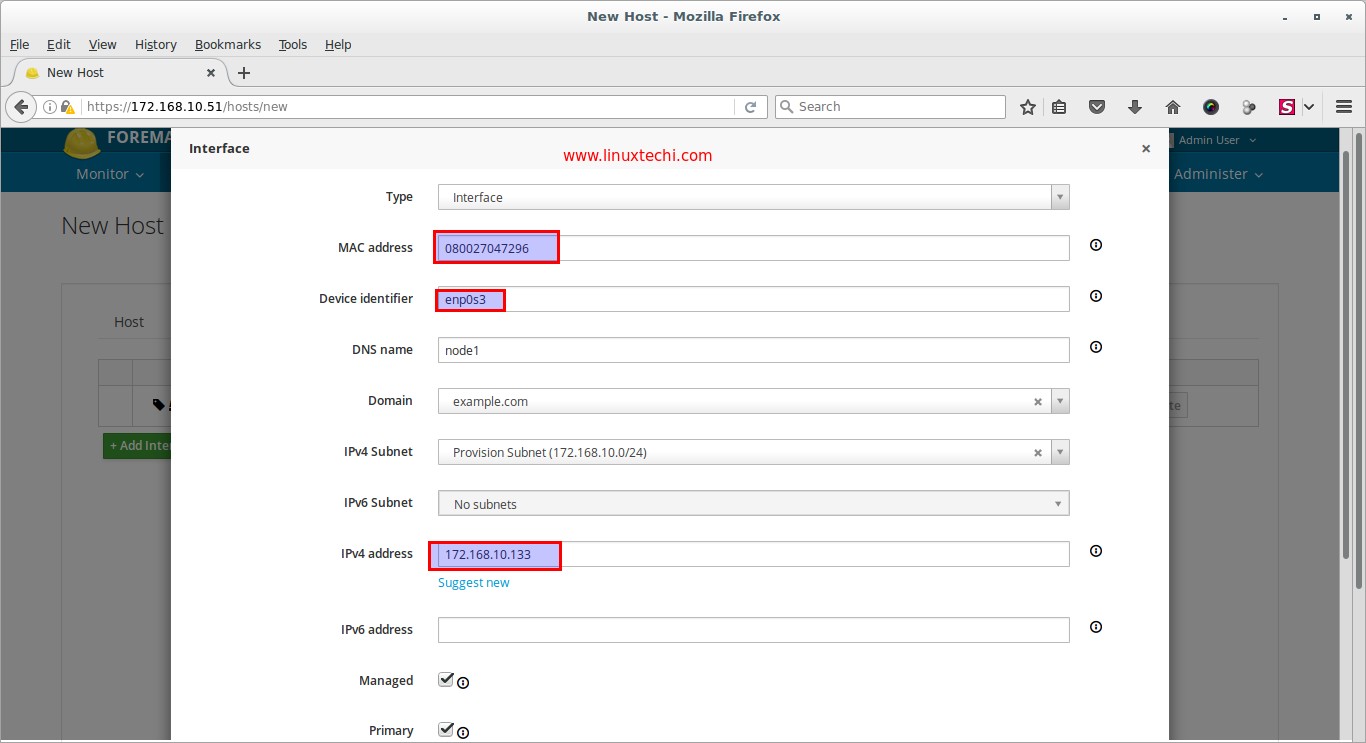
Define the interface parameters and its values from Interface Tab. Specify the MAC address of interface of your server which you want to provision through foreman. Interface name as ‘enp0s3‘ and IP address will be picked automatically from the provision subnet. Once you are done with settings then click on OK.
Go to the Operating system Tab, Select the Operating system “CentOS 7.2” , Media as “CentOS_7_x86_64” and Kickstart default as Partition Table and Root password that you want to set.
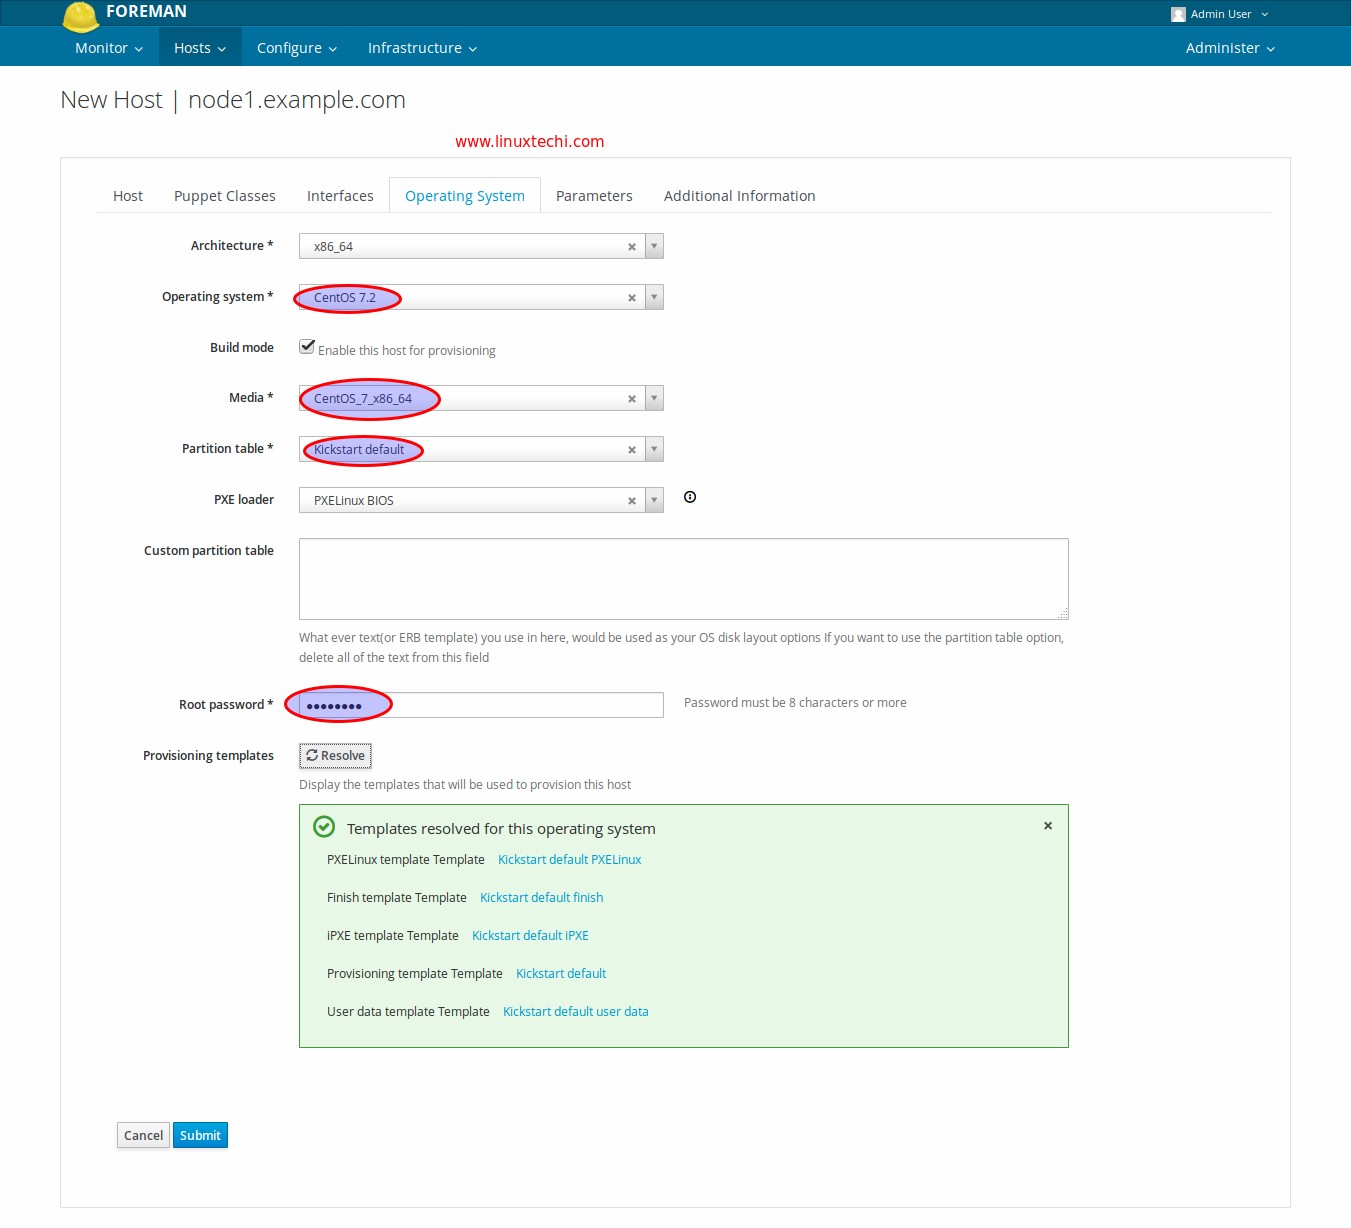
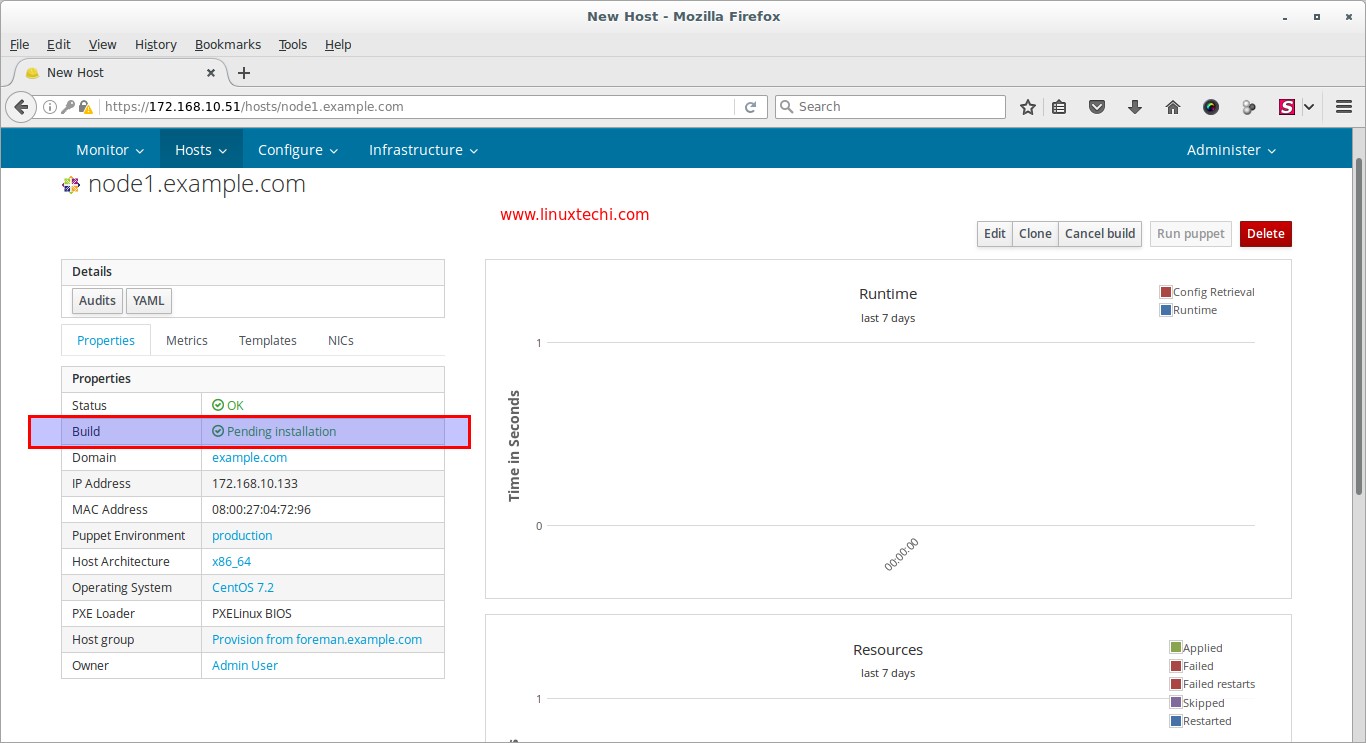
Once we click on Submit. Our New Host build status will become “Pending Installation”
Step:6 Boot Your Server or virtual Machine via PXE.
Now boot your bare metal Server or virtual machine via PXE, as we can see that server has picked the IP address from foreman DHCP server.
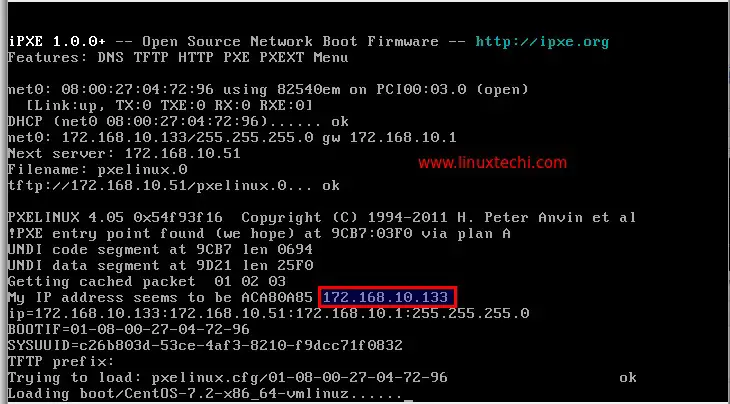
Whole installation will be performed in text mode.
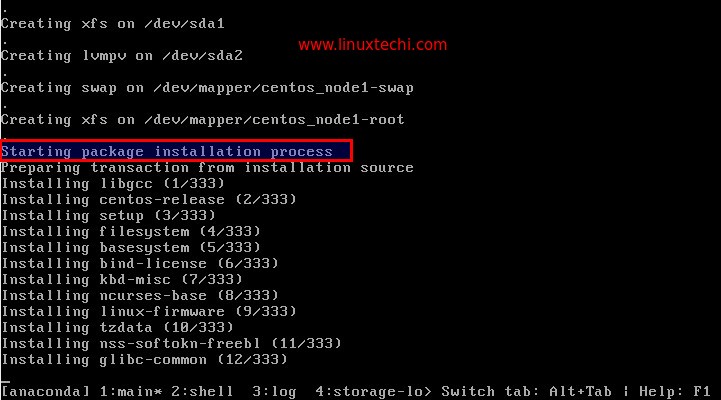
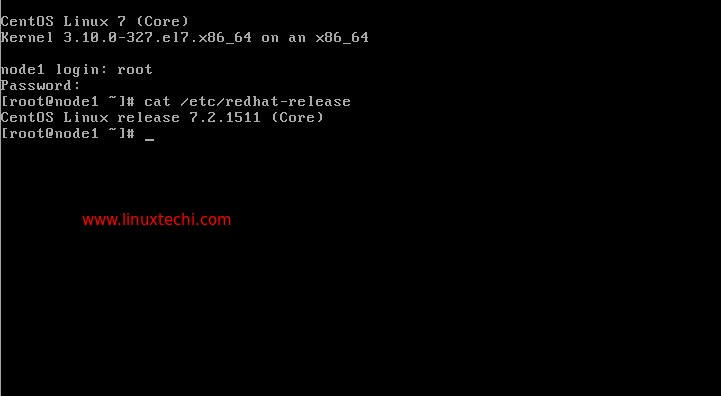
Once the Installation is completed, installer will reboot your server. Login to the server and verify its OS version
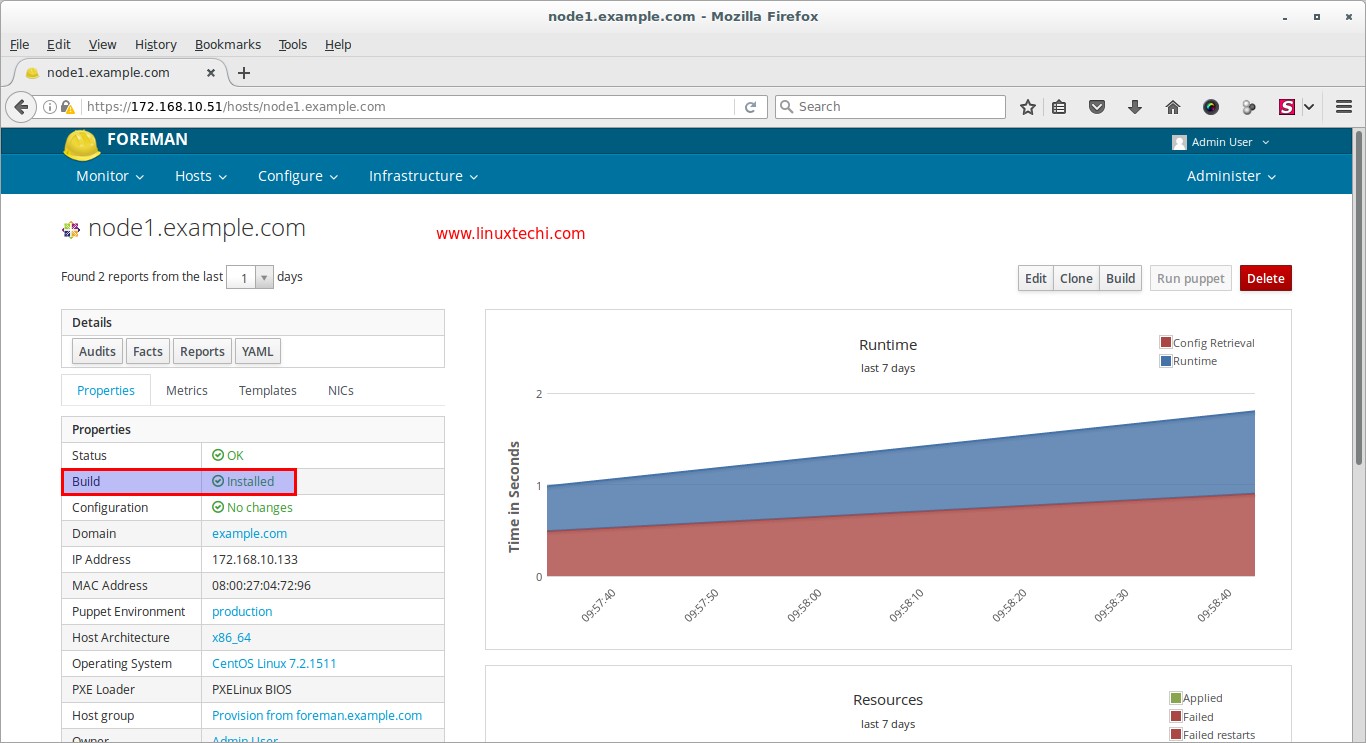
From Foreman Dashboard verify the host details as well. Go To Hosts Tab —>Select All Hosts
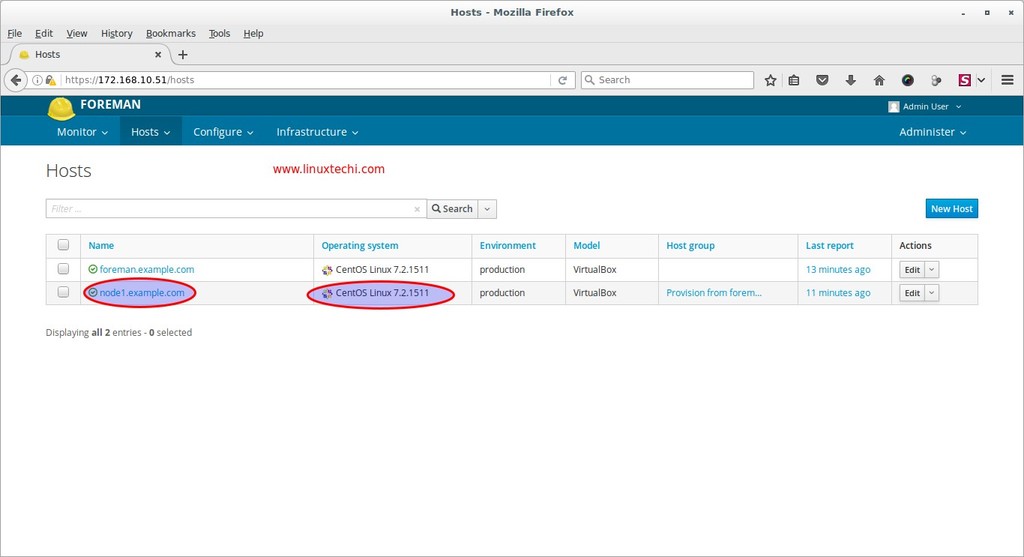
Click on host “node1.example.com“, as we can see that build status has now changed to “installed”
That’s all for this article. Hope you guys got an idea how to provision bare metal and virtual machine through Foreman server. Please share your valuable feedback and comments 🙂
Nice Article.!! Really clear information.
R u using the VMWARE workstation? or ESIX or Vecenter?
I am trying the following steps but not yet succeed
I am following this
Step 1 : I have installed workstation in my window machine and In one VM, installing the centos and foreman on top of it.
Step 2 : And another VM is VCENTER/ESXI server as compute resource .
Step 3 : In provisioning setup, i will give the VCENTER IP details in foreman provisioning setup and as i dont have DNS and DCHP . I will give the static IP
Step 4 : I will create the compute resource with V-CENTER IP and all other details
Step 5 : Follow the steps of provisioning templates and all related stuff.
Am i in right track. Please help me.. I am new to virtualization concepts and please correct me if I wrong direction
Basically .. What I am thinking Foreman will provision the VM on host i.e compute host .. (BOTH IP are different foreman and compute host IP)
VM-FOREMAN will contact COMPUTE VM PROVISON NEW VM on IT.
Hi Phani,
I have tested these steps on VirtualBox VMs and Bare metal Severs as well. First of all your Forman VM and target VM should be on the same vlan. My recommended way is to setup DHCP, DNS and TFTP service on Foreman(Steps are there in article), Create your installation media and update the provisioning templates and define your target vm in dashboard and then start your VM with pxe.
Thanks for your response. I got it.
Can you please also mention Step:3 Configure Provisioning Setup.. I gave my foreman IP address in network address ( in your case 172.168.10.0.). is that correct? is it the foreman server ip address or VMWARE cluster ip adress?
Can you please help me .
Also
I am getting the following an error when i try to provision a VM in VMWARE. I think its may be because of newotking interfaces issue.
Please let me know if you have any thoughts on this. Thanks
It is not the Foreman or cluster IP, It is a Network address on which your DHCP server will start and will start assigning IP address to its clients from this network address only, In the network address we have specify the range of IP that can be used from this network address. From this range only Clients will get IP via DHCP.
Thanks your quick reply and let me try to talk to my sysadmin. Thanks a lot again
Hey Pradeep .
I dont have dhcp server in my environment. So I have given my own IP and defined my own template with user data and cloud init ( image based provision without ssh and I have one template template in vsphere. I gave the path of the location. So VM got created and i can login to VM also.
Question 1 : But in foreman still the status of the host is “Pending for installation” not sure why its not showing that installation got completed.
Question 2. In your case you ahve 5 templates are there. My question is where is the Centos ISO is location? will it be on foreman machine or Vsphere? or Its template will take care of the ISO part or will it downloaded and installed from internet?
Question 3 : Also I ahve given the in host creation process as 136.123.24.123 but after VM created with ip 136.123.24.123 not sure why it got changed . Please help me on this.
I really appreciated your supported . Thanks in advance please help me when you have some time
Small correction in Question 3 : Also I have given the IP in host creation process as 136.123.24.123 but after VM created with ip 136.123.24.12 not sure why it got changed . Please help me on this.
Hey Pradeep .. Seems that I need to include a user defined template for puppet agent scripts. Can you help me please
Hello All, I followed all the steps but my host is not booting up. Please help…
My node is showing below mentioned error:
Filename: node1.pxe
tftp://10.0.2.4/node1.pxe… Permission denied
Nice article. Sir how to install Openstack Newton using FOREMAN .
Hi Pradeep,
Followed all steps, in /var/log/messages it appears that DHCP process is complete. However my machine is never installed with OS on PXE.
Logs:
Apr 18 21:49:36 foreman kernel: device enp4s0f0 left promiscuous mode
Apr 18 21:49:43 foreman kernel: device enp4s0f0 entered promiscuous mode
Apr 18 21:53:23 foreman dhcpd: DHCPDISCOVER from a4:c6:4f:ca:5d:bd via enp4s0f0
Apr 18 21:53:23 foreman dhcpd: none: host unknown.
Apr 18 21:53:23 foreman dhcpd: DHCPOFFER on 10.100.112.68 to a4:c6:4f:ca:5d:bd via enp4s0f0
Apr 18 21:53:25 foreman dhcpd: Dynamic and static leases present for 10.100.112.68.
Apr 18 21:53:25 foreman dhcpd: Remove host declaration jaime-smithee.controller or remove 10.100.112.68
Apr 18 21:53:25 foreman dhcpd: from the dynamic address pool for 10.100.112.0/24
Apr 18 21:53:25 foreman dhcpd: DHCPREQUEST for 10.100.112.68 (10.100.112.61) from a4:c6:4f:ca:5d:bd via enp4s0f0
Apr 18 21:53:25 foreman dhcpd: DHCPACK on 10.100.112.68 to a4:c6:4f:ca:5d:bd via enp4s0f0
Apr 18 21:53:25 foreman in.tftpd[32856]: RRQ from 10.100.112.68 filename pxelinux.0
Apr 18 21:53:25 foreman in.tftpd[32856]: tftp: client does not accept options
Apr 18 21:53:25 foreman in.tftpd[32857]: RRQ from 10.100.112.68 filename pxelinux.0
Apr 18 21:53:25 foreman in.tftpd[32857]: Client 10.100.112.68 finished pxelinux.0
Apr 18 21:53:25 foreman in.tftpd[32858]: RRQ from 10.100.112.68 filename pxelinux.cfg/0a84332b-8bef-e611-8c0b-f09838ae657a
Apr 18 21:53:25 foreman in.tftpd[32858]: Client 10.100.112.68 File not found pxelinux.cfg/0a84332b-8bef-e611-8c0b-f09838ae657a
Apr 18 21:53:25 foreman in.tftpd[32859]: RRQ from 10.100.112.68 filename pxelinux.cfg/01-a4-c6-4f-ca-5d-bd
Apr 18 21:53:25 foreman in.tftpd[32859]: Client 10.100.112.68 finished pxelinux.cfg/01-a4-c6-4f-ca-5d-bd
Apr 18 21:53:25 foreman in.tftpd[32860]: RRQ from 10.100.112.68 filename boot/CentOS-7.4.1708-x86_64-vmlinuz
Apr 18 21:53:25 foreman in.tftpd[32860]: Client 10.100.112.68 finished boot/CentOS-7.4.1708-x86_64-vmlinuz
Apr 18 21:53:25 foreman in.tftpd[32861]: RRQ from 10.100.112.68 filename boot/CentOS-7.4.1708-x86_64-initrd.img
Apr 18 21:53:26 foreman in.tftpd[32861]: Client 10.100.112.68 finished boot/CentOS-7.4.1708-x86_64-initrd.img
Apr 18 21:54:22 foreman dhcpd: DHCPDISCOVER from a4:c6:4f:ca:5d:bd via enp4s0f0
Apr 18 21:54:22 foreman dhcpd: DHCPOFFER on 10.100.112.68 to a4:c6:4f:ca:5d:bd via enp4s0f0
Apr 18 21:54:22 foreman dhcpd: Dynamic and static leases present for 10.100.112.68.
Apr 18 21:54:22 foreman dhcpd: Remove host declaration jaime-smithee.controller or remove 10.100.112.68
Apr 18 21:54:22 foreman dhcpd: from the dynamic address pool for 10.100.112.0/24
Apr 18 21:54:22 foreman dhcpd: DHCPREQUEST for 10.100.112.68 (10.100.112.61) from a4:c6:4f:ca:5d:bd via enp4s0f0
Apr 18 21:54:22 foreman dhcpd: DHCPACK on 10.100.112.68 to a4:c6:4f:ca:5d:bd via enp4s0f0
Apr 18 21:54:26 foreman smart-proxy: localhost – – [18/Apr/2018:21:54:24 +0530] “DELETE /puppet/ca/jaime-smithee.controller HTTP/1.1” 404 77
Apr 18 21:54:26 foreman smart-proxy: – -> /puppet/ca/jaime-smithee.controller
Apr 18 21:54:26 foreman smart-proxy: localhost – – [18/Apr/2018:21:54:26 +0530] “POST /puppet/ca/autosign/jaime-smithee.controller HTTP/1.1” 200 0
Apr 18 21:54:26 foreman smart-proxy: – -> /puppet/ca/autosign/jaime-smithee.controller
Could you please help.
Hi Pradeep,
Awesome article ! In Foreman 1.16.1 with Katello 3.5. I am not seeing any Provisioning Setup Tab in Infrastructure. Is that changed now in new version. Do you have any article for newer version.
I have the same inconvenience. My lab setup (foreman 1.20) has two NICs, one of them is for NAT so I can download packages, and the last one is for local network. So far I can not configure provisioning over PXE. Some help I’ll appreciate.
Install foreman using this command “sudo foreman-installer –enable-foreman-plugin-setup”. Apparently you need the plugin setup to have the provision setup tab.
Awesome!!! thank you!! it works!