In this guide, we will cover how to install latest version of HAProxy on Ubuntu 20.04 LTS (Focal Fossa) step-by-step.
HAProxy is a free & open source solution for High availability and load balancing, it can also be used for proxying TCP & HTTP based applications. HAProxy can be installed and configured on Linux, Solaris & FreeBSD. HAProxy is best recommended solution for the websites which has huge traffic as it improves performance & reliability of the server by means of load balancing the servers & using its high availability capabilities.
HAProxy is used by a number of most popular websites including GitHub, Bitbucket, Stack Overflow, Reddit, Tumblr, Twitter and it is also used in the OpsWorks product from Amazon Web Services.
Prerequisites
- Minimal Installed Ubuntu 20.04 System
- Local User with sudo rights
- Internet connectivity
Without any further delay, let’s deep dive into HAProxy installation steps.
Step 1) Install Updates
Login to Ubuntu 20.04 system and install all the available updated using beneath apt command,
$ sudo apt update
$ sudo apt upgrade -y
Once all the updates are installed, reboot the system once.
$ sudo reboot
Step 2) Install latest HAProxy
HAProxy package is available in the default package repositories but it is not the latest and stable version. So to install latest version, enable HAProxy PPA, run
$ sudo apt install software-properties-common
$ sudo add-apt-repository ppa:vbernat/haproxy-2.6 -y
Now, run following apt command to install haproxy
Note: At the time of writing this article, HAProxy 2.6 is available via PPA.
$ sudo apt update$ sudo apt install haproxy -y
To verify the haproxy version, run
$ haproxy -v'

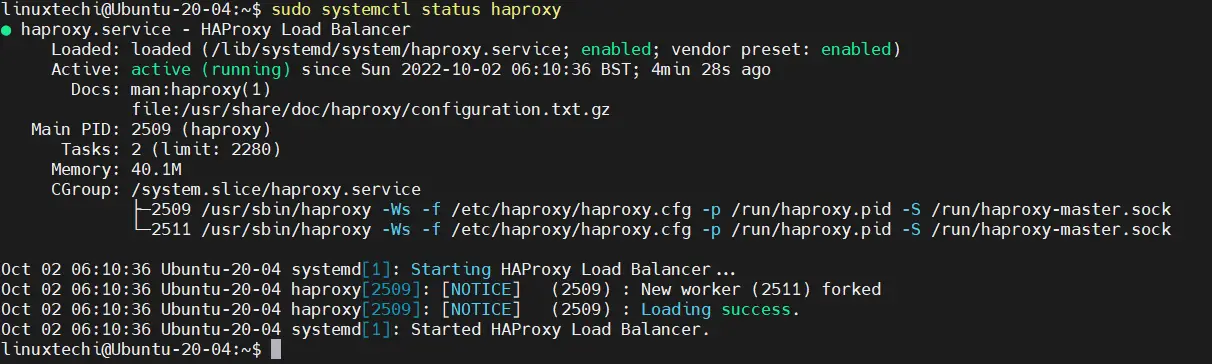
Haproxy service starts automatically when we install haproxy package. To validate the haproxy service status, run following
$ sudo systemctl status haproxy
output,
Step 3) Configure HAProxy
Now we have haproxy ready. For purpose of this guide, we will configure HAProxy to load balance the requests from a mail server & a web server.
Load balancing a Mail server with HAProxy
For this example, we will be using two SMTP servers with the IP adresse 192.168.1.10 & 192.168.1.20 respectively.
The IP address for haproxy server is 192.168.1.100.
We will now make the changes to main HAProxy configuration file i.e. ‘/etc/haproxy/haproxy.cfg’ and then make the configuration changes for load balancing the two SMTP servers,
Before making the changes, take backup of its configuration file using cp command.
$ sudo cp /etc/haproxy/haproxy.cfg /etc/haproxy/haproxy.cfg-org
Now the make the changes, add the following frontend‘ & ‘backend‘ section at the end of the file.
$ sudo vi /etc/haproxy/haproxy.cfg
-------------------------------
frontend front_smtp
        bind *:25
        mode tcp
        default_backend back_smtp

backend back_smtp
        mode tcp
        balance roundrobin
        server smtp1 192.168.1.10:25 check
        server smtp2 192.168.1.20:25 check
Here most of the options have been set by default, main things to change here are ‘frontend‘ & ‘backend‘ sections.
frontend front_smtp
bind *:25
mode tcp
default_backend back_smtp
Here we have defined a name for frontend i.e. front_smtp & have asked to take all the request from port 25 with bind parameter, laslty we have mentioned the backend section with the name ‘back_smtp’ where all the requests will be distributed.
backend back_smtp
mode tcp
balance roundrobin
server smtp1 192.168.1.10:25 check
server smtp2 192.168.1.20:25 check
In this section, we have established a name for backend i.e. back_smtp & mode for the transmission will be tcp load balancing method to be used is ‘roundrobin‘. Other load balancing methods that can be used are Weighted round robin, Dynamic round robin algorithm,Least connection algorithm, Source. Lastly we have mentioned the server addresses for both SMTP servers.
Once the changes have been made, save the file & restart the haproxy service to implement the changes,
$ sudo systemctl restart haproxy
Our Haproxy server is now ready to work as load balancer for mail server. Now rather than using the SMTP server addresses, we need to use the server address for HAPROXY i.e. 192.168.1.100:25 for haproxy loadbalancing to work.
To check out if the load balancing for our smtp server is working we can use telnet,
Output of telnet command should be something like below:
$ telnet 192.168.1.100 25
Trying 192.168.1.100..
Connected to 192.168.1.100.
Escape character is ‘^]’.
220 smtp1.linuxtechi.com ESMTP Postfix
Now again run the telnet command,
$ telnet 192.168.1.100 25
Trying 192.168.1.100..
Connected to 192.168.1.100.
Escape character is ‘^]’.
220 smtp2.linuxtechi.com ESMTP Postfix
Notice the change in the server of the mail servers in both the outputs, which shows that the load balancing is working fine. Now let’s discuss a harpoxy example for load balancing a web server.
Load balancing a Web server with HAProxy
Same file will be edited ‘/etc/haproxy/haproxy.cfg’. We will be using two web servers (192.168.1.10 & 192.168.1.20) on backend. IP address for the haproxy server is 192.168.1.100.
Open the haproxy main configuration file and append following changes at the end of file
$ sudo vi /etc/haproxy/haproxy.cfg

------------
frontend www-http
        bind *:80
        mode http
        default_backend apache

backend apache
        mode http
        balance roundrobin
        server web1 192.168.1.10
        server web2 192.168.1.20
Save the file & restart the haproxy service to implement the changes,
$ sudo systemctl restart haproxy
To test out if the load balancing is working, we can place two different web pages on both server. Like for example, we can modify index.html on Webserver 1,
[linuxtechi@web1 ~]$ sudo vi /var/www/html/index.html
This is WEB SERVER 1
& similarly on Web server 2, we can edit the index.html to say,
[linuxtechi@web2 ~]$ sudo vi /var/www/html/index.html
This is WEB SERVER 2
Don’t forget to restart the web service to implement the changes that have been made.
Now, use the haproxy IP address, 192.168.1.100 & access it using a web browser.

Every time we refresh the browser, we should the alternating web pages from both web servers.
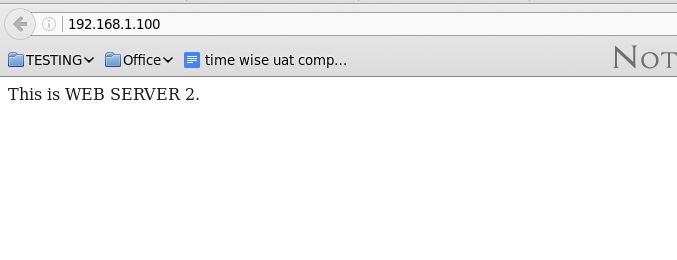
This shows that our webserver load balancing also working fine. That’s all from from this guide, I hope, you have successfully installed HAProxy on Ubuntu 20.04 LTS (Focal Fossa). Please feel free to send in your queries or suggestions using the comment box below.
Can I load the balance of Two exchange servers such that they will be accessible through a single public IP?