You can easily increase the size of your root volume of an AWS instance (EC2) without incurring any form of downtime or interrupted associated with a reboot. In this tutorial, we will give you a step-by-step procedure on how you can extend an EBS boot disk on AWS without an instance reboot.
Prerequisites
- A running EC2 instance in your AWS account. For this guide, we are using a Ubuntu 18.04 LTS instance.
- Root access to the EC2 or sudo privileges
Step 1) Modify the EBS volume
To get started, you need to resize the size of your EBS volume. Our default EBS volume is 8 GB (For free tier). We are going to scale this up to 30GB.
To check the current block size, simply run the command:
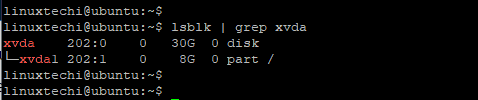
$ lsblk | grep /dev/xvda

From the output above, you can see that the boot partition, xvda1 is 8G. Now we are going to extend this volume to 30GB. Feel free to scale it to whatever size you wish.
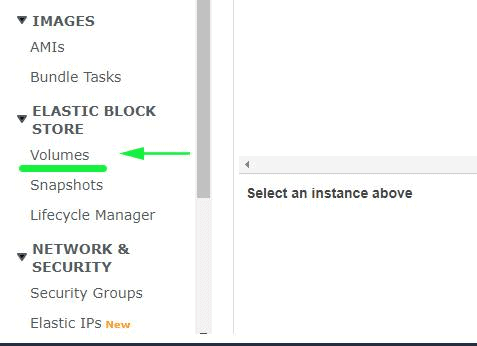
Now to extend the volume, first log in to your AWS account. Under the Elastic Block Store section on the left pane, click on Volumes.
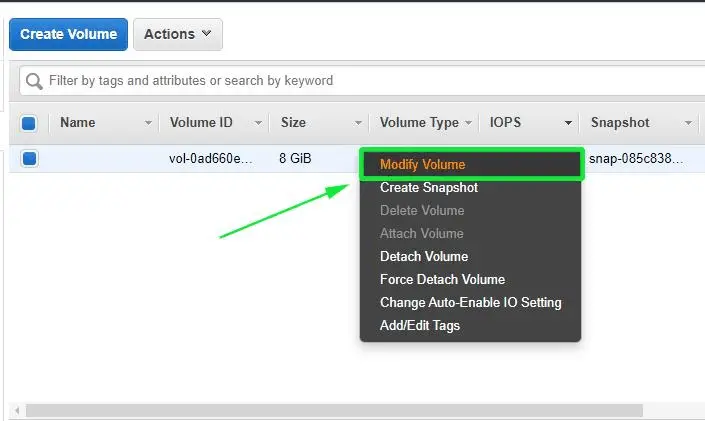
On the next window, you will find the EBS volume that is attached to your EC2 instance. To modify it, right-click and select the modify option.
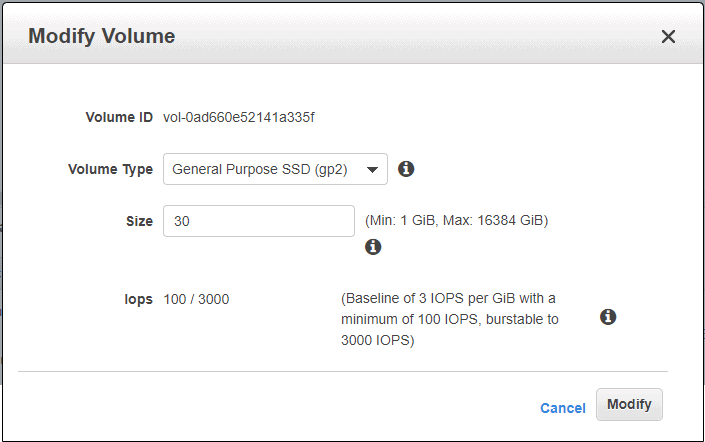
A pop-up will appear displaying the information about the volume such as the volume ID, Volume type and size. By default, the size of the EBS volume is 8 GB. To modify this, type 30 as shown.
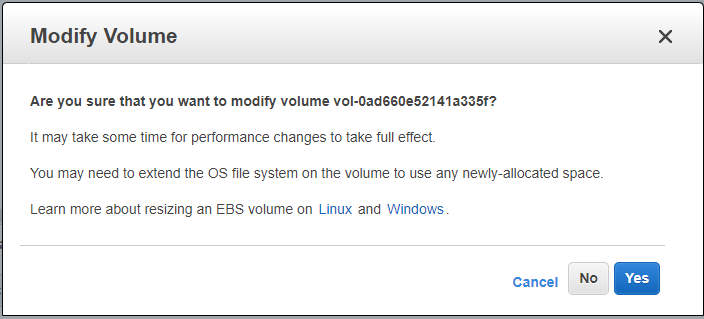
Next, click on the ‘Modify’ button. The next pop-up will prompt you to confirm whether you really want to modify the drive. Click on the ‘Yes’ button to effect the changes.
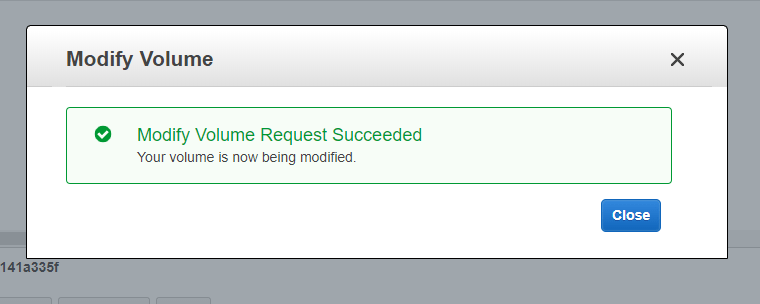
You will get the notification below to indicate that the modification was successful. Click on the ‘Close’ button to exit.
Back to the terminal. When you check the sizes of your volumes, notice that xvda is now 30G but the boot partition is still 8GB.
Step 2) Install cloud-guest-utils package
To scale this up to 30GB, we need to install the cloud-guest-utils package.
For Ubuntu run:
$ sudo apt install cloud-guest-utils
For RHEL / CentOS run:
$ sudo dnf install cloud-utils-growpart
Usually, for newer EC2 instances, this comes in installed.
Finally, we shall use the growpart command to extend the size of the boot disk. To do this, execute:
$ sudo growpart /dev/xvda 1

Finally, proceed and resize the filesystem to fill up the extended space using the resize2fs utility.
$ sudo resize2fs /dev/xvda1

At this point, we have extended the boot disk volume. To verify this, use lsblk command:
$ lsblk | grep xvda
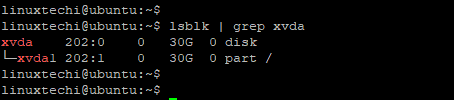
The xvda1 partition has finally been extended from 8GB to 30GB. As you have seen it’s quite an easy and straightforward procedure. Thanks for your time and feel free to get back to us with your feedback.
Also Read : Monitor API Call and User Activity in AWS Using CloudTrail
In Step 2 why it is required to Install cloud-guest-utils package? Without that also it’s working.
Hey Saumik, it’s necessary to install the cloud-guest-utils package because it ships with growpart which is used for resizing the boot partition. However, it comes already installed, that’s why you may not be required to install it.
Thanks, works like a charm. Useful, simple, elegant.