After RHEL 8 release, CentOS community has released its most awaited Linux distribution as CentOS 8. It is released into two forms:
- CentOS stream – It is designed for the developers where they will get the updates quite frequently.
- CentOS – It is RHEL 8 like stable OS where sysadmin can install and configure the servers and applications.
In this article, we will demonstrate how to install CentOS 8 Server step by step with screenshots.
New features in CentOS 8
- DNF is the default package manager though yum can also be used.
- Network configuration will be controlled by Network Manager (nmcli & nmtui) as network scripts are removed.
- Podman utility to manage containers
- Introduction of two new packages repositories: BaseOS and AppStream
- Cockpit available as default server management tool
- Wayland is the default display server
- Iptables are replaced by nftables
- Linux Kernel 4.18
- PHP 7.2, Python 3.6, Ansible 2.8, VIM 8.0 and Squid 4
Minimum System Requirements for CentOS 8
- 2 GB RAM
- 2 GHz or Higher Processor
- 20 GB Hard Disk
- 64-bit x86 System
CentOS 8 Installation Steps with Screenshots
Step:1) Download CentOS 8 ISO File
Download CentOS 8 ISO file from its official site,
https://www.centos.org/download/
Step:2) Create CentOS 8 bootable media (USB / DVD)
Once you have downloaded CentOS 8 iso file, burn it either into USB stick or in DVD to make it bootable.
Reboot the system on which you want to install CentOS 8, change the boot medium either as USB or DVD from bios settings.
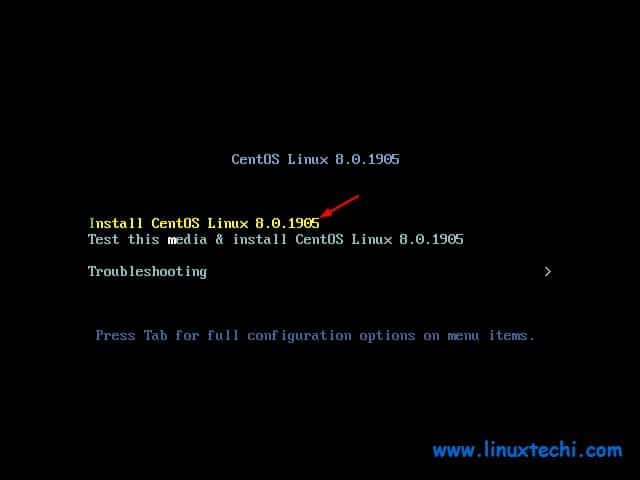
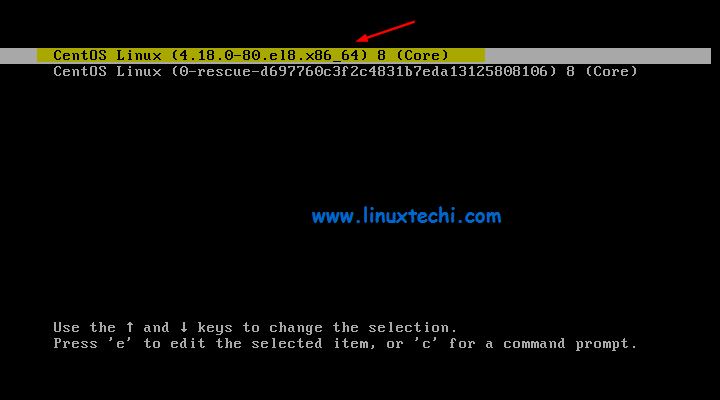
Step:3) Choose “Install CentOS Linux 8.0” option
When the system boots up with CentOS 8 bootable media, then we will get the following screen, choose “Install CentOS Linux 8.0” and hit enter,
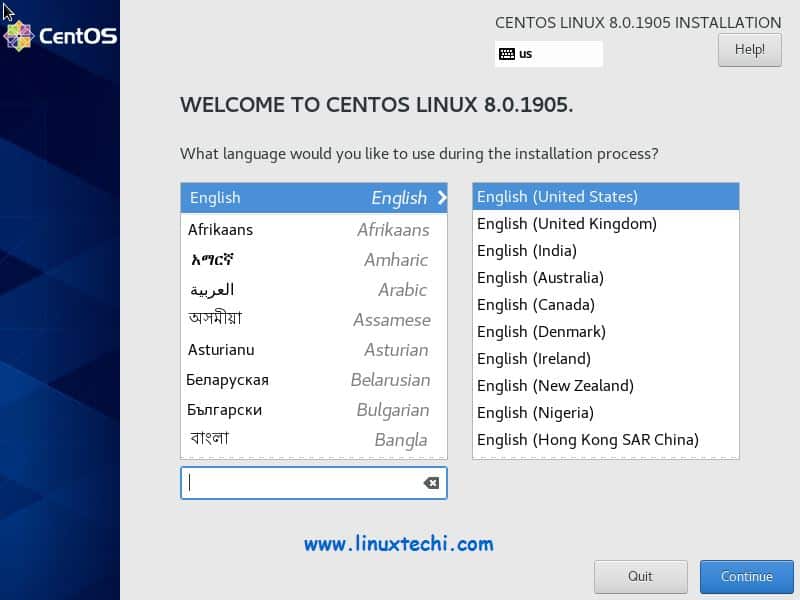
Step:4) Select your preferred language
Choose the language that suits to your CentOS 8 installation and then click on Continue,
Step:5) Preparing CentOS 8 Installation
In this step we will configure the followings:
- Keyboard Layout
- Date / Time
- Installation Source
- Software Selection
- Installation Destination
- Kdump
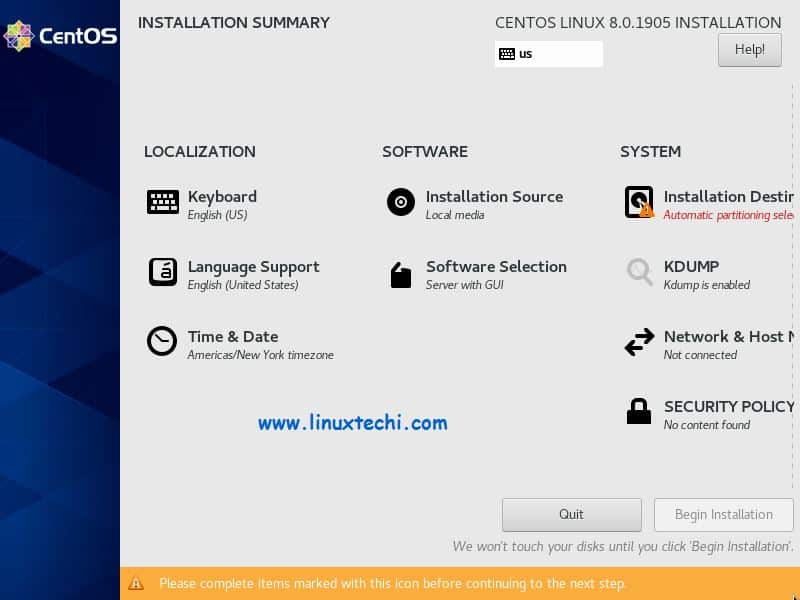
As we can see in above window, installer has automatically pick ‘Keyboard’ layout, ‘Time & Date’, ‘Installation Source’ and ‘Software Selection’.
If you want to change any of these settings, then click on their respective icon, let’s assume we want to change Time & Date of system, so click on ‘Time & Date’ and choose the time zone that suits to your installation and then click on Done

Choose your preferred option from “Software Selection“, in case you want to install server with GUI then choose “Server with GUI” option and if you want to do minimal installation then choose “Minimal Install“.
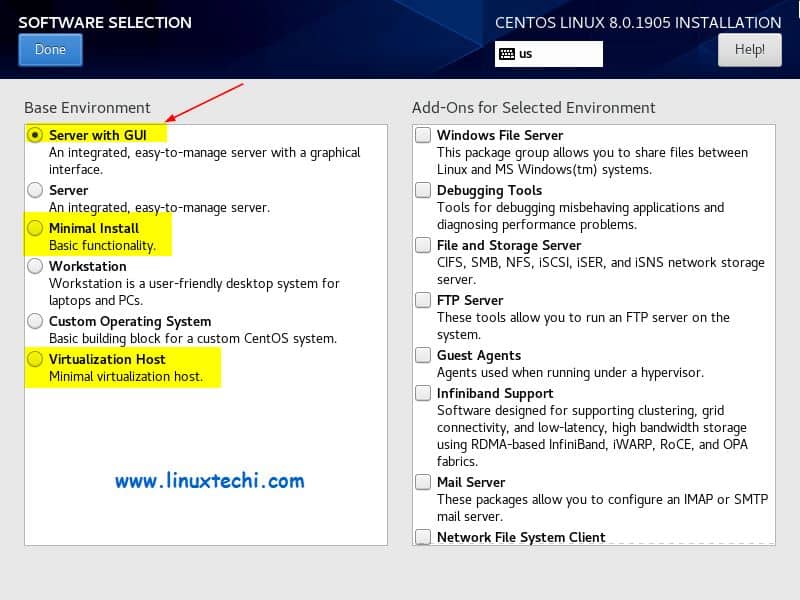
In this tutorial we will go with “Server with GUI” option, click on Done
Kdump is enabled by default, if wish to disable it then click on its icon and disable it but it is strongly recommended one should enable kdump.
If you wish to configure networking during the installation, then click on “Network & Host Name”
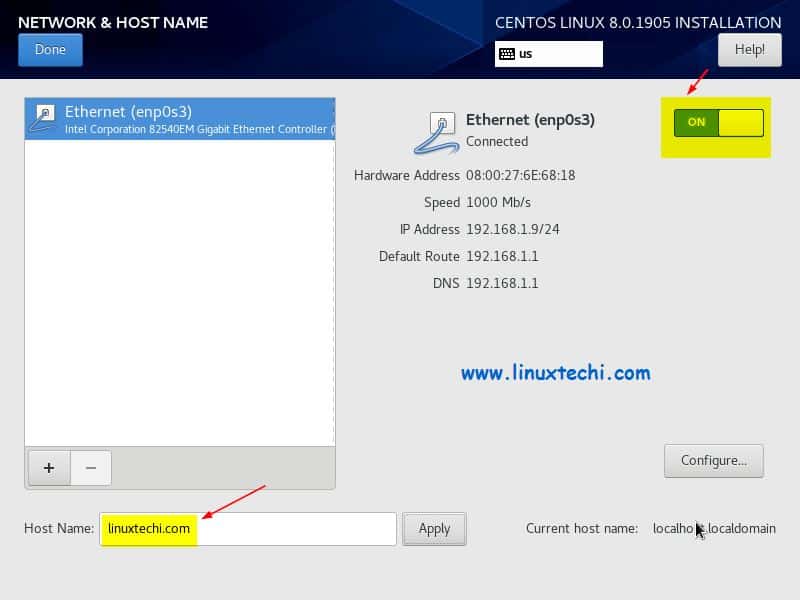
In case your system is connected to modem where DHCP is running then it will automatically pick the ip whenever we enable the interface and if you wish to configure the static ip then click on ‘Configure‘ and specify IP details there and apart from this we have also set host name as “linuxtechi.com“.
Once you are done with network changes, click on Done,
Now finally configure ‘Installation Destination‘, in this step we will specify on which disk we will install CentOS 8 and what would be its partition scheme.
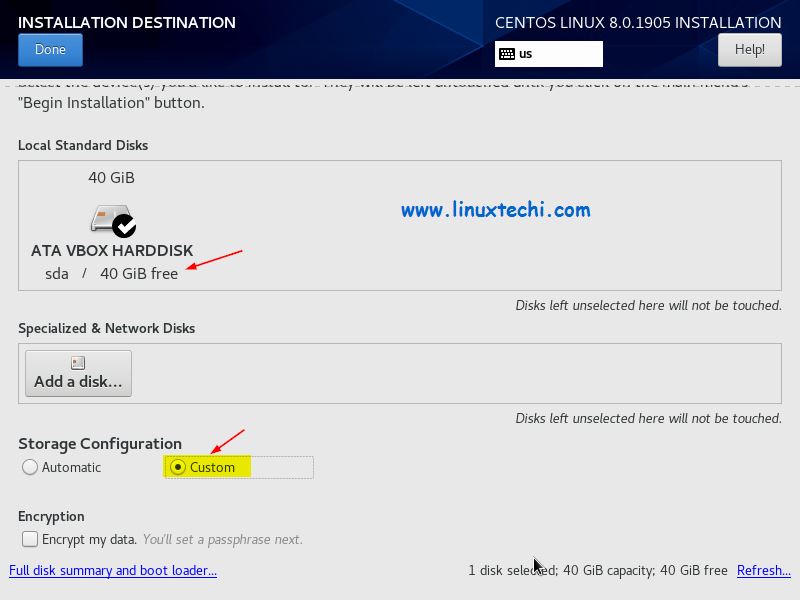
Click on Done
As we can see I have 40 GB disk space for CentOS 8 installation, here we have two options to create partition scheme, if you want installer to create automatic partition on 40 GB disk space then choose “Automatic” from Storage Configuration and if you want to create partitions manually then choose “Custom” option.
In this tutorial I will create custom partitions by choosing “Custom” option. I will create following LVM based partitions,
- /boot – 2 GB (ext4 file system)
- / – 12 GB (xfs file system)
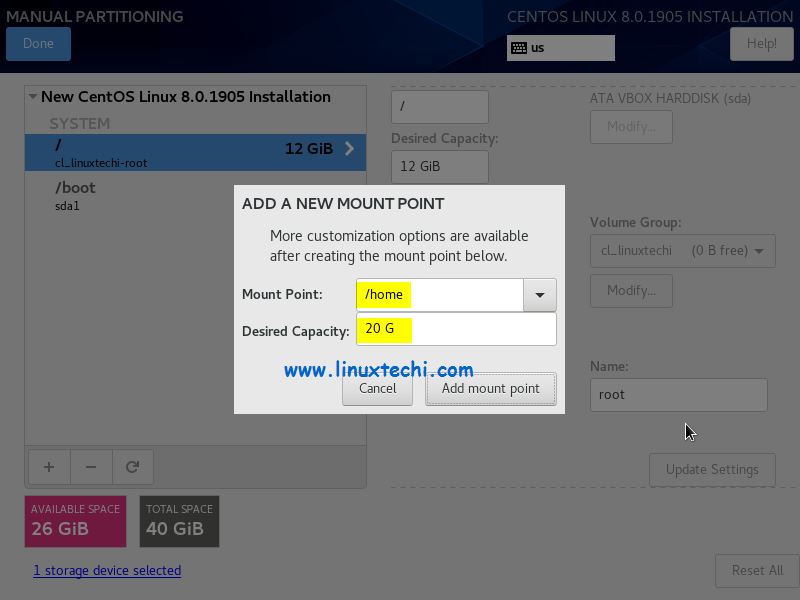
- /home – 20 GB (xfs file system)
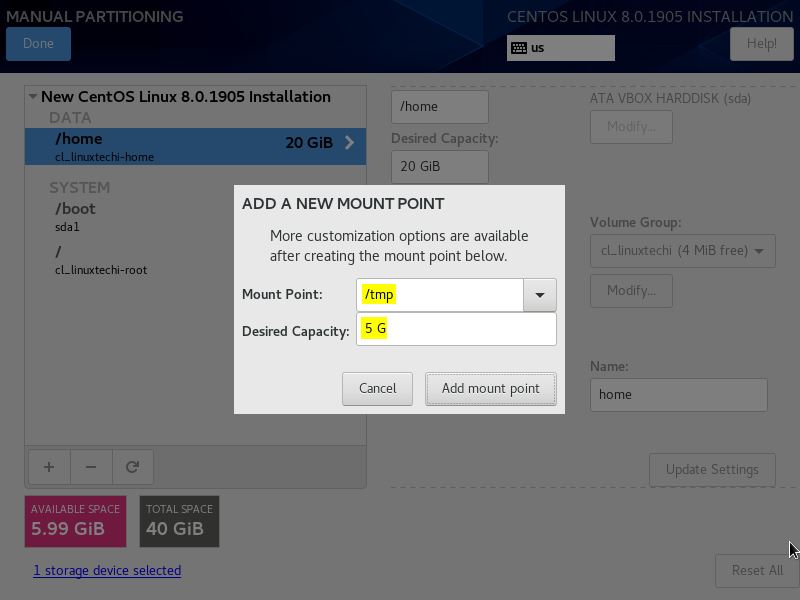
- /tmp – 5 GB (xfs file system)
- Swap – 1 GB
First create /boot as standard partition of size 2 GB, steps are shown below,
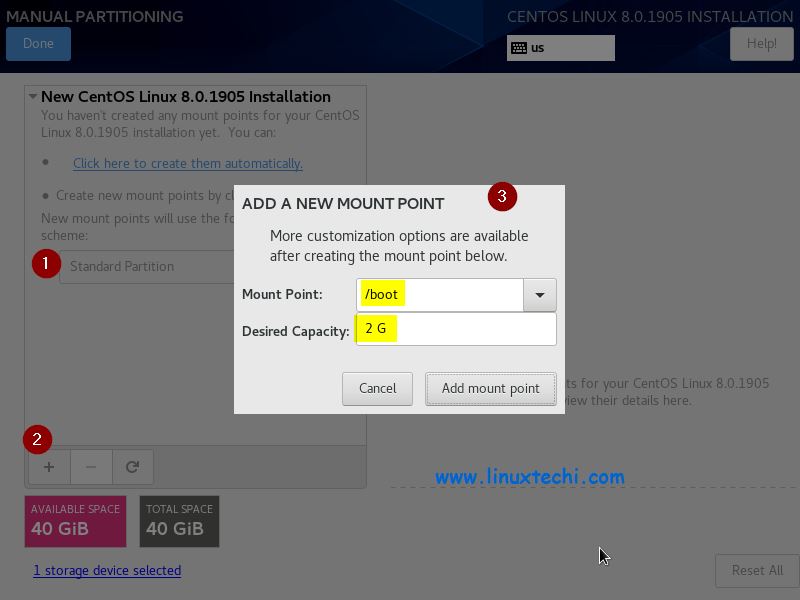
Click on “Add mount point”
Create second partition as / of size 12 GB on LVM, click on ‘+’ symbol and specify mount point and size and then click on “Add mount point”
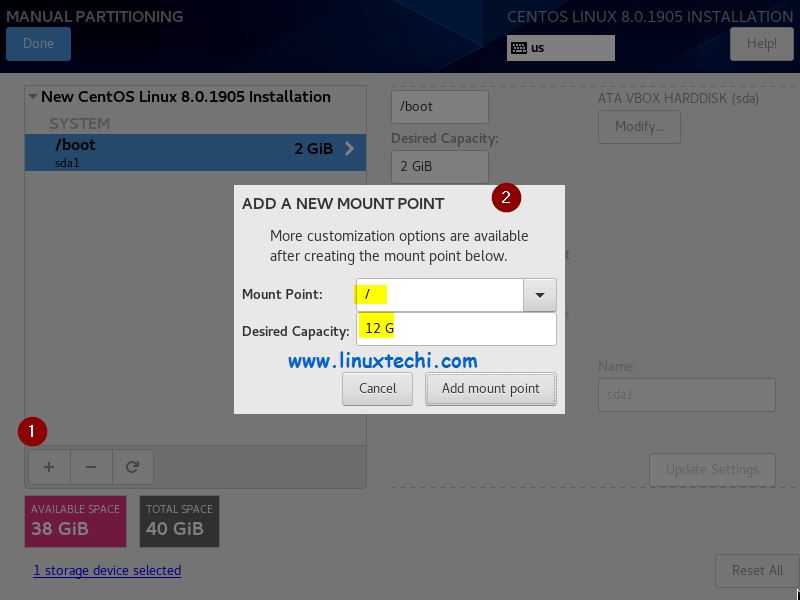
In next screen change Partition Type from standard to LVM for / partition and click on update settings
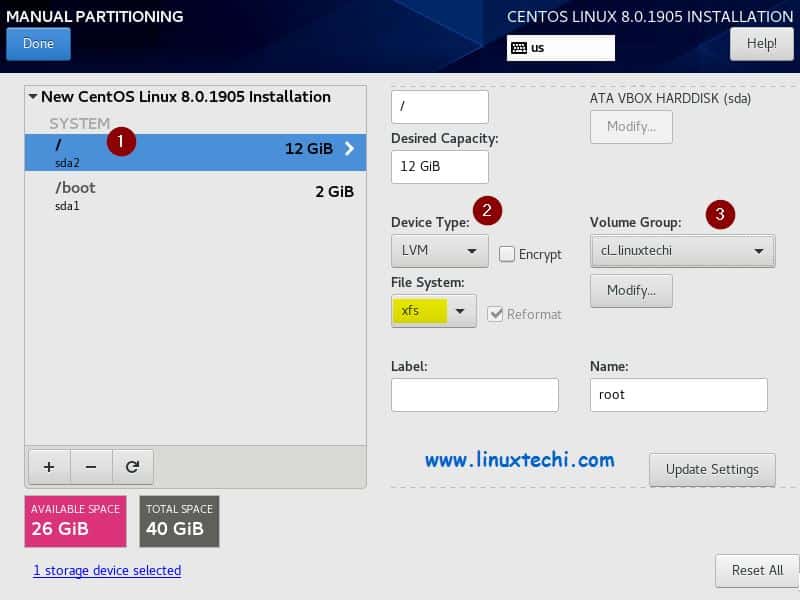
As we can see above, installer has automatically created a volume group, if want to change the name of that volume group then click on “Modify” option from “Volume Group” Tab
Similarly create next partitions as /home and /tmp of size 20 GB and 5 GB respectively and also change their partition type from standard to LVM,
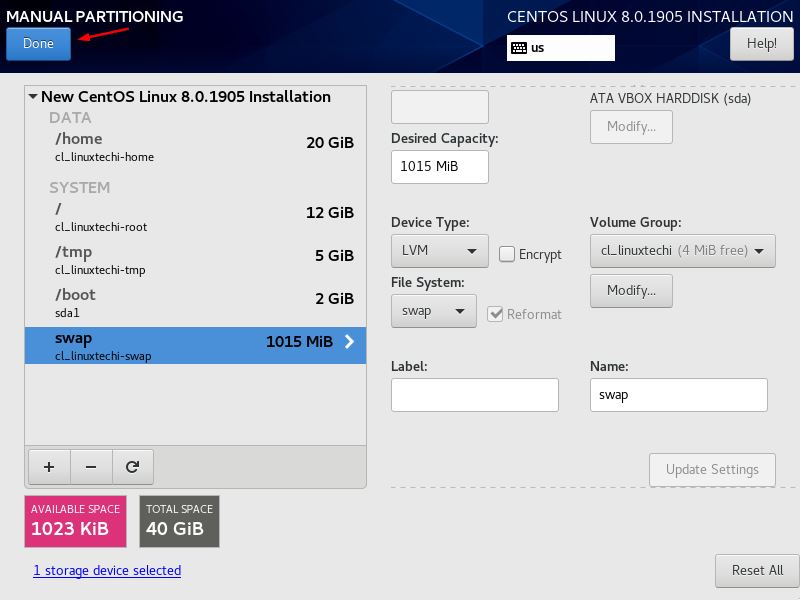
Finally create swap partition,
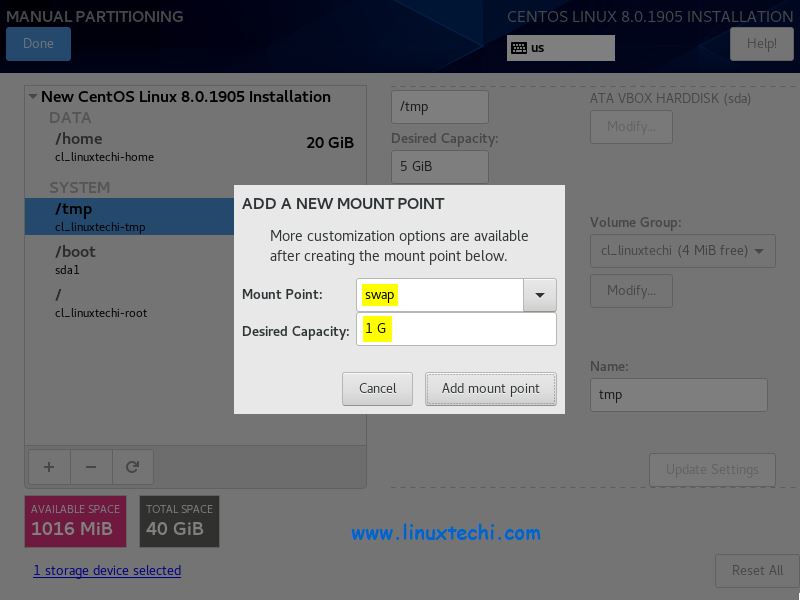
Click on “Add mount point”
Once you are done with all partition creations then click on Done,
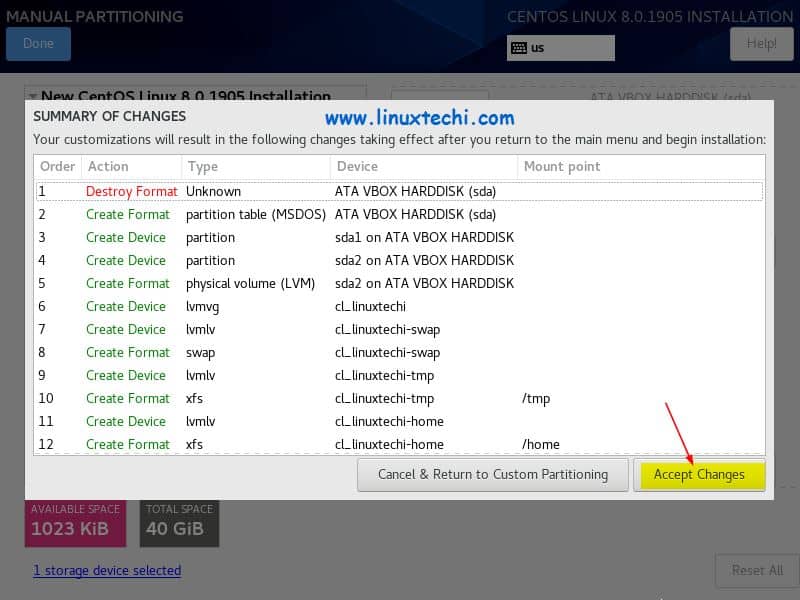
In the next window, click on “Accept changes“, it will write the changes to disk,
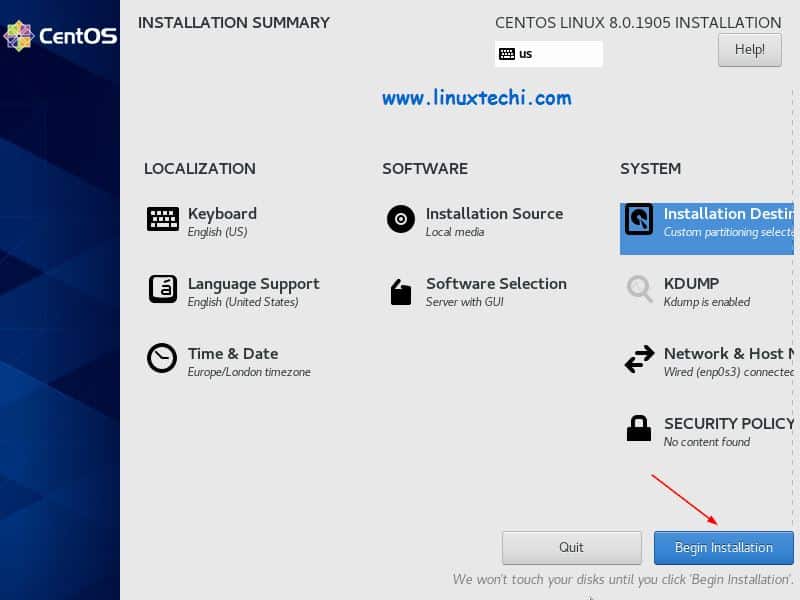
Step:6) Choose “Begin Installation”
Once we Accept the changes in above window then we will move back to installation summary screen, there click on “Begin Installation” to start the installation
Below screen confirms that installation has been started,
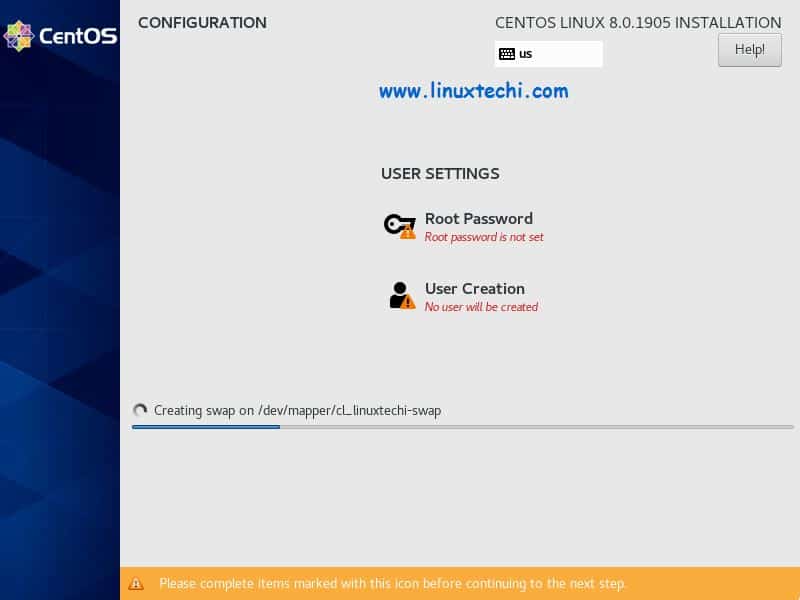
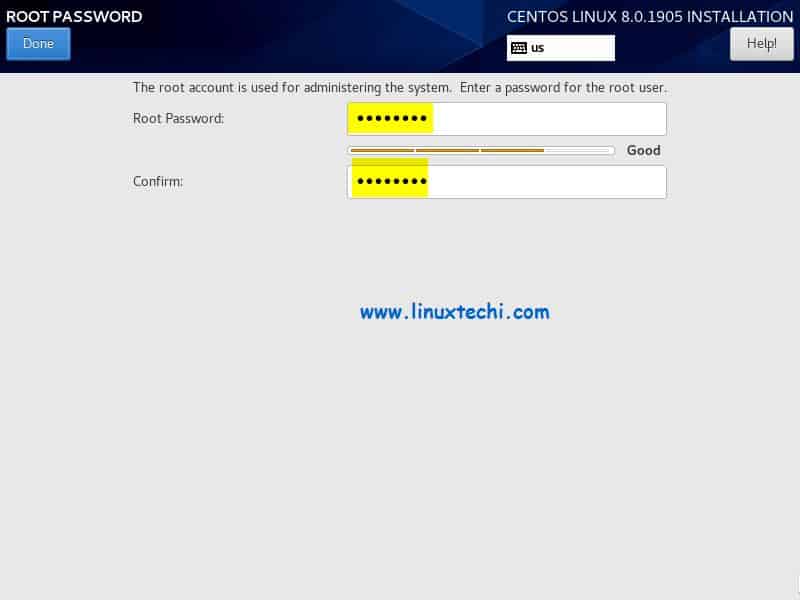
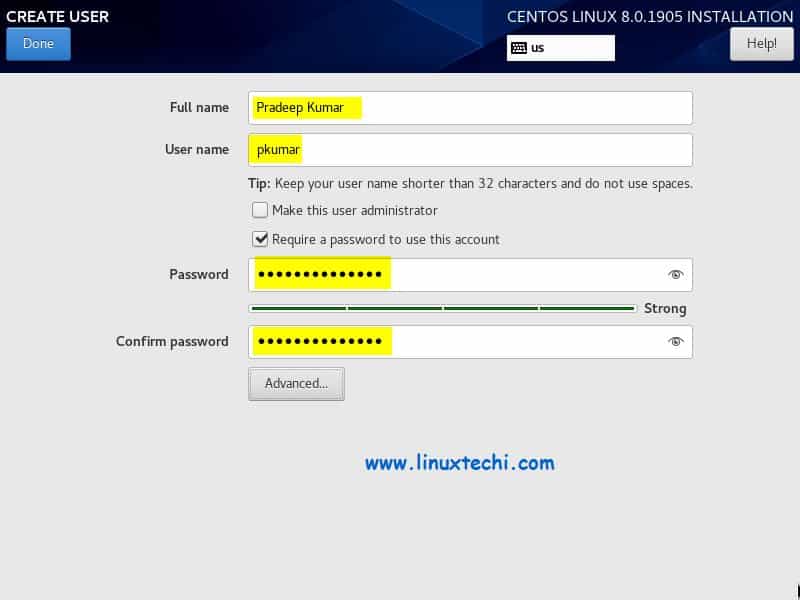
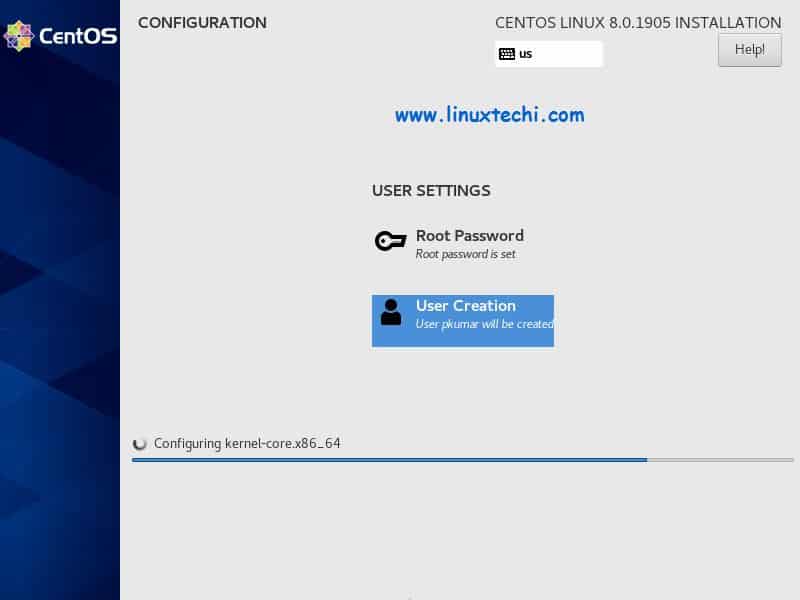
To set root password, click on “Root Password” option and then specify the password string and Click on “User creation” option to create a local user
Local User details,
Installation is progress and once it is completed, installer will prompt us to reboot the system
Step:7) Installation Completed and reboot system
Once the installation is completed, reboot your system, Click on Reboot
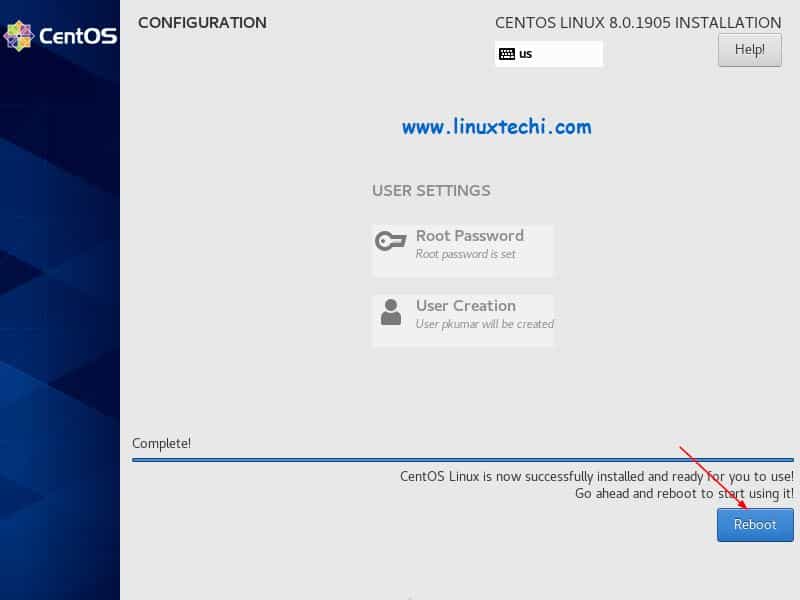
Note: After the reboot, don’t forget to remove the installation media and set the boot medium as disk from bios.
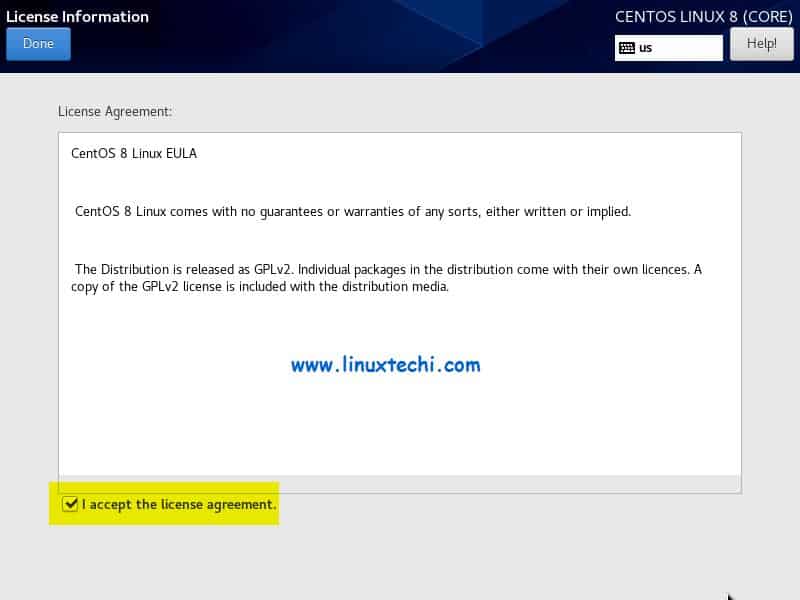
Step:8) Boot newly installed CentOS 8 and Accept License
From the grub menu, select the first option to boot CentOS 8,
Accept CentOS 8 License and then click on Done,
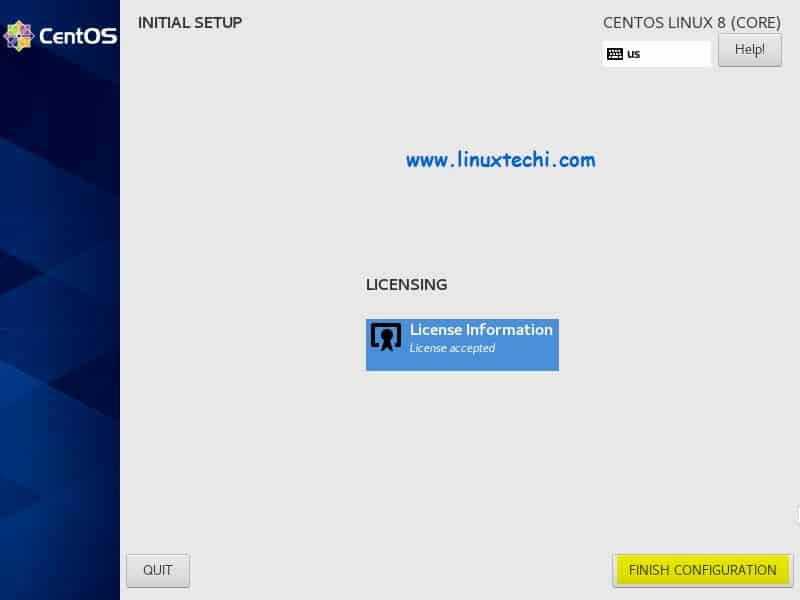
In the next screen, click on “Finish Configuration”
Step:9) Login Screen after finishing the configuration
We will get the following login screen after accepting CentOS 8 license and finishing the configuration
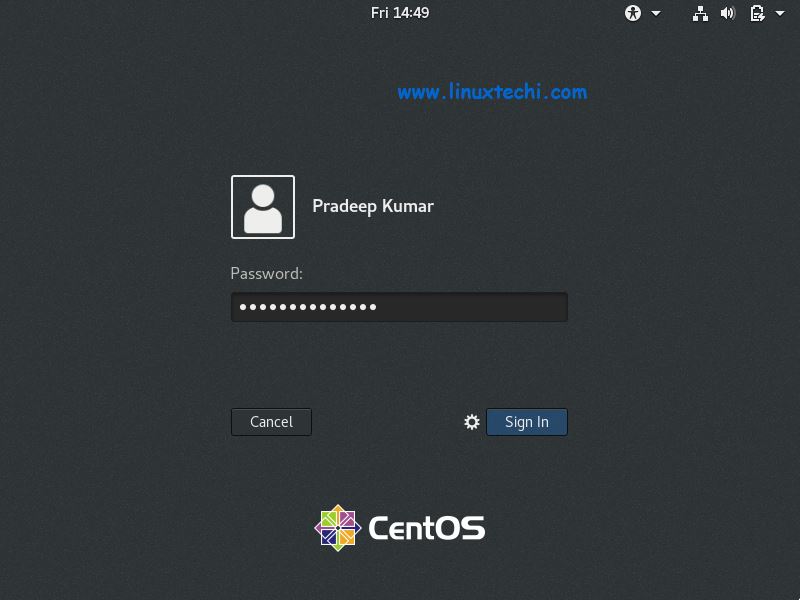
Use the same credentials of the user that you created during the installation. Follow the screen instructions and then finally we will get the following screen,

Click on “Start Using CentOS Linux”
That’s all from this tutorial, this confirms we have successfully installed CentOS 8. Please do share your valuable feedback and comments.
Read More : How to Install and Use Cockpit on CentOS 8 / RHEL 8
Also Read : Top 7 Security Hardening Tips for CentOS 8 / RHEL 8 Server
Swap partition type is not xfs/ext{2,3,4} but just swap.
Hi Abrar,
Thank you for pointing out the typo, i have corrected it now.
What about guest addition installation for CentOS 8 guest in host Mac OS?
Hi Thanks for this. Helped a lot. I had been fighting the whole automatic partioning setup. I think this has solved it. I am in the process of installing again (I hate to say how many). I have a 400GB drive in an old mac that I am going to be loading with a lot of pdfs to be served up. I used your method and expanded it to a 400 GB scheme…. Hopefully it works. I really don’t understand how or why the automatic partioning leaves the bulk of the 400 GB as unavailable free space… oh well. I watch you on YouTube….. always interesting although a little beyond me most of the time. Also did folding@home for a few months but had to stop about a week ago
how to create a partitioning the disk after installation of centos8.2
After the CentOS 8.x installation, you can use fdisk or parted utility to create partition on new disks.
Pradeep, many thanks for a great tutorial. Much appreciated.