How to Launch an Instance from OpenStack Horizon Dashboard

To Launch an instance from OpenStack Horizon dashboard, first we need to finish following steps :

  • Create a Project and add a member to the Project.
  • Create a Image and Flavor
  • Create a Network and Router for a Project.

In my Case i will use Project Name as “Innovation” and linuxtechi as Project Member of Innovation.

  • Internal Network = 10.10.10.0/24
  • External Network or Floating IP Network = 192.168.1.0/24
  • Gateway of External Network = 192.168.1.1

Create a Project and add a member to the Project.

Login to the dashboard using Admin credentials and Go to Identity Tab –> Projects and Click on Create Project.
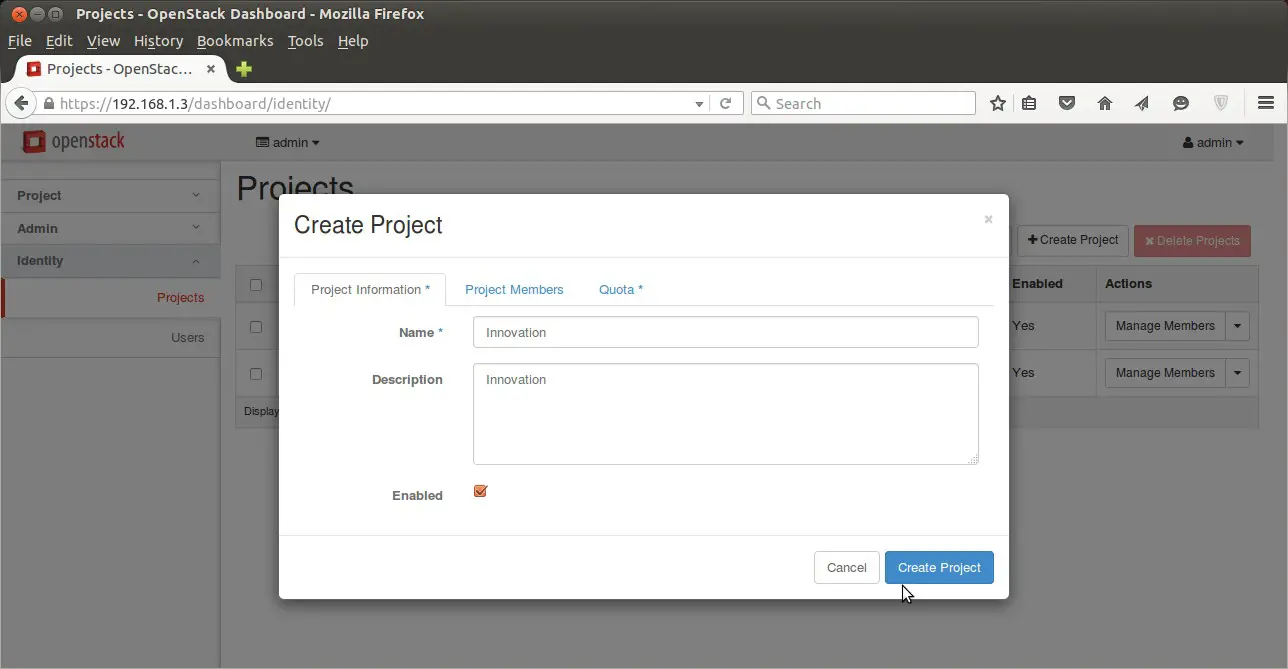
Create-Projects-OpenStack-Dashboard

Click on “Create Project” , We can also set the Quota for the project from Quota Tab.

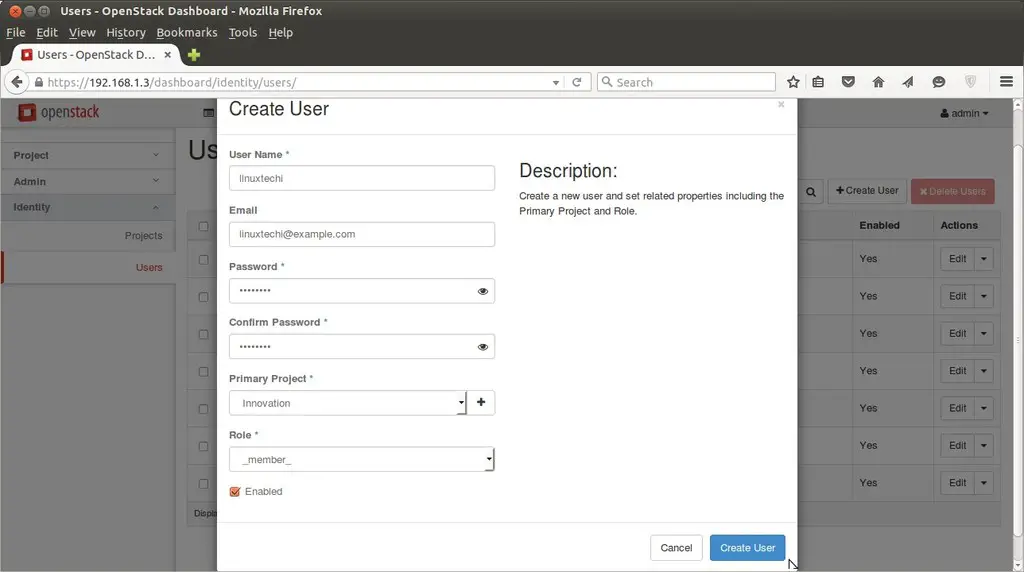
To create Users , Go to Identify Tab–> Users–> Click on ‘Create User’

In my case i have specify the followings :

  • User Name = linuxtechi
  • email = [email protected]
  • password = xxxxxx
  • Primary Project = innovation
  • Role = member

Create-Users-OpenStack-Dashboard

Create a flavor and image :

To create a flavor login in dashboard using admin credentials , Go to Admin Tab –> Flavors –> Click on create Flavor.
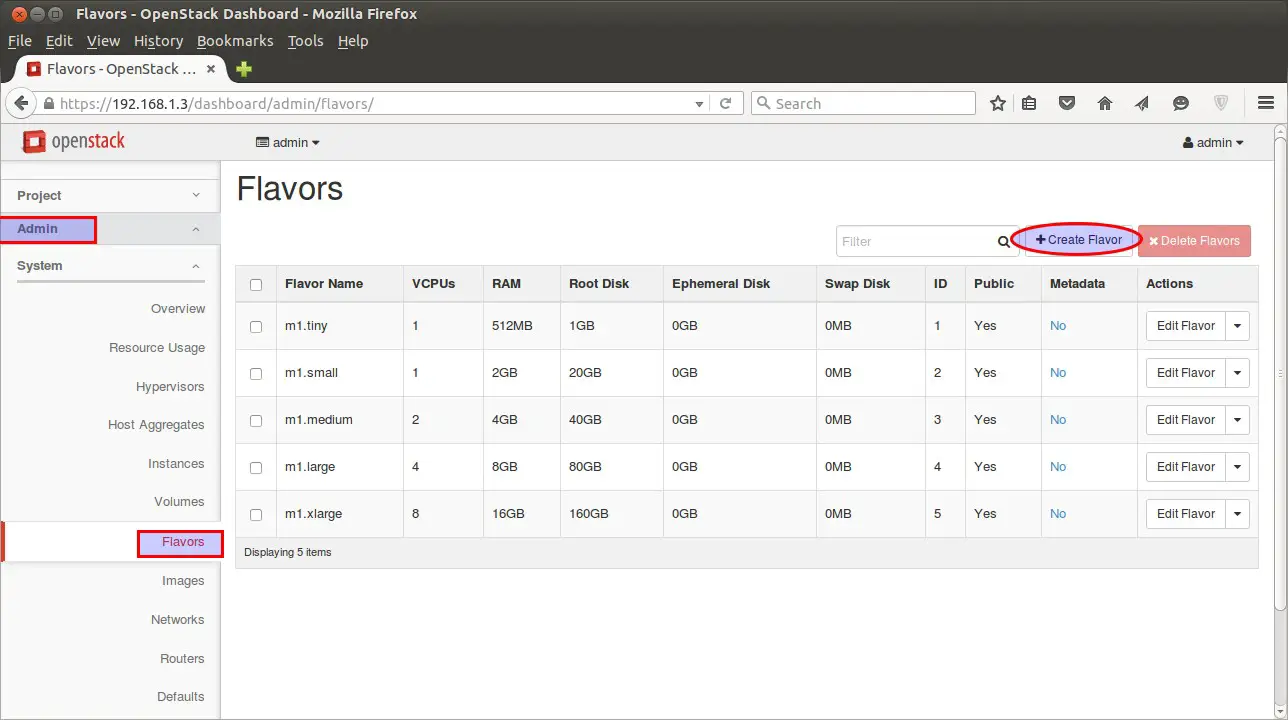
Flavors-OpenStack-Dashboard

Specify the Flavor Name (fedora.small) , VCPU , Root Disk , Ephemeral Disk & Swap disk.
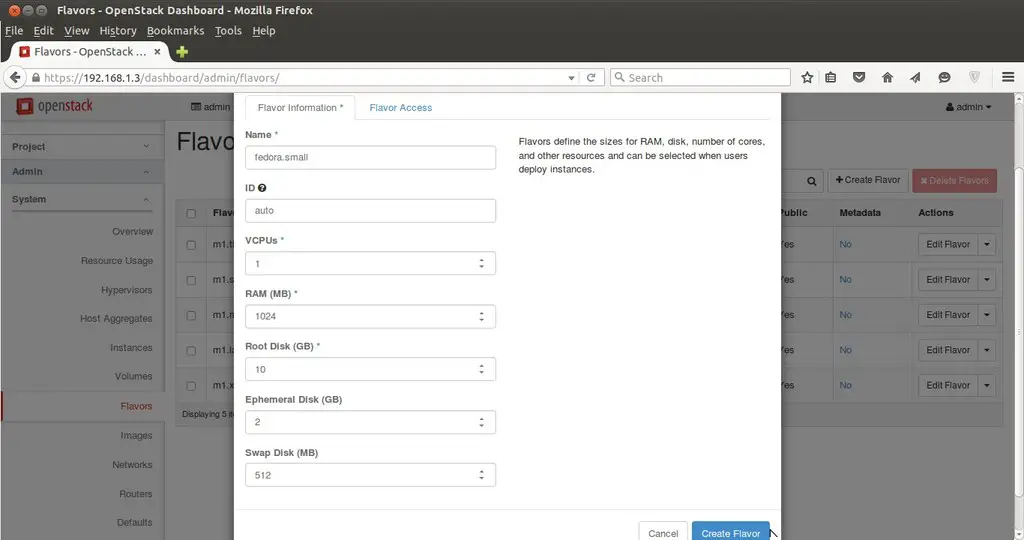
Create-Flavors-OpenStack-Dashboard

To Create Image , Go to Admin Tab –> Images—> Click on Create Image.

Specify the Image Name , Description, Image Soure ( in my case i am using Image File as i have already downloaded the Fedora 23 Cloud Image ) , Format QCOW2
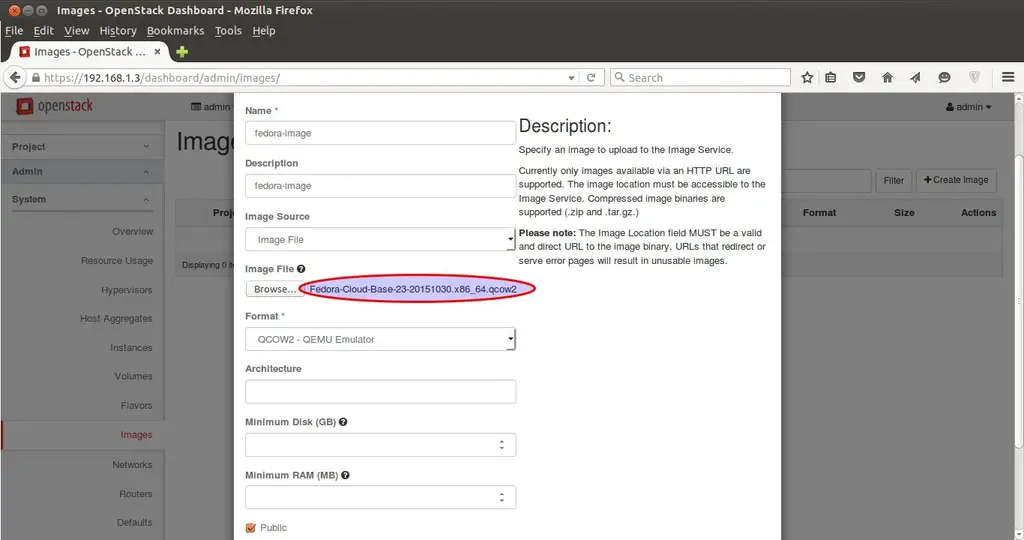
Create-Images-OpenStack Dashboard

Create Network and Router for Project Innovation.

To create Network and router for Innovation project sign out of admin user and login as “linuxtechi” user in dashboard.

Go to the Network Tab —> Click on Networks —> then Click on Create Network

Specify the Network Name as Internal
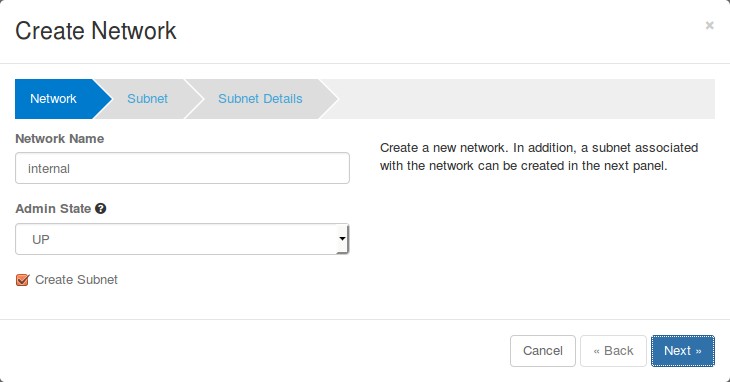
internal-network-name-openstack

click on Next..

Specify the Subnet name (sub-internal) and Network Address (10.10.0.0/24)
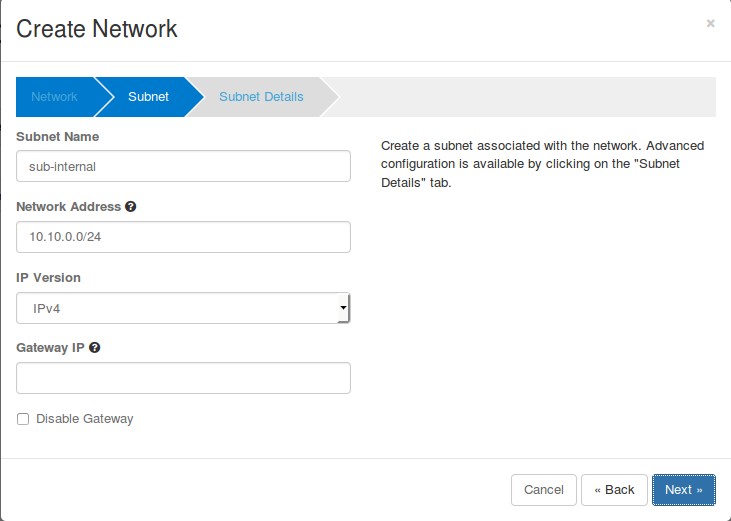
internal-subnet-name-openstack

Click on Next..

click-create-internal-network-openstack

VMs will be getting internal ip from DHCP Server because we enable DHCP option for internal network.

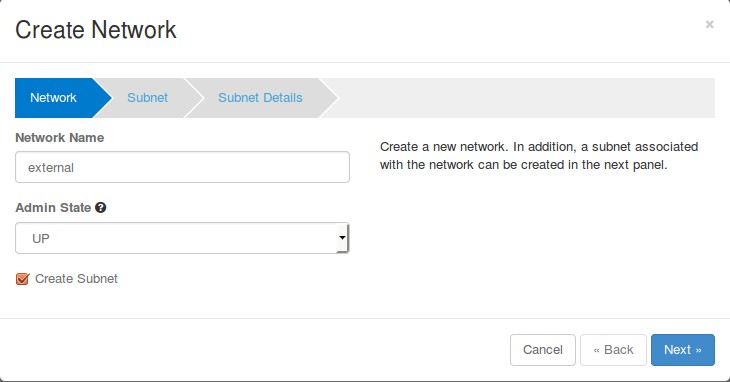
Now Create External Network . Click on “Create Network” again , Specify Network Name as “external

external-network-openstack-dashboard

Click on Next…

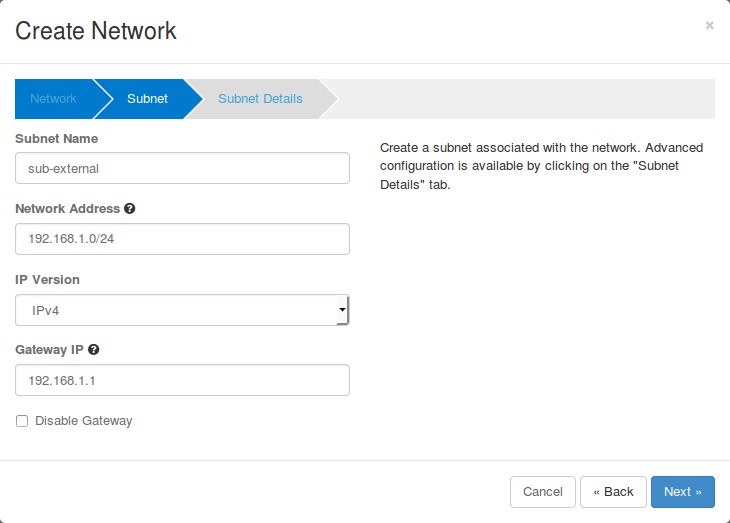
Specify subnet Name as “sub-external” & Network Address as “192.168.1.0/24

subnet-name-external-name-openstack

Click on Next

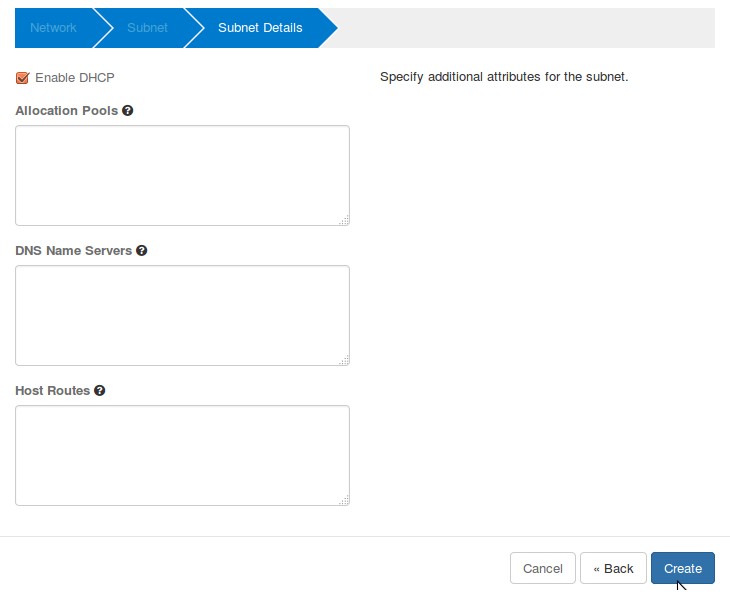
Untick  “Enable DHCP” option and Specify the ip address pool for external network.
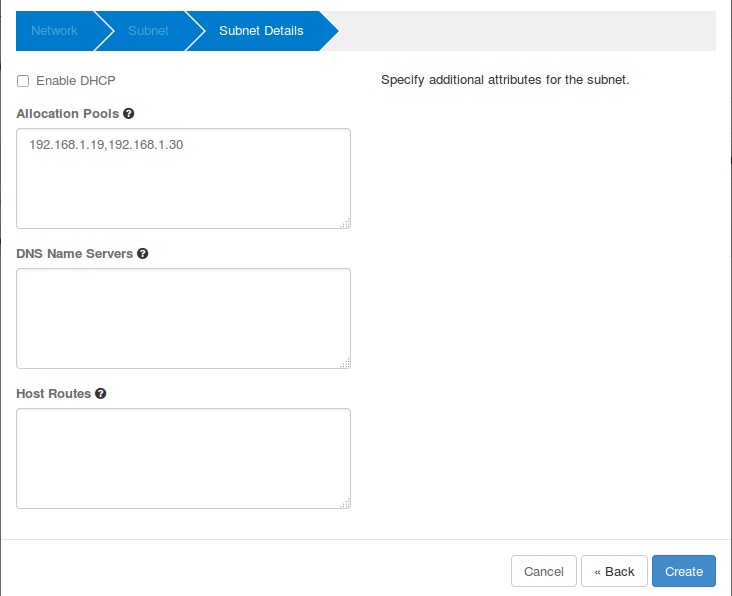
ipaddress-pool-external-network-openstack

Click on Create.

Now time to create a Router.

Go To Network Tab –> Routers –> Click on ‘+ Create Router’
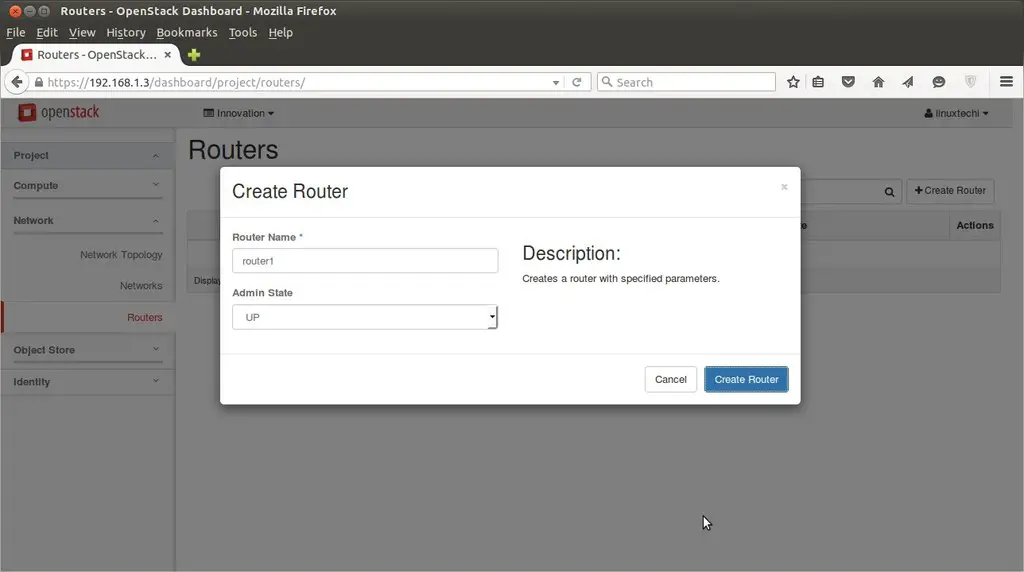
create-router-openstack

Now Mark External network as “External” , this task can be completed only from admin user , so logout from linuxtechi user and login as admin.

Go to Admin Tab —> Networks–> Click on Edit Network for “External”
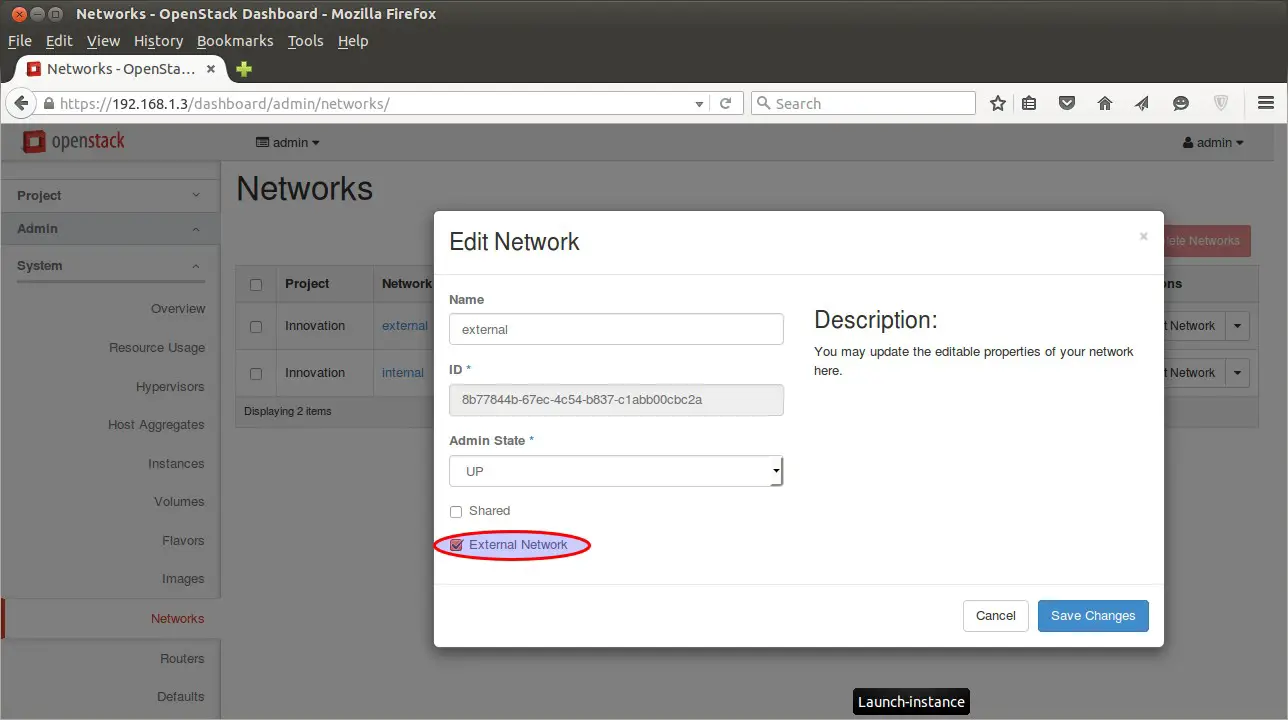
Set-External-Networks-OpenStack-Dashboard

Click on Save Changes

Now Logout from admin user and login as linuxtechi user.

Go to Network Tab —> Routers –> for Router1 click on “Set Gateway”
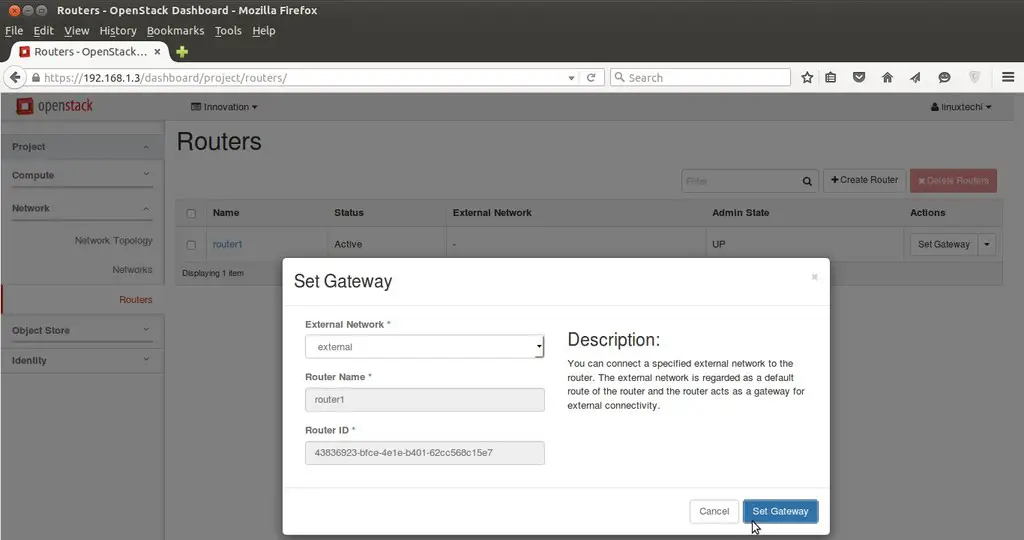
Set-Gateway-Router-OpenStack-Dashboard

Click on “Set Gateway” , this will add a interface on router and will assign the first ip of external subnet (192.168.1.0/24).

Add internal interface to router as well , Click on the “router1″ and select on “interfaces” and then click on “Add interface”
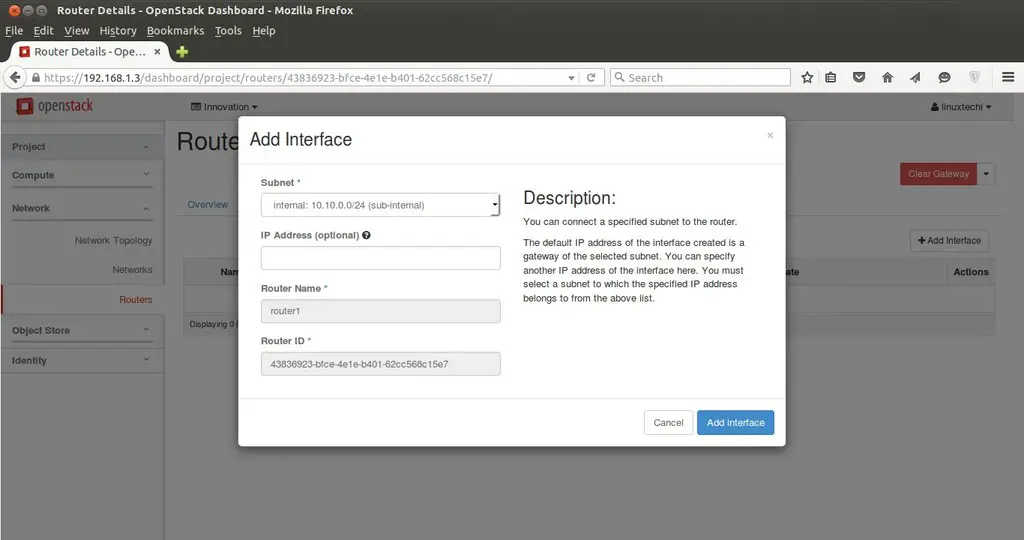
Add-internal-interface-router-OpenStack-Dashboard

Click on Add interface.

Network Part is completed Now & we can view Network Topology from “Network Topology” Tab
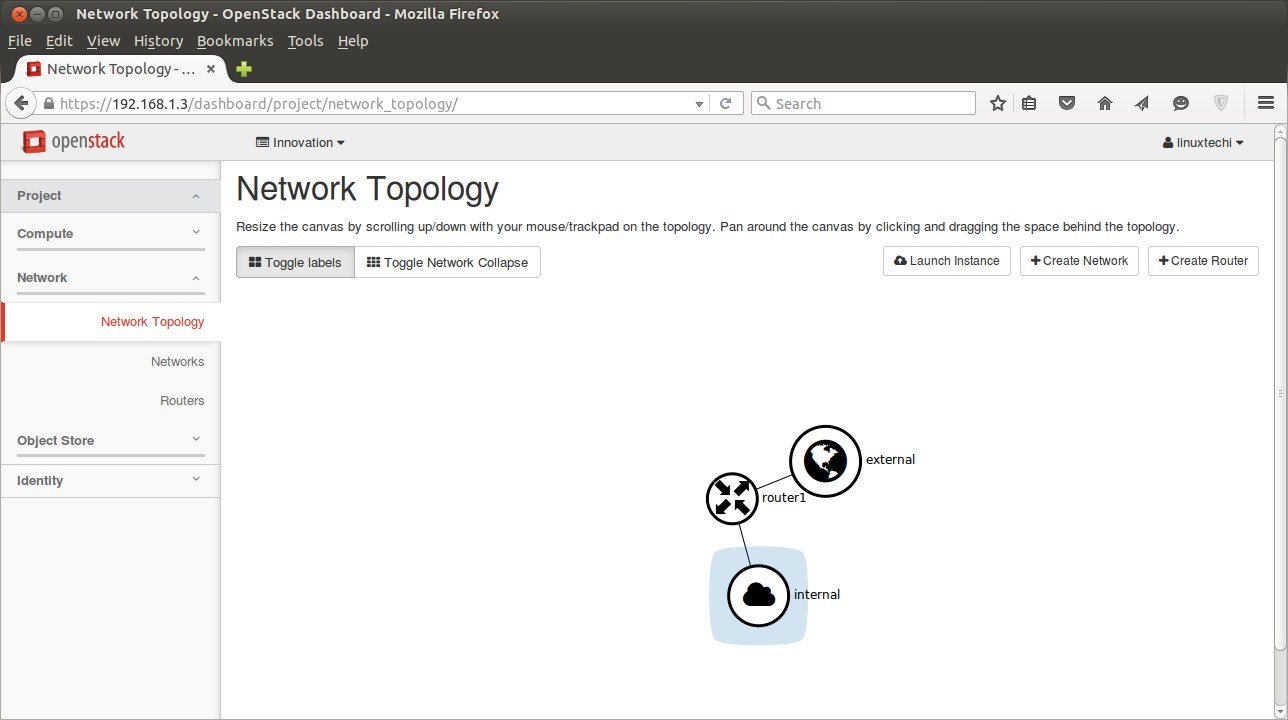
Network-Topology-OpenStack-Dashboard

Now Create a key pair that will be used for accessing the VM and define the Security firewall rules.

For creating a key pair

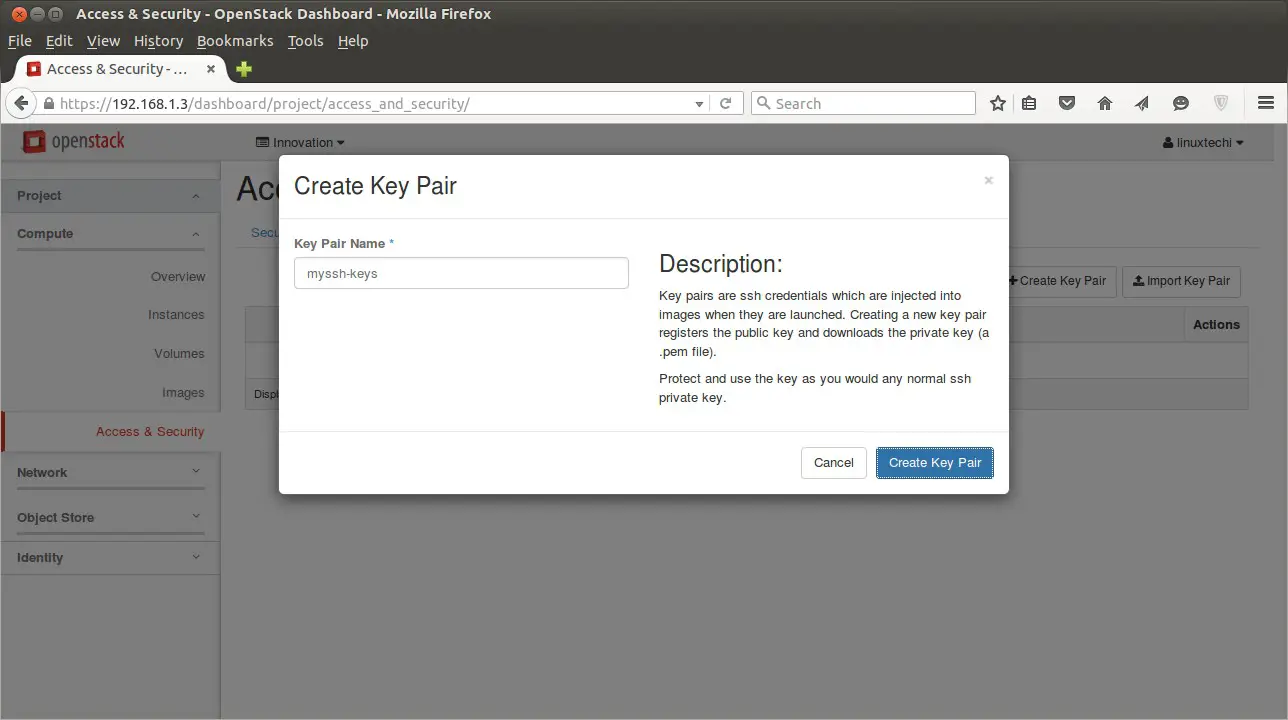
Go to ‘Access & Security’  Tab —> Click on Key Pairs –> then click on ‘Create Key Pair

Access-security-OpenStack-Dashboard

It will create a Key pair with name “myssh-keys.pem

Add a new Security Group with name ‘fedora-rules’ from Access & Security Tab. Allow 22 and ICMP from Internet ( 0.0.0.0 ).
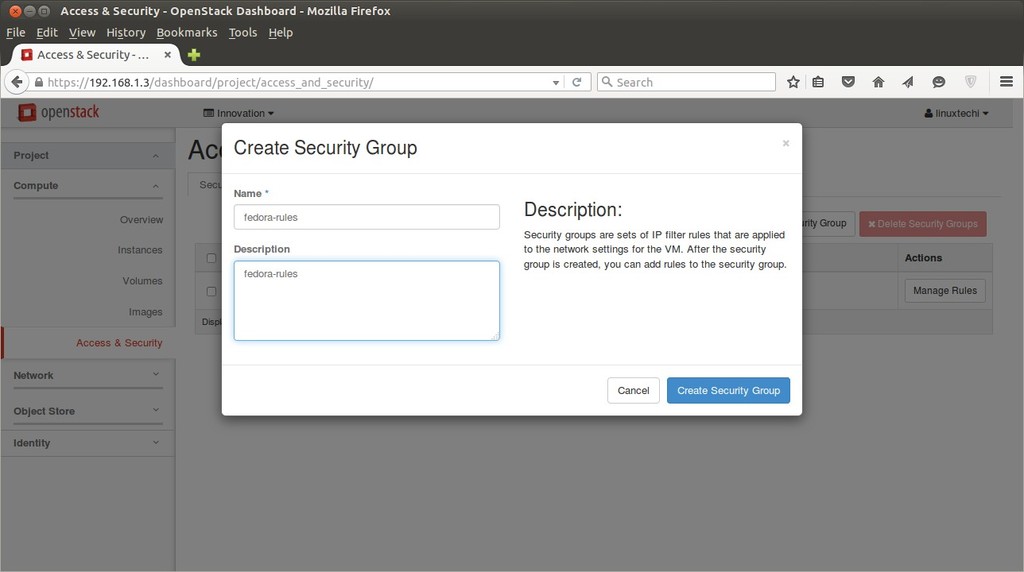
Security-Group-OpenStack-Dashboard

Once the Security Group ‘fedora-rules’ created , click on Manage Rules and allow 22 & ICMP ping.
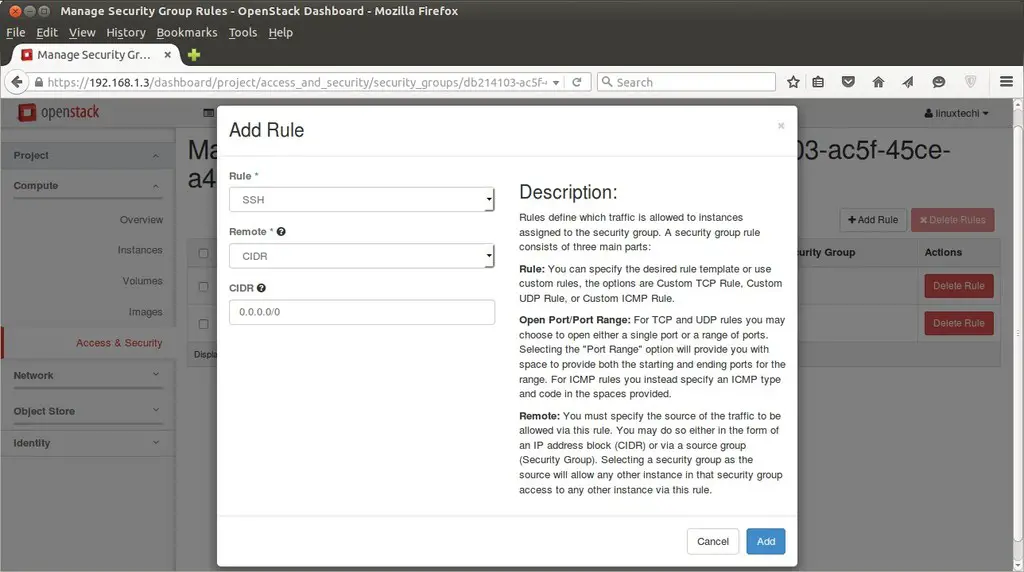
Manage-Security-Group-Rules-OpenStack Dashboard

Click on Add , Similarly add a rule for ICMP.

Now Finally it’s time to Launch an instance.

Go to Compute Tab –> Click on Instances –> then click on ‘Launch Instance’
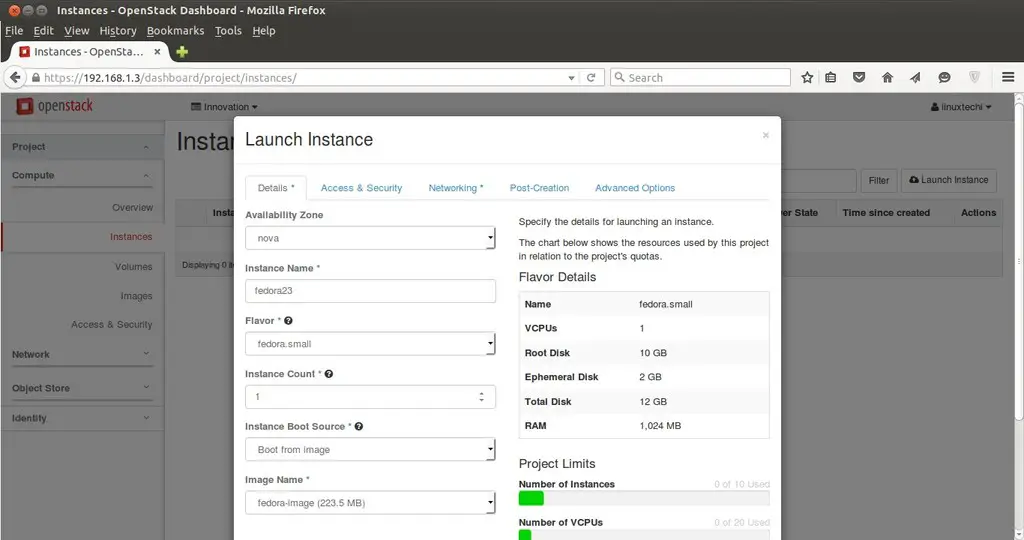
Instances-Details-OpenStack-Dashboard

Specify the Instance Name , Flavor that we created in above steps and ‘Boot from image’ from Instance Boot Source option and Select Image Name ‘fedora-image’.

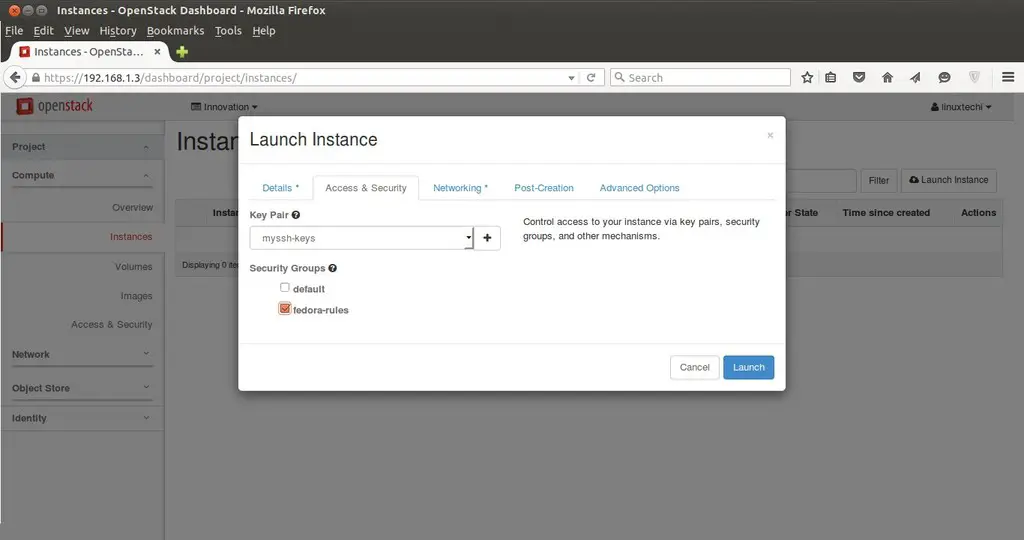
Click on ‘Access & Security’ and Select the Security Group ‘fedora-rules’ & Key Pair ”myssh-keys

Instances-Security-group-keypair-OpenStack-Dashboard

Now Select Networking and add ‘Internal’ Network and the Click on Launch ….
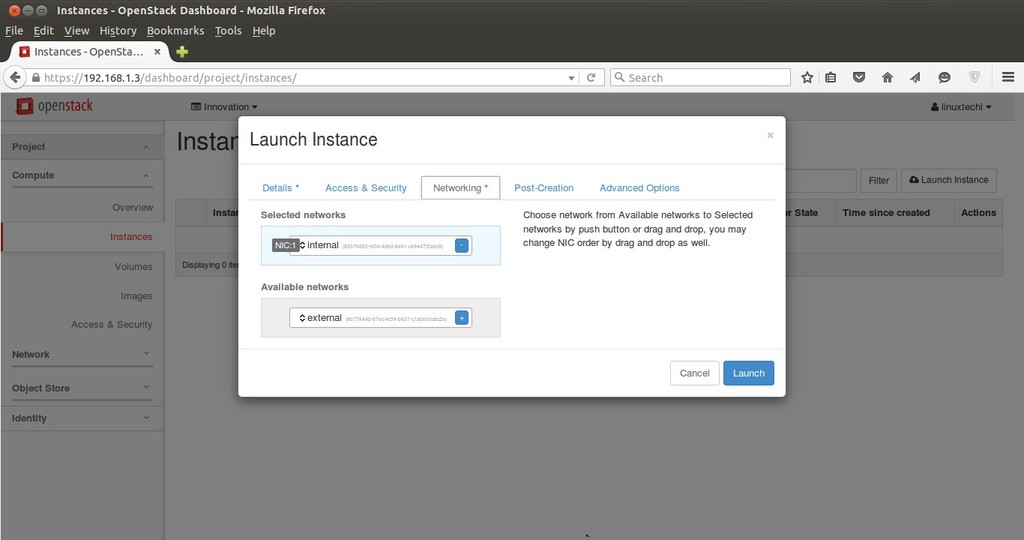
Instances-Network-OpenStack-Dashboard

Once the VM is launched , Associate a floating ip so that we can access the VM.
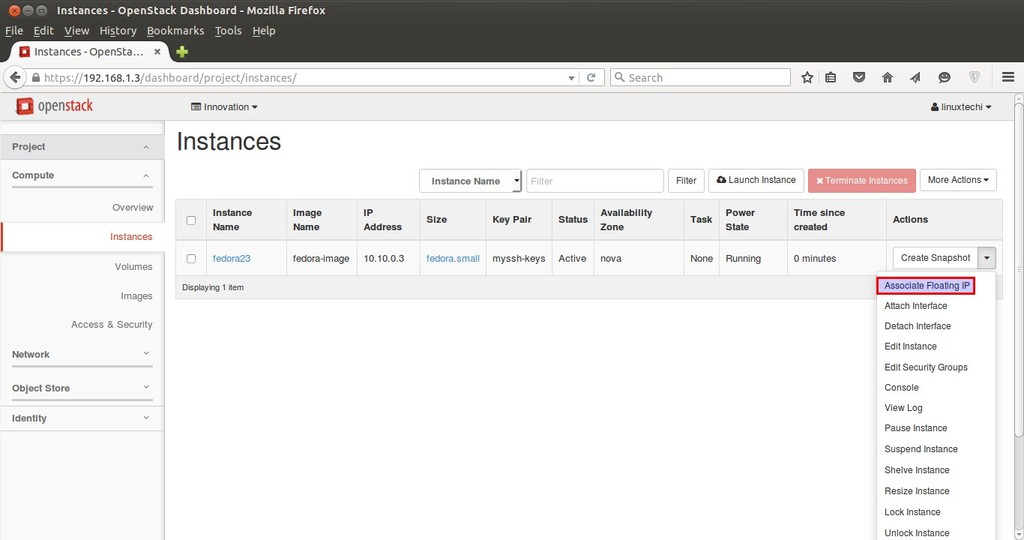
Associate-floating-ip-Instances-OpenStack-Dashboard

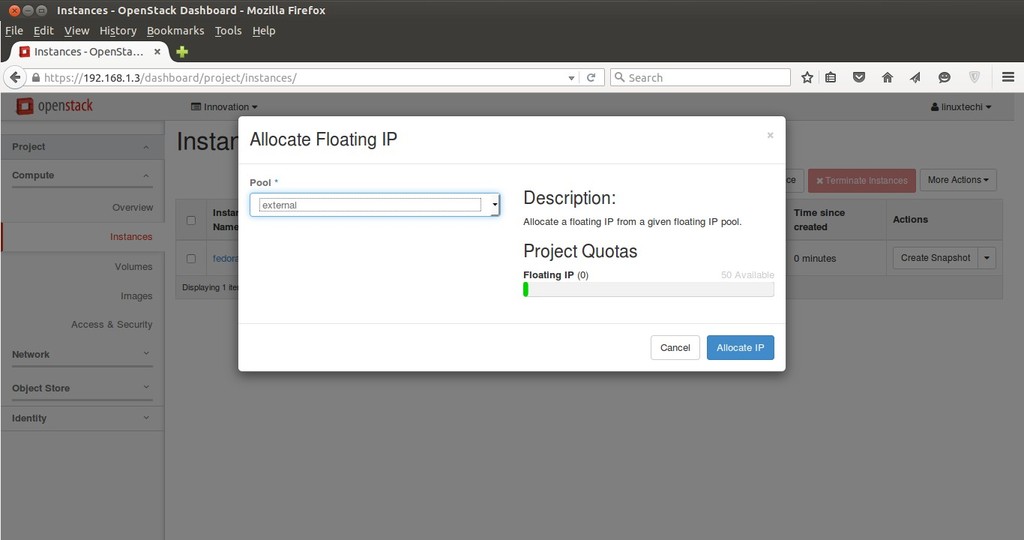
Click on ‘Associate Floating IP

Allocating-floating-OpenStack Dashboard

Click on Allocate IP.

Associate-floating-ip-instance-OpenStack-Dashboard

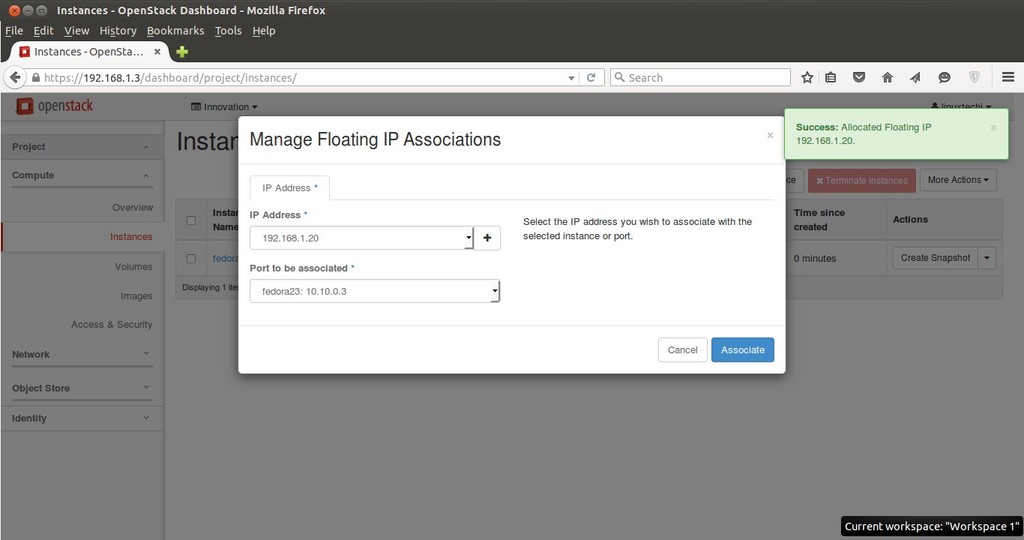
Click on Associate

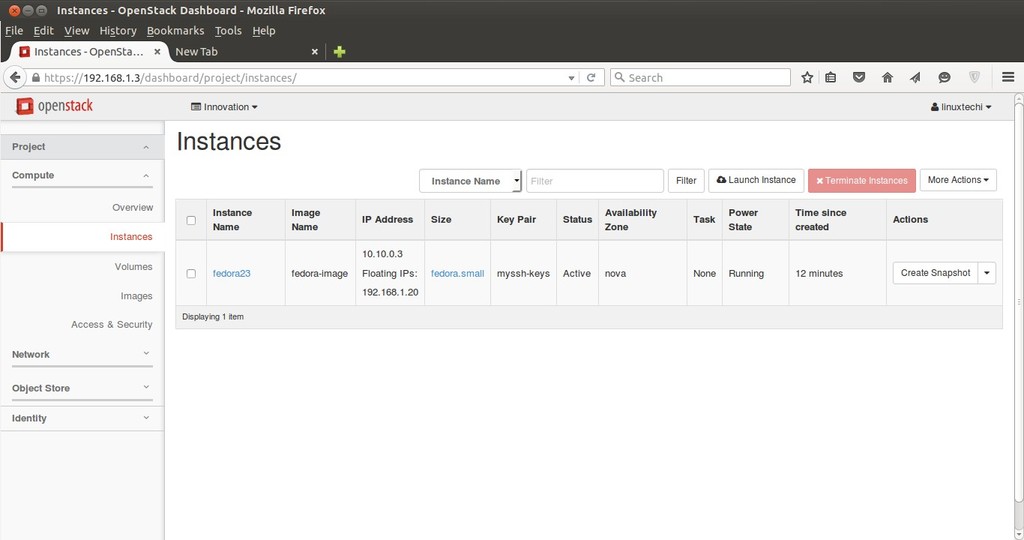
Instances-internal-floating-OpenStack-Dashboard

Now try to access the VM with floating IP ( 192.168.1.20) using keys.

Access-openstack-instance-using-keys

As we can see above that we are able to access the VM using keys. Our task of launching a VM from Dashboard is Completed Now.

Hope you like steps and do not hesitate to share this article.

23 thoughts on “How to Launch an Instance from OpenStack Horizon Dashboard”

  1. Dear Pradeep,
    Thanks for providing such a wonderful step by step guide for bringing up instance. Have tried to bring up the same fedora image provided here with virtual box. My virtual box has interface with ip 192.168.56.103 and dashboard is being accessed using this ip inside virtual box.

    Now, I brought up the instance by following the steps mentioned and my instance associated floating ip which is allocated from the external pool as 192.168.56.51.

    When I tried to ssh 192.168.56.51, getting no route to host error.

    stack@ubuntuNewWilly:~$ ssh -i myssh-keys.pem 192.168.56.51 -l fedora
    ssh: connect to host 192.168.56.51 port 22: No route to host
    stack@ubuntuNewWilly:~$

    List of interface in the system:
    ——————————–
    stack@ubuntuNewWilly:~$ ifconfig
    br-ex Link encap:Ethernet HWaddr 26:69:31:53:f7:4b
    inet addr:192.168.56.1 Bcast:0.0.0.0 Mask:255.255.255.0
    inet6 addr: 2001:db8::2/64 Scope:Global
    inet6 addr: fe80::2469:31ff:fe53:f74b/64 Scope:Link
    UP BROADCAST RUNNING MULTICAST MTU:1500 Metric:1
    RX packets:36 errors:0 dropped:2 overruns:0 frame:0
    TX packets:157 errors:0 dropped:0 overruns:0 carrier:0
    collisions:0 txqueuelen:0
    RX bytes:2900 (2.9 KB) TX bytes:7374 (7.3 KB)

    enp0s3 Link encap:Ethernet HWaddr 08:00:27:1f:15:b0
    inet addr:10.0.2.15 Bcast:10.0.2.255 Mask:255.255.255.0
    inet6 addr: fe80::a00:27ff:fe1f:15b0/64 Scope:Link
    UP BROADCAST RUNNING MULTICAST MTU:1500 Metric:1
    RX packets:1817138 errors:0 dropped:0 overruns:0 frame:0
    TX packets:444940 errors:0 dropped:0 overruns:0 carrier:0
    collisions:0 txqueuelen:1000
    RX bytes:2011689572 (2.0 GB) TX bytes:32372620 (32.3 MB)

    enp0s8 Link encap:Ethernet HWaddr 08:00:27:60:0c:84
    inet addr:192.168.56.103 Bcast:192.168.56.255 Mask:255.255.255.0
    inet6 addr: fe80::a00:27ff:fe60:c84/64 Scope:Link
    UP BROADCAST RUNNING MULTICAST MTU:1500 Metric:1
    RX packets:4575 errors:0 dropped:0 overruns:0 frame:0
    TX packets:123 errors:0 dropped:0 overruns:0 carrier:0
    collisions:0 txqueuelen:1000
    RX bytes:430030 (430.0 KB) TX bytes:15096 (15.0 KB)

    lo Link encap:Local Loopback
    inet addr:127.0.0.1 Mask:255.0.0.0
    inet6 addr: ::1/128 Scope:Host
    UP LOOPBACK RUNNING MTU:65536 Metric:1
    RX packets:1522434 errors:0 dropped:0 overruns:0 frame:0
    TX packets:1522434 errors:0 dropped:0 overruns:0 carrier:0
    collisions:0 txqueuelen:0
    RX bytes:1841120824 (1.8 GB) TX bytes:1841120824 (1.8 GB)

    qbre4cc1c39-a6 Link encap:Ethernet HWaddr a6:b3:d5:dd:c4:bb
    UP BROADCAST RUNNING MULTICAST MTU:1450 Metric:1
    RX packets:49 errors:0 dropped:0 overruns:0 frame:0
    TX packets:0 errors:0 dropped:0 overruns:0 carrier:0
    collisions:0 txqueuelen:0
    RX bytes:13056 (13.0 KB) TX bytes:0 (0.0 B)

    qvbe4cc1c39-a6 Link encap:Ethernet HWaddr a6:b3:d5:dd:c4:bb
    inet6 addr: fe80::a4b3:d5ff:fedd:c4bb/64 Scope:Link
    UP BROADCAST RUNNING PROMISC MULTICAST MTU:1450 Metric:1
    RX packets:7 errors:0 dropped:0 overruns:0 frame:0
    TX packets:52 errors:0 dropped:0 overruns:0 carrier:0
    collisions:0 txqueuelen:1000
    RX bytes:738 (738.0 B) TX bytes:14040 (14.0 KB)

    qvoe4cc1c39-a6 Link encap:Ethernet HWaddr 02:25:f0:17:cd:58
    inet6 addr: fe80::25:f0ff:fe17:cd58/64 Scope:Link
    UP BROADCAST RUNNING PROMISC MULTICAST MTU:1450 Metric:1
    RX packets:52 errors:0 dropped:0 overruns:0 frame:0
    TX packets:7 errors:0 dropped:0 overruns:0 carrier:0
    collisions:0 txqueuelen:1000
    RX bytes:14040 (14.0 KB) TX bytes:738 (738.0 B)

    tape4cc1c39-a6 Link encap:Ethernet HWaddr fe:16:3e:5f:71:5c
    inet6 addr: fe80::fc16:3eff:fe5f:715c/64 Scope:Link
    UP BROADCAST RUNNING MULTICAST MTU:1450 Metric:1
    RX packets:45 errors:0 dropped:0 overruns:0 frame:0
    TX packets:7 errors:0 dropped:0 overruns:0 carrier:0
    collisions:0 txqueuelen:500
    RX bytes:13302 (13.3 KB) TX bytes:738 (738.0 B)

    virbr0 Link encap:Ethernet HWaddr 52:54:00:cc:a6:ba
    inet addr:192.168.122.1 Bcast:192.168.122.255 Mask:255.255.255.0
    UP BROADCAST MULTICAST MTU:1500 Metric:1
    RX packets:0 errors:0 dropped:0 overruns:0 frame:0
    TX packets:0 errors:0 dropped:0 overruns:0 carrier:0
    collisions:0 txqueuelen:0
    RX bytes:0 (0.0 B) TX bytes:0 (0.0 B)

    stack@ubuntuNewWilly:~$

    Route table entries are:
    ————————-
    stack@ubuntuNewWilly:~$ route -n
    Kernel IP routing table
    Destination Gateway Genmask Flags Metric Ref Use Iface
    0.0.0.0 10.0.2.2 0.0.0.0 UG 0 0 0 enp0s3
    10.0.0.0 192.168.56.10 255.255.255.0 UG 0 0 0 enp0s8
    10.0.2.0 0.0.0.0 255.255.255.0 U 0 0 0 enp0s3
    192.168.56.0 0.0.0.0 255.255.255.0 U 0 0 0 enp0s8
    192.168.56.0 0.0.0.0 255.255.255.0 U 0 0 0 br-ex
    192.168.122.0 0.0.0.0 255.255.255.0 U 0 0 0 virbr0
    stack@ubuntuNewWilly:~$

    It would be great help if you provide any input on this.

    Thanks in Advance.

    Reply
    • Dear Pradeep,
      Thanks for your reply. I have not configured it, could you please give me a pointer on how to do it?
      I am using windows as host machine and guest as ubuntu wily server (Installed devstack on ubuntu server).

      Thanks for your help

      Reply
  2. Hello Pradeep,

    I have installed Openstack Mitaka using three nodes: Controller (IP Address: 192.168.100.62), Compute (IP Address: 192.168.100.63) and Networking Node (192.168.100.64).
    I have followed your website to do the installation and then network bridging. After successful installation I have followed above steps to create project, user, image, network and router. At last I have created an instance successfully.

    Internal network is configured as 10.10.10.0/24
    External network is configured as 192.168.100.0/34, Gateway IP is 192.168.100.1 and Allocation pool IP is 192.168.100.120, 192.168.100.125

    After creating instance, I am able to access the instance from the console on OpenStack Dashboard.

    Router External IP is listed as 192.168.100.120
    Instance External IP is listed as 192.168.100.121

    I have created security rules for SSH and ICMP but still I am not able to do SSH and ping the instance using the External IP (192.168.100.121)

    Please let me know if you need any other information.

    It would be great help if you provide any input on this. Please provide you email address if possible.

    Thanks in Advance.

    Regards,
    Vaibhav

    Reply
  3. Hi,

    Great post !!
    Congratulations.

    I follow this post for installing all-in-one Liberty on CentOs7.

    All is fine , except I got following error in Horizon dashboard :

    Error: Unable to retrieve volume limit information.

    I checked with Liberty2 and Liberty-3 , I got error in both cases.

    Did you encounter this error ?

    Thx for help.

    Regards,

    J.P.

    Reply
    • Hello JP ,

      Yes , i got the same error while accessing the Dashboard in Liberty. Please refer the below URL :

      ‘http://www.linuxtechi.com/multiple-node-openstack-liberty-installation-on-centos-7-x/’

      At end of this article you will get the steps to resolve “Error: Unable to retrieve volume limit information.”

      Reply
  4. great work i am trying on flat network where ip address of cloud can ping outside computer without public ip address i am frusted please help me

    Reply
  5. if you are getting error Unable to retrieve volume limit information . then you have to increase the number of virtual cpu(vcp if you are installing inside vmwrae workstation or vmware ESXi). The openstack requires a lot of CPU resources. Definitely your error will remove if assign a more cpu to compute node.

    Reply
  6. Thanks for sharing the instructions.
    I followed the document and installed openstack.
    I am able to ping and ssh to the openstack instance but from openstack I am not able to ping the external default gateway and cannot access internet. Can you please help with this issue.

    Reply
  7. Hi Pradeep ,
    Thank for the detailed procedure.I have followed your document , everything went fine. But after bringing up the instance i am not able to ping any IP (neither floating nor private IP) . I am using OCATA version, host is Window and using virtual box for guest VM.

    Below is ifconfig output from the VM
    # ifconfig -a
    br-ex: flags=4163 mtu 1500
    inet 172.17.17.95 netmask 255.255.255.0 broadcast 172.17.17.255
    inet6 2002:646d:9d34:c:a00:27ff:fe21:2fe9 prefixlen 64 scopeid 0x0
    inet6 fec0::c:a00:27ff:fe21:2fe9 prefixlen 64 scopeid 0x40
    inet6 fe80::e4bf:d0ff:fe79:540 prefixlen 64 scopeid 0x20
    ether 08:00:27:21:2f:e9 txqueuelen 1000 (Ethernet)
    RX packets 147740 bytes 28272087 (26.9 MiB)
    RX errors 0 dropped 25300 overruns 0 frame 0
    TX packets 6895 bytes 7069030 (6.7 MiB)
    TX errors 0 dropped 0 overruns 0 carrier 0 collisions 0

    br-int: flags=4098 mtu 1450
    ether 36:56:34:37:7f:41 txqueuelen 1000 (Ethernet)
    RX packets 0 bytes 0 (0.0 B)
    RX errors 0 dropped 140089 overruns 0 frame 0
    TX packets 0 bytes 0 (0.0 B)
    TX errors 0 dropped 0 overruns 0 carrier 0 collisions 0

    br-tun: flags=4098 mtu 1500
    ether d2:b7:1c:97:94:49 txqueuelen 1000 (Ethernet)
    RX packets 0 bytes 0 (0.0 B)
    RX errors 0 dropped 0 overruns 0 frame 0
    TX packets 0 bytes 0 (0.0 B)
    TX errors 0 dropped 0 overruns 0 carrier 0 collisions 0

    enp0s3: flags=4163 mtu 1500
    inet6 fe80::a00:27ff:fe21:2fe9 prefixlen 64 scopeid 0x20
    ether 08:00:27:21:2f:e9 txqueuelen 1000 (Ethernet)
    RX packets 216578 bytes 113212864 (107.9 MiB)
    RX errors 0 dropped 69 overruns 0 frame 0
    TX packets 30876 bytes 13818856 (13.1 MiB)
    TX errors 0 dropped 0 overruns 0 carrier 0 collisions 0

    lo: flags=73 mtu 65536
    inet 127.0.0.1 netmask 255.0.0.0
    inet6 ::1 prefixlen 128 scopeid 0x10
    loop txqueuelen 1 (Local Loopback)
    RX packets 1308279 bytes 258192253 (246.2 MiB)
    RX errors 0 dropped 0 overruns 0 frame 0
    TX packets 1308279 bytes 258192253 (246.2 MiB)
    TX errors 0 dropped 0 overruns 0 carrier 0 collisions 0

    ovs-system: flags=4098 mtu 1500
    ether 16:9f:ac:c0:46:b2 txqueuelen 1000 (Ethernet)
    RX packets 0 bytes 0 (0.0 B)
    RX errors 0 dropped 0 overruns 0 frame 0
    TX packets 0 bytes 0 (0.0 B)
    TX errors 0 dropped 0 overruns 0 carrier 0 collisions 0

    qbr031ee7c9-33: flags=4163 mtu 1450
    ether 9e:69:25:de:94:bd txqueuelen 1000 (Ethernet)
    RX packets 54 bytes 7470 (7.2 KiB)
    RX errors 0 dropped 14 overruns 0 frame 0
    TX packets 0 bytes 0 (0.0 B)
    TX errors 0 dropped 0 overruns 0 carrier 0 collisions 0

    qvb031ee7c9-33: flags=4419 mtu 1450
    inet6 fe80::9c69:25ff:fede:94bd prefixlen 64 scopeid 0x20
    ether 9e:69:25:de:94:bd txqueuelen 1000 (Ethernet)
    RX packets 147 bytes 17739 (17.3 KiB)
    RX errors 0 dropped 0 overruns 0 frame 0
    TX packets 149 bytes 14054 (13.7 KiB)
    TX errors 0 dropped 0 overruns 0 carrier 0 collisions 0

    qvo031ee7c9-33: flags=4419 mtu 1450
    inet6 fe80::ec8f:67ff:fe40:c0af prefixlen 64 scopeid 0x20
    ether ee:8f:67:40:c0:af txqueuelen 1000 (Ethernet)
    RX packets 149 bytes 14054 (13.7 KiB)
    RX errors 0 dropped 0 overruns 0 frame 0
    TX packets 147 bytes 17739 (17.3 KiB)
    TX errors 0 dropped 0 overruns 0 carrier 0 collisions 0

    tap031ee7c9-33: flags=4163 mtu 1450
    inet6 fe80::fc16:3eff:fedc:4ab prefixlen 64 scopeid 0x20
    ether fe:16:3e:dc:04:ab txqueuelen 1000 (Ethernet)
    RX packets 141 bytes 13406 (13.0 KiB)
    RX errors 0 dropped 0 overruns 0 frame 0
    TX packets 112 bytes 11383 (11.1 KiB)
    TX errors 0 dropped 0 overruns 0 carrier 0 collisions 0

    Below are IP from the Instance
    10.10.0.10
    Floating IPs:
    172.17.17.14

    In Instance when i do console log-in i do not see floating IP .Is it ok?
    Any direction would be highly appreciated.

    Thanks

    Reply
    • Hi Anshul,

      Floating is not assigned to VM Interface but when we associate a floating to a VM then a Nat Rule is written in Firewall in such way that if any request comes to floating IP then it will be redirected to the internal IP of VM.

      Try accessing the VM with floating IP from the network Node.

      Reply
      • Thanks for sharing the instructions.
        We followed the document and installed openstack Multi Node.
        We are able to ping and ssh to the openstack instance from openstack. But the instance cannot ping internet or the external default gateway and cannot access internet. Can you please help with this issue.

        Reply
  8. Hi Pradeep, i’m confused about all the ip addresses you’ve listed there, would you please tell me the meaning and the relationship between these ip addresses, thank you so much.
    your br-ex ip: 192.168.1.3; your floatiog ip: 192.168.1.0; your ip address pool: 192.168.1.19, 192.168.1.30 and this ip: 192.168.1.20
    i’m quite new to openstack, so thanks for your help~

    Reply
  9. Author is using bridged network for first interface, kind of easy to get the SSH access, but most of you guys have Host only network for enp0s8, and making configuration changes which are meant for bridged network.

    Reply
  10. Hi Pradeep, I am getting below error

    Message
    Build of instance ec4b4174-c0f7-4932-b1e1-45690a462446 aborted: Volume eba07b7d-48a0-4257-bcc7-ef744f532f0d did not finish being created even after we waited 0 seconds or 1 attempts. And its status is error.
    Code
    500
    Details
    Created
    Jan. 16, 2018, 5:34 p.m.

    Can you please help me to find out what is the problem here ?

    Reply
  11. Hi,

    Is anyone stsill monitoring this site?
    I cannot reach the internet from the instance though I am able to SSH into it. I can reach the instance via SSH and its external IP. It seems that the bridge is not forwarding the traffic. Any suggestions?

    Thank you

    Reply
  12. Hello Mr. Pradeep,

    I’ve followed your documentation & performed all exercise very well. However, I’m unable to connect VM using putty.

    ICMP & SSH is allowed from 0.0.0.0/0 network range. Here is my configuration.

    Internal Network: 10.159.0.0/24 (DHCP Enabled). The internal network captures 10.159.1.1 as a default gateway as I left that field blank.

    External Network: 192.168.7.0/20
    (IP Range Address Range is 192.168.7.20-192.168.7.200) (DHCP Disabled)

    Router External IP: 192.168.7.58

    I can access the Fedora VM over the console however I’m unable to login as without as the ppk has not given.

    Any suggestions?

    Reply
    • Hi,

      You need to first create key pair and attach that key pair while launching the virtual machine. You can not login to virtual machine without keys. It is mandate to use it unless you have customized the cloud image.

      Reply

Leave a Reply to Vaibhav Sharma Cancel reply