Hello Techies, as you know Openshift provides container platform and can installed either on onprem or in public cloud using different methods like IPI (Installer Provisioned Installer), UPI (User Provisioned Infrastructure) and Assisted Bare Metal installer.
In this post, we will demonstrate how to install Openshift 4.9 on bare metal nodes with UPI approach.
For the demonstration purpose, I am using KVM virtual machines. Following are my lab setup details,
Total Virtual Machines: 7
Bastion Node:
- OS – Rocky Linux 8 / CentOS 8,
- RAM- 4GB, vPCU-4,
- Disk- 120 GB
- Network: Management N/w – (169.144.104.228), ocp internal n/w – (192.168.110.115)
Bootstrap Node:
- OS : Core OS
- RAM : 8GB
- vCPU: 4
- Disk: 40 GB
- Network: OCP Internal Network (192.168.110.116)
Control Plane 1 Node:
- OS : Core OS
- RAM : 10GB
- vCPU: 6
- Disk: 60 GB
- Network: OCP Internal Network (192.168.110.117)
Control Plane 2 Node:
- OS : Core OS
- RAM : 10GB
- vCPU: 6
- Disk: 60 GB
- Network: OCP Internal Network (192.168.110.118)
Control Plane 3 Node:
- OS : Core OS
- RAM : 10GB
- vCPU: 6
- Disk: 60 GB
- Network: OCP Internal Network (192.168.110.119)
Worker Node 1:
- OS : Core OS
- RAM : 12GB
- vCPU: 8
- Disk: 60 GB
- Network: OCP Internal Network (192.168.110.120)
Worker Node 2:
- OS : Core OS
- RAM : 12GB
- vCPU: 8
- Disk: 60 GB
- Network: OCP Internal Network (192.168.110.121)
Note: In KVM hypervisor, we have created host only network for ocp-internal.
Use the following file and commands to create host only network in KVM,
$ cat hostonly.xml
<network>
  <name>hostnet</name>
  <bridge name='virbr2' stp='on' delay='0'/>
  <ip address='192.168.110.1' netmask='255.255.255.0'>
      <range start='192.168.110.10' end='192.168.110.254'/>
  </ip>
</network>
$ sudo virsh net-define hostonly.xml
$ virsh net-start hostnet
$ virsh net-autostart hostnet
$ sudo systemctl restart libvirtd
Download Openshift Software from Red Hat portal
a) Login to Red Hat Portal using following URL:
https://cloud.redhat.com/openshift
b) Click on Create Cluster
c) Choose Datacenter Tab –> Click on BareMetal
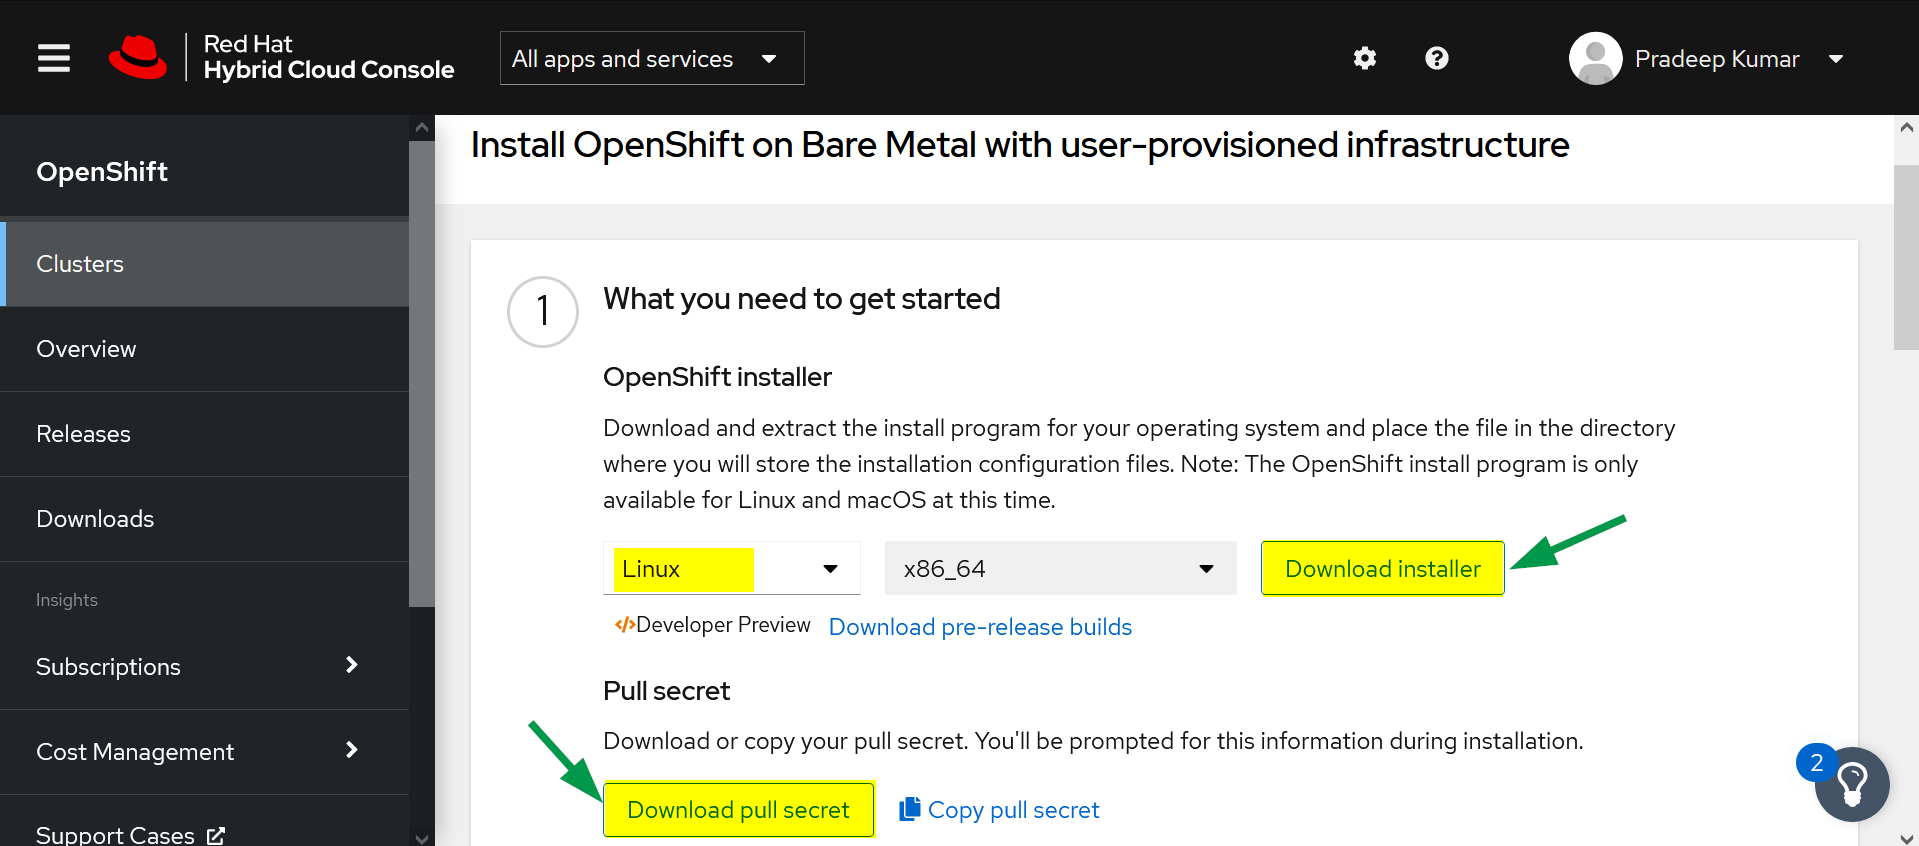
d) Select the Installation Type as ‘UPI’ (User-provisioned infrastructure)
e) Download the followings
- OpenShift Installer
- Pull Secret
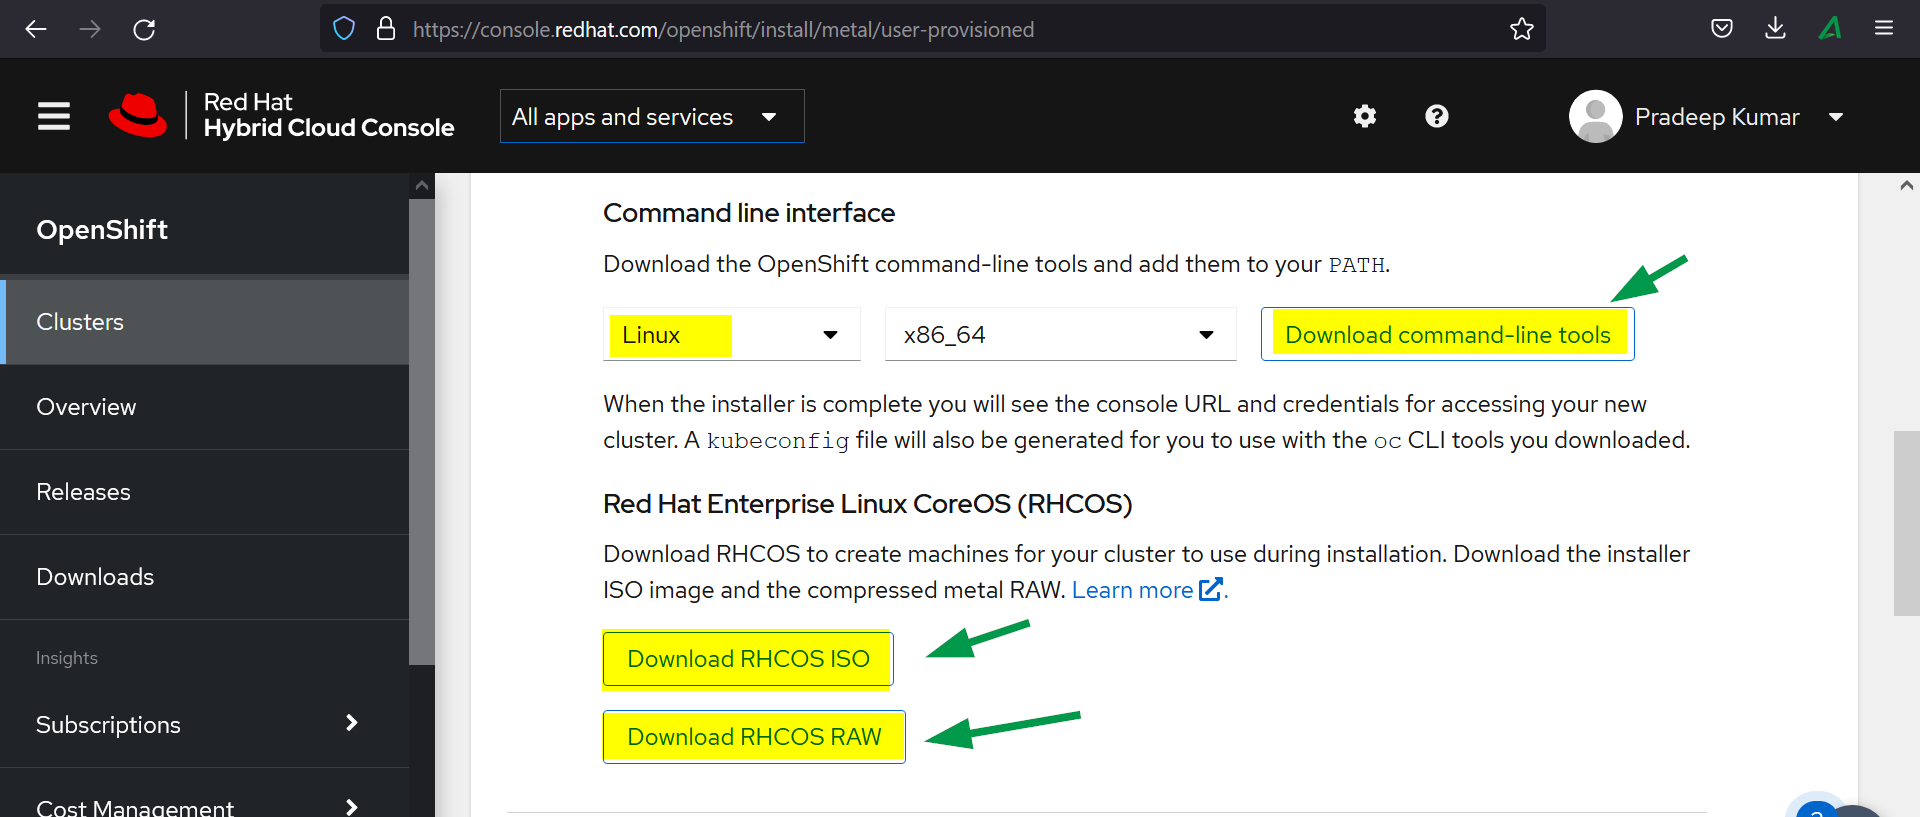
- Command Line Interface
- RHCOS ISO
- RHCOS RAW
Let’s now jump into the installation steps of OpenShift
Step 1) Prepare Bastion Node
Create a virtual machine with resources mentioned above for bastion, you can install OS either Rocky Linux 8 or CentOS 8. Assign the ip address from management and ocp internal network.
Similarly create bootstrap, control plane VMs and Worker VMs and attach OCP network (hostnet) to interface and note down their mac address. So, in my case following are the MAC addresses,
- Bootstrap: 52:54:00:bf:60:a3
- ocp-cp1: 52:54:00:98:49:40
- ocp-cp2: 52:54:00:fe:8a:7c
- ocp-cp3: 52:54:00:58:d3:31
- ocp-w1: 52:54:00:38:8c:dd
- ocp-w2: 52:54:00:b8:84:40
Step 2) Configure Services on bastion node
Transfer the downloaded Openshift software including the secret to bastion node under the root folder.

Extract openshift client tar file using following tar command,
# tar xvf openshift-client-linux.tar.gz
# mv oc kubectl /usr/local/bin
Confirm openshift client tool installation and its version by running,
# oc version
# kubectl version
Output of above command would look like below:

Extract Openshift Installer tar file,
# tar xpvf openshift-install-linux.tar.gz
README.md
openshift-install
#
Configure Zones and masquerading (SNAT)
In my bastion node, I have two lan cards, ens3 and ens8. On ens3 , external or management network is configured and on ens8, ocp internal network is configured. So, define the following zones and enable masquerading on both the zones.
# nmcli connection modify ens8 connection.zone internal
# nmcli connection modify ens3 connection.zone external
# firewall-cmd --get-active-zones
# firewall-cmd --zone=external --add-masquerade --permanent
# firewall-cmd --zone=internal --add-masquerade --permanent
# firewall-cmd --reload
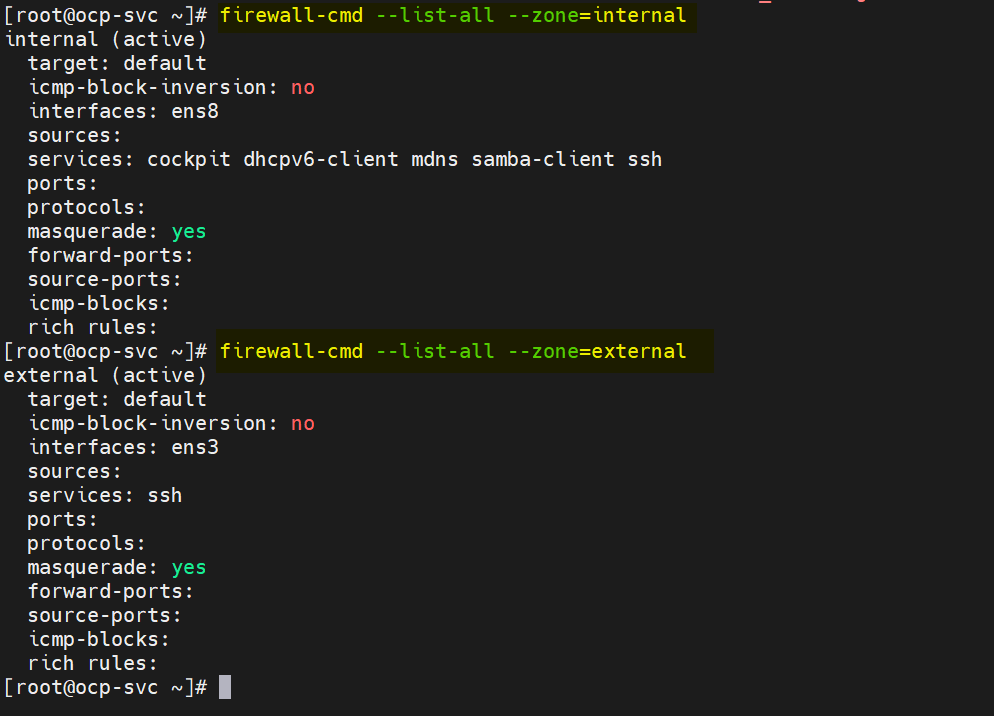
Verify the zone settings by running following firewall-cmd commands,
# firewall-cmd --list-all --zone=internal
# firewall-cmd --list-all --zone=external
Now let’s configure DNS, DHCP, Apache, HAProxy and NFS Service.
Note: For the demonstration purpose, I am using ‘linuxtechi.lan’ as the base domain.
Configure DNS Server
To install DNS server and its dependencies, run following dnf command
# dnf install bind bind-utils -y
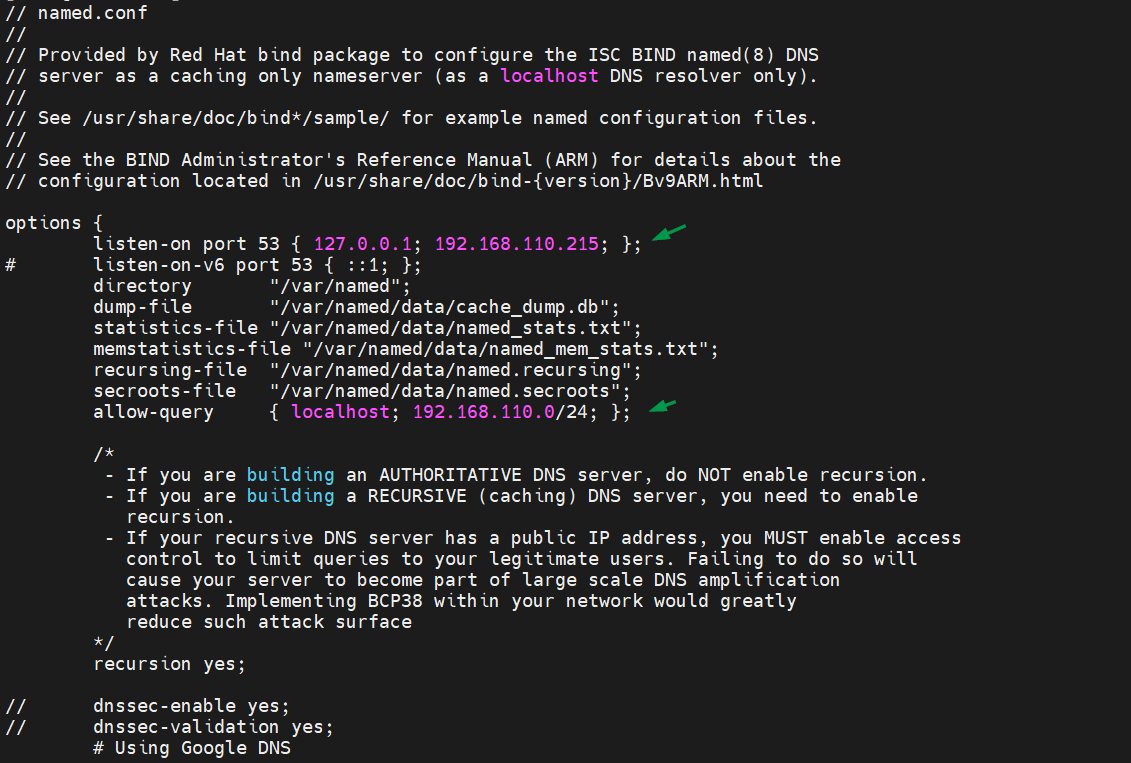
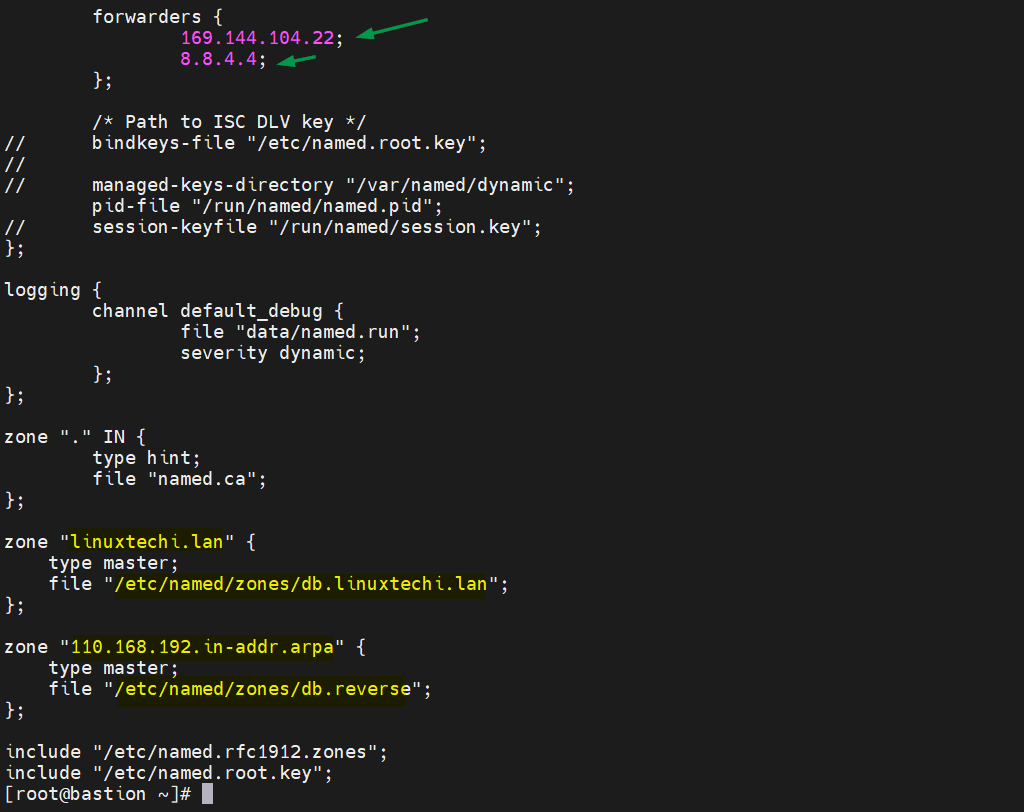
Edit /etc/named.conf and make sure file has the following contents,
# vi /etc/named.conf
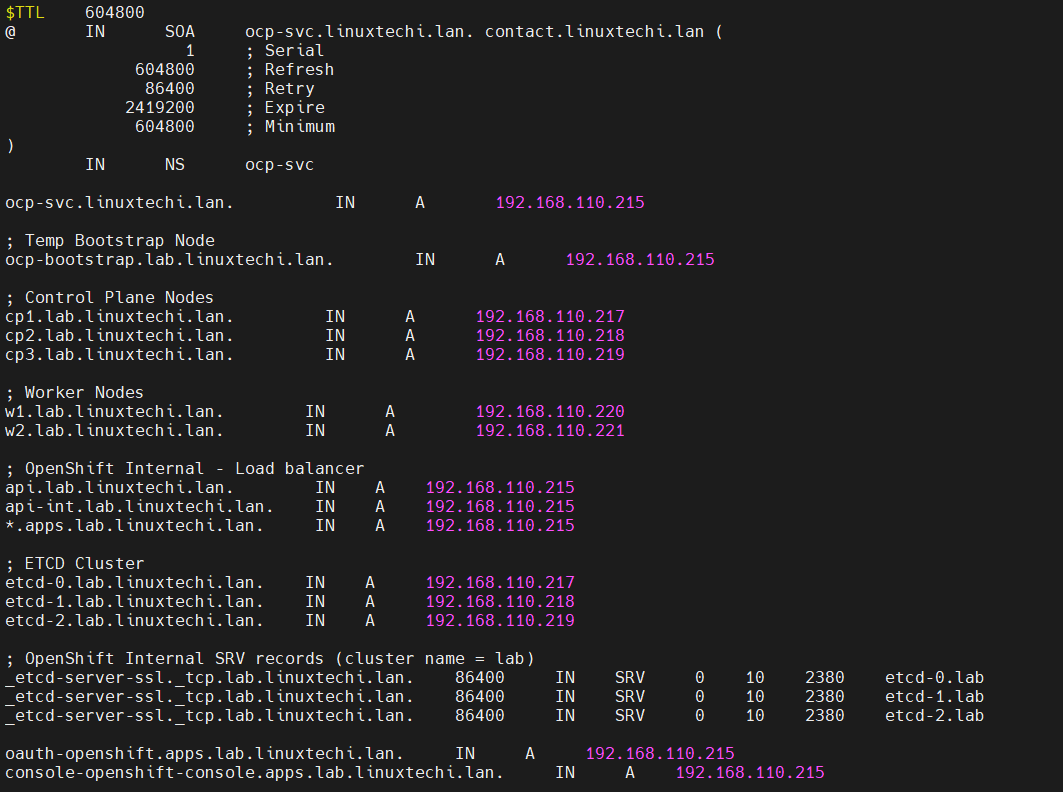
Now create forward and reverse zone file,
# mkdir /etc/named/zones
# vi /etc/named/zones/db.linuxtechi.lan
Save and exit the file.
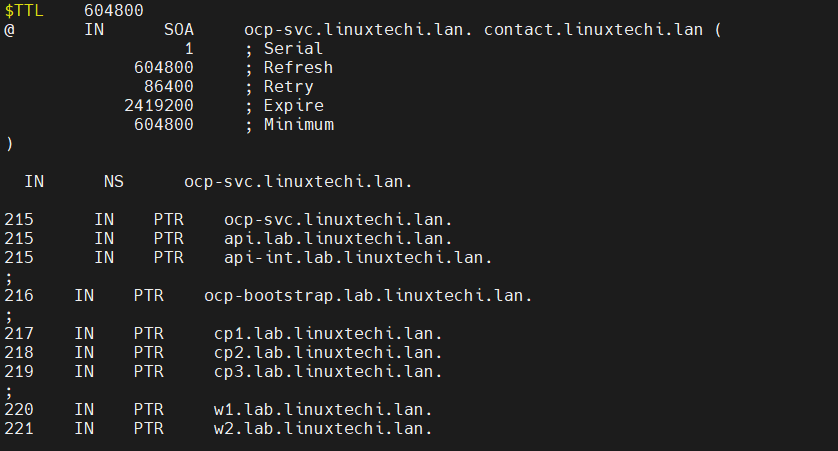
Create reverse zone file with following entries,
# vi /etc/named/zones/db.reverse
Save and close the file and then start & enable dns service
# systemctl start named
# systemctl enable named
Allow the DNS port in firewall, run
# firewall-cmd --add-port=53/udp --zone=internal --permanent
# firewall-cmd --reload
Configure DHCP Server
Install and configure the dhcp server, bind the mac address of bootstrap, control planes and worker nodes to their respective IPs. Run below command to install dhcp package,
# dnf install -y dhcp-server
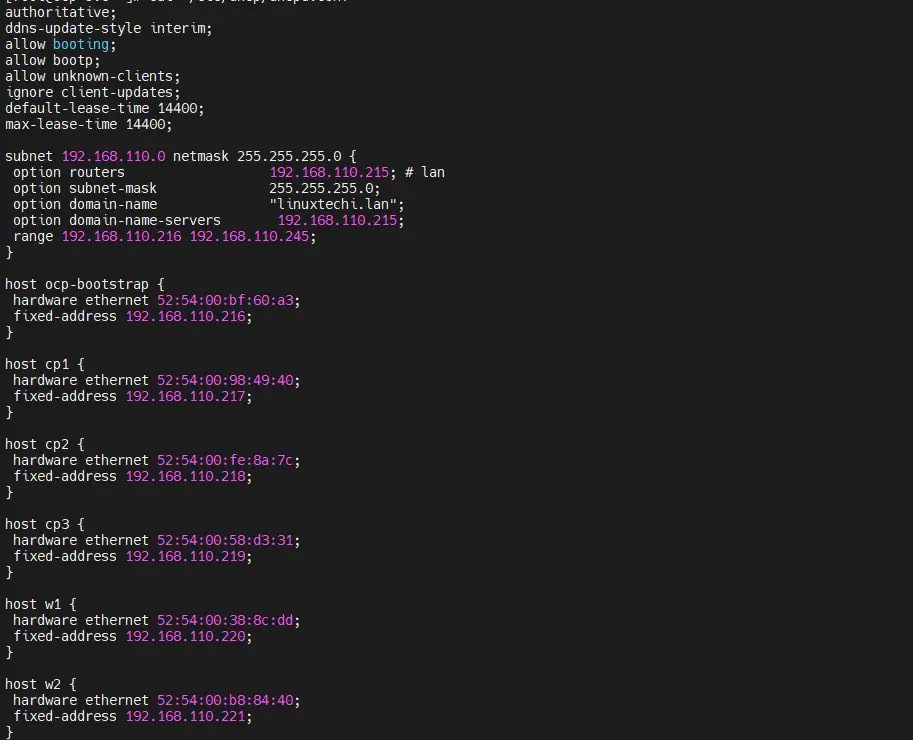
Edit the /etc/dhcp/dhcpd.conf file and add the following contents, use the mac addresses that we have collected in step1 and specify the IP address of nodes according the DNS entries. So in my case, content of file will look like below,
[root@ocp-svc ~]# vi /etc/dhcp/dhcpd.conf
authoritative;
ddns-update-style interim;
allow booting;
allow bootp;
allow unknown-clients;
ignore client-updates;
default-lease-time 14400;
max-lease-time 14400;
subnet 192.168.110.0 netmask 255.255.255.0 {
 option routers                  192.168.110.215; # lan
 option subnet-mask              255.255.255.0;
 option domain-name              "linuxtechi.lan";
 option domain-name-servers       192.168.110.215;
 range 192.168.110.216 192.168.110.245;
}

host ocp-bootstrap {
 hardware ethernet 52:54:00:bf:60:a3;
 fixed-address 192.168.110.216;
}

host cp1 {
 hardware ethernet 52:54:00:98:49:40;
 fixed-address 192.168.110.217;
}

host cp2 {
 hardware ethernet 52:54:00:fe:8a:7c;
 fixed-address 192.168.110.218;
}

host cp3 {
 hardware ethernet 52:54:00:58:d3:31;
 fixed-address 192.168.110.219;
}

host w1 {
 hardware ethernet 52:54:00:38:8c:dd;
 fixed-address 192.168.110.220;
}

host w2 {
 hardware ethernet 52:54:00:b8:84:40;
 fixed-address 192.168.110.221;
}
Save and close the file.
Start DHCP service and allow dhcp service for internal zone in firewall, run
[root@ocp-svc ~]# systemctl start dhcpd
[root@ocp-svc ~]# systemctl enable dhcpd
[root@ocp-svc ~]# firewall-cmd --add-service=dhcp --zone=internal --permanent
success
[root@ocp-svc ~]# firewall-cmd --reload
success
[root@ocp-svc ~]#
Configure Apache Web Server
We need apache to serve ignition and rhcos file, so let’s first install it using below command,
[root@ocp-svc ~]# dnf install -y httpd
Change the default apache listening port from 80 to 8080 by running beneath sed command
[root@ocp-svc ~]# sed -i 's/Listen 80/Listen 0.0.0.0:8080/' /etc/httpd/conf/httpd.conf
Start and enable apache service via below command,
[root@ocp-svc ~]# systemctl start httpd
[root@ocp-svc ~]# systemctl enable httpd
Allow Apache service port (8080) for internal zone,
[root@ocp-svc ~]# firewall-cmd --add-port=8080/tcp --zone=internal --permanent
[root@ocp-svc ~]# firewall-cmd --reload
Configure HAProxy
We will use haproxy to load balance the Openshift services like ectd, ingress http & ingress https and apps like openshift console.
So, let’s first install haproxy by running following dnf command,
[root@ocp-svc ~]# dnf install -y haproxy
Edit haproxy confile and add the following contents to it
[root@ocp-svc ~]# vi /etc/haproxy/haproxy.cfg
# Global settings
#---------------------------------------------------------------------
global
    maxconn     20000
    log         /dev/log local0 info
    chroot      /var/lib/haproxy
    pidfile     /var/run/haproxy.pid
    user        haproxy
    group       haproxy
    daemon
    # turn on stats unix socket
    stats socket /var/lib/haproxy/stats
#---------------------------------------------------------------------
# common defaults that all the 'listen' and 'backend' sections will
# use if not designated in their block
#---------------------------------------------------------------------
defaults
    log                     global
    mode                    http
    option                  httplog
    option                  dontlognull
    option http-server-close
    option redispatch
    option forwardfor       except 127.0.0.0/8
    retries                 3
    maxconn                 20000
    timeout http-request    10000ms
    timeout http-keep-alive 10000ms
    timeout check           10000ms
    timeout connect         40000ms
    timeout client          300000ms
    timeout server          300000ms
    timeout queue           50000ms

# Enable HAProxy stats
listen stats
    bind :9000
    stats uri /stats
    stats refresh 10000ms

# Kube API Server
frontend k8s_api_frontend
    bind :6443
    default_backend k8s_api_backend
    mode tcp

backend k8s_api_backend
    mode tcp
    balance source
    server      ocp-bootstrap 192.168.110.216:6443 check
    server      cp1 192.168.110.217:6443 check
    server      cp2 192.168.110.218:6443 check
    server      cp3 192.168.110.219:6443 check

# OCP Machine Config Server
frontend ocp_machine_config_server_frontend
    mode tcp
    bind :22623
    default_backend ocp_machine_config_server_backend

backend ocp_machine_config_server_backend
    mode tcp
    balance source
    server      ocp-bootstrap 192.168.110.216:22623 check
    server      cp1 192.168.110.217:22623 check
    server      cp2 192.168.110.218:22623 check
    server      cp3 192.168.110.219:22623 check

# OCP Ingress - layer 4 tcp mode for each. Ingress Controller will handle layer 7.
frontend ocp_http_ingress_frontend
    bind :80
    default_backend ocp_http_ingress_backend
    mode tcp

backend ocp_http_ingress_backend
    balance source
    mode tcp
    server cp1 192.168.110.217:80 check
    server cp2 192.168.110.218:80 check
    server cp3 192.168.110.219:80 check
    server w1 192.168.110.220:80 check
    server w2 192.168.110.221:80 check

frontend ocp_https_ingress_frontend
    bind *:443
    default_backend ocp_https_ingress_backend
    mode tcp

backend ocp_https_ingress_backend
    mode tcp
    balance source
    server cp1 192.168.110.217:443 check
    server cp2 192.168.110.218:443 check
    server cp3 192.168.110.219:443 check
    server w1 192.168.110.220:443 check
    server w2 192.168.110.221:443 check
save and exit the file.
Start and enable haproxy to make above changes into the effect
[root@ocp-svc ~]# setsebool -P haproxy_connect_any 1
[root@ocp-svc ~]# systemctl start haproxy
[root@ocp-svc ~]# systemctl enable haproxy
Allow HAProxy ports that we have defined in its configuration file in OS firewall. Run beneath commands,
[root@ocp-svc ~]# firewall-cmd --add-port=6443/tcp --zone=internal --permanent
[root@ocp-svc ~]# firewall-cmd --add-port=6443/tcp --zone=external --permanent
[root@ocp-svc ~]# firewall-cmd --add-port=22623/tcp --zone=internal --permanent
[root@ocp-svc ~]# firewall-cmd --add-service=http --zone=internal --permanent
[root@ocp-svc ~]# firewall-cmd --add-service=http --zone=external --permanent
[root@ocp-svc ~]# firewall-cmd --add-service=https --zone=internal --permanent
[root@ocp-svc ~]# firewall-cmd --add-service=https --zone=external --permanent
[root@ocp-svc ~]# firewall-cmd --add-port=9000/tcp --zone=external --permanent
[root@ocp-svc ~]# firewall-cmd --reload
[root@ocp-svc ~]#
Configure NFS Server
We need NFS server to provide the persistent storage to OpenShift registry.
Run following command to install nfs server,
[root@ocp-svc ~]# dnf install nfs-utils -y
Create following directory and set the required permissions. This directory will be exported as NFS share,
[root@ocp-svc ~]# mkdir -p /shares/registry
[root@ocp-svc ~]# chown -R nobody:nobody /shares/registry
[root@ocp-svc ~]# chmod -R 777 /shares/registry
Now export the share by adding the following line to /etc/exports file.
[root@ocp-svc ~]# vi /etc/exports
/shares/registry  192.168.110.0/24(rw,sync,root_squash,no_subtree_check,no_wdelay)
Save and close the file and run ‘exportfs -rv’ to export the directory
[root@ocp-svc ~]# exportfs -rv
exporting 192.168.110.0/24:/shares/registry
[root@ocp-svc ~]#
Start and enable NFS service
[root@ocp-svc ~]# systemctl start nfs-server rpcbind nfs-mountd
[root@ocp-svc ~]# systemctl enable nfs-server rpcbind
Allow NFS service in OS firewall, run following commands,
[root@ocp-svc ~]# firewall-cmd --zone=internal --add-service mountd --permanent
[root@ocp-svc ~]# firewall-cmd --zone=internal --add-service rpc-bind --permanent
[root@ocp-svc ~]# firewall-cmd --zone=internal --add-service nfs --permanent
[root@ocp-svc ~]# firewall-cmd --reload
Step 3) Generate Manifests and Ignition files
To generate ignition files for bootstrap, control plane and worker nodes, refer the following steps
a) Generate SSH keys
[root@ocp-svc ~]# ssh-keygen
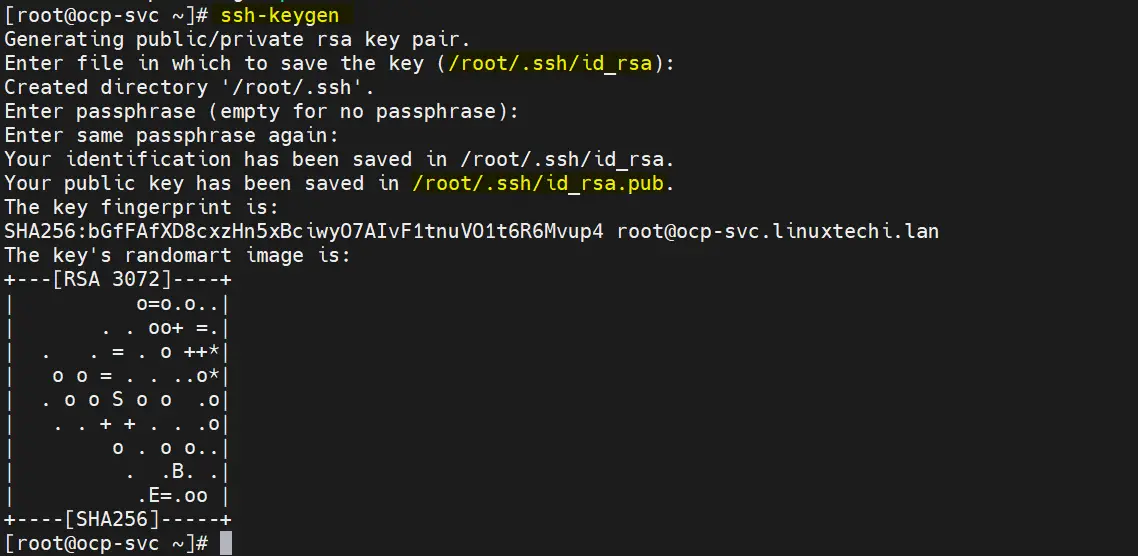
These ssh keys will be used to remotely access the bootstrap, control plane and worker nodes.
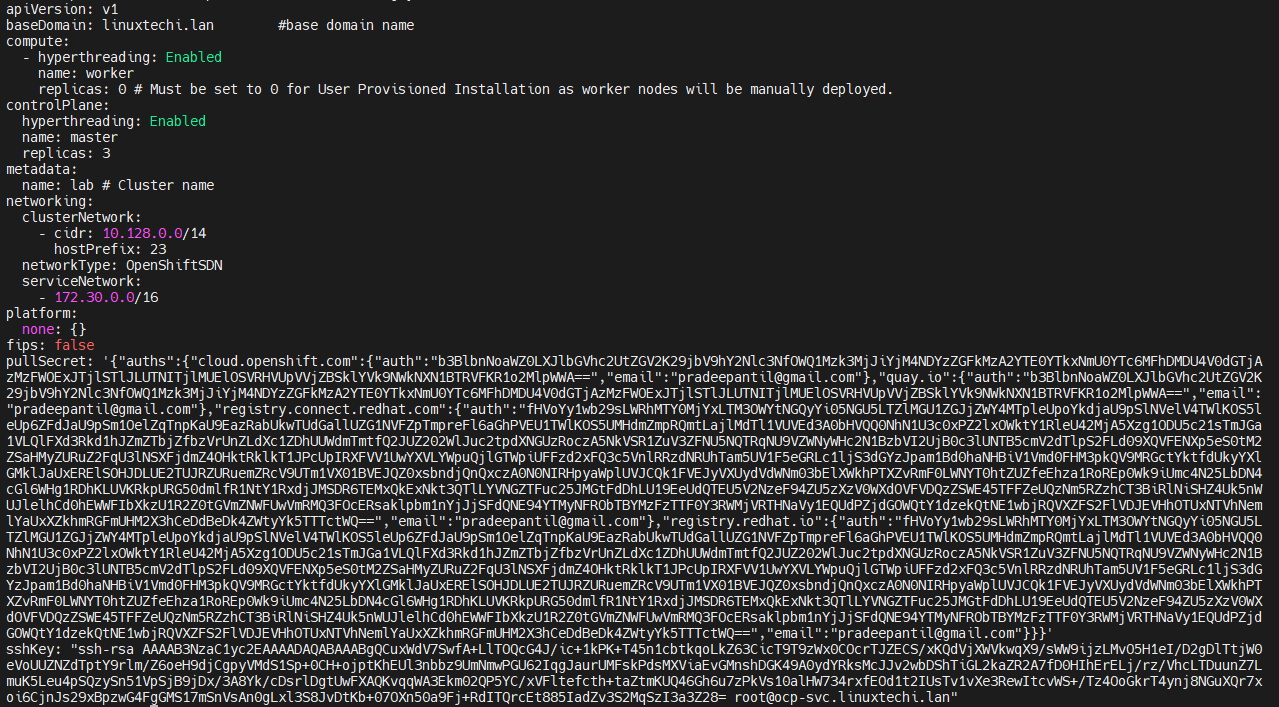
b) Create install-config.yaml file with following contents
[root@ocp-svc ~]# vi /ocp-install/install-config.yaml
apiVersion: v1
baseDomain: linuxtechi.lan        #base domain name
compute:
  - hyperthreading: Enabled
    name: worker
    replicas: 0 # Must be set to 0 for User Provisioned Installation as worker nodes will be manually deployed.
controlPlane:
  hyperthreading: Enabled
  name: master
  replicas: 3
metadata:
  name: lab # Cluster name
networking:
  clusterNetwork:
    - cidr: 10.128.0.0/14
     hostPrefix: 23
  networkType: OpenShiftSDN
  serviceNetwork:
    - 172.30.0.0/16

platform:
  none: {}
fips: false
pullSecret: '{"auths": ...}'           # Copy the pullsecret here
sshKey: "ssh-ed25519 AAAA..."          # Copy ssh public key here
In Line 23 and 24 copy contents of pull secret and public key that we generated above.
After making the changes file will look like below:
c) Generate manifests file
Run following openshift-install command,
[root@ocp-svc ~]# ~/openshift-install create manifests --dir ~/ocp-install

Above warning message says that master nodes are schedulable, it means we can have workload on control planes (control planes will also work as worker nodes). If you wish to disable this then run following sed command,
# sed -i 's/mastersSchedulable: true/mastersSchedulable: false/' ~/ocp-install/manifests/cluster-scheduler-02-config.yml
Note: In my case, I am not disabling it.
d) Generate Ignition and auth file
Run beneath openshift-install command,
[root@ocp-svc ~]# ~/openshift-install create ignition-configs --dir ~/ocp-install/
Output,

e) Serve Manifests, ignition and core OS image file via web server
Create /var/www/html/ocp4 directory and copy all the files from ‘/root/ocp-install’ to ocp4.
[root@ocp-svc ~]# mkdir /var/www/html/ocp4
[root@ocp-svc ~]# cp -R ~/ocp-install/* /var/www/html/ocp4
[root@ocp-svc ~]# mv ~/rhcos-metal.x86_64.raw.gz /var/www/html/ocp4/rhcos
Set the required permissions on ocp4 directory
[root@ocp-svc ~]# chcon -R -t httpd_sys_content_t /var/www/html/ocp4/
[root@ocp-svc ~]# chown -R apache: /var/www/html/ocp4/
[root@ocp-svc ~]# chmod 755 /var/www/html/ocp4/
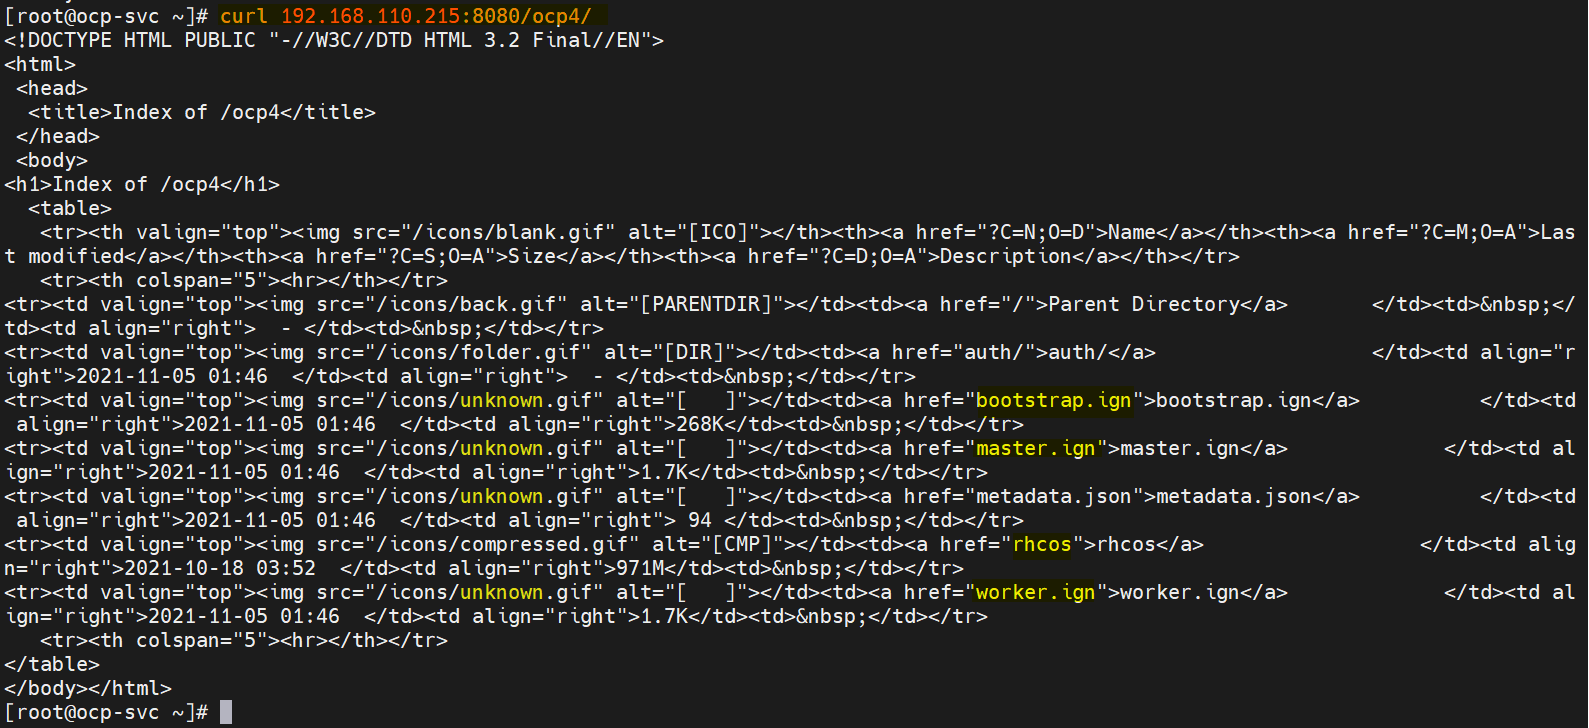
Verify whether these files are accessible or not via curl command
[root@ocp-svc ~]# curl 192.168.110.215:8080/ocp4/
Output should look like below
Perfect, now we are ready to start deployment.
Step 4) Start OpenShift deployment
Boot the bootstrap VM with rhcos-live ISO file. We will get the following screen
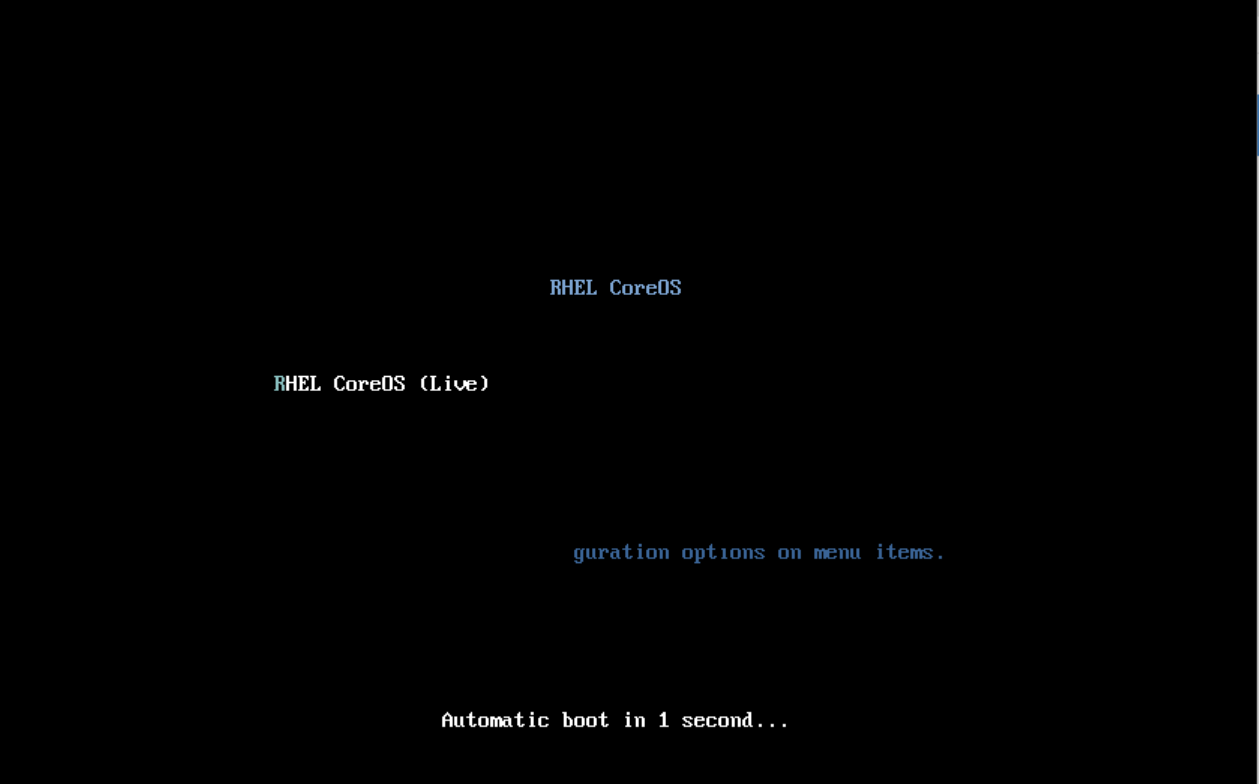
When it boots up with the ISO file, we will get the following screen,
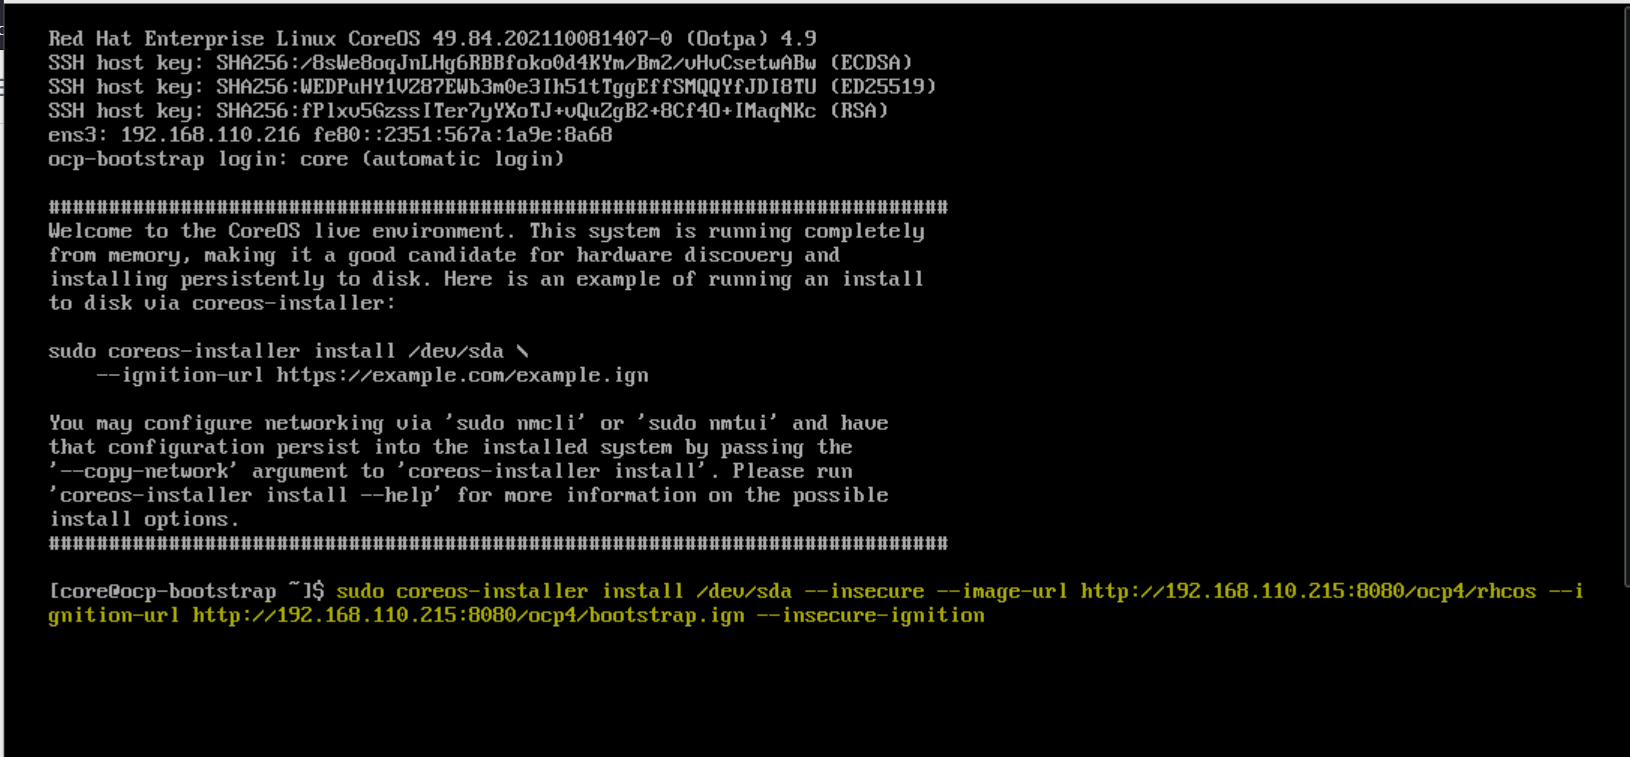
Type coreos-installer command and hit enter
$ sudo coreos-installer install /dev/sda --insecure --image-url http://192.168.110.215:8080/ocp4/rhcos --ignition-url http://192.168.110.215:8080/ocp4/bootstrap.ign --insecure-ignition
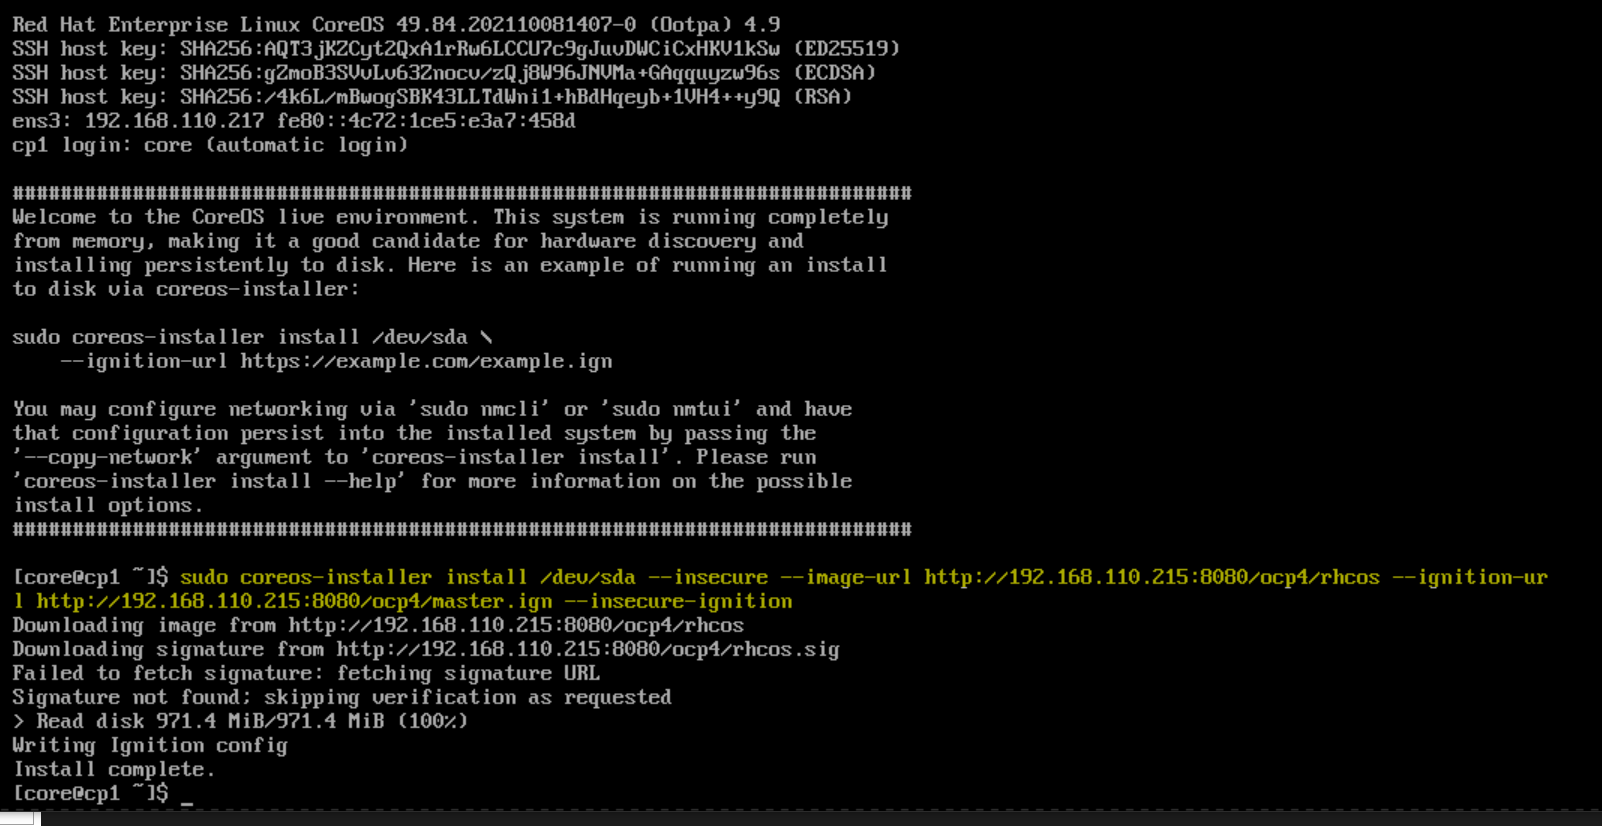
Once the installation is completed, we will get the following screen,

Reboot the bootstrap node so that it boots up with hard disk this time.
$ sudo reboot
Similarly boot all three-control plane nodes with RHEL Core OS (rhcos) ISO file. Once control nodes boot up then run the following command and hit enter
$ sudo coreos-installer install /dev/sda --insecure --image-url http://192.168.110.215:8080/ocp4/rhcos --ignition-url http://192.168.110.215:8080/ocp4/master.ign --insecure-ignition
Reboot the control plane and boot it with hard disk.
Repeat this procedure for rest of control planes and monitor bootstrap process using following command.
[root@ocp-svc ~]# ~/openshift-install --dir ~/ocp-install wait-for bootstrap-complete --log-level=debug
Now, boot both the worker nodes with Core OS ISO file and once it boots up then run following command on the nodes
$ sudo coreos-installer install /dev/sda --insecure --image-url http://192.168.110.215:8080/ocp4/rhcos --ignition-url http://192.168.110.215:8080/ocp4/worker.ign --insecure-ignition
Bootstrap process for control planes and worker nodes may take 10 to 15 minutes depending on your infrastructure. Check status of nodes by using following commands
[root@ocp-svc ~]# export KUBECONFIG=~/ocp-install/auth/kubeconfig
[root@ocp-svc ~]# oc get nodes
NAME                     STATUS   ROLES           AGE   VERSION
cp1.lab.linuxtechi.lan   Ready    master,worker   69m   v1.22.0-rc.0+894a78b
cp2.lab.linuxtechi.lan   Ready    master,worker   66m   v1.22.0-rc.0+894a78b
cp3.lab.linuxtechi.lan   Ready    master,worker   68m   v1.22.0-rc.0+894a78b
[root@ocp-svc ~]#
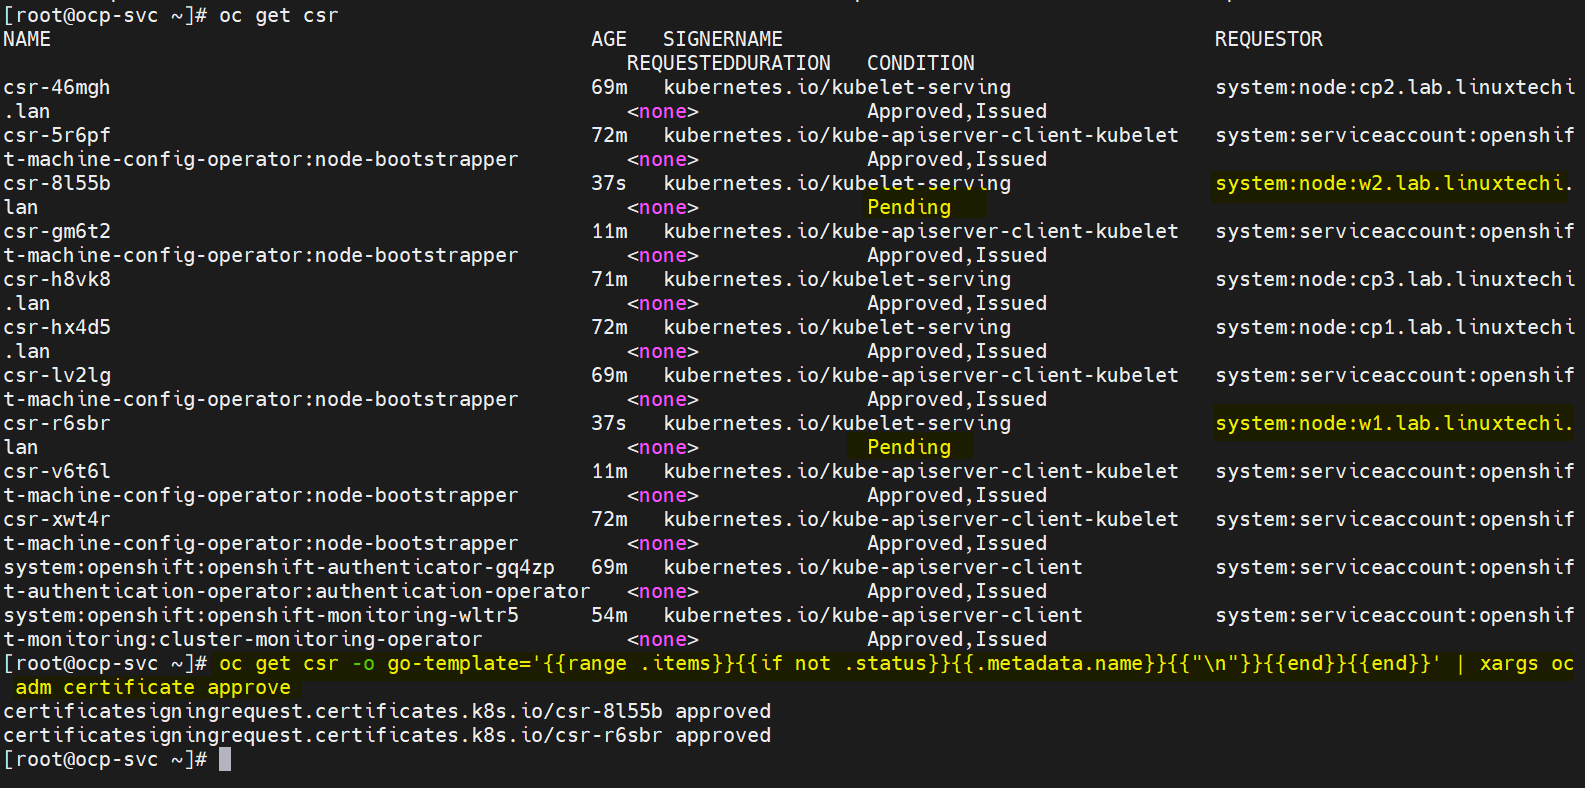
Now approve all the pending CSR for the worker nodes so that they can join cluster and become ready. Run following oc command to view pending CSR
[root@ocp-svc ~]# oc get csr
Run following oc command to approve the pending CSRs
[root@ocp-svc ~]# oc get csr -o go-template='{{range .items}}{{if not .status}}{{.metadata.name}}{{"\n"}}{{end}}{{end}}' | xargs oc adm certificate approve
Output of above two commands would look like below:
After couple of minutes, worker nodes should join the cluster and should be in ready state, run beneath commands to confirm the same.
[root@ocp-svc ~]# oc get nodes

Great, above confirms that both worker nodes join the cluster and are in ready state.
Also check the status of bootstrap and in the output we should get the following,
[root@ocp-svc ~]# ~/openshift-install --dir ~/ocp-install wait-for bootstrap-complete --log-level=debug
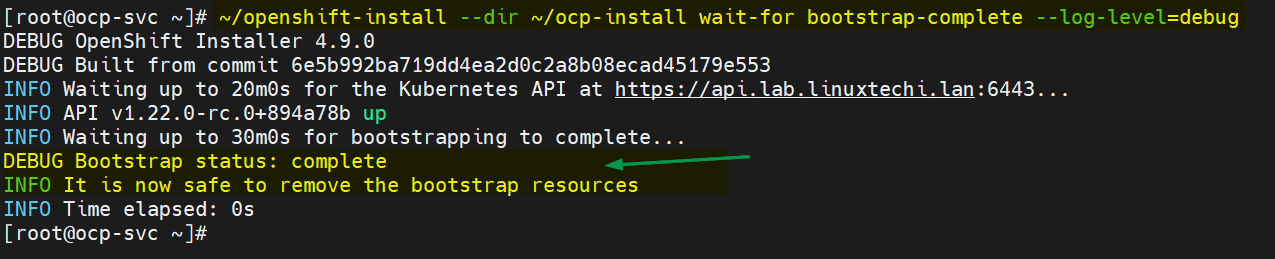
Above confirms that bootstrap process is also completed, and we are good to stop and delete bootstrap VM resources and bootstrap entries from haproxy file.
This conclude the article; I hope you find it informative. Please do share your feedback and comments.
Also Read : How to Setup Single Node OpenShift Cluster on RHEL 8


Dear Pradeep
Thanks for the post and much helpful !
kindly help me with few queries regarding the above installation procedure of OCP.
> what is node named ocp-svc?
> Is it the industry standard installation method?
> I’m trying to setup the cluster on my own using the above steps in the any cloud provider. So, need you support if any
Regards,
Sreeni
[root@ocp-svc ~]# openshift-install –dir ~/ocp-install wait-for bootstrap-complete –log-level=debug
DEBUG OpenShift Installer 4.12.11
DEBUG Built from commit 7f830053ffa923a8b569a68c436de0882141f91e
INFO Waiting up to 20m0s (until 10:41PM) for the Kubernetes API at
https://api.lab.ocp.lan:6443...DEBUG Loading Agent Config…
DEBUG Still waiting for the Kubernetes API: Get “https://api.lab.ocp.lan:6443/version”: EOF
DEBUG Still waiting for the Kubernetes API: the server has asked for the client to provide credentials
DEBUG Still waiting for the Kubernetes API: Get “https://api.lab.ocp.lan:6443/version”: EOF
DEBUG Still waiting for the Kubernetes API: Get “https://api.lab.ocp.lan:6443/version”: EOF
DEBUG Still waiting for the Kubernetes API: the server has asked for the client to provide credentials
DEBUG Still waiting for the Kubernetes API: Get “https://api.lab.ocp.lan:6443/version”: EOF
DEBUG Still waiting for the Kubernetes API: Get “https://api.lab.ocp.lan:6443/version”: EOF
DEBUG Still waiting for the Kubernetes API: the server has asked for the client to provide credentials
DEBUG Still waiting for the Kubernetes API: Get “https://api.lab.ocp.lan:6443/version”: EOF
DEBUG Still waiting for the Kubernetes API: Get “https://api.lab.ocp.lan:6443/version”: EOF
DEBUG Still waiting for the Kubernetes API: the server has asked for the client to provide credentials
DEBUG Still waiting for the Kubernetes API: the server has asked for the client to provide credentials
DEBUG Still waiting for the Kubernetes API: Get “https://api.lab.ocp.lan:6443/version”: EOF
ERROR Attempted to gather ClusterOperator status after wait failure: listing ClusterOperator objects: Get “https://api.lab.ocp.lan:6443/apis/config.openshift.io/v1/clusteroperators”: EOF
INFO Use the following commands to gather logs from the cluster
INFO openshift-install gather bootstrap –help
ERROR Bootstrap failed to complete: Get “https://api.lab.ocp.lan:6443/version”: EOF
ERROR Failed waiting for Kubernetes API. This error usually happens when there is a problem on the bootstrap host that prevents creating a temporary control plane.
[root@ocp-svc ~]#