Hello techies, as we know Kubernetes (k8s) is a free and open-source container orchestration system. It is used for automating deployment and management of containerized applications. In this guide, we will cover how to install kubernetes cluster on Rocky Linux 8 with kubeadm step by step.
Minimum System Requirement for Kubernetes
- 2 vCPUs or more
- 2 GB RAM or more
- Swap disabled
- At least NIC card
- Stable Internet Connection
- One regular user with sudo privileges.
For demonstration, I am using following systems
- Once Master Node / Control Plane (2 GB RAM, 2vCPU, 1 NIC Card, Minimal Rocky Linux 8 OS)
- Two Worker Nodes (2GB RAM, 2vCPU, 1 NIC Card, Minimal Rocky Linux 8 OS)
- Hostname of Master Node – control-node (192.168.1.240)
- Hostname of Work Nodes – worker-node1(192.168.1.241), worker-node2(192.168.1.242)
Without further ado, let’s deep dive into Kubernetes installation steps.
Note: These steps are also applicable for RHEL 8 and AlmaLinux OS.
Step 1) Set Hostname and update hosts file
Use hostnamectl command to set the hostname on control node and workers node.
Run beneath command on control node
$ sudo hostnamectl set-hostname "control-node"
$ exec bash
Execute following command on worker node1
$ sudo hostnamectl set-hostname "worker-node1"
$ exec bash
Worker node 2
$ sudo hostnamectl set-hostname "worker-node2"
$ exec bash
Add the following entries in /etc/hosts file on control and worker nodes respectively.
192.168.1.240   control-node
192.168.1.241   worker-node1
192.168.1.242   worker-node2
Step 2) Disable Swap and Set SELinux in permissive mode
Disable swap, so that kubelet can work properly. Run below commands on all the nodes to disable it,
$ sudo swapoff -a
$ sudo sed -i '/ swap / s/^\(.*\)$/#\1/g' /etc/fstab
Run beneath sed command on all the nodes to set SELinux in permissive mode
$ sudo setenforce 0
$ sudo sed -i 's/^SELINUX=enforcing$/SELINUX=permissive/' /etc/selinux/config
Step 3) Configure Firewall Rules on Master and Worker Nodes
On control plane, following ports must be allowed in firewall.
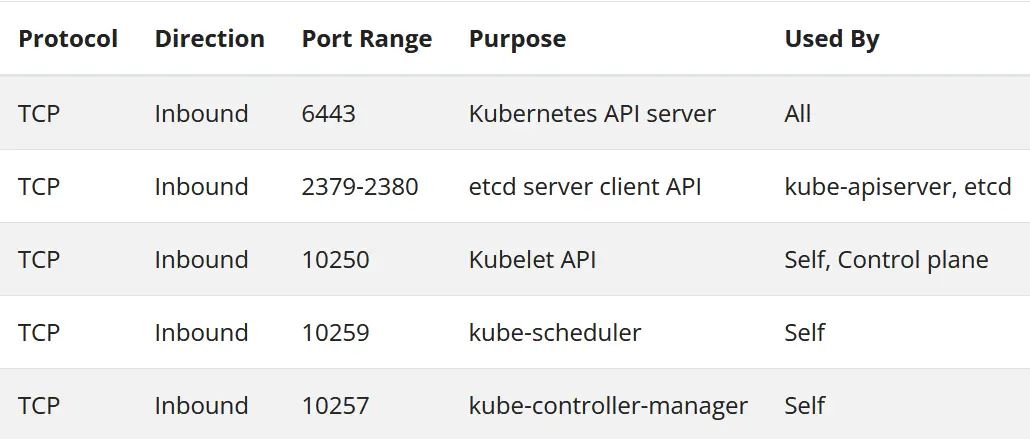
To allow above ports in control plane, run
$ sudo firewall-cmd --permanent --add-port=6443/tcp
$ sudo firewall-cmd --permanent --add-port=2379-2380/tcp
$ sudo firewall-cmd --permanent --add-port=10250/tcp
$ sudo firewall-cmd --permanent --add-port=10251/tcp
$ sudo firewall-cmd --permanent --add-port=10252/tcp
$ sudo firewall-cmd --reload
$ sudo modprobe br_netfilter
$ sudo sh -c "echo '1' > /proc/sys/net/bridge/bridge-nf-call-iptables"
$ sudo sh -c "echo '1' > /proc/sys/net/ipv4/ip_forward"
On worker Nodes, following ports must be allowed in firewall

$ sudo firewall-cmd --permanent --add-port=10250/tcp
$ sudo firewall-cmd --permanent --add-port=30000-32767/tcp
$ sudo firewall-cmd --reload
$ sudo modprobe br_netfilter
$ sudo sh -c "echo '1' > /proc/sys/net/bridge/bridge-nf-call-iptables"
$ sudo sh -c "echo '1' > /proc/sys/net/ipv4/ip_forward"
Step 4) Install Docker on Master and Worker Nodes
Install Docker on master and worker nodes. Here docker will provide container run time (CRI). To install latest docker, first we need to enable its repository by running following commands.
$ sudo dnf config-manager --add-repo=https://download.docker.com/linux/centos/docker-ce.repo
Now, run below dnf command on all the nodes to install docker-ce (docker community edition)
$ sudo dnf install docker-ce -y
Output
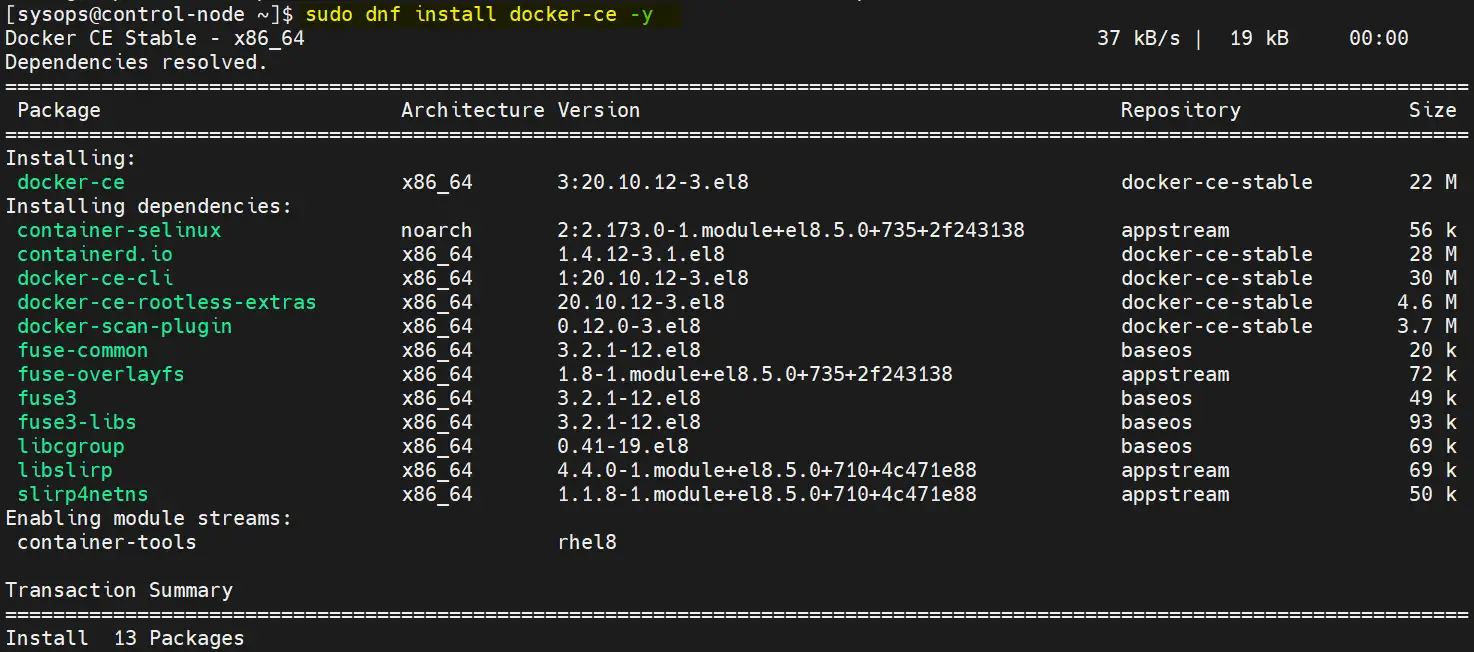
Once docker and its dependencies are installed then start and enable its service by running following commands
$ sudo systemctl start docker
$ sudo systemctl enable docker
Step 5) Install kubelet, Kubeadm and kubectl
Kubeadm is the utility through which we will install Kubernetes cluster. Kubectl is the command line utility used to interact with Kubernetes cluster. Kubelet is the component which will run all the nodes and will preform task like starting and stopping pods or containers.
To Install kubelet, Kubeadm and kubectl on all the nodes, first we need to enable Kubernetes repository.
Perform beneath commands on master and worker nodes.
$ cat <<EOF | sudo tee /etc/yum.repos.d/kubernetes.repo
[kubernetes]
name=Kubernetes
baseurl=https://packages.cloud.google.com/yum/repos/kubernetes-el7-\$basearch
enabled=1
gpgcheck=1
repo_gpgcheck=1
gpgkey=https://packages.cloud.google.com/yum/doc/yum-key.gpg https://packages.cloud.google.com/yum/doc/rpm-package-key.gpg
exclude=kubelet kubeadm kubectl
EOF

$ sudo dnf install -y kubelet kubeadm kubectl --disableexcludes=kubernetes
After installing above packages, enable kubelet service on all the nodes (control and worker nodes), run
$ sudo systemctl enable --now kubelet
Step 6) Install Kubernetes Cluster with Kubeadm
While installing Kubernetes cluster we should make sure that cgroup of container run time (CRI) matches with cgroup of kubelet. Typically, in Docker, cgroup is cgroupfs, so we must instruct Kubeadm to use cgroupfs as cgoup of kubelet. This can be done by passing a yaml in Kubeadm command,
Create kubeadm-config.yaml file on control plane with following content
$ vi kubeadm-config.yaml
# kubeadm-config.yaml
kind: ClusterConfiguration
apiVersion: kubeadm.k8s.io/v1beta3
kubernetesVersion: v1.23.4
--
kind: KubeletConfiguration
apiVersion: kubelet.config.k8s.io/v1beta1
cgroupDriver: cgroupfs
Note: Replace the Kubernetes version as per your setup.
Now, we are all set to install (or initialize the cluster), run below Kubeadm command from control node,
$ sudo kubeadm init --config kubeadm-config.yaml
Output of above command would look like below,
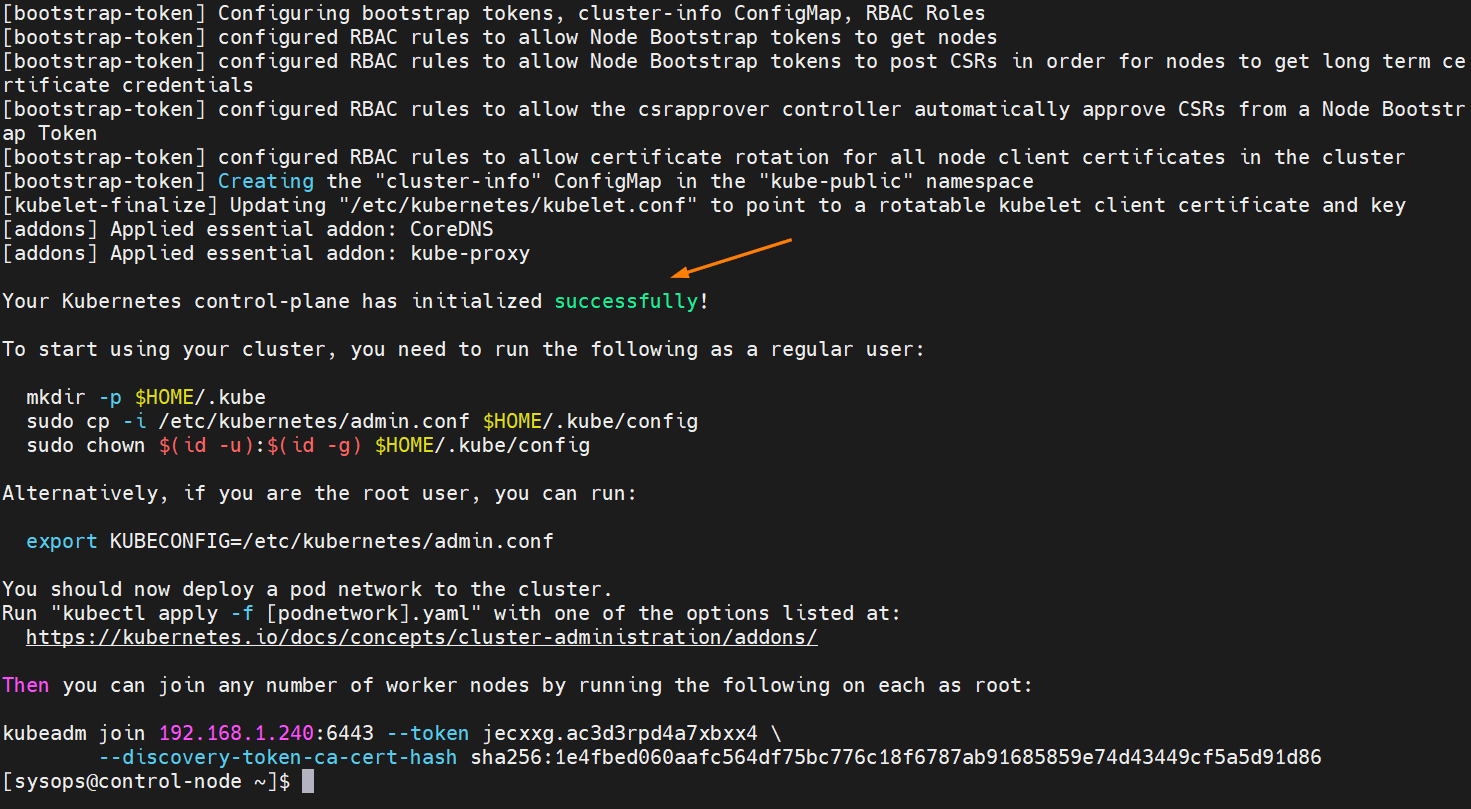
Above output confirms that cluster has been initialized successfully.
Execute following commands to allow regular user to interact with cluster, these commands are already there in output.
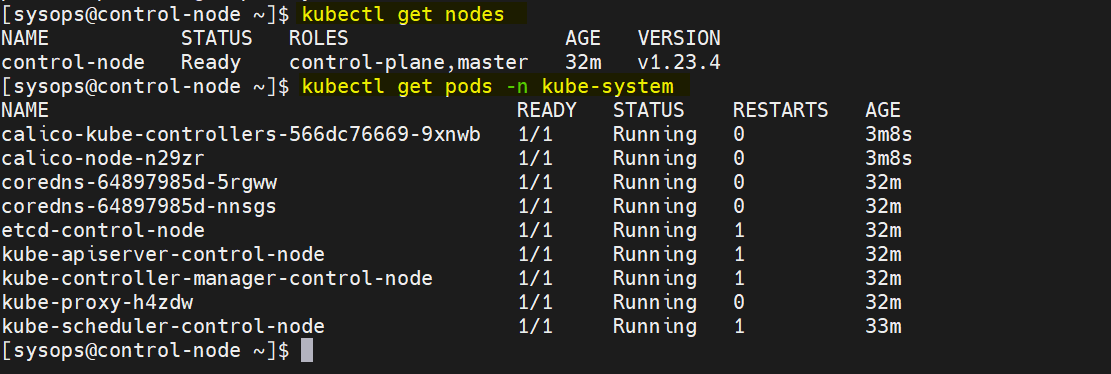
$ mkdir -p $HOME/.kube
$ sudo cp -i /etc/kubernetes/admin.conf $HOME/.kube/config
$ sudo chown $(id -u):$(id -g) $HOME/.kube/config
$ kubectl get nodes

To make nodes in ready state and to enable cluster dns service (coredns) , install pod network ad-on (CNI – Container Network Interface). Pods will start communicating each other once pod network ad-on is installed. In this guide, I am installing calico as network ad-on. Run beneath kubectl command from control-plane.
$ kubectl apply -f https://raw.githubusercontent.com/projectcalico/calico/v3.25.0/manifests/calico.yaml
Output
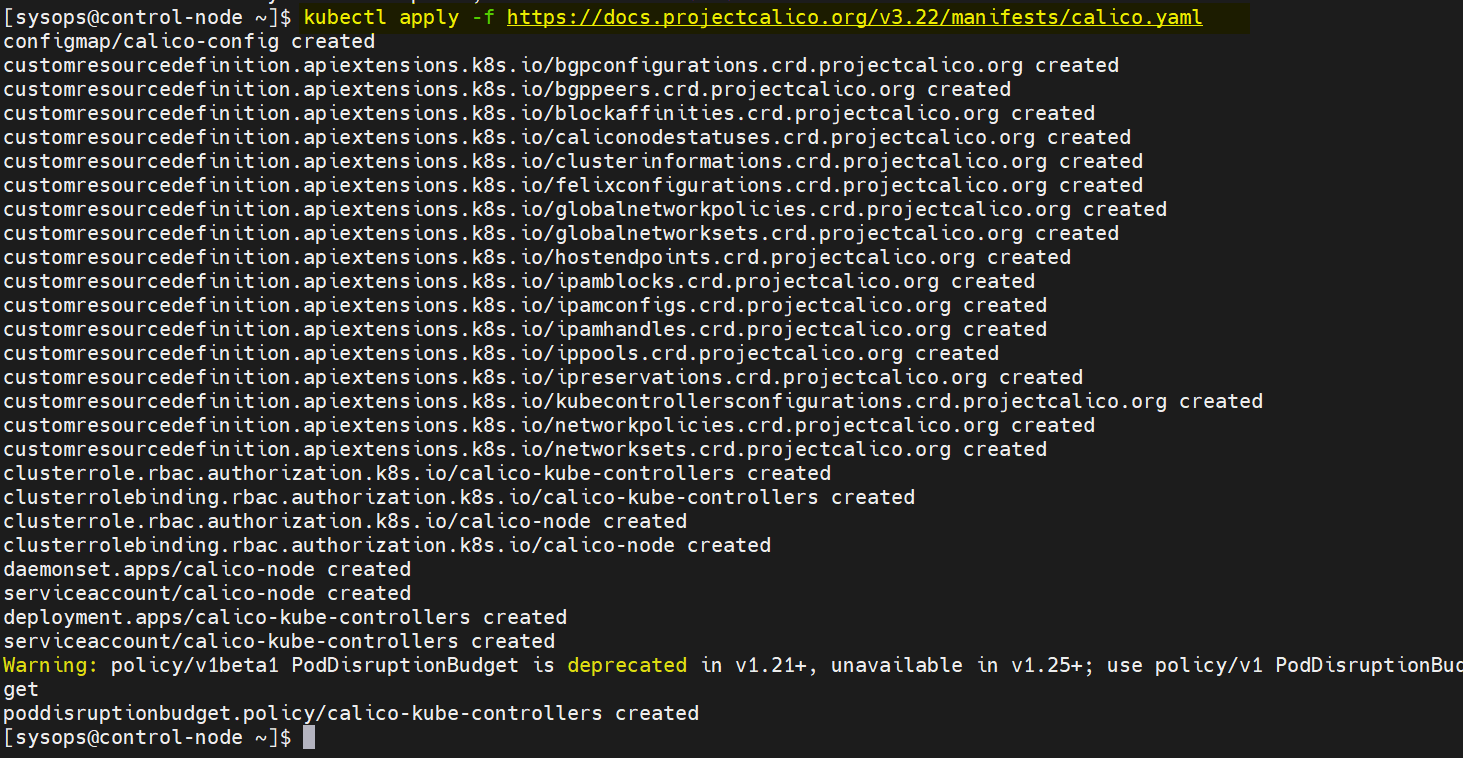
After the successful installation of calico network ad-on, control node and pods in kube-system namespace will be come ready and available respectively.
Now, next step is to join worker nodes to the cluster.
Step 7) Join Worker Nodes to Cluster
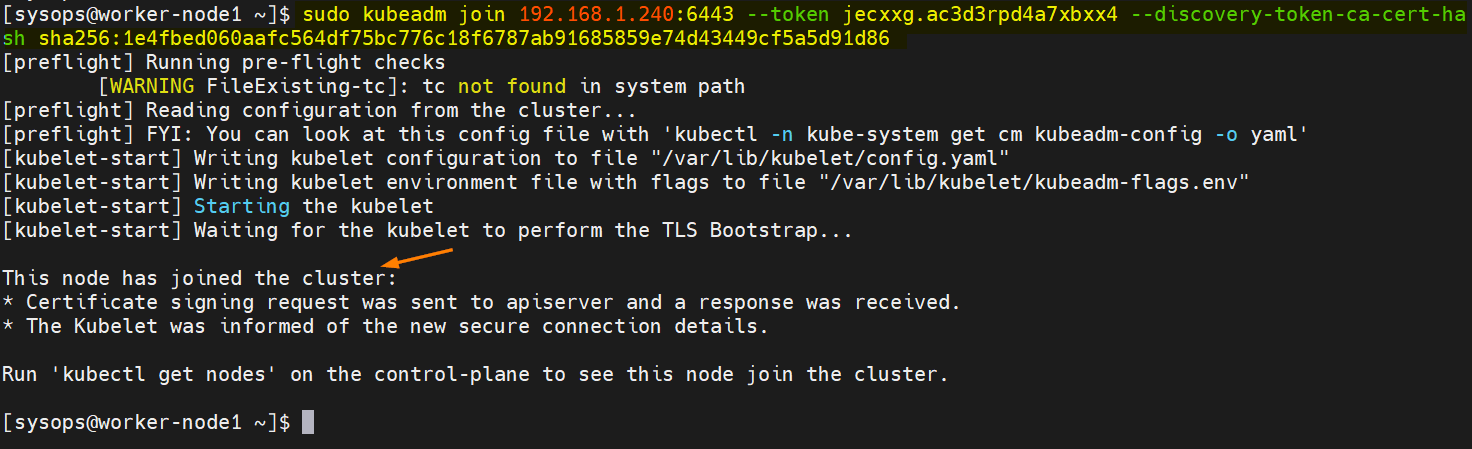
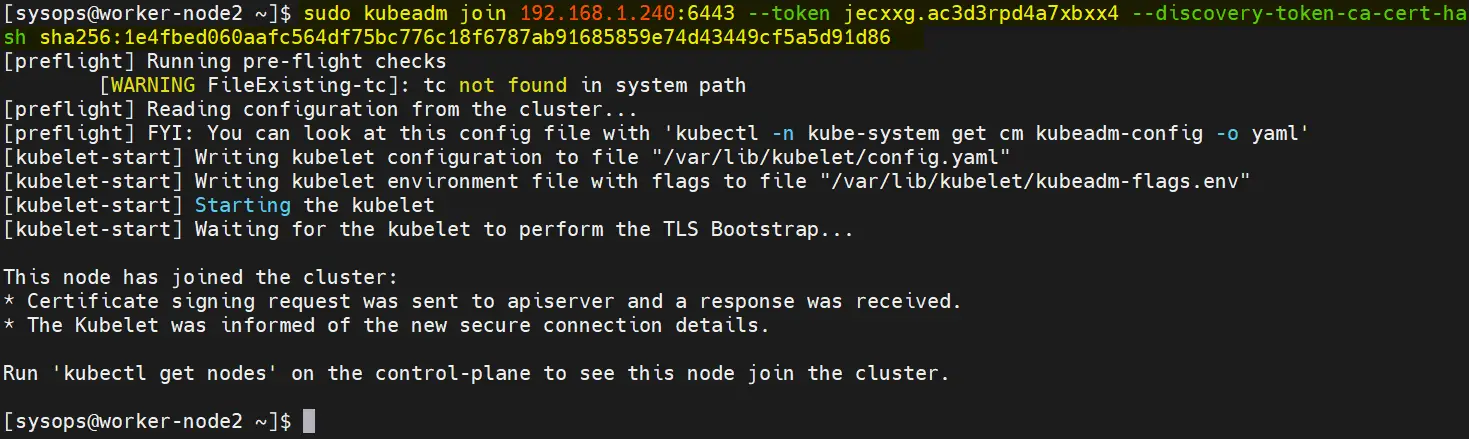
After the successful initialization of Kubernetes cluster, command to join any worker node to cluster is shown in output. So, copy that command and past it on worker nodes. So, in my case command is,
$ sudo kubeadm join 192.168.1.240:6443 --token jecxxg.ac3d3rpd4a7xbxx4 --discovery-token-ca-cert-hash sha256:1e4fbed060aafc564df75bc776c18f6787ab91685859e74d43449cf5a5d91d86
Run above commands on both the worker nodes.
Verify the status of both worker nodes from control-plane, run
[sysops@control-node ~]$ kubectl get nodes
NAME           STATUS   ROLES                  AGE     VERSION
control-node   Ready    control-plane,master   49m     v1.23.4
worker-node1   Ready    <none>                 5m18s   v1.23.4
worker-node2   Ready    <none>                 3m57s   v1.23.4
[sysops@control-node ~]$
Great, above output confirms that worker nodes have joined the cluster. That’s all from this guide, I hope you have found this guide informative. Please do share your queries and feedback in below comments section.
Also Read: How to Create Sudo User on RHEL | Rocky Linux | AlmaLinux

I’m on Rocky Linux 8 and have run this over and over I get this:
[root@k8s-master-1 keepalived]# sudo kubeadm init –control-plane-endpoint “vip-k8s-master:8443”
[init] Using Kubernetes version: v1.24.2
[preflight] Running pre-flight checks
error execution phase preflight: [preflight] Some fatal errors occurred:
[ERROR CRI]: container runtime is not running: output: E0626 11:17:46.022101 9976 remote_runtime.go:925] “Status from runtime service failed” err=”rpc error: code = Unimplemented desc = unknown service runtime.v1alpha2.RuntimeService”
time=”2022-06-26T11:17:46Z” level=fatal msg=”getting status of runtime: rpc error: code = Unimplemented desc = unknown service runtime.v1alpha2.RuntimeService”
, error: exit status 1
[preflight] If you know what you are doing, you can make a check non-fatal with `–ignore-preflight-errors=…`
To see the stack trace of this error execute with –v=5 or higher
Hi Rick,
To fix the issue, kindly try following commands one after the another,
# rm /etc/containerd/config.toml
# systemctl restart containerd
# kubeadm init
Hi Rick,
1st, thanks for this cool documentation 🙂
2nd I think I found a bug in your kubeadm-config.yaml example.
— should be — in order to have it valid.
Hope this helps,
Jean-Paul
small update regarding calico installation :
kubectl apply -f ‘https://raw.githubusercontent.com/projectcalico/calico/v3.25.0/manifests/calico.yaml’
Thanks Youssef, I have updated this in post too.