Apache Tomcat 9 is a free and open source web server which is used to serve java based web applications. In other words we can say Tomcat server is used to implement Java Servlet and JSP (Java Server Pages) technologies.
In this article we will demonstrate how to install latest version of tomcat i.e Tomcat 9.0.10 on Ubuntu 18.04 / 16.04 LTS Server. One of the important perquisite of Tomcat 9 is Java 8 or higher version, lets jump into the installations steps.
Step:1) Install Java 8 or its higher version
Using the default configured apt repositories on ubuntu 18.04 & 16.04 server, we can install the java using the package name “default-jdk“. Run the beneath apt commands,
pkumar@linuxtechi:~$ sudo apt update
pkumar@linuxtechi:~$ sudo apt install default-jdk -y
Once above packages are installed then verified the Java version using below command,
pkumar@linuxtechi:~$ java --version
openjdk 10.0.1 2018-04-17
OpenJDK Runtime Environment (build 10.0.1+10-Ubuntu-3ubuntu1)
OpenJDK 64-Bit Server VM (build 10.0.1+10-Ubuntu-3ubuntu1, mixed mode)
pkumar@linuxtechi:~$
Step:2 Create tomcat User
Tomcat service will be controlled by tomcat user, so let create a user with name “tomcat“, whose home directory will be “/opt/tomcat” and shell will be “/bin/false”.
If the folder or home directory of tomcat (/opt/tomcat) doesn’t exist then create it using mkdir command,
pkumar@linuxtechi:~$ sudo mkdir /opt/tomcat
Create a tomcat user using below useradd command,
pkumar@linuxtechi:~$ sudo useradd -s /bin/false -d /opt/tomcat tomcat
Step:3 Download & Install Tomcat 9 from command line
Download the latest version of tomcat 9 (i.e 9.0.10) from its official Web site https://tomcat.apache.org/download-90.cgi. In my case I am directly downloading it on my server using below wget command,
pkumar@linuxtechi:~$ wget http://www-us.apache.org/dist/tomcat/tomcat-9/v9.0.10/bin/apache-tomcat-9.0.10.tar.gz
Once the above file is downloaded, extract it into the tomcat user’s home folder (/opt/tomcat) using below tar command,
pkumar@linuxtechi:~$ sudo tar xzvf apache-tomcat-9.0.10.tar.gz -C /opt/tomcat --strip-components=1
Set the required permissions on /opt/tomcat and its sub folder and files.
pkumar@linuxtechi:~$ sudo chgrp -R tomcat /opt/tomcat
pkumar@linuxtechi:~$ cd /opt/tomcat/
pkumar@linuxtechi:/opt/tomcat$ sudo chmod -R g+r conf
pkumar@linuxtechi:/opt/tomcat$ sudo chmod g+x conf
Make the tomcat as file owner of the following directories webapps, work, temp, and logs using the beneath chown command
pkumar@linuxtechi:/opt/tomcat$ sudo chown -R tomcat webapps/ work/ temp/ logs/
So now all the required permissions are set, let create tomcat systemd service so that tomcat service can be controlled by systemctl command.
Step:4) Create Tomcat Systemd Service
To configure tomcat as a service on ubuntu server we need to create systemd file. In the systemd file we must specify the java path, so first find java path using below command,
pkumar@linuxtechi:~$ sudo update-java-alternatives -l
java-1.11.0-openjdk-amd64      1101       /usr/lib/jvm/java-1.11.0-openjdk-amd64
pkumar@linuxtechi:~$
Now create a systemd file with name “/etc/systemd/system/tomcat.service” and insert the following contents
pkumar@linuxtechi:~$ sudo vi /etc/systemd/system/tomcat.service
[Unit]
Description=Apache Tomcat Web Application Container
After=network.target

[Service]
Type=forking

Environment=JAVA_HOME=/usr/lib/jvm/java-1.11.0-openjdk-amd64
Environment=CATALINA_PID=/opt/tomcat/temp/tomcat.pid
Environment=CATALINA_HOME=/opt/tomcat
Environment=CATALINA_BASE=/opt/tomcat
Environment='CATALINA_OPTS=-Xms512M -Xmx1024M -server -XX:+UseParallelGC'
Environment='JAVA_OPTS=-Djava.awt.headless=true -Djava.security.egd=file:/dev/./urandom'
ExecStart=/opt/tomcat/bin/startup.sh
ExecStop=/opt/tomcat/bin/shutdown.sh

User=tomcat
Group=tomcat
UMask=0007
RestartSec=10
Restart=always

[Install]
WantedBy=multi-user.target
Reload the systemd daemon and start tomcat service,
pkumar@linuxtechi:~$ sudo systemctl daemon-reload
pkumar@linuxtechi:~$ sudo systemctl start tomcat
pkumar@linuxtechi:~$ sudo systemctl enable tomcat
Created symlink /etc/systemd/system/multi-user.target.wants/tomcat.service → /etc/systemd/system/tomcat.service.
pkumar@linuxtechi:~$
pkumar@linuxtechi:~$ sudo systemctl status tomcat
Output of above command should be something like below,

Step:5) Test Your Tomcat 9 Server
In case OS firewall is enabled and configured on your server then we need to allow 8080 port. Use the below command
pkumar@linuxtechi:~$ sudo ufw allow 8080
Rule added
Rule added (v6)
pkumar@linuxtechi:~$
By default, we can access the tomcat web gui from Server itself either via local ip or localhost and if you want to access it from outside then we must comment out one line in both the files “/opt/tomcat/webapps/host-manager/META-INF/context.xml” and “/opt/tomcat/webapps/manager/META-INF/context.xml”
pkumar@linuxtechi:~$ sudo vi /opt/tomcat/webapps/host-manager/META-INF/context.xml
----------------------------------------------------------
<Valve className="org.apache.catalina.valves.RemoteAddrValve"
  allow="127\.\d+\.\d+\.\d+|::1|0:0:0:0:0:0:0:1" />
----------------------------------------------------------
Change to or comment out
----------------------------------------------------------
<!--Valve className="org.apache.catalina.valves.RemoteAddrValve"
  allow="127\.\d+\.\d+\.\d+|::1|0:0:0:0:0:0:0:1" /> -->
-----------------------------------------------------------
pkumar@linuxtechi:~$ sudo vi /opt/tomcat/webapps/manager/META-INF/context.xml
-----------------------------------------------------------
<Valve className="org.apache.catalina.valves.RemoteAddrValve"
         allow="127\.\d+\.\d+\.\d+|::1|0:0:0:0:0:0:0:1" />
-----------------------------------------------------------
Change to or Comment out
-----------------------------------------------------------
<!--Valve className="org.apache.catalina.valves.RemoteAddrValve"
         allow="127\.\d+\.\d+\.\d+|::1|0:0:0:0:0:0:0:1" />-->
-----------------------------------------------------------
Restart the tomcat service using the below command,
pkumar@linuxtechi:~$ sudo systemctl restart tomcat
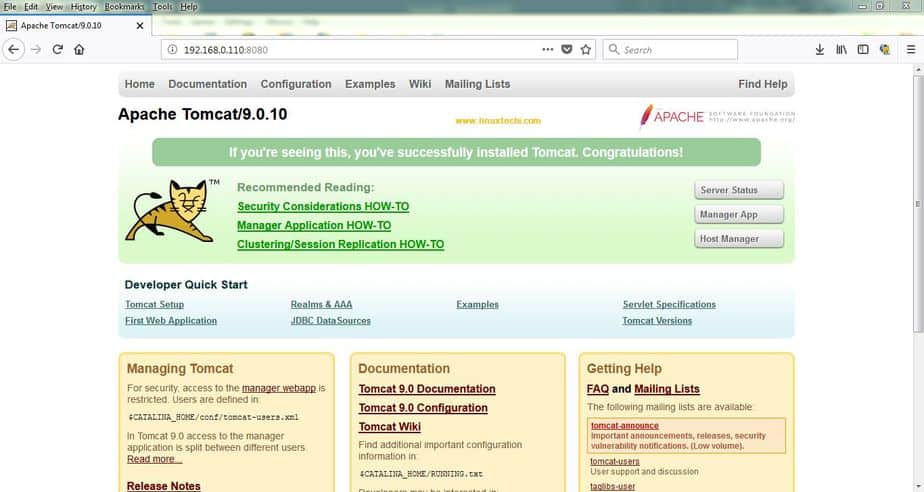
Now Open your web browser and type url : http://<Tomcat-Server-IP-Addres>:8080
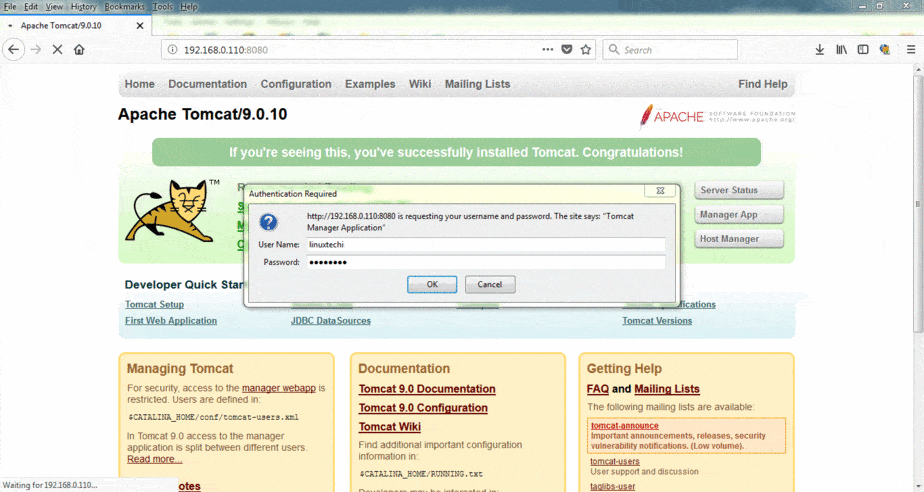
As of now we have successfully installed Tomcat 9, but to Access Application Web manager and Virtual Host Manager we must define some user and its password in “tomcat-users.xml” file. So add the following line before </tomcat-users>
pkumar@linuxtechi:~$ sudo vi /opt/tomcat/conf/tomcat-users.xml
----------------------------------------------------------
<role rolename="manager-gui"/>
<user username="linuxtechi" password="XXXXXXX" roles="manager-gui,admin-gui"/>
----------------------------------------------------------
Save and exit the file then restart the tomcat service
pkumar@linuxtechi:~$ sudo systemctl restart tomcat
pkumar@linuxtechi:~$
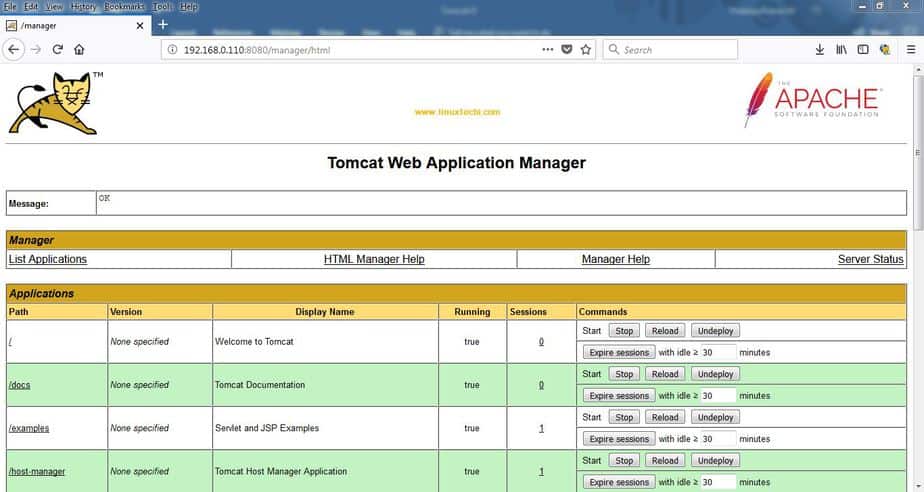
Now Try to access Web Application Manager and Virtual Host Manager, use the same user name and password that you have specified in the tomcat-users.xml file,
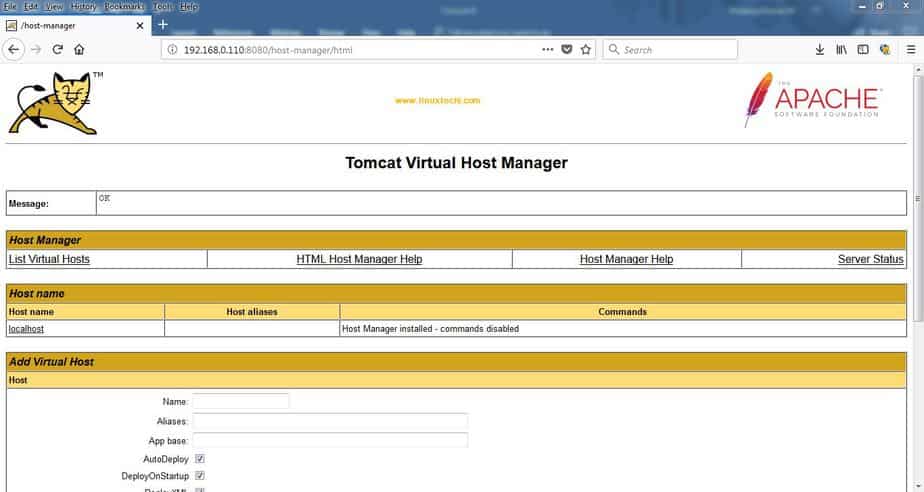
Similarly access Virtual Host Manager,
This confirms that you have successfully installed Tomcat 9 on your Ubuntu 18.04 / 16.04 LTS Server. That’s all from this tutorial, please do share your feedback and comments.
Thanks! Very easy tutorial, i have tested on Ubuntu Desktop 18.10, Java 11 and Tomcat 9 successfully
how to link tomcat server to netbeans. I’ve used /opt/tomcat and it doesn’t work