In this guide, we will show you how to create lvm partition step-by-step in Linux.
LVM stands for Logical Volume Management, it is the highly recommended way to manage disk or storage on Linux systems specially for servers. One of the main benefit of LVM partition is that we can extend its size online without any downtime. LVM partition can also be reduced but it is not recommended.
For the demo purpose, I have used Ubuntu 22.04 system and attached 15GB disk to it. We will create LVM partition on this disk from the command line.
Prerequisites
- Raw disk attached to Linux system
- Local User with sudo rights
- Pre-Install lvm2 package
Without further ado, let’s deep dive into the steps.
Step 1) Identify New Attached Raw Disk
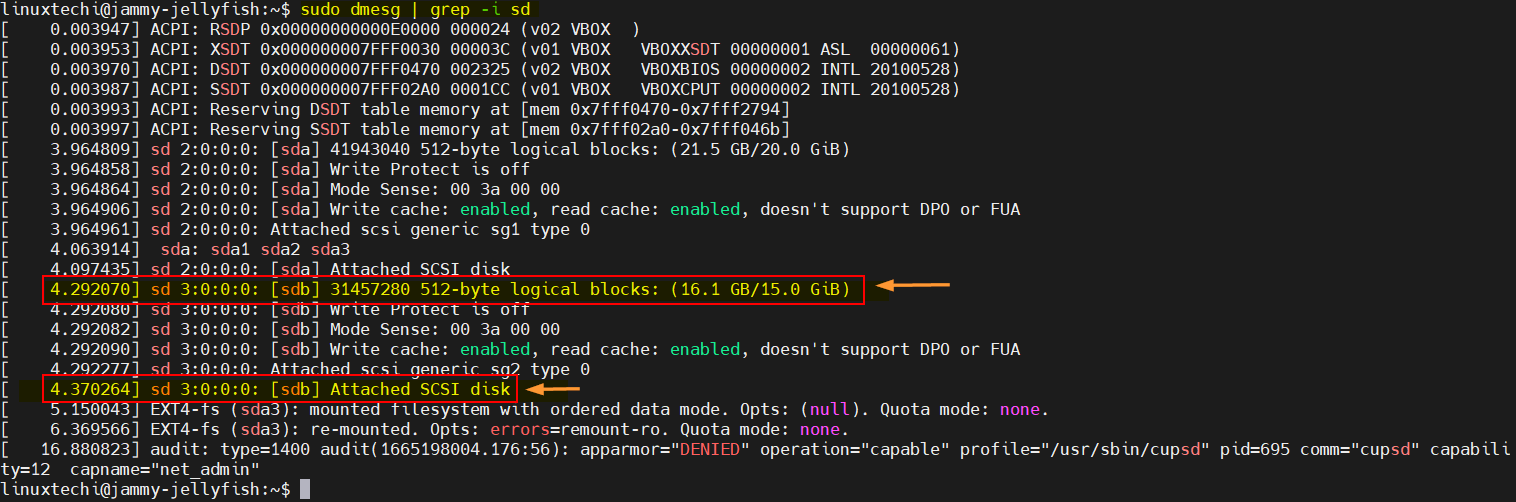
Login to your system, open the terminal and run following dmesg command,
$ sudo dmesg | grep -i sd
In the output, look for new disk attached of size 15GB,
Alternate way to identify new attached raw disk is via fdisk command,
$ sudo fdisk -l | grep -i /dev/sd
Output,

From output above, it is confirmed that new attached disk is ‘/dev/sdb’
Step 2) Create PV (Physical Volume)
Before start creating pv on disk /dev/sdb, make sure lvm2 package is installed. In case it is not installed, then run following command,
$ sudo apt install lvm2     // On Ubuntu / Debian
$ sudo dnf install lvm2    // on RHEL / CentOS
Run following pvcreate command to create pv on disk /dev/sdb,
$ sudo pvcreate /dev/sdb
  Physical volume "/dev/sdb" successfully created.
$
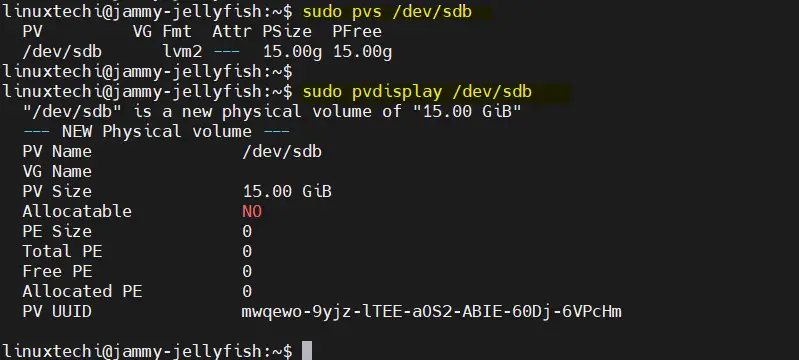
To verify pv status run,
$ sudo pvs /dev/sdb
Or
$ sudo pvdisplay /dev/sdb
Step 3) Create VG (Volume Group)
To create a volume group, we will use vgcreate command. Creating VG means adding pv to the volume group.
Syntax :
$ sudo vgcreate <vg_name> <pv>
In our case, command would be,
$ sudo vgcreate volgrp01 /dev/sdb
  Volume group "volgrp01" successfully created
$
Run following commands to verify the status of vg (volgrp01)
$ sudo vgs volgrp01
Or
$ sudo vgdisplay volgrp01
Output of above commands,
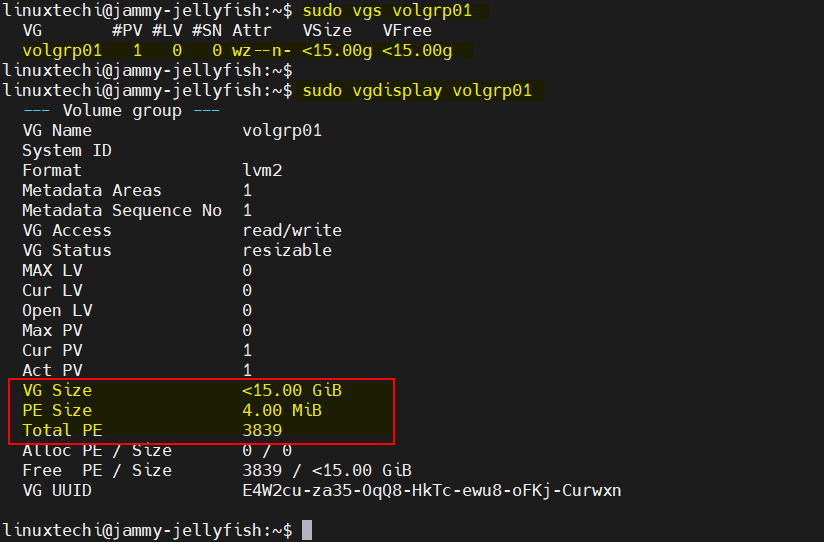
Above output confirms that volume group (volgrp01) of size 15 GiB is created successful and size of one physical extend (PE) is 4 MB. PE size can be changed while creating vg.
Step 4) Create LV (Logical Volume)
Lvcreate command is used to create LV from the VG. Syntax of lvcreate command would look like below,
$ sudo lvcreate -L <Size-of-LV> -n <LV-Name> <VG-Name>
In our case, following command will be used to create lv of size 14 GB
$ sudo lvcreate -L 14G -n lv01 volgrp01
  Logical volume "lv01" created.
$
Validate the status of lv, run
$ sudo lvs /dev/volgrp01/lv01
or
$ sudo lvdisplay /dev/volgrp01/lv01
Output,

Output above shows that LV (lv01) has been created successfully of size 14 GiB.
Step 5) Format LVM Partition
Use mkfs command to format the lvm partition. In our case lvm partition is /dev/volgrp01/lv01
Note: We can format the partition either ext4 or xfs, so choose the file system type according to your setup and requirement.
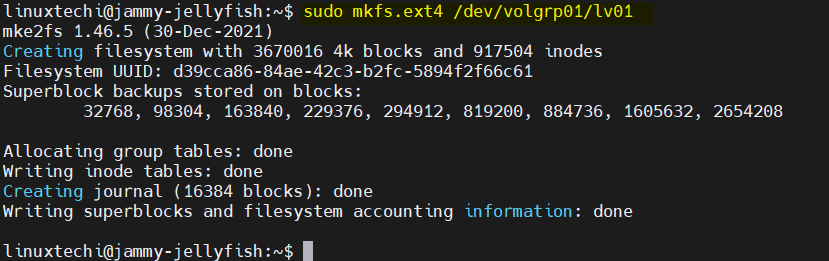
Run following command to format LVM partition as ext4 file system.
$ sudo mkfs.ext4 /dev/volgrp01/lv01
Execute beneath command to format the lvm partition with xfs file system,
$ sudo mkfs.xfs /dev/volgrp01/lv01
To use above formatted partition, we must mount it on some folder. So, let’s create a folder /mnt/data
$ sudo mkdir /mnt/data
Now run mount command to mount it on /mnt/data folder,
$ sudo mount /dev/volgrp01/lv01 /mnt/data/
$ df -Th /mnt/data/
Filesystem                Type  Size  Used Avail Use% Mounted on
/dev/mapper/volgrp01-lv01 ext4   14G   24K   13G   1% /mnt/data
$
Try to create some dummy file, run following commands,
$ cd /mnt/data/
$ echo "testing lvm partition" | sudo tee  dummy.txt
$ cat dummy.txt
testing lvm partition
$
$ sudo rm -f  dummy.txt
Perfect, above commands output confirm that we can access lvm partition.
To mount above lvm partition permanently, add its entries in fstab file using following echo command,
$ echo '/dev/volgrp01/lv01  /mnt/data  ext4  defaults 0 0' | sudo  tee -a /etc/fstab
$ sudo mount -a
That’s all from this guide, thanks for the reading. Kindly do post your queries and feedback in below comments section.
Read Also: How to Extend XFS Root Partition without LVM in Linux


Thank you. Very helpful
Excellent – exactly what I was looking for – merci
What does the 0 0 mean? or 1 0?
and how casn you use the UUID instead of the filesystem path
when you see “0 0” or “1 0” at the end of an /etc/fstab entry, it indicates the dump and pass fields respectively. The values “0 0” mean that the file system will not be dumped (backed up) and will not be checked during the boot process. The values “1 0” would mean that the file system will be dumped and checked first during the boot process. However, as mentioned earlier, the dump field is rarely used nowadays, and the pass field is typically set to 0 for most non-root file systems.
Perfect
this article and procedure is perfect
efficient and very useful, thank you
I already have a VG which I did when installing Debian, with the name vg0 (Which is a Raid 0 NVMe)
Now I have another HDD, want to use it for saving big files. I created the PV, but I’m unsure if about the VG naming, should I use vg0 or name it vg1.
Is it even possible to increase the LV size on vg0 with vg1?
Hi ,
Yes, you can add the new PV to the existing VG vg0 and then you can extend the size of LV.
# vgextend volume-group new-disk
# vgextend vg0 /dev/sdb
Thank you for the excellent step-by-step procedure.
When doing:
# mkfs.ext4 /dev/volgrp01/lv01
I recommend using the -m0 option:
# mkfs.ext4 -m0 /dev/volgrp01/lv01
Otherwise, 5% of the disk will be reserved for super-user. This isn’t usually necessary on filesystems other than the / root. The m0 says to reserve no space for the super-user on that partition.
Perfect Document !! Thanks