Hello Techies, In our previous tutorial we have already discussed installation steps of Kubernetes on CentOS 7 / RHEL 7. In this tutorial we will discuss how we can deploy pods, replication controller and service.
I am assuming Kubernetes setup is already up and running. In case it is not then refer the following guide:
Now Let’s jump into the Pod deployment. Pod is a multi-tier or group of containers which is launched on any of Worker nodes or Minion. To deploy a pod, first we have to create yml or json file on master node or in a system where kubectl tool is installed. Kubectl will use the yml file and will connect to kube-apiserver on 6443 port and then kube-apiserver will connect to kube-controller-manager and Kube-controller-manager will further connect to Kube-Scheduler and scheduler program connects to worker nodes using kubelet agent and then kubelet agent connects to docker daemon on the node and launch a container based on Pod definition.
Before start creating pod yml file, first make sure you have test docker image on docker hub. In my case I have already push one docker image(linuxtechi/web-server-php) on docker hub.
Now Let’s create a file pod.yml on the master server.
[root@k8s-master ~]# mkdir /techcode
[root@k8s-master ~]# cd /techcode/
[root@k8s-master techcode]# vi pod.yml
apiVersion: v1
kind: Pod
metadata:
  name: web-server-pod
  labels:
   app: webserver-app1
   region: IN
   rack: r1
   version: "1.1"
spec:
  containers:
    - name: web-server-test-container
      image: linuxtechi/web-server-php:testversion
      ports:
      - containerPort: 80
Save and exit the file.
In the file we have specify apiversion as v1 , you can cross verify the apiversion from the file “/root/.kube/config”, Specify Kind as ‘Pod’ as we are deploying pod using this yml file. Specify the meta-data and label for pod.
Apart from this we have mentioned the specification for the container like “Image Name” and port exposed from the container etc.
Use below ‘kubectl‘ command to deploy pod.
[root@k8s-master techcode]# kubectl create -f pod.yml
pod "web-server-pod" created
[root@k8s-master techcode]#
Verify the pod status from master node using the following command
[root@k8s-master ~]# kubectl get pods
NAME             READY     STATUS    RESTARTS   AGE
web-server-pod   1/1       Running   0          4m
[root@k8s-master ~]#
[root@k8s-master ~]# kubectl get pods -o wide
NAME             READY     STATUS    RESTARTS   AGE       IP          NODE
web-server-pod   1/1       Running   0          4m        10.32.0.2   worker-node2
[root@k8s-master ~]#
As per above output, pod has been deployed on worker node 2. We can’t access the application running inside the pod because till now we have not set any patting or natting rule for the pod.
Let’s create a rule in such a way that if any request comes on ip address of worker node 2 on specific port then it should be redirected to the pod (web-server-pod) on port 80. This can be achieved with service. A service can be defined either from command or via yml file.
Creating Service from Command Line using “kubectl expose”
[root@k8s-master ~]# kubectl expose pods web-server-pod  --name=webpod-service --target-port=80  --type=NodePort
service "webpod-service" exposed
[root@k8s-master ~]#
Above command will expose pod or container to outside world. It will generate the random port on the node on which pods are created and we can say above command will do the patting task for us, External users can reach to my web server which is running inside the pod with node ip along with random port.
Verify the Service status using the following commands
[root@k8s-master ~]# kubectl get svc
NAME             CLUSTER-IP      EXTERNAL-IP   PORT(S)        AGE
kubernetes       10.96.0.1       <none>        443/TCP        2h
webpod-service   10.101.51.190   <nodes>       80:30108/TCP   2m
[root@k8s-master ~]#
[root@k8s-master ~]# kubectl get svc -o wide
NAME             CLUSTER-IP      EXTERNAL-IP   PORT(S)        AGE       SELECTOR
kubernetes       10.96.0.1       <none>        443/TCP        2h        <none>
webpod-service   10.101.51.190   <nodes>       80:30108/TCP   3m        app=webserver-app1,rack=r1,region=IN,version=1.1
[root@k8s-master ~]#
Now try to access Web Server
~]# curl 192.168.1.50:30108
We can delete the above created service using the following command
[root@k8s-master ~]# kubectl delete svc webpod-service
service "webpod-service" deleted
[root@k8s-master ~]#
Creating service using yml file
Create a new yml file with the name ‘service.yml‘ with following content. This time Kind parameter value will be ‘Service’. Under the Specification field mentioned the port on which web server or application is running inside the container and NodePort is a random port on Work node. Selector indicates that this service will applicable for the pod whose version parameter is ‘1.1’, So in our case this service will be applicable for the pod “web-server-pod”
[root@k8s-master techcode]# vi service.yml
apiVersion: v1
kind: Service
metadata:
 name: webpod-service
 labels:
   app: webpod-service-label
spec:
 type: NodePort
 ports:
 - port: 80
   nodePort: 30001
   protocol: TCP
 selector:
   version: "1.1"
Now create the service by executing the following command
[root@k8s-master techcode]# kubectl create -f service.yml
service "webpod-service" created
[root@k8s-master techcode]#
Let’s verify the Service status by using the beneath command
[root@k8s-master techcode]# kubectl get svc
NAME             CLUSTER-IP     EXTERNAL-IP   PORT(S)        AGE
kubernetes       10.96.0.1      <none>        443/TCP        2h
webpod-service   10.102.18.35   <nodes>       80:30001/TCP   1m
[root@k8s-master techcode]#
[root@k8s-master techcode]# kubectl get svc -o wide
NAME             CLUSTER-IP     EXTERNAL-IP   PORT(S)        AGE       SELECTOR
kubernetes       10.96.0.1      <none>        443/TCP        2h        <none>
webpod-service   10.102.18.35   <nodes>       80:30001/TCP   2m        version=1.1
[root@k8s-master techcode]#
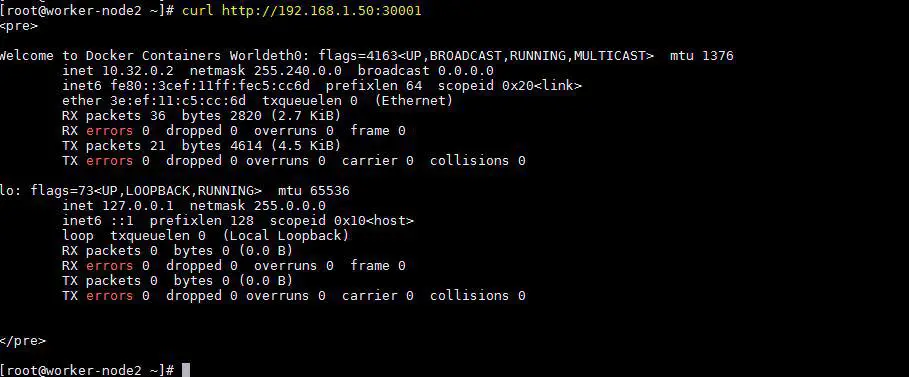
Now access your application using curl command:
[root@worker-node2 ~]# curl http://192.168.1.50:30001
Output would be something like below
As of now we have deployed one pod and its service. Let’s assume i want to deploy 5 pods of same kind, then it can be deployed using replication controller. In short it called as ‘rc‘. Whenever we provision pods using rc then pods will be in high availability and fault tolerance, it means if anything goes wrong with pod then pod of same kind will be deployed automatically by the cluster.
Deploying Replication Controller
Replication controller is also deployed with yml file using kubectl command. Let’s create a yml file for rc.
[root@k8s-master techcode]# vi replication-controller.yml
apiVersion: v1
kind: ReplicationController
metadata:
 name: webserver-rc
spec:
 replicas: 5
 selector:
   app:  lamp-app1
 template:
    metadata:
     labels:
       app: lamp-app1
       region: IN
       rack: r1
       version: "1.1"
    spec:
       containers:
       - name: webserver-php-con1
         image: linuxtechi/web-server-php:testversion
         ports:
         - containerPort: 80
This time kind parameter value is “ReplicationController” and under specification we have ‘replicas=5‘, it means 5 pods will deployed across worker nodes using the docker image “linuxtechi/web-server-php:testversion”
Run the following command to deploy replication controller
[root@k8s-master techcode]# kubectl create -f replication-controller.yml
replicationcontroller "webserver-rc" created
[root@k8s-master techcode]#
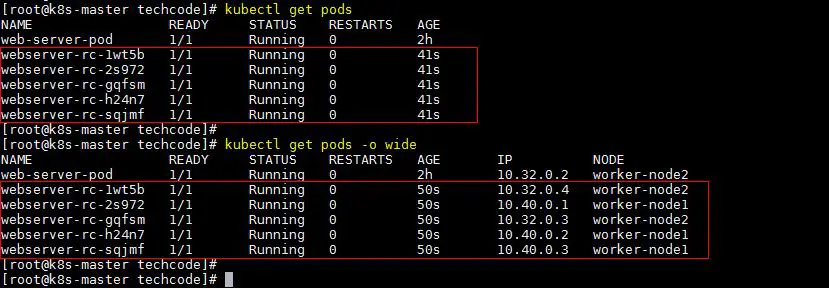
Verify the pod status and see where they have been provisioned
[root@k8s-master techcode]# kubectl get pods
[root@k8s-master techcode]# kubectl get pods -o wide
Verify the replication controller status using beneath kubectl command
[root@k8s-master techcode]# kubectl get rc
NAME           DESIRED   CURRENT   READY     AGE
webserver-rc   5         5         5         5m
[root@k8s-master techcode]# kubectl get rc -o wide
NAME           DESIRED   CURRENT   READY     AGE       CONTAINER(S)         IMAGE(S)                                SELECTOR
webserver-rc   5         5         5         5m        webserver-php-con1   linuxtechi/web-server-php:testversion   app=lamp-app1
[root@k8s-master techcode]#
Let’s define the service for above created replication controller.
[root@k8s-master techcode]# vi rc-service.yml
apiVersion: v1
kind: Service
metadata:
 name: webserver-service
 labels:
   app: webserver-service-label
spec:
 type: NodePort
 ports:
 - port: 80
   nodePort: 30002
   protocol: TCP
 selector:
   version: "1.1"
Create the service using kubectl command
[root@k8s-master techcode]# kubectl create -f rc-service.yml
service "webserver-service" created
[root@k8s-master techcode]#
Get the status of Service using below kubectl command
[root@k8s-master techcode]# kubectl get svc -o wide
NAME                CLUSTER-IP     EXTERNAL-IP   PORT(S)        AGE       SELECTOR
kubernetes          10.96.0.1      <none>        443/TCP        3h        <none>
webserver-service   10.111.34.34   <nodes>       80:30002/TCP   1m        version=1.1
[root@k8s-master techcode]#
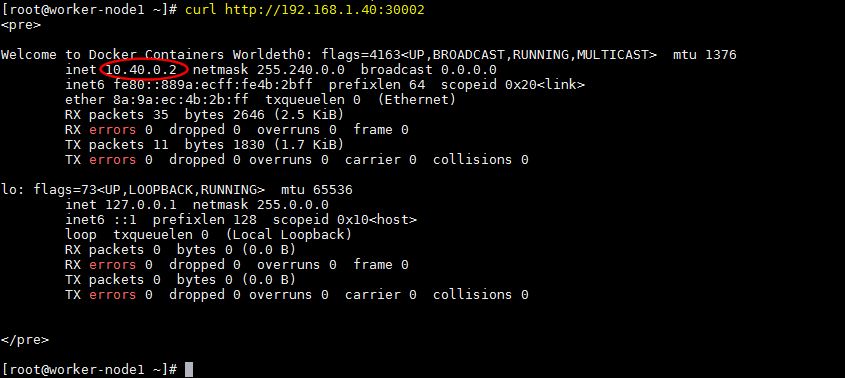
Now try accessing web server from both the nodes
[root@worker-node1 ~]# curl http://192.168.1.40:30002
[root@worker-node2 ~]# curl http://192.168.1.50:30002
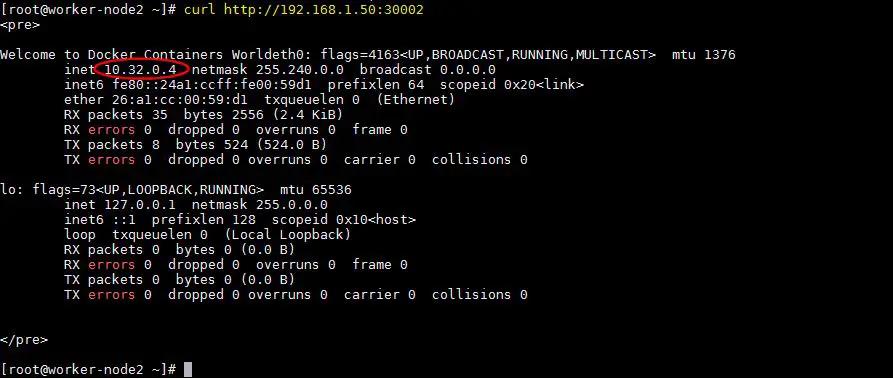
As per the above output, we can access our web server using the ip address of both worker nodes. Whenever we access web server using worker nodes ip then the request is load balanced automatically among the pods on nodes.
This conclude the article. Please do share your feedback and comments in case this article helps to deploy and understand Pods, service and Replication controller.


Excellent work. Thanks.
Thanks for sharing good work
Thank you using the article i was able to deploy k8 cluster in few minutes runing the master and worker nodes as vm under VirtualBox
Thanks you very much sir posting this tutorial.
Requesting you to post more videos on kubernetes deployment..
Great work bro, Thanks for sharing. It is working fine and gives wonderful basic knowledge on what is kubernetes how to setup kubernetes cluster, pods,worker nodes.