Sometimes, you may have tasks that need to be performed on a regular basis or at certain predefined intervals. Such tasks include backing up databases, updating the system, performing periodic reboots and so on. Such tasks in linux are referred to as cron jobs (Crontab). Cron jobs are used for automation of tasks that come in handy and help in simplifying the execution of repetitive and sometimes mundane tasks. Cron is a daemon that allows you to schedule these jobs which are then carried out at specified intervals. In this tutorial, you will learn how to schedule jobs using cron jobs.
The Crontab file
A crontab file, also known as a cron table, is a simple text file that contains rules or commands that specify the time interval of execution of a task. There are two categories of crontab files:
1) System-wide crontab file
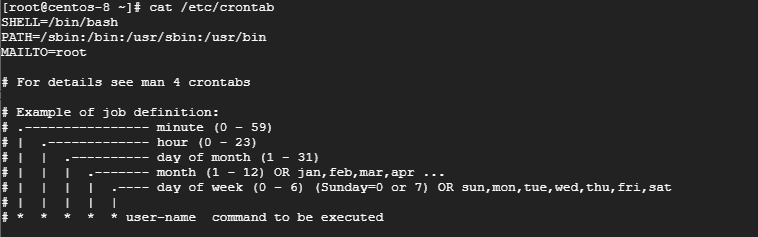
These are usually used by Linux services & critical applications requiring root privileges. The system crontab file is located at /etc/crontab and can only be accessed and edited by the root user. It’s usually used for the configuration of system-wide daemons. The crontab file looks as shown:
2) User-created crontab files
Linux users can also create their own cron jobs with the help of the crontab command. The cron jobs created will run as the user who created them.
All cron jobs are stored in /var/spool/cron (For RHEL and CentOS distros) and /var/spool/cron/crontabs (For Debian and Ubuntu distros), the cron jobs are listed using the username of the user that created the cron job
The cron daemon runs silently in the background checking the /etc/crontab file and /var/spool/cron and /etc/cron.d*/ directories
The crontab command is used for editing cron files. Let us take a look at the anatomy of a crontab file.
The anatomy of a crontab file
Before we go further, it’s important that we first explore how a crontab file looks like. The basic syntax for a crontab file comprises 5 columns represented by asterisks followed by the command to be carried out.
* * * * * command
This format can also be represented as shown below:
m h d moy dow command
OR
m h d moy dow /path/to/script
Let’s expound on each entry
- m: This represents minutes. It’s specified from 0 to 59
- h: This denoted the hour specified from 0 to 23
- d: This represents the day of the month. Specified between 1 to 31`
- moy: This is the month of the year. It’s specified between 1 to 12
- doy: This is the day of the week. It’s specified between 0 and 6 where 0 = Sunday
- Command: This is the command to be executed e.g backup command, reboot, & copy
Managing cron jobs
Having looked at the architecture of a crontab file, let’s see how you can create, edit and delete cron jobs
Creating cron jobs
To create or edit a cron job as the root user, run the command
# crontab -e
To create a cron job or schedule a task as another user, use the syntax
# crontab -u username -e
For instance, to run a cron job as user Pradeep, issue the command:
# crontab -u Pradeep -e
If there is no preexisting crontab file, then you will get a blank text document. If a crontab file was existing, The -e option allows to edit the file,
Listing crontab files
To view the cron jobs that have been created, simply pass the -l option as shown
# crontab -l
Deleting a crontab file
To delete a cron file, simply run crontab -e and delete or the line of the cron job that you want and save the file.
To remove all cron jobs, run the command:
# crontab -r
That said, let’s have a look at different ways that you can schedule tasks
Crontab examples in Scheduling tasks.
All cron jobs being with a shebang header as shown
#!/bin/bash
This indicates the shell you are using, which, for this case, is bash shell.
Next, specify the interval at which you want to schedule the tasks using the cron job entries we specified earlier on.
To reboot a system daily at 12:30 pm, use the syntax:
30 12 * * * /sbin/reboot
To schedule the reboot at 4:00 am use the syntax:
0 4 * * * /sbin/reboot
NOTE: The asterisk * is used to match all records
To run a script twice every day, for example, 4:00 am and 4:00 pm, use the syntax.
0 4,16 * * * /path/to/script
To schedule a cron job to run every Friday at 5:00 pm use the syntax:
0 17 * * Fri /path/to/script
OR
0 17 * * * 5 /path/to/script
If you wish to run your cron job every 30 minutes then use:
*/30 * * * * /path/to/script
To schedule cron to run after every 5 hours, run
* */5 * * * /path/to/script
To run a script on selected days, for example, Wednesday and Friday at 6.00 pm execute:
0 18 * * wed,fri /path/to/script
To schedule multiple tasks to use a single cron job, separate the tasks using a semicolon for example:
* * * * * /path/to/script1 ; /path/to/script2
Using special strings to save time on writing cron jobs
Some of the cron jobs can easily be configured using special strings that correspond to certain time intervals. For example,
1) @hourly timestamp corresponds to 0 * * * *
It will execute a task in the first minute of every hour.
@hourly /path/to/script
2) @daily timestamp is equivalent to 0 0 * * *
It executes a task in the first minute of every day (midnight). It comes in handy when executing daily jobs.
@daily /path/to/script
3) @weekly timestamp is the equivalent to 0 0 1 * mon
It executes a cron job in the first minute of every week where a week whereby, a week starts on Monday.
@weekly /path/to/script
3) @monthly is similar to the entry 0 0 1 * *
It carries out a task in the first minute of the first day of the month.
@monthly /path/to/script
4) @yearly corresponds to 0 0 1 1 *
It executes a task in the first minute of every year and is useful in sending New year greetings 🙂
@monthly /path/to/script
Crontab Restrictions
As a Linux user, you can control who has the right to use the crontab command. This is possible using the /etc/cron.deny and /etc/cron.allow file. By default, only the /etc/cron.deny file exists and does not contain any entries. To restrict a user from using the crontab utility, simply add a user’s username to the file. When a user is added to this file, and the user tries to run the crontab command, he/she will encounter the error below.

To allow the user to continue using the crontab utility, simply remove the username from the /etc/cron.deny file.
If /etc/cron.allow file is present, then only the users listed in the file can access and use the crontab utility.
If neither file exists, then only the root user will have privileges to use the crontab command.
Backing up crontab entries
It’s always advised to backup your crontab entries. To do so, use the syntax
# crontab -l > /path/to/file.txt
For example,
# crontab -l > /home/james/backup.txt
Checking cron logs
Cron logs are stored in /var/log/cron file. To view the cron logs run the command:
# cat /var/log/cron

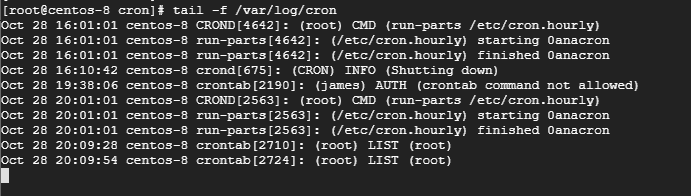
To view live logs, use the tail command as shown:
# tail -f /var/log/cron
Conclusion
In this guide, you learned how to create cron jobs to automate repetitive tasks, how to backup as well as how to view cron logs. We hope that this article provided useful insights with regard to cron jobs. Please don’t hesitate to share your feedback and comments.


I very much appreciated to this article about Crontab and Cron Jobs
I also appreciate this article about Crontab. Is it possible to export the result logs to a Windows folder?