LVM (Logical Volume Management) is a good way to use the disk space on the server more efficiently. One of the benefits of LVM is that we can take the snapshots of lvm based partitions and can create thinly provisioned logical volumes.
Thin Provisioning allows us to create the larger logical volumes than the available disk space. To use the thin provisioning we have to create a thin pool from volume group and then we can create logical volumes from that thin pool.
In this article we will demonstrate how to create thin provisioned Logical Volumes in Linux step by step.
Let’s assume we have Linux Server (CentOS 7.x / RHEL 7.x) and have assigned new a disk of 10 GB. We will be creating a thin pool of 10 GB, from this thin pool initially we will create two logical volumes of each 4 GB and one logical volume of size 1GB.
Refer the following steps to create thinly provisioned Logical Volumes
Step 1) Create the physical volume using pvcreate command
Let’s assume new disk is detected as /dev/sdb. Run below pvcreate command to create physical volume on the disk.
[root@linuxtechi ~]# pvcreate /dev/sdb
 Physical volume "/dev/sdb" successfully created
[root@linuxtechi ~]#
Step 2) Create volume group using vgcreate command
Run vgcrereate command to create volume with name ‘volgrp‘
[root@linuxtechi ~]# vgcreate volgrp /dev/sdb
 Volume group "volgrp" successfully created
[root@linuxtechi ~]#
Step 3) Create a thin pool from the volume group
Thin pool is like a logical volume which is created using lvcreate command
Syntax :
# lvcreate –L <Size_of_pool> -T <volume_group>/<thin_pool_name>
Where -L is used to specify the size of the pool and -T specify the thin pool
[root@linuxtechi ~]# lvcreate -L 9.90G -T volgrp/lvpool
 Rounding up size to full physical extent 9.90 GiB
 Logical volume "lvpool" created.
[root@linuxtechi ~]#
Verify the thin pool size
[root@linuxtechi ~]# lvs /dev/volgrp/lvpool
  LV     VG     Attr       LSize Pool Origin Data%  Meta%  Move Log Cpy%Sync Convert
  lvpool volgrp twi-a-tz-- 9.90g             0.00   0.59
[root@linuxtechi ~]#
Step 4) Create logical volumes from thin pool
Let’s create two logical volumes of each size 4 GB size
Syntax :
# lvcreate -V <Size_of_Logical_Volume> -T <volume_group_name> /<name_of_thinpool> -n <name_of_logical_volume>
[root@linuxtechi ~]# lvcreate -V 4G -T volgrp/lvpool -n node1
Logical volume "node1" created.
[root@linuxtechi ~]# lvcreate -V 4G -T volgrp/lvpool -n node2
Logical volume "node2" created.
[root@linuxtechi ~]#
Verify the status of thin pool and logical volumes using below lvs command,
[root@linuxtechi ~]# lvs /dev/volgrp/lvpool && lvs /dev/volgrp/node{1..2}
  LV     VG     Attr       LSize Pool Origin Data%  Meta%  Move Log Cpy%Sync Convert
  lvpool volgrp twi-aotz-- 9.90g             0.00   0.65
  LV    VG     Attr       LSize Pool   Origin Data%  Meta%  Move Log Cpy%Sync Convert
  node1 volgrp Vwi-a-tz-- 4.00g lvpool        0.00
  node2 volgrp Vwi-a-tz-- 4.00g lvpool        0.00
[root@linuxtechi ~]#
Step 5) Format the thin provisioned logical volumes
Use the mkfs command to create file system(ext4) on the above created logical volumes.
[root@linuxtechi ~]# mkfs.ext4 /dev/volgrp/node1
[root@linuxtechi ~]# mkfs.ext4 /dev/volgrp/node2
[root@linuxtechi ~]# mkdir /opt/vol1 && mkdir /opt/vol2
[root@linuxtechi ~]# mount /dev/volgrp/node1 /opt/vol1/ && mount /dev/volgrp/node2 /opt/vol2/
[root@linuxtechi ~]#
Check the mount points using ‘df command‘
[root@linuxtechi ~]# df -Th /opt/vol1/ /opt/vol2/
Filesystem               Type  Size  Used Avail Use% Mounted on
/dev/mapper/volgrp-node1 ext4 3.9G   16M  3.6G   1% /opt/vol1
/dev/mapper/volgrp-node2 ext4 3.9G   16M  3.6G   1% /opt/vol2
[root@linuxtechi ~]#
Write some data into the above created file system using dd command
[root@linuxtechi ~]# dd if=/dev/zero of=/opt/vol1/file.txt bs=1M count=1024
1024+0 records in
1024+0 records out
1073741824 bytes (1.1 GB) copied, 3.26031 s, 329 MB/s
[root@linuxtechi ~]# dd if=/dev/zero of=/opt/vol2/file.txt bs=1M count=1024
1024+0 records in
1024+0 records out
1073741824 bytes (1.1 GB) copied, 2.70821 s, 396 MB/s
[root@linuxtechi ~]#
Now verify the size of thin provisioned logical volumes using lvs command.
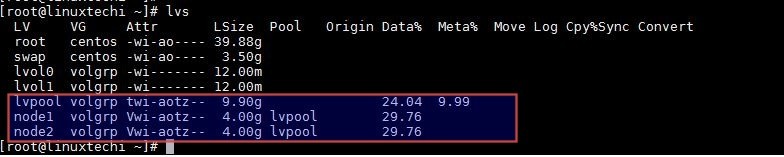
As we can see that both the logical volumes consume 29 % data.
Now try to create third logical volume from the thin pool.
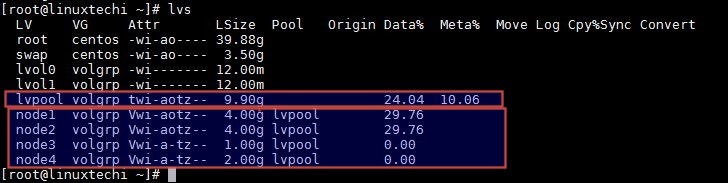
[root@linuxtechi ~]# lvcreate -V 1G -T volgrp/lvpool -n node3
  Logical volume "node3" created.
[root@linuxtechi ~]#
Scenario :
Well as of now we have consume whole space of thin pool in logical volumes. If some one ask me to create one more logical volume of size 2G.
Can I create new logical volume from the thin pool… ?
What will happen ? Does it support over-committed… ?
Answers is Yes, we can create logical volume as it supports over-committed or over-provisioning but while creating logical volume it will throw an warning message. Example is shown below :
[root@linuxtechi ~]# lvcreate -V 2G -T volgrp/lvpool -n node4
  WARNING: Sum of all thin volume sizes (11.00 GiB) exceeds the size of thin pool volgrp/lvpool and the size of whole volume group (10.00 GiB)!
  For thin pool auto extension activation/thin_pool_autoextend_threshold should be below 100.
  Logical volume "node4" created.
[root@linuxtechi ~]#
Now Verify the logical volume status again
Step 6) Extend the size of thin pool using lvextend command
Lets assume one more disk of 5G is assigned to the server (/dev/sdc), we will be using this disk to extend the thin pool.
Refer the following steps
Create the physical volume and extend the volume group (volgrp)
[root@linuxtechi ~]# pvcreate /dev/sdc
Physical volume "/dev/sdc" successfully created
[root@linuxtechi ~]# vgextend volgrp /dev/sdc
Volume group "volgrp" successfully extended
[root@linuxtechi ~]#
As thin pool is a logical volume so we can extend its size by lvextend command
[root@linuxtechi ~]# lvextend -L+5G volgrp/lvpool
Now verify the thin pool size, it should be around 15 GB.
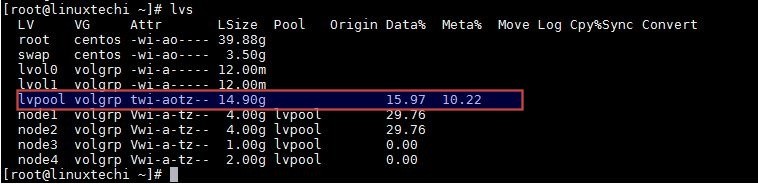
Note: We can not reduce or shrink thin pool only extension is supported
That’s all from this guide, I hope you found it informative. Please do share your feedback and comments.
Also Read : Top 5 tools to Monitor Your Linux Disk Usage and Partitions